Einleitung

  1. clKFjhVNoFVyOGSB
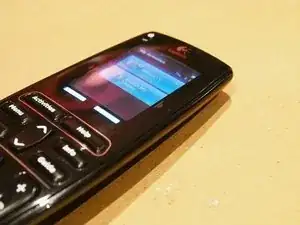
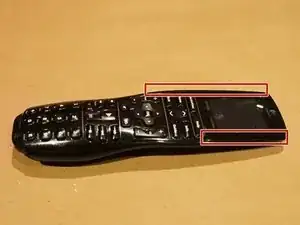
    • Die Logitech Harmony One ist eine fantastische Universalfernbedienung. Dank des durchdachten Gehäuses, des Gewichtes und der Tastatur ist die Fernbedienung ideal für komplexe Medien. Obwohl das Gerät gut gegen verschüttete Flüssigkeiten versiegelt ist, wird die Benutzung der Tasten schwierig, wenn etwas Klebriges zwischen die Tasten geraten ist.

  2. SNVSUhTfaExZPnRT
    SNVSUhTfaExZPnRT
    sfZHsGNi46reoZtN
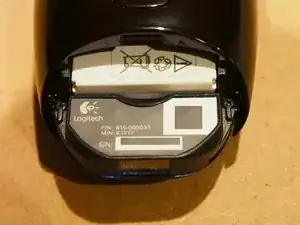
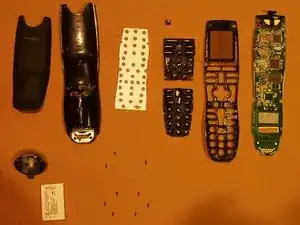
    • Öffne das Batteriefach und entferne den Akku.

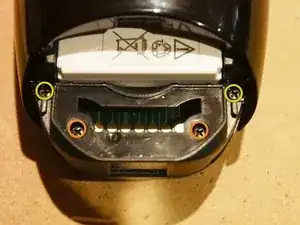
    • Entferne den Logitech-Aufkleber vorsichtig mit einer Rasierklinge oder einem anderen sehr dünnen Plektrum, um die 2 verborgenen Schrauben freizulegen.

    • Entferne die 4 Kreuzschlitzschrauben.

  3. dl2W4NdAIPZCOBWJ
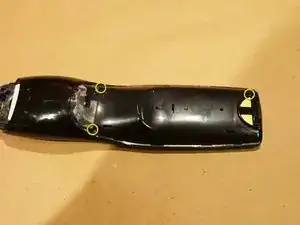
    • Entferne den gummierten Griffbereich, indem du ihn vorsichtig von der Rückseite weghebelst. Beginne dabei mit dem Ende, das den Ladekontakten am nächsten liegt.

    • HINWEIS: Auf der Rückseite befindet sich ein doppelseitiges Klebeband, das sich jedoch leicht löst.

    • Entferne nun die 3 verbleibenden Kreuzschlitzschrauben.

    when opening the remote the powerbutton may fall out. When inserting it again let the symbol point upwards. db

    blablabla -

  4. cRnjcdBXItROZxUR
    cRnjcdBXItROZxUR
    ngtOQO6QZTEtOnYA
    • Löse die Laschen, die das Gehäuse zusammenhalten, indem du ein dünnes, festes Öffnungswerkzeug in etwa der Mitte der Fernbedienung (in der Nähe der Mute-Taste und der Zurück-Taste) einsetzt und dann der Lücke an der Vorderseite der Fernbedienung folgst.

    • Achte darauf, das Flachbandkabel auf der linken Seite der Fernbedienung beim Abnehmen des Gehäuses nicht zu beschädigen.

    • Die Rückseite sollte sich mit nur geringem Widerstand von der Tastaturseite lösen lassen.

    • Halte die Ladekontakte, das LCD-Display und die vordere Abdeckung zusammen, während du die Rückseite entfernst.

    • Entferne NUR die Rückseite. Die Ladekontakte und das LCD-Display sind noch miteinander verbunden.

    • Trenne die vordere Abdeckung NICHT vom LCD-Display. Andernfalls kann sich das Flachbandkabel von den Touchscreen-Kontakten trennen.

  5. 1RXMSrbl6EGZJh5t
    1RXMSrbl6EGZJh5t
    uFmNNXhNyHlKDQIq
    ldCoSKHMV22CYqWY
    • Entferne das Klebeband (falls vorhanden), mit dem der Flachbandstecker befestigt ist

    • Klappe dann die Fixierung hoch und ziehe das Flachbandkabel heraus.

  6. Hws3AtHifMnLVGk4
    Hws3AtHifMnLVGk4
    BxLTIKNUaL2CZrGJ
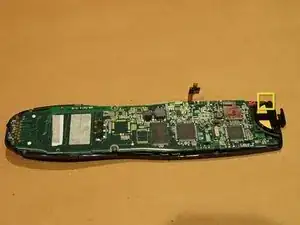
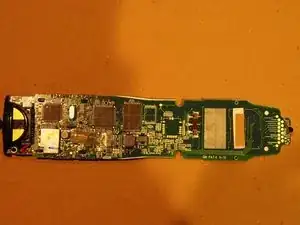
    • Entferne nun die restlichen beiden Kreuzschlitzschrauben, mit denen das Logic Board befestigt ist.

    • Ziehe das Logic Board von der Tastatur weg.

    • HINWEIS: Die obere linke Seite ist in das Gehäuse eingearbeitet. Sei daher beim Herausnehmen der Platine besonders vorsichtig.

    • Halte die Batterie während des Zusammenbaus gegen die Batteriekontakte und stelle sicher, dass der Touchscreen funktioniert.

  7. JifrLtBckKZqZH2h
    JifrLtBckKZqZH2h
    Ca2AWbiSwl2Fy3Zy
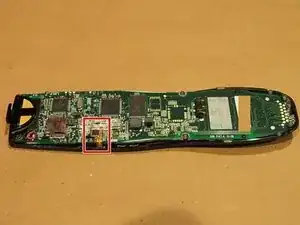
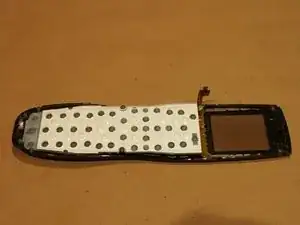
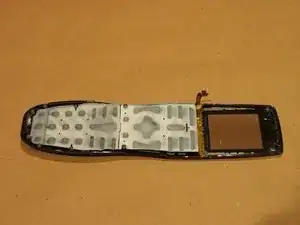
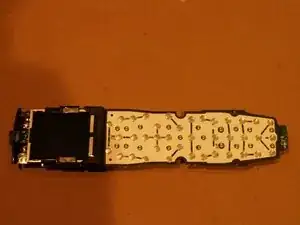
    • Unter dem Logic Board befindet sich ein Abstandshalter aus Hartplastik, der die Gummitastatur abdeckt.

    • HINWEIS: Wird der Abstandshalter ausgetauscht, muss Seite mit dem enger werdenden "Konus" in Richtung der Gummitastatur eingelegt werden.

    • Die Tastatur ist in zwei Abschnitte unterteilt.

  8. DtMyekt5VvDC2YTO
    DtMyekt5VvDC2YTO
    cesMeKEjY5ZViIGH
    GMoZCbLwgVQFJmXc
    • Hier sind alle Teile der Logitech Harmony One-Fernbedienung.

    Danke für die ausführliche Anleitung. Ich musste die Tastatur reinigen, weil einige Tasten etwas klemmten und den Akku tauschen, weil er aufgebläht war und keine Kapazität mehr hatte. Mit der Anleitung und etwas Geschick kein Problem! ?

    GA

    Gero Aschoff -

euchre

308 Reputation

14 Kommentare

Great guide! I wish I would have read it first before attempting to disassemble my remote to clean the buttons. Is there any way to repair where the ribbon cable contacts attach the clear plastic film on the face? It separated a little from the film and now the touch screen isn't working for the soft buttons (i.e. Current Activity, Options or Devices, etc.). Thanks!

nuukem -

nuukem : I had the same problem when I cleaned the buttons on my remote. I found a tip that said to gently heat the ribbon with a solder iron or heat gun. (http://www.instructables.com/id/How-to-r...) I used foil on the tip of my iron and made sure it was set before reassembling. Be patient and work slowly. Since the rest of the ribbon should be in place, it should be easy to get the contacts aligned. This worked for me. Hope it helps you. Also, my battery is swollen, so removing it after the cover is off and loosening the screw on the holder makes it easier to remove.

imtwicetaken -

Nice guide, but what I was really looking for was a way to disassemble the charging station for this remote. Would very much appreciate if you could somehow make a guide for that as well, thanks!

Slap Woop -

I have an intermittent "0". Would a little alcohol and Q tip on the metallic(?) touch pad fix the problem? I understand this model is no longer available so I want to be very careful. I prefer this model because of the large LCD screen. Thanks for the great write-up!

rebhunrc -

This was extremely useful as I had to replace swollen batteries in two remotes. I just stopped at Step 4, removed the 4 screws from the battery holder, and removed the battery. Reassembly was easy - I found that starting at the top of the remote when snapping it back together works best..

axolotlimages -

Extremely helpful! Thanks so much. My 8 year old remote is working like new again after a quick cleaning.

colinlacey -

Easy instruction however when I re-assembled the remote the touch screen does not respond. Is there some trick to latching the ribbon cable connector other than closing it?

austiophil -

Thank you for this. Made my longest lasting and most useful tech purchase feel like new once I cleaned it all up. Made what looked to be a hard product to open up extremely easy to do. Took 15mins to open, and 5 to put it back together.

somebrownguy -

Thanks for this guide. I was in trouble because the battery was bloated and it would not come out any more. There are actually some more screws just for the casing of the battery - but to get there this guide was very helpful.

Florian Kolbe -

Thanks for the guide. The best remote I’ve ever owned and they don’t make this one any longer. Able to get it up and running because of this guide. Kudos my friend

stonybonz2 -

This works! One of my kids - no one is confessing - must have spilled coke or something sticky on the remote. The upper keypads and the volume keys were totally stuck.

Following these instructions, I was able to take the whole thing apart and clean all the keys as well as the frame with alcohol without dislodging the touch screen connector from the screen. In fact, it looks like my remote has an extra blob of adhesive where the ribbon cable attaches to the screen - maybe there were issues with early models?

Anyway, if you’re careful, you can take this apart and save your expensive remote.

Thanks ifixit!

Mister Muscles -

Hey guys

Is there a tip to cleanup underneath or replace the metallic clicky buttons ? my remote has 2 buttons that “click” but don’t actually work unless I apply a bit more force.

Jalal -

thx for this guide. worked great for my two one remotes. cleaning the rubberkeypads i used a shavingbrush and some (iqos) qtips.

removing the sticky rubber on the back, a cleaningpad, not too hot water and dasty. when the power button fell out, put it in with the point upwards.

blablabla -

Danke für die Anleitung. Nachdem ich vor dem Zusammenbau den Test mit dem Akku gemacht und alles funktionierte habe ich den Test wieder zusammengestellt.

Leider hat die Fernbedienung seid dem den Fehler das wenn ich sie auf den Kopf drehe geht sie aus. Wenn ich sie zurück drehe startet sie wieder.

Was kann das sein?

Dennis -