Einleitung

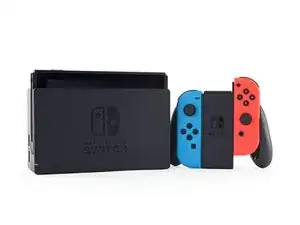
An diesem Freitagabend ist der Moment, auf den ihr alle gewartet habt: endlich hat Nintendo seine Zelda Maschine neue Konsole herausgebracht, die Nintendo Switch. Vergesst erstmal das Spielen, es ist Zeit, einen Blick auf die Hardware zu werfen. Lasst iFixit sprechen und unsere Werkzeuge erledigen den Rest. Auf zum Teardown mit uns!

Wenn du mal jemand anderen spielen lassen musst, dann kannst du uns in der Zwischenzeit auf Facebook, Instagram, oder Twitter finden, um etwas Neues zu lernen.

  1. XGI3Z41BySYJTLlO
    XGI3Z41BySYJTLlO
    3VUUjjbvXGGB154y
    • Merry Switchmas an alle! Das hier ist die Hardware von Nintendos neuem Handgerät/Konsolen Hybrid:

    • Angepasster NVIDIA Tegra Prozessor

    • Eingebauter 6,2" Multi-Touch LCD Bildschirm mit einer 1280 × 720 Auflösung (mit der Möglichkeit 1920 × 1080 p auf ein externes Display via HDMI auszugeben)

    • 32 GB interner Speicher (bis zu 2 TB zusätzlicher Speicherplatz mit einer microSDHC oder microSDXC Karte)

    • 802.11 a/b/g/n/ac Wi-Fi, Bluetooth 4.1, USB Typ-C Ladebuchse und 3,5 mm Audiobuchse an der Konsole — und zusätzlich drei Standard USB Buchsen am Switch Dock

    • Stereolautsprecher

    • Der aufladbare Lithium-Ionen Akku reicht für eine Spielzeit von 2,5 - 6,5 Stunden.

    • Abnehmbare drahtlose Joy-Cons

  2. sVSQj53UNxf6kBOT
    sVSQj53UNxf6kBOT
    GltxAjQqkthyckhC
    BcP6qAlRJZ2ZHWRt
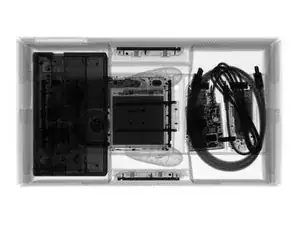
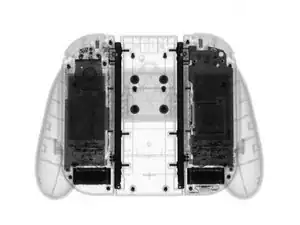
    • Teardowns sind wirklich anstrengend, deswegen dachten unsere Freunde von Creative Electron, sie könnten uns Zeit sparen und haben die ganze Box geröntgt.

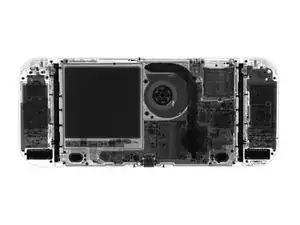
    • Die Aussicht auf eine ausführlichere Hardwaretour machte uns nur noch aufgeregter. Wir holten die Konsole zusammen mit dem Dock aus der Box und nahmen zum Spaß noch ein Röntgenbild auf.

    • Können wir da einen fetten Akku erspähen?

    • Jetzt ist aber Zeit das Röntgengerät auszuschalten und die Werkzeuge herauszuholen!

    propaganda? where?

    Daniel Arens -

    They spy, we spy but we won't tapp that...

    Mike Atkins -

    A beefy battery? Where? *Laugh track*

    Jackson Peter Conway -

  3. gfCTXainf35mIiQt
    gfCTXainf35mIiQt
    dOdcO1ImWy1YaCDP
    iYVAGEVBr32FjZvE
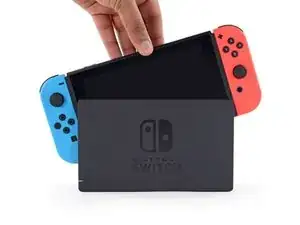
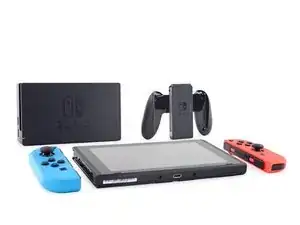
    • Bevor wir tiefer einsteigen, sichten wir erstmal Nintendos Angebot. Da ist erstmal die Konsole selbst, die beiden Joy-Cons, das Dock und der Joy-Con Griff.

    • Mit den angebrachten Joy-Cons misst die Konsole 239 mm in der Breite, 108 mm in der Höhe und nur 13 mm in der Tiefe.

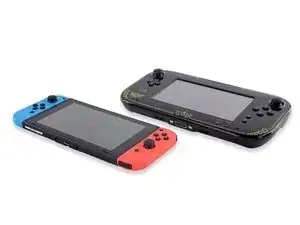
    • Obwohl zusätzliche Funktionen zugefügt wurden, wiegt die Konsole mit Joy-Cons nur 400 g— weniger als die 2 kg des Wii U GamePad.

  4. gaaWn1D4kPUw3UsP
    gaaWn1D4kPUw3UsP
    B6PQi3MXYKo5OIMv
    ETSb2GTSW1BZfU1N
    • Wir switchen um und lassen den Teardown in Gang kommen!

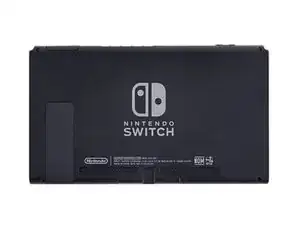
    • Das erste, was wir bemerken ist das Logo vom Domino Pizzabäcker die Modellnummer—HAC-001

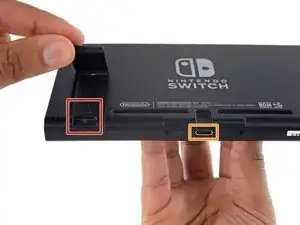
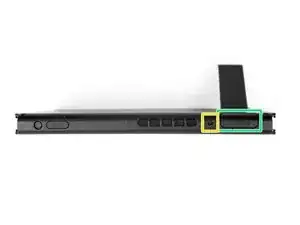
    • Wir blicken mal schnell auf die Anschlüsse:

    • MicroSD unter der (überraschend stabilen) Stütze.

    • USB-C (für den Dock-Anschluss)

    • Standard 3,5 mm Kopfhörerbuchse

    • Proprietärer Nintendo Gamekarteneinschub.

    • Der Lüfter wird seine Wärme an der Oberseite des Geräts los. Erste Berichte sagen, dass die Switch heftig Gebrauch von dieser Entlüftung macht, wenn sie am Dock angeschlossen ist und die 1080p Grafik bedient.

    Any chance the USB-C port supports Thunderbolt 3? I've been holding out hope it does and Nintendo will sell a "Pro Dock" that has an eGPU for better performance while docked.

    Toby Turner -

    You could do that with USB 3.1..

    SpyderCanopus -

    3.5mm headphone jack. You didn't mention anything about TRRS. Does that mean that there is no audio / microphone in?

    Nicholas Wagner -

  5. wTBpiKVIjZu2Yiuo
    wTBpiKVIjZu2Yiuo
    GXbUUjG5YHDNGTZv
    VpuUOjt3eMVIpB4N
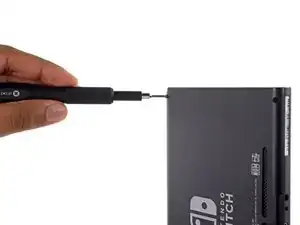
    • Leider wird der Zugang nach Hyrule zur Switch von Tri-point Schrauben bewacht, aber wir müssen ja nur 1/64stel unserer Muskeln anspannen.

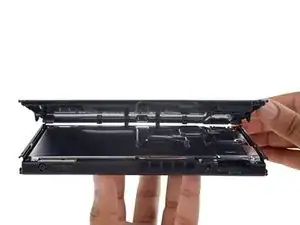
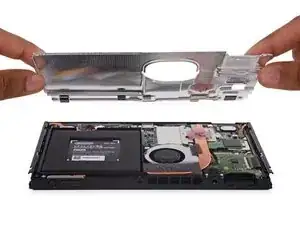
    • Die Tri-point Schrauben sind die Nintendo-Version eines "Zutritt verboten" Schildes, aber wenn man an denen erst einmal vorbei ist, lässt sich die Rückabdeckung ganz leicht abheben - es gibt keine weiteren Clips oder Kleber.

    • Unser erster Blick hinein zeigt - nicht viel. Nur eine metallene Abschirmung.

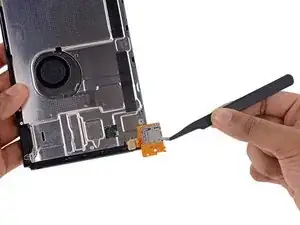
    • Allerdings kann man die Platine des MicroSD-Lesers leicht austauschen, wenn man sie herausgenommen hat. Gute Nachrichten also für künftige Speicherung!

    Whats the model of SD card reader will it read UHS 3 SD cards??

    peacepipe_au -

    2mm Tri-Wing screws.

    Aaron Taylor -

    OK, This is extremely misleading. Good thing I’m a repair tech. There are also about 5 more phillips screws around that need to be removed before the back will come off. One by the SD card reader, one on each side in the center, 2 on the bottom and one on the top

    Jonathan White -

    Hi Jonathan, this is just a teardown, and as such we skip some disassembly steps to get to the more interesting stuff quicker. It’s not meant to be used as a repair guide. We do have more more in-depth guides here that can be referenced for repairs.

    Adam O'Camb -

    For some reason my screws were different in my switch I was trying to repair. I ordered the screwdriver that came with 2 bits and the se card reader but the bits wouldn’t fit the screws.

    caleb payne -

    There are more screws than this guide will say.

    1x middle of each joy-con rail (2 total).

    2x bottom near the charge port

    1x top near the audio jack

    1x just under the microSD flap

    each is a small Phillips head.

    Misunderstood Wookiee -

    Hi! Sorry for the confusion with screws! This is a teardown! There is a warning at the top but it might have been missed: “This teardown is not a repair guide. To repair your Nintendo Switch, use our service manual.”

    Chris Cline -

    The platic thread of one of the screws broke while screwing it out.. I used to push the screw a little bit to prevent over-turning the head while unscrewing - it broke while pushing. Maybe it was a bad assembly, but its worth mentioning that it can possibly break inside.. and you have to deal with a loose screw after then. (Any Ideas?)

    Varco -

    How can you to a teardown guide, without showing witch screws to remove, i thought you ifixit guys knew your stuf and were indebth, will find another guide screw this

    Mathias rønne -

    Yeah I'm attempting something that requires complete disassembly, it would be nice to have a generic guide for that that includes all the steps rather than having to look up how to remove each individual component. I thought the teardown would be the obvious place for that, but apparently this is just, what, for entertainment purposes? Idk, I think it's definitely possible to show all the interesting internals while giving a detailed step-by-step guide for total disassembly, especially for guys like me who mainly just need to know where the screws are.

    Joshua Coffey -

  6. GLtqLoCBIGYkS4kJ
    • Und jetzt der Moment, auf den wir alle gewartet haben... Der Blick ins Innere. Endlich!

    • Es... sieht aus wie ein Computer! Akku, Wärmerohr, Wärmeleitpaste, Lüfter. Es ist alles da.

    • Die Prioritäten der Switch sind ziemlich eindeutig der Akku und die Kühlung.

    • So wie dieser violette Klecks aussieht, ist diese Metalplatte mehr als ein Stabilitätskonstrukt. Sie dient außerdem als Kühlkörper, der die Wärme vom Wärmerohr zum hinteren Teil des Gehäuses transportiert.

    • Dies sollte die Wärme verteilen, so dass sich keine heißen Stellen bilden, die das Plastik schmelzen oder deine Finger verbrennen könnten.

    If we were to remove the back plate, what should we use to replace the purple compound used to transfer heat. Should we use typical CPU/GPU thermal paste such as Arctic Silver or is it even necessary to replace the compound?

    Ambyli -

    i don’t think it would hurt to do so, but i am no expert.

    Grockle88 _ -

    I would like to replace the purple glob with a copper shim, any guesses to the distance between the heat sink and aluminum shield?

    Alan Li -

    is the battery a single or multi-cell unit?

    joseph.s.schaefer -

  7. AyCCYWcZT3uHSJ3e
    AyCCYWcZT3uHSJ3e
    WlgphtCiKGYyeuWQ
    dwQNOROQBb6VLJas
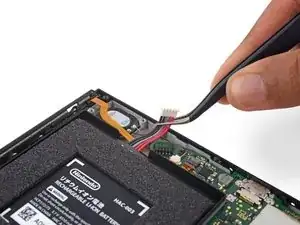
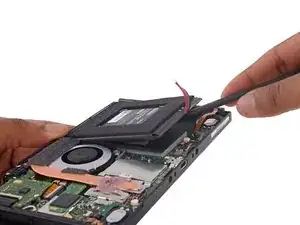
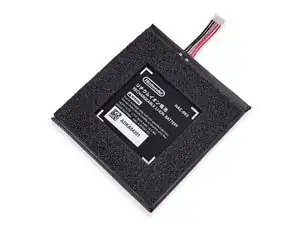
    • Sicherheit geht vor - wir trennen den Akku ab, bevor wir dieses blöde Ding aus seinem Kleber heraus hebeln.

    • Die meisten Konsolen haben eher ein Netzteil als einen Akku. Da die Switch aber auch als tragbare Spielkonsole genutzt wird, benötigt sie eine Energieversorgung ohne Kabel. Und das bedeutet auch eine Beschränkung der Nutzungsdauer.

    • Anders wie bei der 3DS, ist der Akku der Switch nicht zum Austausch durch den Nutzer gedacht. Stattdessen "plant" Nintendo ein Verfahren zum kostenpflichtigen Ersatz.

    • Die Switch tritt mit einem 16 Wh Akku an —mehr als der 5,6 Wh große austauschbare Akku im Wii U GamePad. Aber nochmal: es muss eine Konsole versorgt werden, nicht nur ein Display.

    How is this battery not "User replaceable"?

    Bally -

    It is user replaceable, but it was meant to cause replacement difficulty, which discourages inexperienced repairers.

    Russell Repair Co. -

    It means is not that easy, you have to tear it down almost completely in order to replace it.

    Ricardo Briceño -

    The lack of a user replaceable battery in this thing is BY FAR the lamest thing about it IMO... Though unfortunatly to be fair Vita's the same way. SO crazy lame.

    Also sort of weird it has a cooling fan. I wasn't expecting that. Maybe it's off when undocked and running slower?

    wolfpup3 -

    whats the weight of the switch battery in grams? and what type of battery cell is it?

    justin thorpe -

    @Ricardo - I’m no fan of having to tear it down a bit to replace the battery, but this is by no means having to “tear it down almost completely in order to replace it.” I mean dude, steps 1-5 of this tear down consist of looking at the device, identifying the ports, and removing a few screws. After the screws you just lift the metal shield and unplug your battery. Not exactly rocket science. Step 5 even says, “but once you're past them the back cover lifts off easily—no clips or adhesive” so this couldn’t possibly get any easier. In fact after I remove those tri-point screws, I’ll just replace them with normal screws for future ease.

    Army Turtle -

    Can this battery be charged by power bank ? (5V 1-2A?) any recomendations how to “mobile-charge” this console ?

    Rodryk Pawłowski -

    Yes, it can be done. With a 20000 mAh power bank the portable console can last at least 10 hours while enjoying a game like MHXX.

    Irrawa -

    Hello, my battery connector is broken. Anybody knows where can I buy a new one?

    Thanks,

    joan

    Joan -

    No glue breaker.?

    Jean Ordehi -

  8. kuGkQTMR6atCWRKt
    kuGkQTMR6atCWRKt
    nAg224LZyNTgnqGK
    fYOrh5S2kWa6FRqU
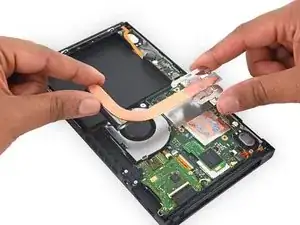
    • Nachdem wir den Akku geschafft haben, wenden wir uns der nächsten wichtigen Hardware zu: dem Kühlsystem.

    • Die Wärmeleitröhre wird durch simple Kreuzschlitzschrauben festgehalten, das bedeutet, dass das Auftragen von Wärmeleitpaste ein Kinderspiel ist.

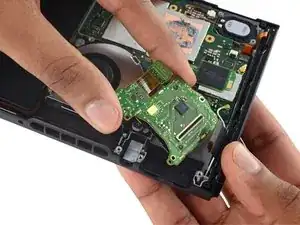
    • Wir suchen den Lüfter, sieht aber so aus, als ob man ihn von hier aus nur reinigen kann - er wird unter der Anschlussplatine gefangen gehalten.

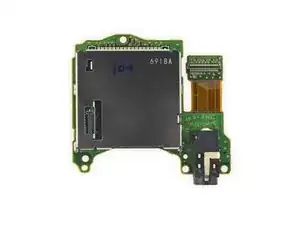
    • Also ziehen wir den Gamekartenleser zusammen mit der daran angeschlossenen Kopfhörerbuchse heraus

    • Und nein, wir haben nicht an den Cartridges geleckt.

    • STMicroelectronics Fingerspitzen-Touchscreen Controller gegenüber vom Gamekartenleser.

    Is the 3.5 mm jack a TRS or TRRS?

    Erin Lewis -

    Is the chassis metal? It looks metalic through the screw holes.

    alan mail -

    Yes. It is metallic.

    Diego Salerno -

    @elrinley I’m sure you’ve figured this out by now, but according to Nintendo the jack is a 4-pole headphone/mic jack.

    https://www.nintendo.com/switch/tech-spe...

    I was looking for the same information and ended up here! :)

    ckoerner -

  9. LTHtcEeHTySCKLUA
    LTHtcEeHTySCKLUA
    5Xq6UQufVAe6sBkm
    dqCsNVLOgXVKkALp
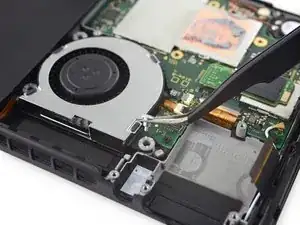
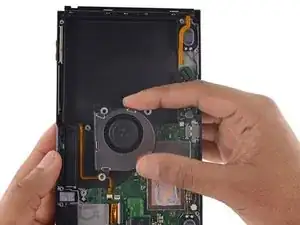
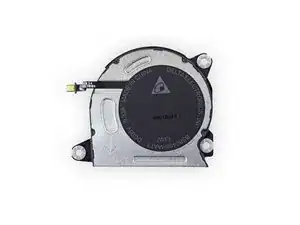
    • Nachdem die Anschlusskarte draußen ist, können wir uns auf den Lüfter konzentrieren.

    • Dieser Lüfter von Delta Electronics wird von drei Schrauben mit Gummivibrationsdämpfern befestigt. Er braucht 5 V bei 0,33 A.

    • Ein Lüfter in einem tragbaren Gerät kann das Todesurteil für den Akku sein. Es scheint was dran zu sein an den Gerüchten, dass die Grafikgeschwindigkeit drastisch reduziert wird, wenn das Gerät nicht im Dock steckt.

    • Zusätzlich zum Energiesparen durch weniger Pixel kann die Switch noch mehr Akkuleistung einsparen, indem der Lüfter etwas langsamer läuft.

    I have a switch that won't power up but clicks for a few seconds when the new battery is replaced. Is it the fan taking the power so it can boot up or is it the fan is broken and prevents it from starting up?

    Kirsty Cobbold -

  10. lWVZ6fbk4w2eMDyI
    lWVZ6fbk4w2eMDyI
    lyfnmQPlg63VMWAA
    BfRaEw2VLngWYsob
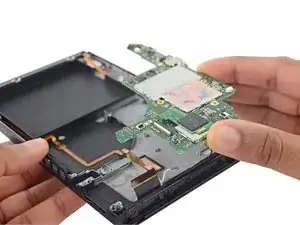
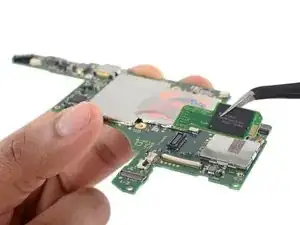
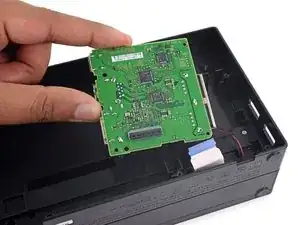
    • Das ist eine Hauptplatine mit vielfältigen Anschlüssen. Um sie frei zu bekommen mussten wir die Stecker vom Touchscreen, der Hintergrundbeleuchtung und der Lautsprecher ablösen, sowie zwei Antennen und die beiden Schienen für die Joy-Cons. Und dann noch sechs Kreuzschlitzschrauben entfernen.

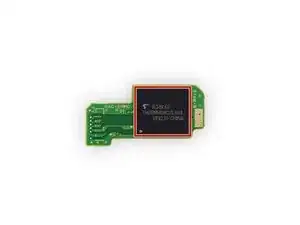
    • Aber Hallo, das ist echte Modularität. Sogar der eMMC Speicher ploppt mit einer extra Leiterplatte heraus!

    • Nintendo schaffte es, ein 6,2" Tablet mit auswechselbarem Flash-Speicher herzustellen, sag also nicht, dass es nicht geht.

    • Die Speicherplatine enthält einen einzigen Toshiba THGBMHG8C2lBAIL 32 GB eMMCNAND Flash Speicherchip.

    • Leider endet die Modularität am USB-C Anschluss. Zum Austausch dieses hoch belasteten Bauteils sind gute Kenntnisse im Mikrolöten nötig.

    What does "Side-A" of the HAC-EMMC daughter board containing the single Toshiba THGBMHG8C2LBAIL 32 GB eMMC NAND Flash IC look like?

    Jonathan Stanley -

    The USB port is soldered to the board conatining the most important hardware? I'd almost call this a form of planned obsolescence

    Nicola Pfister -

    my usb c port just gave up on me and nintendo say it's not covered under the warranty. … the switch has hardly left the dock! nintendo say 175 pounds to replace the port! looks like i need to find another option! like learn to solder!

    steve -

    Is the flash soldered on to the PCB? If so, I wonder how hard it is to remove and swap with a bigger eMMC flash drive from Toshiba.

    Jerome Santander -

    Looks like a Toshiba does make a 512Gb NAND flash model. Now the only question is can you switch between two flashes before bootup with this.

    https://www.digikey.com/product-detail/e...

    b0n3z -

    I just succesfully  soldered a new usb C port to the switch but it's pretty hard to do.

    First of all, I used a hot air soldering workstation. Replaced all the (presumably) leadfree solder with normal leaded solder for better flexibility and a lower melting point. The difficult part is to make both rows of connections connect. This can be achieved by heating the board on the other side while somehow keeping pressure on the usbport and making sure the plastic components of the usbport don't melt. Quite a challenge!

    What did the trick, for me at least, was to cut out a metal strip from a soda can, folded over and cut to the exact same width as to cover the plastic and serve as a heatshield. Also I used no-clean solderflux.

    dan.kusters -

    Nice. Thanks for sharing your experience.

    Lisandro Duran -

    I also replaced the USb C port with a hot air soldering station. The most difficult part was to clean the 4 holes on the pbc that anchor the port. They must be completely cleaned from any soldering residual because you need to be able to freely push the port down against the pbc once the 24 ports pads are heated and with the solder melted.

    Diego Salerno -

    I can feel you! I’m still trying to get all the solder out of the 4 holes. I begin to believe that I’m just to stupid to achieve it.

    Nintendoc -

  11. sp3tJVWmQFybssun
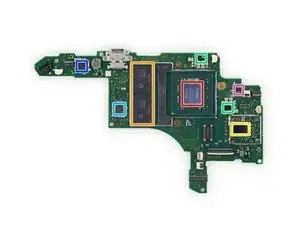
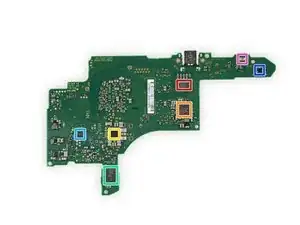
    • Eine kleine Sammlung von Miis ICs bevölkert die Vorderseite der Hauptplatine:

    • NVIDIA ODNX02-A2 (vermutlich der Tegra X1-basierte SoC) (=System-on-a-Chip)

    • Samsung K4F6E304HB-MGCH 2 GB LPDDR4 DRAM (x2 für insgesamt 4 GB)

    • Broadcom/Cypress BCM4356 802.11ac 2×2 + Bluetooth 4.1 SoC

    • Maxim Integrated MAX77621AEWI+T dreiphasiger Abwärtswandler (x2)

    • Rohm BM92T36 USB-C Controller

    • Texas Instruments BQ24193 Einzellen-Akkulader (wahrscheinlich)

    • Texas Instruments TMP451 Temperatursensor lokal/entfernt.

    Is that an LCI near the USB-C connector?

    Positive Intent -

    There’s the connectivity issue! The series elements in the T-networks feeding the RF connectors are unpopulated, meaning the antennas aren’t connected. This is probably causing a 20dB-40dB hit in RF performance and decreasing battery life. If this is a production unit, Nintendo has a recall on their hands; software can’t fix that.

    john horne -

    To be fair, there is a chance those series components have a tiny net tie across them, shorting them out. I can't tell from these photos. This would be cheaper than a jumper resistor, even at $0.001 each. They avoided slikscreen which does indicate they might be trying to aggressively keep PCB costs down. I wish I could get a closer look.

    john horne -

    What kind of adapter would you choose to replace the battery interface adapter? JST EH5P ST90 or something else?

    Hans Müller -

    Has anyone found the original manufacturer and partnumber of the USB-Port?

    I did find a part that looks similar, but not perfectly the same: Amphenol-MCP 101-C4740-02432

    Benedikt M. -

    Where do you get MAX77621AEWI+T ? Nobody has them in stock.

    chayney shuck -

    Im surprised this didnt lose reparability points for the soldered rather than replaceable usb port.

    Kiernan -

    Is the ram upgradable or directly soldered? If upgradable, would it require software, or do you think it is plug & play?

    azileangel4u -

    Unfortunately the RAM’s directly soldered.

    Adam O'Camb -

    I know that there are 2 different motherboards so i was wondering, on the newer motherboard the section with the Maxim Integrated MAX77621AEWI+T three phase buck regulator, that is in-between the temp sensor and bluetooth, mine does not have any of those components right there. any way to update the pictures for people who are currently looking so they know. It also looks like the buck regulator has changed also

    Davin Atkins -

    sorry the motherboard in it is HAD-CPU-01

    Davin Atkins -

  12. MiW2IHeJGIdCRJZQ
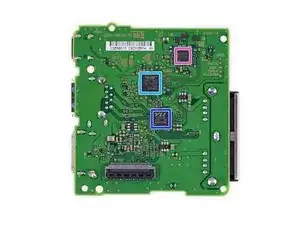
    • Und auf der Rückseite des Motherboards:

    • Pericom Semiconductor PI3USB30532 USB 3.0 / DP1.2 Matrixschalter

    • Realtek ALC5639 Audio-Codec

    • Maxim Integrated MAX77620AEWJ + T PMIC

    • B1633 GCBRG HAC STD T1001216 (wahrscheinlich ein Nintendo Sicherheits-MCU)

    • STMicroelectronics LSM6DS3H 3-Achsen Beschleunigungssensor/Drehsensor (wahrscheinlich)

    • Maxim Integrated MAX17050 Akkustandsmesser

    • Rohm BH1603FVC Umgebungslichtsensor

    How come the accelerometer and gyroscope was never labeled for both the main system or the controllers? I didn’t even know the main system had them until a researched out Super Mario Party did it’s adjacent screens trick. Then I checked Nintendo’s own website which states that it has one.

    obiwankenobi23 -

    Modern accel + gyro ICs are tiny and often use cryptic package markings that can take a fair bit of work for us to identify. We’d love to research and label them all, but we don’t always have the time. They’re definitely in there though!

    Jeff Suovanen -

  13. Sfh6DIfKCDdKLWZI
    Sfh6DIfKCDdKLWZI
    roXN2V3v1TsfCrXM
    SOLQQXF6Qq2PxLuc
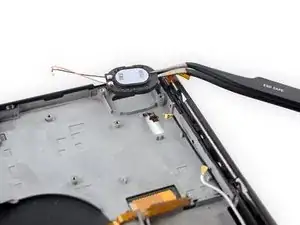
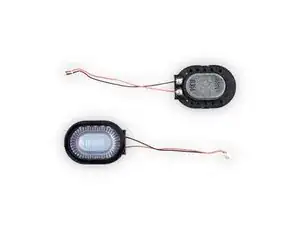
    • Die Stereo Lautsprecher sind leicht am rückseitigen Gehäuse festgeklebt, sie lassen sich, ohne sich groß zur Wehr zu setzten, ablösen.

    • Diese Lautsprecher arbeiten hart daran, den Bass zu verstärken. Größere Membranen bewegen mehr Luft und ein Bassreflexsystem soll zu einem wummernden Bass führen. Aber erste Berichte sprechen doch von einer "höhere Tonlagen favorisieren."

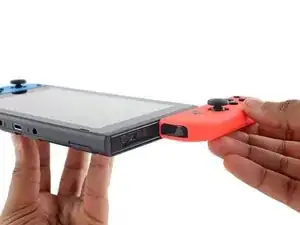
    • An jedem Ende der Konsole ist eine Schiene für die Joy-Cons mit Kreuzschlitzschrauben befestigt.

    • Jede Schiene hat eine Reihe von Stiftkontakten, die zu den entsprechenden Kontakten auf den Joy-Cons passen. Ladung und Knopfdrücke werden so über Flachbandkabel an die Hauptplatine weitergeleitet.

    Do you know similar speakers which can be used as replacement?

    Jube -

    Im not sure, but they look the same as the New 3ds ones

    tbolado -

    I was able to successfully replace mine with a New 3DS speaker

    Mptp -

    My left speaker just blew!! how does the 3DS speaker hold up ?

    Scott Jones -

  14. YFDONA2kGPGBjaeA
    YFDONA2kGPGBjaeA
    du2oR4EScy1KdJCV
    S3Lj1sOZWqKQYKmj
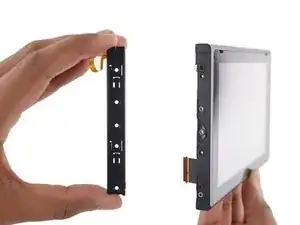
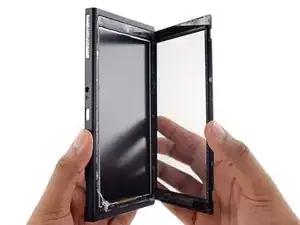
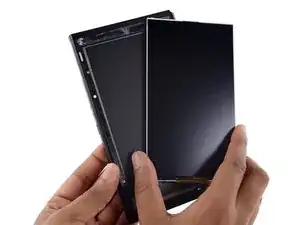
    • Anders als bei vielen modernen Geräten mit Touchscreen, ist der Touchscreen der Switch nicht mit dem Display verklebt. Das bedeutet, dass du diese beiden Teile unabhängig voneinander austauschen kannst. Ein Dank an Nintendo, dass hier an die Reparaturmöglichkeit gedacht wurde.

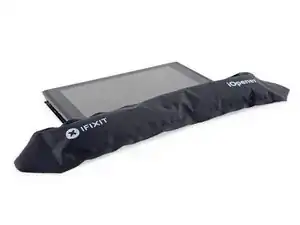
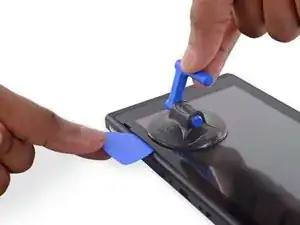
    • Dieser Touchscreen ist mit doppelseitigem Klebeband um den Rand des Displays herum befestigt. Mit ein bisschen Erwärmen und Hebeln konnten wir den Touchscreen zum Loslassen überreden.

    • In unserer Aufregung hat unser hastiger Teardowner dabei das Touchscreen-Kabel beschädigt. Achtung Reparateure, dieses Buch wird an der langen Seite geöffnet.

    Is the digitizer glass or plastic??

    Paul Reynolds -

    ^^ I'd like to know this as well.

    Lucas Luxton -

    It feels like and flexes like plastic.

    dave -

    It is plastic.

    Evan Noronha -

    It's perma-fused to the plastic, I take it? If so I'm rather disappointed. I'm not fond of screen protectors and would much rather someone put out a replacement instead.

    Erin Lewis -

    So the Screen is technically replaceable? Would it be possible to put a new screen on?

    Mitchell Laurence -

    It technically can but be aware the process is quite extensive and technical so in other words if you need a replacement screen, either pay a professional, not some dude off CL who says he can to do it or watch a lot of how-to videos and USE the right tools. I work at a business that fixes cellphones professionally so believe me when I say it can be done but very, very meticulous and technical.

    Josh McCard -

  15. GpO2RQlCEQJSLfRC
    • Und was ist das Tüpfelchen auf dem i? Das LCD Display lässt sich leicht ausbauen!

    • Wenn ein Gerät leichter zu transportieren ist, steigt auch die Wahrscheinlichkeit, dass es mal herunterfällt. Also machte Nintendo ein leichter zu Bruch gehendes Gerät auch leichter reparierbar.

    • Damit ist die Konsole zerlegt - aber ganz fertig sind wir noch nicht.

    • Wo haben wir bloß die Kontroller hingelegt...

    hello , is it IPS or TN or VA LCD ?

    ttt ttt -

    IPS by Japan Display Inc. But what is the LCD model #?

    Girl Usocrzy -

    hello there i was wondering what type of connecter does screen have

    sir spudly -

  16. POA5ZF6ENuw4XB41
    POA5ZF6ENuw4XB41
    NeZsnBXW5KKSYeqW
    WZ3yyZpWtYuJIBGC
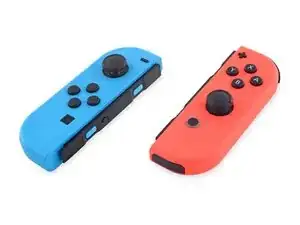
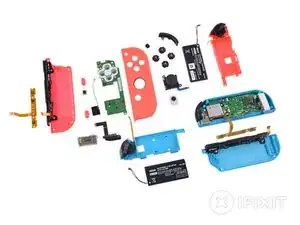
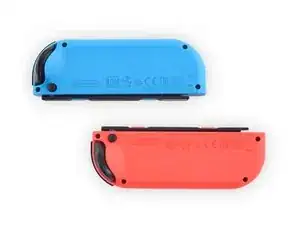
    • Nintendo hat die Joy-Cons sogar verschieden eingefärbt, um uns daran zu erinnern, dass diese gleich aussehenden Gehäuse verschiedene Hardware enthalten.

    • Mit verschiedenen Inhalten erhalten die Kontroller auch verschiedene Modellbezeichnungen: der neonblaue HAC-15, der neonrote HAC-16.

    • Neon ist nicht so dein Ding? Wenn du gut mit Aufklebern umgehen kannst, kannst du ihre echten Farben mit ein paar Skins überdecken.

    • Die Joy-Cons sind nicht wasserfest. Nintendo empfiehlt sogar, dass du sie nicht neben deinem Aquarium benutzt.

    • ...oder einem Laptop, einem drahtlosen Kopfhörer, einem drahtlosen Drucker, einer Mikrowelle, einem drahtlosen Lautsprecher, einer Smartwatch, einem kabellosen Telefon - am Besten benutzt du sie in einer Höhle.

    Any idea on the type of plastic for the Joy-Con shells? ABS, nylon, something else (if so, what)?

    Jonathan Stanley -

    If you didn't already notice- the step 17 photos of the inside of the shells seem to indicate it's polycarbonate + ABS

    David Eltzroth -

    I sort of wish I'd been able to get the model that includes the red/blue controllers LOL

    wolfpup3 -

    I broke my Joy Con a while back and the 2L button is missing. Would you happen to know where I can get a replacement part for that?

    Clinton Wong -

    3D printer: www.thingiverse.com Search “Nintendo Switch Joycon”

    Army Turtle -

  17. KfSv3lnHgJbDqJJ6
    KfSv3lnHgJbDqJJ6
    wVPEUVACywDrALKU
    Y3GIkgtHHZITsfwY
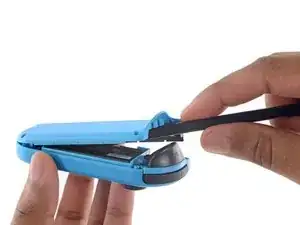
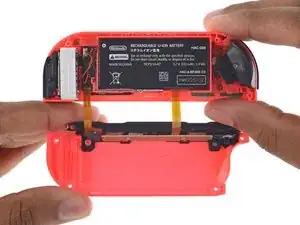
    • Obwohl wir keine Genetiker sind, holen wir unser Skalpell unseren Spudger heraus, um diese Zwillingsbrüder zu vergleichen.

    • Jeder Kontroller besitzt einen 1,9 Wh Lithium-Ionen Akku, Bluetooth, Beschleunigungsmesser/Gyroskop und einen haptischen "HD Rumble"motor

    • Der Akkutausch geht sicher nicht so leicht, wie bei den originalen Wii Fernbedienungen, ist aber machbar.

    • Nintendo behauptet, dass die Joy-Cons zwanzig Spielstunden lang durchhalten, es dauert aber 3,5 Stunden, um sie wieder aufzuladen.

    • Wenn das nicht ausreicht, kann der Joy-Con Ladegriff zusätzliche Energie liefern sowie für einen ergonomischeren Griff sorgen.

    Might want to clarify that the Joy-Con charging grip does not have a battery so there is no boost from the grip itself. You have to plug the grip into a power source (through USB) to get the joy-cons to charge at all when they are attached to the charging grip. Otherwise the grip acts exactly like the included non-charging grip.

    Brice Gilbert -

    Oh goody...more sealed proprietary batteries. LAME.

    wolfpup3 -

    The right joycon has a little black card slotted next to the battery. Anyone know what that is?

    Phrik Graves -

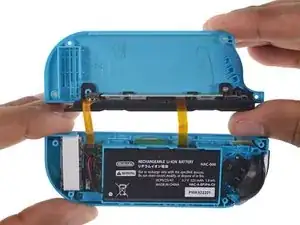
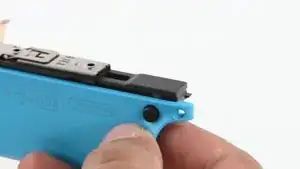
  18. Es gab schon frühzeitige <a href="../../home/external_content?url=https%3A//www.reddit.com/r/Games/comments/5wi0ya/nintendo_switch_joycons_latching_mechanism/" rel="nofollow noopener noreferrer" target="_blank">Gerüchte</a> über mangelnde Haltbarkeit des Schienenmechanismus derJoy-Cons, wir schauen uns das deswegen mal genauer an.
    • Es gab schon frühzeitige Gerüchte über mangelnde Haltbarkeit des Schienenmechanismus derJoy-Cons, wir schauen uns das deswegen mal genauer an.

    • Die Schiene selbst, am Rand der Switch Konsole, ist aus Metall und sollte gut haltbar sein.

    • Ihr Gegenstück am Joy-Con ist aus Kunstoff. Genau so soll es sein, ein eventueller Bruch passiert am abnehmbaren Kontroller, und der ist einfacher und billiger zu reparieren oder zu ersetzen.

    This piece of plastic in joy-con can be exchanged for example metal? It should be better than plastic

    Robert -

    Where would I find the metal replacement ?

    Chris Cruz -

    For replacement, search google for Alloy Buckle Lock

    Niklas Hansen -

  19. D2UjaDgs3XDWjFlP
    D2UjaDgs3XDWjFlP
    5d1YejKkY2FrMs1O
    IDTA3rWOQCULJoWm
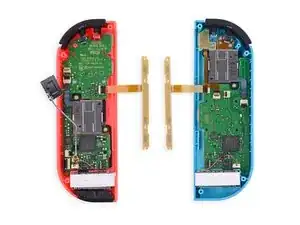
    • Die Controller werfen ihre Haut für einen genaueren Vergleich ab. Rot vs. Blau.

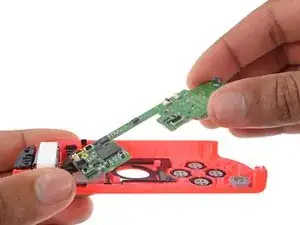
    • Wir sind nicht oberflächlich - nur die inneren Werte zählen. Der rote Joy-Con geht mit der Infrarothardware und der NFC Antenne in Führung.

    • Die Infrarothardware besteht aus einer Infrarotkamera und vier Infrarot-LEDs. Nintendo sagt, dass die Kamera verschiedene Handformen erkennen und Abstände messen kann, in Zukunft soll sie auch Videos aufnehmen. Was die LEDs betrifft, tippen wir darauf, dass sie Infrotlicht auf nahe Objekte aussenden, um sie leichter identifizieren zu können.

    • Weißt du, was jedoch beide gemeinsam haben? Zwei Kreuzschlitzschrauben halten die Joysticks und zwei Kreuzschlitzschrauben halten die Platine. Das ist doch was.

    • Wenns drauf ankommt ist Blau der Richtige für uns Reparateure.

    • Bei beiden befindet sich unten ein kräftiger HD Rumblemotor mit einem Gewicht von 5,5 g.

    I had to send my Left Joy-Con for a repair on day one because the L button was acting erratically. I first noticed it when I tried to write my credit card number. I had made a mistake and tried to go back using tbe L button. When I pressed the button, my text cursor moved all the way to the left even though the button was in normal position (seemingly unpressed).

    I wonder what caused this. Fun fact: Pressing the plastic piece between ZL and L button activated the sensor for L button.

    Does the iFixit team has any idea what caused my problem? Thanks!

    Philippe Morin -

    Any component info on the Joystick? Manufacturer ROM etc?

    Eamonn Clerkin -

    the left Joy-Con Joystick and the right Joy-Con Joystick are the same?

    4646dudu -

    does some one know what could be the problem, after replacing the joy stick everythink works fine except that the switch doesn’t detect the joy con attached to it but if i conect it to it, it stills charge the joy con

    Rodrigo Barba -

    Left joy-con zif connector has lifted from the motherboard everything is intact and connected to the connection ribbon how do you reattach the actual white piece to the motherboard???

    Zeshi -

  20. NYPdejcKUDMhLnLr
    NYPdejcKUDMhLnLr
    hwXfQaAA2FH1RLkl
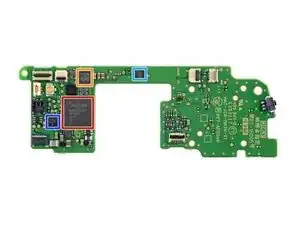
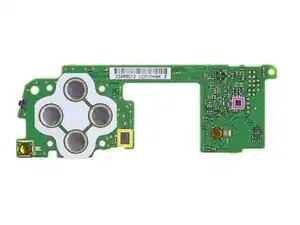
    • Wir legen die Kontrollerplatinen hin und suchen nach noch mehr Silizium. Hier ist die wohlausgestattete rote Platine in aller Glorie (die blaue Platine sieht ein bisschen anders aus, hat aber im Wesentlichen die gleichen Teile):

    • Broadcom BCM20734 Bluetooth 4.1/2.4 GHz Transceiver

    • STMicroelectronics ST21NFCB NFC Controller

    • Macronix International MX25U4033E 4 Mb CMOS Flashspeicher

    • STMicroelectronics STM32P411 32-Bit Microcontroller

    • STMicroelectronics LSM6DS3H 3-Achsen Beschleunigungs-/Drehsensor (wahrscheinlich)

    • Texas Instruments BQ24072 linearer Akkulader mit Power Path Management

    • Rohm BD27400GUL Class-D Audio Monoverstärker

    The chip in the center of the board is probably a Bosch BMI160 (6-DOF Inertial sensor)

    Luko -

    Would love to see photos of both controller PCBs. Only one side is shown.

    Jeff Keyzer -

    I would also like to have both joy-con because I had to send the Left one for a repair because I had troubles with the L button.

    Philippe Morin -

    Is that white quad next to home button LED?

    Damian Wielk -

    Does anyone know whether the joycons use this chip in Classic/EDR mode, or in Smart/LE mode?

    fury -

    How can I buy this whole piece?

    Fantasia Ford -

  21. VMQHAG2WwFtJKfQq
    VMQHAG2WwFtJKfQq
    1s4prAWaFKZsUUBE
    PItkLP5iIFTKJD5P
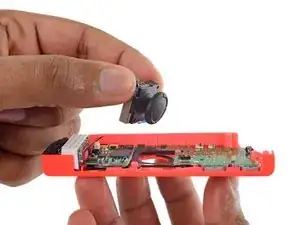
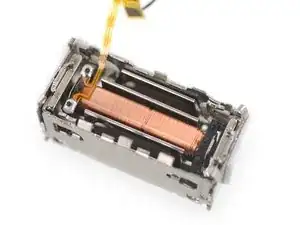
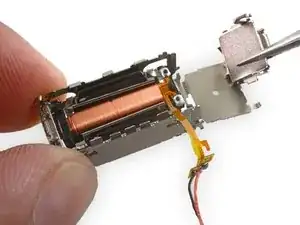
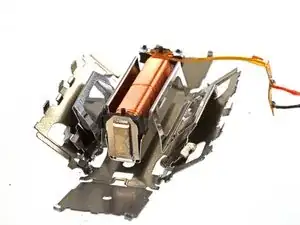
    • Teardown Update: Wir wollten der Switch die letzten Geheimnisse entreißen und öffneten die Abdeckung des Haptikmotors, einen "Linear Resonant Actuator" (LRA = Linearresonanzaktuator), welcher das HD Rütteln der Switch antreibt.

    • Diese LRAs sehen ganz ähnlich wie die aus, die wir aus dem Oculus Touch Kontroller, HTC Vive und dem Steam Kontroller herausgeholt haben.

    • Wir haben schnell noch einen Oculus Touch Haptikmotor geöffnet und er scheint im Inneren identisch wie dieser hier zu sein.

    • Vom inneren Aufbau her scheint dieser Vibrationsmotor üblicher Standard zu sein. Im Wesentlichen ist das eine Anregungsspule, welche um eine bewegliche Masse, flankiert von zwei starken Magneten, gebaut ist.

    • Es ist jedoch interessant, dass dieses LRA entlang seiner kurzen Achse zu vibrieren scheint, wohingegen viele der Haptikmotoren, die wir bisher gesehen haben, entlang ihrer langen Achse vibrieren.

    What, no slow mo video?

    kyletallent -

    If it is like this haptic module, it appears to be able to oscillate in 2 axes: http://www.alps.com/prod/info/E/HTML/Act...

    Aziz Nawrozie -

    pretty sure it is the Alps dual axis haptic. It only needs two wires because the magnets are polarized diagonally.

    Max Chen -

    it occilates in two directions at different frequencies. Only needs two wires because the magnets are magnetized diagonally (half the face is North and half is South.)

    Max Chen -

  22. F4ZyJrnZldZIbbxk
    F4ZyJrnZldZIbbxk
    f1khMcJIVrO5v3Wr
    yxDjRyJKgT3oElC3
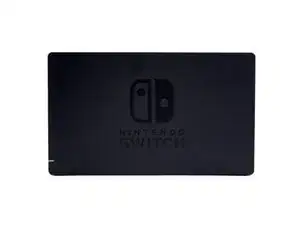
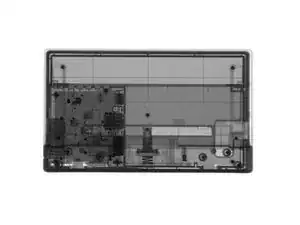
    • Bevor wir in das Haus der Switch einbrechen, haben wir es von unseren Freunden bei Creative Electronic ausspionieren lassen. Wir wollten nicht in versteckte Fallen tappen.

    • Um ehrlich zu sein: das Röntgenbild ist cooler als das, was hier herausgefunden haben. Im Grunde genommen besteht das Dock aus einer Platine in einer Box mit einer Handvoll von Anschlüssen, darunter unter anderem:

    • Zwei USB 2.0 Buchsen

    • Anschluss für den Netzadapter

    • HDMI Buchse

    • Eine USB 3.0 Buchse

    • Nintendo lässt verlauten, dass die rückwärtige USB Buchse zum Serienbeginn nur USB 2.0 unterstützt. Bei einem zukünftigen Update soll USB 3.0 unterstützt werden.

    thanks for info on this.

    does this dock board have power regulator/protection/fuse/whateveryoumaycallit that protects the switch in case the official charger goes haywire?

    MyPerk Tv -

    How much ampere are the USB ports ??

    iltenerone -

    What is the FFC connected to?

    Adam Cove -

  23. eivAhqaH1vrTRfkK
    eivAhqaH1vrTRfkK
    nvDmNrp61DeIo1Lv
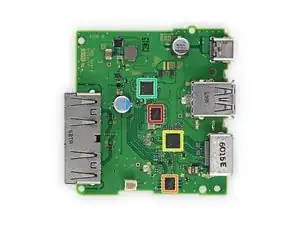
    • Fish and Chips am Dock:

    • Macronix International MX25L512E 512 Kb CMOS Flash-Speicher

    • Macronix International MX25V2006E 2 Mb CMOS Flash-Speicher

    • Megachips STDP2550 Mobility DisplayPort (MyDP) zum HDMI Konverter

    • Rohm BM92T17 USB-C Ladecontroller

    • STMicroelectronics 32P048 STM32P048 32-Bit Microcontroller

    • VIA Labs VL210 USB 3.0 Hub Controller

    • Rohm BM92T55 USB-C Ladecontroller

    Got some issues with the coloring of your little rectangles. M92T55 is pink on the photo, and the M92T17 is dark blue.

    LDM -

    What's the dimension of the motherboard?

    Zero -

    I would love it if someone could provide a drawing of the motherboard with dimensions in inches. For 3d printing purposes.

    Rcmaniac Ten -

    can get a name/model of the ribbon cable from the board that finishes as usb-c?

    rusenikolovski -

    I need the same information. Have you figured it out yet?

    The Real JaeLinx -

    I need another ribbon cable. What type would be a good replacement

    The Real JaeLinx -

    M92T17 is an ROHM chip.

    Blue -

    What’s the part on the dock pcb that holds the ribbon cable (zif connector )

    Hooligan - 69 -

    I’ve got no HDMI out from my dock to my TV. There’s no visible damage anywhere so I’m thinking of putting a new HDMI port onto it. Any other suggestions before I do that? I’ve done all the regular troubleshooting.

    modtang -

  24. GKS41JIQGy1YRF25
    GKS41JIQGy1YRF25
    p5JrXiZEYE21viMQ
    UsOKF4jpc1QP2PNb
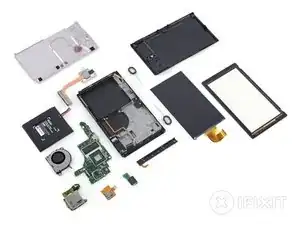
    • Jetzt wollen wir dich mit unserem besten Schuss einigen Schnappschüssen vom Layout überraschen! Hier sind die sorgfältig ausgebreiteten Innenteile der Switch.

    • Danke nochmals an unsere Überwachungshelden bei Creative Electron!

    • Und jetzt bauen wir schnell wieder alles zusammen - es ist Zeit zum Zocken!

  25. D4Mw1SANqBqXDYsI
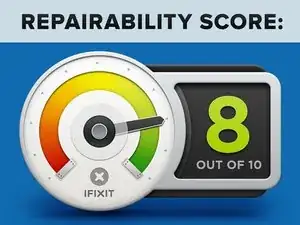
    • Nintendo Switch Reparaturbewertung: 8 von 10 (10 ist am einfachsten zu reparieren)

    • Außer für den Touchscreen werden Schrauben statt Kleber zum Befestigen der einzelnen Komponenten verwendet.

    • Die meisten Bauteile, wie Joysticks, Game Cartridge Leser und Kopfhörerbuchse sind modular und können ausgetauscht werden.

    • Die Akkus sind zwar am Gehäuse befestigt, sind aber modular und können vom Endverbraucher ersetzt werden.

    • Der Touchscreen und das LCD Display sind nicht verklebt. Das reduziert zwar die Kosten für eine Reparatur, macht sie aber komplizierter.

    • Proprietäre Tri-Point Schrauben hindern den Nutzer am Öffnen der Switch.

    • Der Austausch von Touchscreen oder LCD Display erfordert das Anwenden von Warme und Hebeln gegen kräftigen Kleber.

    Great teardown guide. It's nice to see Nintendo hasn't completely abandoned reason for non-user-serviceability.

    David Jonas -

Evan Noronha

Mitglied seit: 06/02/15

219164 Reputation

135 Kommentare

So there's 4GB RAM?

Christopher Meyer -

Yes it has 4GB of RAM in the form of 2x 16Gb (or 2 gigabyte each) Samsung LPDDR4 RAM chips.

acaaew -

Does the HD Rumble operate the same way Apple's Taptic Engine works?

Dimitri Bouniol -

Probably not. The Taptic Engine is a linear oscillator, but the Switch probably uses a 3-D oscillator: That means the weight can move freely in all three directions.

Ethan Zuo -

Single pair of wires means single axis of movement.

Lemming -

two wires true, but magnets are magnetized diagonally and the W shape of the spring arms gives different spring rate in X and Y. Powered, the coil moved diagonally to the corner. Once let go, it occilates in different frequencies in X and Y.

Max Chen -

surprised to learn there's 4GB of RAM

Kai -

Well it's double the RAM in the Wii U. Four times as much if you count the 1 GB used by the Wii U OS when not playing games.

Ethan Zuo -

But also let's not compare Apples and Oranges, ARM architecture needs much less RAM than x86 to perform well, you can't simply compare ARM, PowerPC and x86 with 4GB of RAM and think they will all have the same performance.

theSUBVERSIVE -

<<<But also let's not compare Apples and Oranges, ARM architecture needs much less RAM than x86 to perform well>>>

No it doesn't. That's just...not correct at all.

And yeah, Switch has 2x the RAM as Wii U, though who knows how much will be accessible by games. Obviously all consoles reserve some RAM, but for some reason the Wii U reserved half of it (though that still left more than 2x the RAM versus 360 and PS3, which is maybe why they didn't care that they were reserving so much).

wolfpup3 -
Does the micro sd slot support UHS II (ie. has support for two rows of pins inside)? No one seems to care about this info in the teardowns lol

rosta.pospisil -

I care a lot myself too. I would even like to know what spec version of the SD Association it supports. Does it only comply to version 3.01 (UHS-1) or could it comply to the new 5.1 version or even 6.0?

Philippe Morin -

Thank god i'm not the only one that cares about this. The difference between UHS-I and II could mean half of game load times from the microSD.

Ashler -

I too would like to know this. [and on all devices.]

Josh -

Looking at the photos, It does not have the extra pins, it only has 8 legs, common for a plain SD card reader.

Toby Webb -

Game load times always seem to be CPU bottlenecked on consoles anyway.

alexatkin -

Please deconstruct the rumble motor

Vince -

Possibly the most interesting part of the design.

fastm3driver -

Do we know the thermal envelope of the cpu/gpu? I'm wondering if it's on the verge of needing a fan. If so, a die shrink version might not need the fan anymore freeing up a lot of space for a bigger battery.

fastm3driver -

Added! Check out step 21.

Evan Noronha -

I agree with Vince, I'd love to see what's inside that rumble pack. I'm betting on the same thing apple has with their taptic, but with a slightly heavier weight.

Ryan Mitchell -

I really want to know what's inside the hd rumble motor! Sounds more complex than Apple's one...

Mr. Doge -

Modular eMMC? I smell bigger storage variant from Nintendo.. Anytime Soon..

Yosia Sulistian -

Makes me wonder if we could clone the drive onto a larger drive.

vegetaban -

Like the wiiU they know it's kinda a small amount but most people won't care at launch. I bet they even double it by xmas. Or make a more expensive version with the charging dock, 64 memory, and a Zelda or mario included. It will seem like a deal!

fastm3driver -

Guys any info on the antenna in the main body of the console or joycons for the broadcom chips? I cant see much of a BT antenna in the joycons at all from the pics. Unless theyre PCB etched?

Patrick Frost -

The BT antenna in the blue joycon is pcb etched, just on the outside of the joystick. I don’t see it on the red joycon pcb at all, though.

sigoshi -

Can we get an x-ray of the HD rumble motor? Would be interesting to see how it works and whether it's a similar mechanism to the Taptic Engine.

Jason -

Jason, I'm assuming that you are wanting a video of the LRA in action as a static X-ray of the device would look pretty much like what the teardown looks like only with less color. There's an awful lot of metal there and it's just going to look like a dark block.

Actually, if you look at the X-ray of the system with attached controllers, you can easily make out the dark blocks that are the LRAs.

ritslvids -

Would it be theoretically possible to deliver HDMI over USB-C when you are not docked? I'm thinking when you visit a friend and you don't want to bring the dock etc. to play on a big screen.

Marc Schiller -

You can disassemble the dock and bring the internal board along

Cuong Phan -

Let the time work. I think there will be cables to get the HDMI out of the USB C. In the past, for every console there was a lot of non Nintendo accessories from third-party. Why should it be other this time?

TheLOD2010 -

There are many YouTube vids trying out different USB-C 2 HDMI docs, but AFAIK there is noone which works until now.

I tested it myself with the Microsoft Display Dock for its latest Lumias, but it did not work. Hopefully there will be a solution soon as I use my switch docked at two different locations and do not want to pack the dock everytime.

alex.saternus -

Megachips STDP2550 Mobility DisplayPort (MyDP) to HDMI Converter, part of the dock. You need a MyDP to HDMI converter, as the Switch puts out DP and not HDMI.

Xander Zoolander -

Theres no Nintendo word write on the board why this is not a Nintendo console?

Ricardo CB Pereira -

This is a Nintendo Console.

Reid Fleishman -

Does anyone know what the voltage range of the AC adapter is? Is it 100-240 V AC considering the Switch is now a region free console?

Sagat -

It's USB-C on the console and the dock. Any USB-C charger should provide a charge - so if you had an international charger that supports USB-C you should be good. One of the photos shows 15V / 2.6A input on the dock and the same on the tablet itself.

The x-ray they show at the top shows the US-style prongs on the charger and those are sold supporting US voltage only with a built-in USB-C cable (i.e. the cable can't be unplugged and used on a different adapter)

Jimmy -

The charger that came with my US Switch is rated 100-240. Finally I can throw my transformer away.

Tim Hurley -

Region free powersupply's are very common these days. They are cheap. Under 75W they are more cheaper, because in the EU you will need PFC over 75W. Active PFC is expensive, so a non region free supply will be get more benefit to the manufacturer @75W+.

So the charger of the Switch and every Phone are under 75W and can be build simply with an PSU driver chip and only a few more components. For every Voltage.

TheLOD2010 -

Although it is true that 100-240V power supplies are very common, previous Nintendo portables have been something of an outlier in this regard. The charger with my 3DSXL was 120 only, and that was 2012, years after 100-240 was standard elsewhere.

Tim Hurley -

I wonder if the Bluetooth transceiver different in both joy con, as there are connection problems in the left one but not in the right one.

PKMGO Ajimu -

no cartridges teardown

yenmax -

Well it would be pretty boring. It's just a 16 GB storage chip on a fiberglass board with gold-plated contacts.

Ethan Zuo -

Wow, 16GB cartridges? That's pretty awesome! I loved back in the day when Nintendo Power would list cartridge sizes, just because I'm curious about stuff like that...wish I knew how big a given 3DS/DS/Vita game I'm playing was.

wolfpup3 -
Lick the cartridge!

Ethan Zuo -

Please!!!!!!!

Ethan Zuo -

There's definitely 4GB of RAM inside of the Switch...two 2GB chips of LPDDR4.

Brent Murphree -

Max bandwidth of the 3.0 port for the console? Could be very telling when/if Nintendo launches a dock with an upgraded GPU in it that could (possibly) run in SLI with the SoC GPU.

Shankovich -

It would had been better if it was USB type-C 3.1 with Thunderbolt 3.0 for that purpose. Thunderbolt 3.0 is 8x faster than USB 3.0 and to act like a SLI eGPU, 5Gbps isn't enough for a considerable boost, if it was Thunderbolt 3.0 it would be much more future proof. Since it's just USB 3.0, I'm not sure if Nintendo is really thinking about an eGPU, which is a pity. But I hope someone with more knowledge could say what could Nintendo actually achieve with USB 3.0 regarding an extra graphics boost, I wonder if that would be enough for 4K in the future, but it doens't look like it.

theSUBVERSIVE -

Even TB 3 ends in PCIe 3.0 4x. This is to slow fore 4K gaming too. The actual 4K Graphics needs PCIe 3.0 8x as minimum to run with more than 24 fps.

It is no eGPU in existence that can bring a low power system 4K gaming. For the Switch die CPU will be the next limiting part.

TheLOD2010 -

You'll never get any form of functional dual GPU solution through USB - both bandwidth and latency are far too bad for that to be even remotely functional. Not going to happen.

And for those of you talking about Thunderbolt 3: TB3 is an Intel-developed tech. There's zero evidence of it even being considered for implementation outside of X86 systems. Heck, it doesn't even work on AMD-based systems, and those are X86! TB3 on ARM will never happen.

Trond Aasland -

Thunderbolt is an Intel proprietary external PCIe port. Nvidia would need to develop their own proprietary external PCIe solution.

The Switch would also need extra hardware for this, mainly a couple more ICs.

But it could work since USB type C allows an extra set of data lanes to be used at a non-USB port, this is how the Switch outputs a MyDP signal (which the dock has a MyDP-HDMI converter). But currently, the Switch doesn't have supporting hardware for an external/hybrid gpu setup.

Xander Zoolander -

I don't know what its wrong with the guys befor me, but it's definitly USB 3.1 Standart with an USB-C Port.

USB-C is a standart for the port/plug, and can be provided with USB 2.0 to 3.1.

Only USB 3.1 Standart provides the feature of sending video signals over the cable, and the technical Standart USB 3.1 must be shipped with an C-Port/plug.

That make TB3 only 4 times faster, in cost of an proprietary plug and protocol.

Nintendo isn't so uneconomy and so the choice was USB, cause everybody got USB-devices.

Gordon Kracht -

Sounds like a really bad idea to be honest.

Karl Fahrman -

How do the joycons charge from the console, where are the connectors for power transfer?

Tony -

Step 17 picture 3 -> metal contacts with flatflex cable tu the joycon pcb.

TheLOD2010 -

Also step 13, third picture, is the Switch's side of it. The contacts are on the underside of the rail.

Xander Zoolander -

Is digitizer is made of glass or plastic?

Maciej Jerominek -

It is made of plastic.

Evan Noronha -

So the cooling setup goes SoC - thermal paste - copper shim - thermal paste - cold plate - thermal paste -back plate. Granted the cold plate and heatpipe is the main deal, not the backplate.

You could argue that's similar to a CPU integrated heat spreader, but those are more form fitting and sometimes soldered for better heat dissipation. Cooling setup seems like a not great design, especially as DF clocked the vent area at 52 degrees Celsius. From a mobile SoC.

tipoo -

It's actually;

SoC > thermal paste > the shield/cover around the SoC and nearby components > copper shim > thermal paste > pad >mounting bracket and copper pipe, with what looks to be a layer of material between the bracket and heatpipe; also can't tell if the bracket is brazed to the sides of the heat pipe, or if it's under the heat pipe > thermal paste > backplate.

Also keep in mind that the SoC has an internal heat spreader, with is either soldered or pasted to the chip itself. So there's even more interfaces.

The 'pad' on the heat pipe can be seen on Gamer Nexus' video here: https://youtu.be/obz5tE1mdV0?t=10m46s

I also wonder what effects that shield/cover on the SoC is going to have on the DRAM it covers when it heats up.

So there's 10+ parts on top of the silicon including the IHS and it's solder/paste, 9 if the mounting bracket is brazed to the sides of the heat pipe, 10 if the heat pipe is on top of the bracket. Keep in mind that a standard computer only has 4-5 layers on top of the silicon.

Xander Zoolander -

I think seeing the inside of a game cart would be interesting, see if the pinout is different from SD.

tipoo -

Thanks your well-detailed analysis it's possible to complete wikipedia semantic info about objects components and get this:

https://tools.wmflabs.org/reasonator/?&q... (look at "has part" section)

P.D.: more info https://meta.wikimedia.org/wiki/WikiObje...

Qupro -

I'm guessing the screen cover is made of plastic and not glass?

guitrasher -

Yes, the screen cover is made from plastic.

Reid Fleishman -

What about the cartridges? Can you open one?

Philippe Morin -

hello ,

is the screen IPS or VA or TN ?

ttt ttt -

Came here to ask this as well. Display is TN or IPS?

Dirty Potter -

Definitely not TN, the viewing angles are great. But, idk if it's VA or IPS.

markjkuebel -

What are the screw dimensions? It would be nice to have a set of spare screws sitting around to replace them if they break/strip whilst opening the Switch in future.

Thomas Plummer -

Your teardown doesn't seem to include flavors of any of the components... Was this an oversight, or are you planning to update this information in the future?

erixtyminutes -

Could you guys nail down the die size for us?

tipoo -

Now let's hope that Nintendo will start replacing all the systems that shipped with dead pixels instead of telling us it's normal.

http://www.techspot.com/news/68401-ninte...

marcpgreen -

Nintendo Switch Dock Set (with a separate Switch Dock, AC adapter and HDMI cable) will cost $89.99. After seeing this video, Nintendo is really screwing over the consumer with a price like that.

marcpgreen -

No they're not, at least not versus what anyone else is charging. These types of adapters are expensive, and it's an active adapter.

Maybe they should be much cheaper, but Microsoft, Apple, etc. charge similar.

wolfpup3 -
Can you give a close up and any part number on the usb port on the switch. I would love to know if that is an off the shelf part that I could get from digikey if need be. It appears to be a midmount design that I am familiar with(Molex I think), but I cant get a clear shot of it from your pictures

Tyler Daughtry -
You can click on any of our photos and delete the .huge from the end of the URL to view it in full/original resolution (which is usually 30+ megapixels). Here's the shot of the USB port on the Switch Console motherboard. Hope it helps you find what you are looking for!

Jeff Suovanen -
Kinda want to try swapping thermal paste with some Arctic Silver or something to see if it improves dissipation at all. Not sure that would aid performance but might be worth a go. Not really sure how I'd measure any impact though... Can't exactly monitor the Chip temp.

Russell Applin -

Or perhaps with Coolaboratory liquid ultra. Check it out! It smokes Arctic Silver in the tests.

Haven Games -

I was wondering if it was possible to take apart the front of the dock and get rid of the rail that could scratch the screen. Seems like it should still be functional after completely removing it.

tophoos -

Then you risk the Switch falling over as its vertical rather than at an angle. So you get a scratched screen AND potentially destroy the USB-C connector, the most difficult part to replace.

alexatkin -

It looks like different Switches use different eMMC chips.

Yours had a Toshiba THGBMHG8C2LBAIL.

Gamer Nexus' Switch had a Samsung KLMBG2JENB-B041; seen here https://youtu.be/obz5tE1mdV0?t=9m40s

Samsung's is .2mm thicker at 1mm thick.

I'd like to see someone do a swap with a larger sized chip.

Xander Zoolander -

Update: according to a forum, the devkit switch has a 64GB chip, and people have already done mods to read and write the chip outside of the switch.

The only problem that might arise is the Samsung chip has 2bit MLC (Toshiba doesn't give that spec) on their 32GB chip in the Gamers Nexus' Switch, their largest 2bit MLC chip is 128GB, they offer a 256GB chip but that has a 3bit MLC.

There's hope for storage mods, and there's hopes for a larger storage switch.

Xander Zoolander -

Hi, the stick on Joy-Con are analog or not ? When i tried to use in x360ce it look like a d-pad ?

blaplace -

What model and screen type is the LCD? Why bother pulling it without giving us the part number or identifying marks?

Bitvar -

Can anyone find out what size the player number LEDs are that are on the joycons?

Kyle Ferguson -

As always, a great tear down iFixit! Thanks for keeping the world in the know!

Wagon Fixin -

Are the analogue sticks interchangeable? Would a stick in a spare right joycon work in a left joycon that needs a replacement stick?

Benjamin -

Was the left Joy-Con's 4-button mechanism (circuit board & chassis) the same as the right Joy-Con's? I'm planning on modding a Joy-Con with a replacement (Sega Saturn) D-Pad, so I'd love to see more detail about the D buttons, for example, popping off the rubber buttons on the Joy-Con board and see what's underneath (something you could potentially solder to?). Thanks.

Haven Games -

So how can I tell I will be buying a switch with the fix version of controllers that no longer loses connectivity?

Marlon Alucard -

Any similar speakers for replacement?

Jube -

Really need to find a replacement speaker as well. My right speaker started popping then now no sound comes out unless i put pressure on the membrane. Basically its broken now.

Mptp -

Update: My right speaker started popping and then just stopped working. I sucessfully replaced it with a New 3DS speaker

Mptp -

Is there anywhere I might be able to buy replacement parts for the switch?

Nathan Alan hansen -

suupppppppppp

diego -

suppppppppppppp

diego -

The ZL button of my left joy-con is not responding. Does anybody knows if this is something that can be fix? Or i gonna need a replacement?

marcoscrispim -

What do you use for doing X-Rays ?

Aditya Agarwal -

My right joy-con can be used on console, but it can't be charging........Orz

I tried to change left joy-con's battery to right, but either....

Have any idea can fix it?

pmanyeh -

Is there a place to order replacement parts? My Joystick is jacked up and needs replaced.

Brian Johnson -

+1

I'm just looking for the L + XL buttons ribbon cable. Where can we get replacement parts?

Rockus Ultimus -

So where excactly do you find a mate on the Joy-Con side plastic?

Dexter -

Very Cool! I want to see the graphics card next time!

Ultimate Gamer -

When does the replacement parts comes out?

xFELYNEx xFx -

Hey there, I've managed to have something jam the USB-C port and it's mushed the end of the black pin connector. How feasible is it to bring the system to a local repair shop and have them replace the port for me? Am I out of luck and will have to send it in to Nintendo for repairs?

carlos.chai -

If I tore a ribbon cable in a joy on, any ideas on where to source a replacement?

Clark Sessions -

Was it a ribbon from inside your JoyCon?

zacharywd -

Patrick Frost and John Horne were asking question about the antenna or antennas. SamitSakar wrote an article on the users complaining about the weakness of WIFI. If the wiring is incorrect which Patrick Frost alluded to then how does it get resolved. Is there only one antenna or more. For example iphone has 9 antenna. Slide 11, Researching the Broadcom/Cypress BCM4356 features “Single-stream and dual-stream IEEE 802.11ac solution with data rates up to 433.3 and 866.7 Mb/s” Hence it’s not the chip but the antenna configuration. Perhaps there should be more. Any input? All ears?

hebrwn -

Hello our son has inserted a Micro USB into the USB-C socket. Now the pins are bent and the Device cannot be loaded. Does anyone know where I can get a Nintendo USB 3.1 Type C jack to replace it or an alternative jack?

marijankruljac -

I’m looking for a replacement flatflex cable for the Left Joycon. It’s the cable that goes inside the switch. If anyone can help me locate one that would be awesome.

zacharywd -

Can anyone direct me to a place where I can find replacement MicroSD card boards?

Jake Wharton -

Can someone help me? On step 19 , there’s a flex cable coming out of the joycon where the LED is , mine is malfunctioning it doesn’t work properly , if I open the joycon and stretch the cable the led lights works normally , but when I fold it to close the joycon it stops working, I think the cable somehow is broken inside I dont know…but anyway , is there a place that I can buy only this part so I can replace it? I don’t even know the name of this cable ;(

floyd -

Any clues on the model of the IR camera? I’m interested to know how sensitive it is, the Labo shows some interesting stuff, but it makes me wonder if it’s got a high enough resolution to read QR codes made up of reflective material.

Richard Hodgson -

Does anybody know if I can replace the c-stick sensors? I dont know if im using the correct word here, but mines pretty much messed up, i have two sets of joycons and only right ones broke twice, and I might be able to fix them by exchanging it.

TehVilly -

Hey, this might be a silly question, but should I wear any safety equipment when taking apart the joy-Con? To protect the controller, not myself. Obviously disconnect the battery, but will static electricity do anything? Should I be aware of anything else? Thanks!

Isaac -

Hi I strip one of the screw of bad that even super glue did’t work. To remove the glue is use a drill (1mm) drill bit and hand turn to scrape the glue out. Anyother idea? Will epoxy work?

jonathan ambrose -

Where can I buy all of these parts featured in the video?

Matt Seibert -

How many Connector Pins are on/what kind of connector is on the Swich LCD Flex Cable

Alex Sparks -

What is screwdriver used to take off the screws on the bottom and on the joycon rail on the switch?

Branden D -

I wouldn’t knock it for the tri-wing screws. They use Philips plenty once you get in. they are meant to act as a deterrent to mildly curious children who can get their hands on a small Phillips a little too easily “speaking as a former kiddo that broke a toy or two in this way…”. i’d say good job Nintendo overall and would give a slightly higher repair-ability score. maybe an 8.5.

Alan Warrick -

my switch dont charging i have replace the chip M92T36 but nothing help

the switch dont starting

any Idea?

berlin.suratthani.imbiss -

I was wondering if the microswitch for the R button (not zr) was modular and if it required soldering to fix.

Peter P -

The upper shell (where the digitizer mounts) looks as if it can come off with about 8 more or so screws? I'm looking to replace this part due to cracking as well as replacing the digitizer and a few internal parts as well. Any tips?

kragithzedrok -

Beefy Battery? Yeah right

Jackson Peter Conway -

Could you provide instructions on how to open up the analog stick module without breaking it? Joystick drifting seems to be a recurrent problem with joycons and since they’re still pretty expensive, it would be a good plus to be able to repair or at least clean them at home.

Xnerdz -

Lacks sizes for the screws and generally leaves details out.

Zachary Hudson -

Hi Zachary, be sure you check the header at the top of this teardown! “This teardown is not a repair guide. To repair your Nintendo Switch, use our service manual.” We use teardowns as an entertaining, educational look inside a device not a step-by-step guide! Thanks for stopping by!

Sam Goldheart -

If the joycons started to always move forward and not let you jump in games what would need tobe fixed? just the buttons or like the whole board and for the stick wouldnt it just be the stick?

Miles Pridgeon -

Hey Miles! That sounds an awful lot like the dreaded Joy-Con drift that’s been plaguing switch owners lately. The good news is, if you head over to http://support.nintendo.com, they’ll probably be able to get them fixed up for free! If you don’t want to ship them out to Nintendo, we can sell you the joystick by itself. I’m working on the replacement guide right now, it should be ready next week. Swapping out the joystick yourself only takes about half an hour, and should fix the issues you’re having.

Taylor Dixon -

Howdy, just wanted to tell people be very very careful when removing the joycon battery clip. Those things are super cheap and flimsy. I broke one, even being gentle. After some different approaches and a digital microscope I still haven’t figured out a safe reliable way to repair one. If I ever do I’ll post it.

RebTech -

While switching out the left joy-con it was dropped the zif connector lifted from the motherboard completely intact still attached to the ribbon cable how do I reattach the connector to the motherboard?

Zeshi -

Thanks a lot for this guide !

maxim.gilot -

Danke für dieses kleine, aber ausführliche Tutorial

Robin Gründing -