Einleitung

  1. JTpljSnQXIKxJsi5
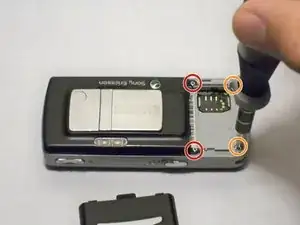
    • Remove the battery cover.

    • Press down firmly with your thumb and slide the cover back.

  2. ZrDcWvK2FrtbAjWf
    • Remove two Phillips #0 screws from the battery chamber.

    • Remove two Torx T6 screws from the battery chamber.

  3. JZtIRSEaCJyOetJM
    • Gently pry off the back casing.

    • Work an opening tool around the entire seam before attempting to pull off the casing. This action will reduce the chance of cracking the casing.

  4. W6VjZP3cxjnUtjMS
    • Remove the casing to expose the camera's components.

  5. EMOP155jhLmrTBym
    • Gently pry open the front casing by working an opening tool along the entire seam.

  6. WqGWOFDPGvtKHjDV
    • Remove the front casing by gently lifting it from the phone.

    • Be careful not to pull off any other delicate pieces.

  7. 3ptAFD6VAwhJFo3e
    3ptAFD6VAwhJFo3e
    wSFnAlEykPRflkTC
    • Remove the keypad.

    • The LCD screen is very fragile. Be careful not to catch the keypad on it while removing.

  8. 5RLmXDEG2cZYAhZb
    • Remove the screws holding the screen in place.

  9. l3RdB3oQC3eoEUYL
    • Gently lift the base of the keypad to remove it.

  10. PHs4UguuSg6bvO2w
    • Gently pull up the green film, avoiding the joystick.

    • The LCD screen will be attached to this film and come off with it.

  11. qAIZJUP6DXpWg2ig
    • Remove the back cover from the phone.

    • Gently slide the ribbon out of its connection.

  12. 3qvujQ13TEn5XJDJ
    3qvujQ13TEn5XJDJ
    3Ek4miVGcnDYAsXu
    • Lift the motherboard out of the phone.

    • The ribbon is fragile so work the motherboard off around the ribbon to prevent damage.

  13. GvQOvMkK1fGDYkPG
    GvQOvMkK1fGDYkPG
    6eMLiPUxdnd1medI
    • Pry off the microchip that is located below the ribbon.

  14. Pn6WwcjZwVKFgZyq
    Pn6WwcjZwVKFgZyq
    vLWM4TmnbayfJ6pL
    • Lift out the plastic support to complete the teardown.

Abby Evers

Mitglied seit: 04/10/11

202 Reputation

0 Kommentare