Einleitung

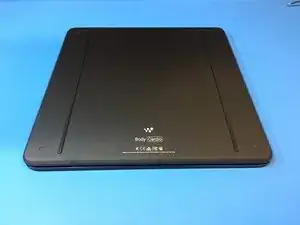
This month, we're cracking the case of the Withings Body Cardio, one of the most advanced consumer body composition weighing scales on the market today.

Please checkout the full post on:

https://novemberfive.co/blog/hardware-te...

  1. ePE4PNCVZNplTbsY
    ePE4PNCVZNplTbsY
    ybnBRLm1NJXswdBT
    ShCPimOkmnAx1S5X
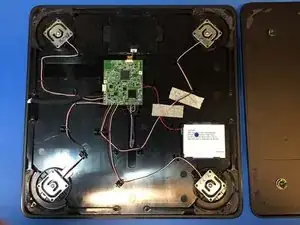
    • Opening up the scale was not an easy task – there was a lot of double-sided tape involved.

    • The back of the scale is fastened with four Torx screws – easy enough. The entire backplate, however, is glued to the front with double-sided adhesive cushions. Removing it simply involved pulling it firmly enough to break the adhesive, but not so hard as to break the connectors.

    • With the backplate removed, you can immediately spot 4 loads cells, one in each corner.

  2. K1yLTprmjl6SPTCn
    K1yLTprmjl6SPTCn
    WIZinUx6IxM2oHjZ
    FH2NuqLLXxOxdTNO
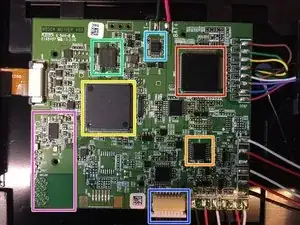
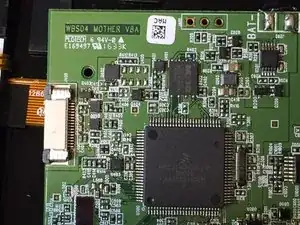
    • ARM MCU - MK22FN1M0VLL12 (NXP)

    • weighing scale and body composition front-end IC - AFE4300 (Texas Instruments)

    • battery charging IC (including battery protection) - BQ24095 (Texas Instruments)

    • WiFi and Bluetooth radio - BCM43438 (Broadcom)

    • flash memory - MX25L3233F (Macronix)

    • op-amp - AD8544

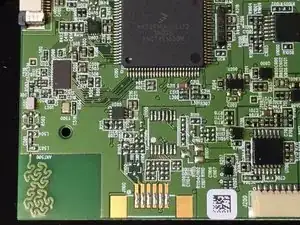
    • connector to the USB port PCB

  3. cAvf2NOWGAaj3FEu
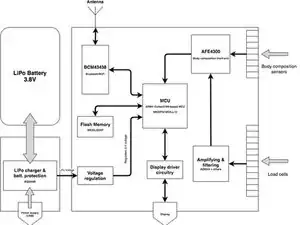
    • I’ve made an attempt to design a block diagram for the whole setup. This won’t be 100% accurate as I don’t know all the details but it will give you an idea on how the components are interlinked and work together.

November Five

Mitglied seit: 25/08/16

465 Reputation

37 Kommentare

Thanks for sharing your experience, wouldn’t guess the double sided tape trick without your help.

Soon my scale will be deactivated by Nokia and was wondering what I can do with it.

ALMO -

Hi please tell me what are battery dimensions. I need to order one - cause mine is already dead.

Michal -

Hi, I never took note of the dimensions, it’s best you open up the scale yourself to check it out.

Since the battery is dead you’ll have to do it anyways ;)

November Five -

Thanks for the breakdown info. I'm replacing the battery as well. It's 63x50x5mm. 2100 mAh, 7.98Wh, 3.8V

I think this battery should be exactly the same:

Samsung 2100 mAh Replacement Battery for Samsung Galaxy Avant SM-G386T https://www.amazon.com/dp/B00OY9BY6W/ref...

Ryan Wills -

Hi,

my battery died as well. Was the Samsung battery the correct replacement?

With best regards

MArtin
spamfilter -

Thanks for this, it really helped me to open it!

lpcormier -

Hello,

Thanks to ifixit.com for the information is very helpful. I am in the process of replacing the battery, but before I do I am weighing options.

I was wondering, if there is data on replacing the battery successfully? If the battery solder or is quick connected to a housing that is solder to the PCBA?

higuzman -

hi higuzman, the battery is soldered directly to the PCB, no connector attached. You can see this in step 1 on the 3rd picture ;)

November Five -

Hi all,

Has anyone got the right battery or managed to get a suitable replacement? Was the Samsung one ok ?

Steve -

I used the Samsung EB-F1M7FLU and it’s working fine.

https://www.amazon.co.uk/gp/product/B00V...

Adam Warne -

My issue is the small USB PCB. When I unplug the USB cable inside, the scale boots up. When I plug it back in to the small PCB it shuts off. I think the external switch that's on the outside of the scale got water damage. Somehow is stuck in off mode, the white lights do not light up anymore. Anyone have any tips on this issue?

Taylor -

I have exactly the same issue.

After replacing the battery (15€), the scale works when the USB PCB is not plugged in.

What could be the problem? The button?

F J -

I found out how to fix the USB circuit board that does not allow the scale to work when connected. I detached it from the metal board and found copper corrosion (white and green substances) on the 3 pins on the hidden side of the small USB circuit board. These are located in front of the three holes of the metal board that face the floor. I think they are designed to prevent a short circuit of the battery and the main PCB in case they are exposed to water.

I simply cleaned the corrosion with a toothbrush and 90% alcohol and let it dry for 30 minutes.

It works perfectly now.

Fahd from Paris ;-)

F J -

Hello

What is the good method to reassemble the scale?

Lionel -

What size are the Torx screws? T3? This article isn’t clear.

Antony Stubbs -

Screws are T6 Torx

scroberts72 -

I got a small Platine which was attached to the original Battery. Do I need this for the Samsung battery or can I just solder the wires directly on the battery?

irfanyounas -

Thanks for the pictures. I opened the scale, dried the water as much as I can, checked battery voltage is around 3.8v and it still didn't turn on. After two weeks of started working. I think the moisture dried out. Glad it works now.

Siri Velauthapillai -

Hi, how can I reassemble the scale? Tried with new, strong double side tape but it won't stay together.

Csizmadia Szabolcs -

Turns out the USB PCB was my issue. My scale died when according to the app it had 78% battery.

Once I was able to disassemble per the instructions above, the battery was actually fine and I could get 4V when testing with my multimeter on the negative and positive terminals. The USB/power-toggle PCB had a bunch of gunk all over it, however, so I decided to give that a thorough cleaning.

I unscrewed the USB PCB from the backplate and cleaned it with 99.9% isopropyl alcohol using anti-static qtips There are also 3 holes on the backplate under the USB PCB that had a bunch of gunk on it. I cleaned out those from both sides.

After reassembling, I plugged in the USB charger and powered it on without a problem.

Andrew Weisenborn -

Hi,

I want to change the display, do some one have the reference?

Serge

jobandsun -

I just got mine apart, have something to add. On the corners there are floating plastic pieces which are glued to the bottom. This is the double sided tape mentioned. They have a bit of play, but they’re located by flimsy plastic. You could just continue to pry the glass and metal apart, but you're better off targeting the glue so as to not break anything.

.

I inserted a flat spoon handle in at the side opposite the button, then worked along the plastic ‘arms’ towards the corners and the glue. Now I have it apart I can see that there are notches for disassembly; https://imgur.com/a/VLMNTrq . You should be able to get something in at the corners to catch this notch and pry the part itself (preferably a plastic pry bar where glass is involved). I presume this is how they do it when it's in for repairs.

.

I also cut the wires to make attaching a new battery easier; I'll just use wire crimp joiners once I get a new battery, like you'd use in car audio wiring. :P

.

DM me on twitter if you need any help; @TheTopMostDog

TheTopMostDog -

Top get the base off leveraging firmly but carefully with a spoon or similarly non-sharp object works ok. My scale (branded Nokia rather than Withings) also had a small printed circuit board attached to the original battery. Given my main board was identical to the ones in the tear down (which didn’t have the board) I just cut left it aside/out and soldered the new battery in directly. https://imgur.com/gallery/0pFkP0p

Adam Warne -

Excellent information, my USB port PCB got water damaged. Do you have any information on where I can get a replacement USB port PCB?

Thank you!

Ramon N. De la Cruz -

Same damage , USB port with PCB control charging got damage. Searching for replacement without success. Would be grateful for any suggestions.

Thanks

Piotrek -

One tip, when levering the two halves of the case apart, to break the double-sided tape, face the tip of the lever (e.g. screwdriver) away from the front of the scale i.e. lever against the metal back of the scale. Else you may scratch the white undercoating of the glass top.

Andy May-Coates -

My scale stopped working after the sink in the bathroom overflowed onto the floor. I disassembled the scales by following this guide, but there was no obvious water ingress or corrosion. Nevertheless I took off the USB power board and cleaned the underside with alcohol (I used the stuff I use to clean old thermal paste off CPUs). I reassembled and it’s working again!

I agree with other posts, this is a major design flaw. I’ve now blocked the three holes on the underside with some electrical tape.

Andy May-Coates -

Just wanted to add my feedback, and thanks to everyone for comments, insight here… helped me. From opening it, to all the tips.

Seems for me its actually been the switch/usb pcb that was the issue… although I have the unit re-assembled with another replacement battery in it (and seems to be working!).

During the re-assemble I got some random startups and messages when I connected the small PCB back, I’ve put it down to drying out and once I got through the setup failing issue (dont forget if you do do a factory reset, you need to forget the device in you mobile BT settings)

Anthony Clarke -

Reassembly tip: It was hard for me to reassemble the scale for the reason that the screws did not get a grip on the whole in the plastic part. Squeezing the two parts of the scales together by hand and trying to get the screws in did also not work - no grip. By using two small woodclamps I managed to apply enough pressure to squeeze the scales together, and got the screws in. The cohesive tape will probably also help to keep the scales together in the long run, so I suggest that you reapply the tape when reassembling.

Marc van der Steen -

Any idea where one could get a replacement of the small pcb containing the mini usb and switch? Seems to be defective on my unit as device works when it’s disconnected from motherboard.

Brian Garvan -

I managed to fix my scale not working when connected to the mini usb board by cutting wires 3 and 6 from the cable connector

Layout is (Top of the PCB, connector at the bottom)

1: GND

2: USB +5V

3: TP6 (safe to cut)

4: Side push button

5: Debug TX (safe to cut)

6: Debug RX (safe to cut)

7: GND

8: NC

0xd33d33 -

I managed to track the issue on mine down to the diode in parallel with the button to ground. For mine that measures 150k (broken) i.e. the controller seems to think it is constantly pressed down. That leads to a factory reset loop.

Jussi Wallin -

Hi, is there any way how to exchange the cracked top glass?

joefou -

I got an issue with screen LEDs: https://support.withings.com/hc/en-us/co...

I have disassembled the screen and the board looks good. I think that the problem is at the main board. Have someone managed to fix it?

Jakub Popowski -

Hi Jakub, I'm experiencing the same issue as you. Have you managed to resolve this problem? Currently, there is no backlight on my scale. I bought a spare one and replaced the screen, but the problem persists.

Michal -