Einleitung

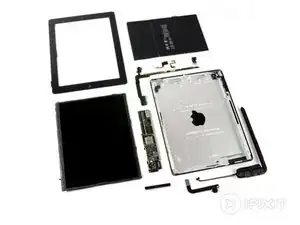
We got our hands on the fourth generation of iPad; we shall call it iPad 4. The iPad 4 is kind of like a fourth book added on to a trilogy: its release was a bit sudden and unexpected, but it's a part of the group, nonetheless. This fourth iteration of iPad shares a lot of similarities with the previous version, so instead of our traditional, exploratory teardown, we're going to play "spot the differences" by illustrating all the changes from the last generation.

Need more teardowns in your life? Follow us on Twitter, like us on Facebook, or subscribe to our YouTube channel. Heck, you could even do all three!

  1. xWnPFMx1MjRKyWq6
    • Welcome, ladies and gentlemen.

    • Apple has stunned the tech world once again. A mere 7 months after the announcement of the iPad 3, the iPad 4 was introduced on October 23, 2012.

    • Tech Specs:

    • Dual-core A6X processor with quad-core GPU

    • 9.7 inch LCD, backlit in-plane switching LED with 2048×1536 pixel Retina display

    • 16, 32, or 64 GB flash memory (at launch)

    • 5 MP rear-facing camera

    • Lightning connector

  2. 34toIasclBfIivJX
    34toIasclBfIivJX
    AnWmOiOXYahMyYAo
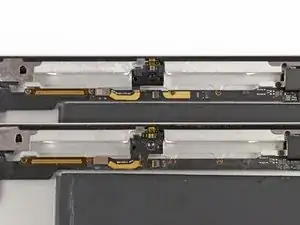
    • One of the major differences between the 3rd and 4th generation iPads is the connector. The 3rd gen (top) has the 30-pin dock connector, while the 4th gen (bottom) has the Lightning connector.

    • The iPad 4 has a new model number, A1458.

  3. ZCfA6THrcE5IAL3y
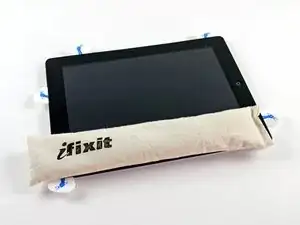
    • Continuing the trend, this iPad is glued shut. This isn't our first adhesive-riddled iPad, and we've been working to figure out how to make the painful opening process a lot easier.

    • Our heated-up iOpener lets us apply heat just where it's needed, softening the troublesome adhesive. Once we've snuck a few guitar picks in the seam, we're nearly home-free.

    • We're happy to report that no iPads were cracked in the creation of this teardown. We haven't always been so fortunate.

    ****There is a new ribbon that is connected to the home button. Be cautious when opening the bottom left corner as to not tear it.

    mazzolagregory -

  4. FhRSvbMImkHGW2go
    FhRSvbMImkHGW2go
    XNojbdXWGtXcrJbO
    RPCDXA2uBaciGgBr
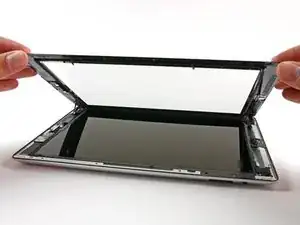
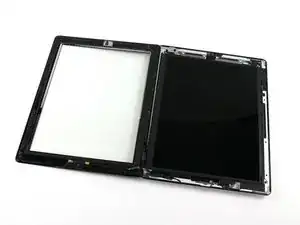
    • With the adhesive out of the way, we open up the iPad.

    • As expected, this stage looks no different from the previous generation.

    • Now that the hard part is out of the way, it's time for a break with a hot cup of drinking chocolate.

    Is this digitizer panel, compatible with the ipad 3gen?

    luis ortiz -

    the ipad3 digitizer is the same as the ipad4. I have installed three ipad4 digitizers by now and i used the same part as for the ipad3.

    Simon -

  5. 2sUWAUO4KHWlHmCr
    2sUWAUO4KHWlHmCr
    cKU3foECLBpmFWc2
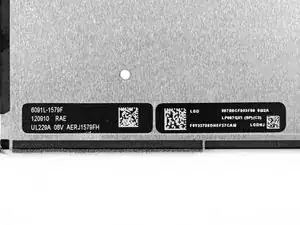
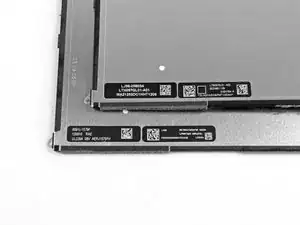
    • As opposed to the Samsung display we found in the iPad 3, the new iPad LCD is manufactured by LG.

    • Apple has reportedly been working to move away from Samsung as a primary supplier, so this LG display is not surprising. However, Apple often relies on multiple suppliers for a single component, meaning there are quite likely other LCD manufacturers lurking inside other iPad 4s.

  6. xviDmCRhiMdKiVpG
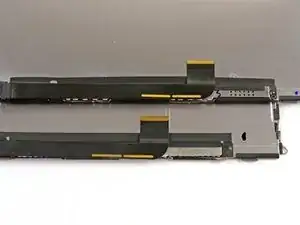
    • Continuing to examine differences in the LCD cables…

    • Well, Apple used a different color Sharpie.

    what differences in the LCD cables ?

    fariborz sarshar -

  7. RMheXXa1xPxyPlhq
    RMheXXa1xPxyPlhq
    1gnNynQbEmnTKTb1
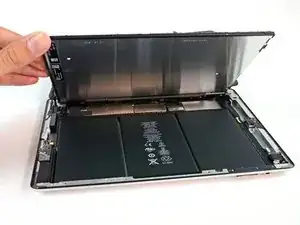
    • We lift up the LCD to reveal the battery.

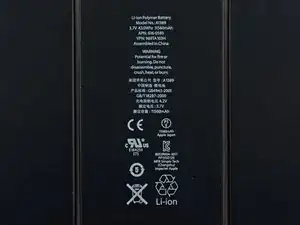
    • The battery is labeled with the same model number (A1389) as in the last round, so it's no surprise that it's another 3.7 V, 43 Whr package.

    • Like the iPad 3, the battery is adhered very securely to the rear case. Since batteries are consumables that wear out, the trend of glued-in, hard-to-access batteries in iPads and other Apple devices is unfortunate.

    Ya... But, where the heck does it attach to the board...

    mstein -

  8. IauOEOZcMbCkudw6
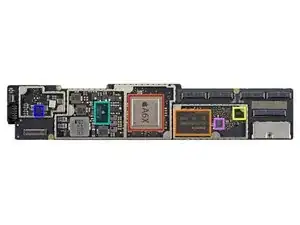
    • Skipping ahead to the good stuff, we get a quick look at the biggest improvement in the iPad 4—the A6X and its supporting hardware:

    • Apple A6X Processor

    • SK Hynix H2JTDG8UD2MBR 16 GB NAND Flash

    • Apple 338S1116 Cirrus Logic Audio Codec

    • 343S0622-A1 Dialog Semi PMIC

    • Apple 338S1077 Cirrus Logic Class D Audio Amplifier

    • QVP TI 261 A9P2 Boost Converter (likely)

    Can you remove the A6X cover just like what you did in the iPad 3 teardown

    Honam1021 -

  9. hETKHGyLlAvMgWT1
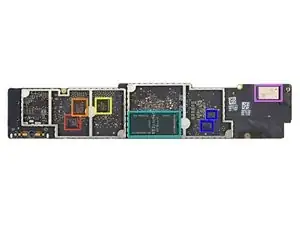
    • The backside of the board, however, boasts no dramatic improvements:

    • Broadcom BCM5974 Touch Screen Controller

    • Broadcom BCM5973A1 Touch Screen Controller

    • Texas Instruments CD3240B0 Touch Screen Line Driver

    • 2 x 4Gb Elpida LP DDR2 = 1 GB DRAM in separate packages in a 64-bit configuration

    • 2 x Fairchild BCHAH/FDMC Voltage Regulator / Reference

    • Murata 339S0171 Broadcom BCM4334 WiFi Module

    What camera model was used to take this clear photos?

    Filip Pusca -

    Was wondering what the name of a part is, as I am looking for it but am unable to find due to the fact I don't know its proper name....

    The part that on one end is attached to the ribbon for the headphone goes across the top and on the other end the power and volume buttons plug in to get there power.....HRLP IN DESPERATE NEED TO KNOW

    Christina Hodge -

  10. UWfwKBkkbINPABvW
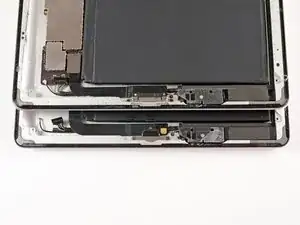
    • Apple didn't save any space by switching to the smaller Lightning connector (lower); rather they let the Lightning cable sit in a frame the same size as the 30-pin dock connector (upper).

    • We were hoping that space savings would yield bigger, better speakers. Very disappointing, indeed.

  11. LtGAgxLHbZbZm2IE
    LtGAgxLHbZbZm2IE
    BlHyLHORu1nkRdor
    ILxoAShQeVKLG4g1
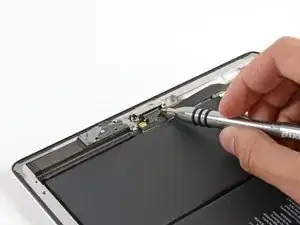
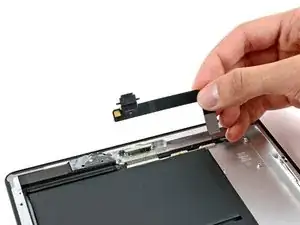
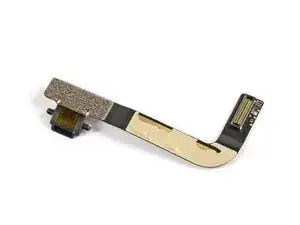
    • If you're new to our site, we'll let you in on a little secret: we love our 54 Bit Driver Kit. It makes quick work freeing the Lightning connector, even with a couple of hard to find screws.

    • There is a bit of adhesive holding the connector in, but nothing compared to some adhered components we've seen before.

    • Repair techs, DIY-ers, and clumsy iPad-users, rejoice! The Lightning connector is on its very own ribbon cable, meaning that procuring a replacement connector should be fairly inexpensive.

  12. LVQlwEfKlVwAJmQn
    LVQlwEfKlVwAJmQn
    ESuPsQjZdrJmLefS
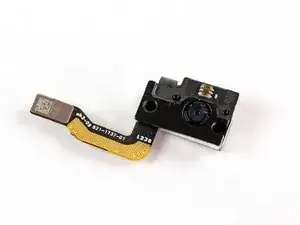
    • Despite looking almost identical in this shot, we do spot one more difference between the 3rd (top) and 4th (bottom) generations: the front-facing camera!

    • We've got a 1.2MP FaceTime HD camera, with the ability to shoot 720p HD video. That's a big improvement from the .3MP FaceTime camera in the iPad 3.

    • Compared to the iPad 3, this camera is actually slightly thicker (an extra .4 mm), but it still manages to fit into the same space.

    Unless I’m mistaken, that thingie on the top of the front-facing camera, with a copper plate on top of what look like three resistors, and a teeny tiny component to the right? Stuck to the camera with some light adhesive and held in place with those two pointy bits, is the ambient light sensor (which tells your iPad to adjust its screen brightness to the ambient light. Anyone know if I’m right?

    I have an iPad that isn’t responding to ambient light, so I need to find out for sure. But it makes sense—there’s a small hole in the front display just above the camera opening, with what looks almost like a paper filter behind it—consistent with what I’ve seen for ambient light sensors in iPhones. I’ll go check the front-facing camera guide and see if I can find out more…I’ll come back if I do.

    Bonnie Baxter -

    Well, after a couple of hours, I have not come across anything that says what that little module does. It looks an awful lot like a flash. So…ambient light sensor, flash, or both?

    So I did what I probably should have done first. I went to my working iPad for and tried to take a front facing picture in a dark room. There was no flash. Then I went to the control panel under “display and brightness,” and sure enough, there is a toggle switch for auto brightness, and it works. In a dark room, the screen gets dimmer, and in a well-lit room, the screen gets brighter. This only happens with the toggle switch set to “on .”

    My field testing thus suggests that the iPad 4 has auto brightness but no front flash. Since my dissection of a non-working iPad 4 revealed no other candidates, I conclude that the little module on the front-facing camera is an ambient light sensor.

    Now I’ll swap one into the iPad 4 without auto-brightness. If that solves the problem, question definitively answered I’ll be back…

    Bonnie Baxter -

    I ended up swapping the front camera module. I tried to take it apart and remove the “thingie”, but 1) it was really a pain, and 2) I never did get the module separate from the camera flex. I think it’s possible, but it’s black tape on black tape and I couldn’t separate them.

    BUT when I swapped the whole front camera module, BINGO, I got ambient light sensor function back!!

    SO personally I conclude that module above the front camera, that looks sort of like three parallel resistors with a shiny square thing on top, is the ambient light sensor!! I’ll put a note like this in the front camera replacement guide as well.

    [Moderators, if it’s possible to change “front camera replacement” to “front camera and ambient light sensor replacement,” in the guides list, I think it would be helpful. It doesn’t really need a separate guide, but it would perhaps help other people to know where the ambient light sensor is and how to swap it.]

    Bonnie Baxter -

  13. DnSKZsGuVvKH3DtH
    DnSKZsGuVvKH3DtH
    y42sCBarJNdcYf6m
    • iPad 4 Repairability Score: 2 out of 10 (10 is easiest to repair)

    • The LCD is easy to remove once the front panel is gone.

    • The battery is not soldered to the logic board, making the replacement process a tad less difficult.

    • Just like in the iPad 2 & 3, the front panel is glued to the rest of the device, greatly increasing the chances of cracking the glass when trying to remove it.

    • Gobs, gobs, and gobs of adhesive hold everything in place, including the prone-to-start-a-fire-if-punctured battery.

    • The LCD has foam sticky tape adhering it to the front panel, increasing chances of it being shattered during disassembly.

    • You can't access the front panel's connector until you remove the LCD.

Brittany McCrigler

Mitglied seit: 05/03/12

88148 Reputation

14 Kommentare

home 键是最大的改变

Green Zhu -

Be careful with the home button flex!

iTiger Repair -

I know! I tore mine. Does anyone know where to get a replacement?

Aliases Poopoo -

can the home button flex be torn taking the glass out or is it if your trying to remove the flex it's self.

keith -

I assume also from because they dont comment on the glass that it is the same as the ipad 3 glass?

keith -

the home button flex got me too on a ipad mini 3

tjunk2000 -

grip a phone an swap it

Bufu -

Can anyone confirm that only LG panels are being used?

Shaune Ng -

我觉得iPad 4就数据线接口位置变化大,如果不看接口,大体上看区别不是很大。

GaoYuming -

Be careful when removing glass - home button and touch panel ribbons are located to the bottom left side of the ipad. I've just taken my apart to clean screen from dust . It was easy. Regret I haven't done it earlier, as soon as saw first dust particles, as it had permanently scratched the lcd. But those scratches / dots are still transparent.

aziz108 -

where is cellular antennas replacement i need to know how to replace all 3 antennas on the top am missing 3rd cable connector

Pet Pedro -

Our iPad 4’s touch screen is so badly damaged that it just flops over whenever it is placed vertically. though it is now completely unresponsive to touches. disassembly was really, really easy because of it being so damaged, nothing was stuck to anything, in terms of screen and touch screen.

The Liamerator -

Where is the wifi cable? I've replaced the battery and now the wifi doesn't working - thinking I may have not reconnected something properly...

Jo M -

Love your inclusion of a hot chocolate 'break'.

dschind -