Einleitung

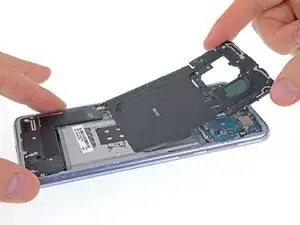
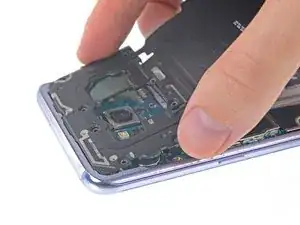
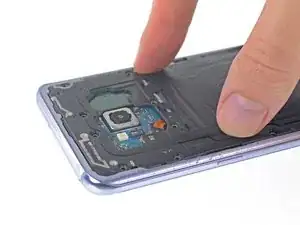
Voraussetzung für weitere Reparaturen

  1. OJ4EoNU6lvwmrn6C
    OJ4EoNU6lvwmrn6C
    To1LTjPvpNYBtFZS
    • Entferne die elf 3,7 mm Kreuzschlitzschrauben, welche die kabelloses Ladespule und die Antenneneinheit befestigen.

    • Wenn du Schwierigkeiten hast, manche der Schrauben zu entfernen, selbst wenn sie ganz herausgedreht sind, kannst du sie mit einer Pinzette herausziehen.

  2. FJR1UamlLtD33TiP
    FJR1UamlLtD33TiP
    YmP6Jkay2FaRacuO
    • Die kabellose Ladespule und Antenneneinheit wird noch mit kleinen Plastikklammern festgehalten.

    • Heble an den markierten Stellen den Kunststoff hoch, um die Klammern zu lösen.

    The spudger tool has a pointy end and a flat end, it’s not clear which end should be used. Furthermore, the flat end is too wide to insert into the area shown, so the pointy end would seem obvious, but there is no clear indication whether it should be used to push any tabs in the area referenced, which I couldn’t find any, or if you’re meant to just sort of pry it in there until the area pops up, which is what I had to do. Then use the flat end of the spudger to lift it up gently after releasing, or popping the opposite side up as well.

    Mark Velasco -

    Unlike its smaller sibling, the Galaxy S8, this model's assembly is tightly attached; not easy to remove. I tried different ways. The one way that worked for me was to

    1. pry a little on the small notch (in the marked area on the side with the Power button) using the tip of the pick, then

    2. lift a little that part, sufficiently to insert a opening pick as support, then

    3. used the flat edge of the pick to pop free that side of the assembly. Then

    4. used the tip of the pick to pry on the little notch on the opposite side (the side with Bixby and Volume buttons) to release the assembly.

    You have to slide it out a little in order to disengage the small plastic clips at the top of the assembly from the frame.

    PilotFerdi -

  3. nf1GEgcgcLaIkBMN
    nf1GEgcgcLaIkBMN
    h2Qa2QyaMIa42H46
    NeAUnJrySrOeycWx
    • Entferne die kabellose Ladespule und die Antenneneinheit.

    • Setze beim Zusammenbau zuerst die Oberkante der Einheit in den Rahmen des Smartphones ein und drücke dann den Rest der Einheit nach unten, damit er einrastet.

  4. PGrD2RYGY2WXySuo
    PGrD2RYGY2WXySuo
    dZUELWBeMCugsJZR
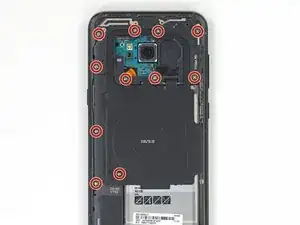
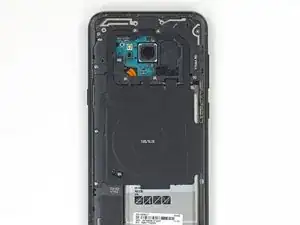
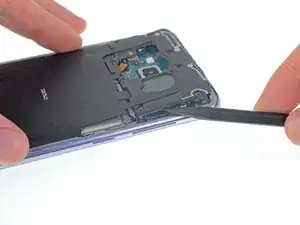
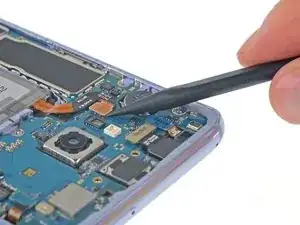
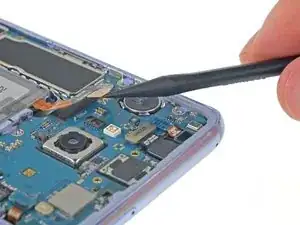
    • Heble den Akkustecker mit einem Spudger gerade aus seinem Anschluss hoch und trenne so den Akku ab.
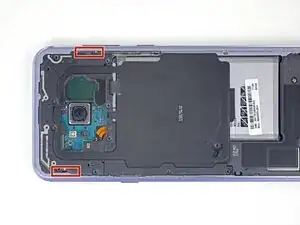
Abschluss

Um dein Gerät wieder zusammenzusetzen, folge den Schritten in umgekehrter Reihenfolge.

Jeff Suovanen

Mitglied seit: 06/08/13

442488 Reputation

0 Kommentare