
Einleitung
Ersatzteile
-
-
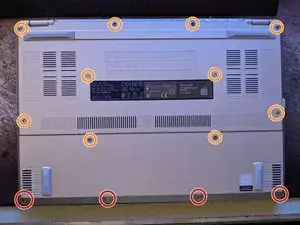
Beginne damit, die Bodenplatte abzuschrauben. Es gibt zwei unterschiedliche Schraubengrößen.
-
Die rot markierten sind die kurzen Schrauben, die orange markierten sind die langen.
-
-
-
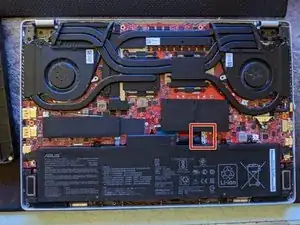
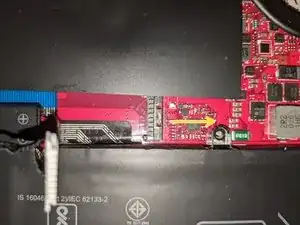
Drücke mit einem Spudger aus Kunststoff die Halteklammer für den Akkustecker zurück. Es ist eine Gleitbewegung, also schiebe sie nach rechts, wobei der Akku am nächsten zu dir sein sollte.
-
-
-
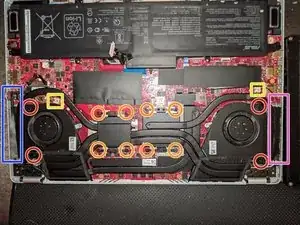
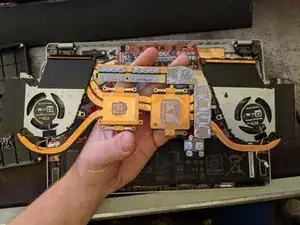
Die Schrauben, die den Kühlerkörper halten, sind rot und orange markiert.
-
Die Strom- und Signalkabel für die Lüfter sind gelb markiert. Nutze einen Plastikspudger, um den Stecker langsam auszustecken.
-
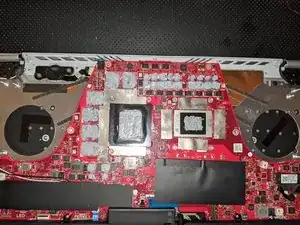
Hebel mit der flachen Seite desselben Spudgers um die beiden Matrizen herum. Die alte Wärmeleitpaste wird ein wenig Widerstand leisten, also lass dir Zeit.
-
Stecke vorsichtig das blau markierte mit Plastik verdeckte Displaykabel ganz links aus.
-
Stecke nun die pink markierten und von Plastik verdeckten WLAN Koaxialkabel (schwarz und weiß) ganz rechts aus.
-
-
-
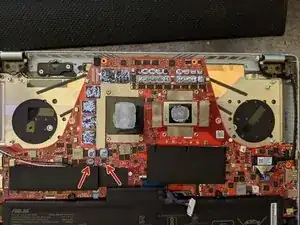
Du kannst sehen, wo die Wärmeleitpaste war, achte darauf die neue Wärmeleitpaste an genau den gleichen Stellen aufzutragen.
-
Entferne die alte Wärmeleitpaste mithilfe von Reinigungsalkohol, Küchenpapier und dem flachen Ende eines Spudgers.
-
Ich habe einen Plastikspudger benutzt, um die Wärmeleitpaste sorgfältig auf den Chips zu verteilen.
-
-
-
Ersetze den Kühler, indem du die Anweisung in Schritt drei in umgekehrter Reihenfolge befolgst.
-
-
-
Beende die Reparatur, indem du die Bodenplatte wieder anschraubst.
-
Es gibt zwei verschiedene Schraubengrößen:
-
Die im Bild rot markiert Schrauben sind kurz.
-
Die im Bild orange markiert Schrauben sind lang.
-
-
-
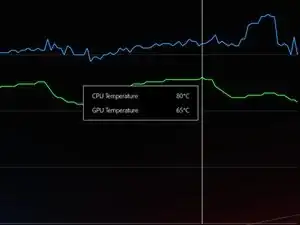
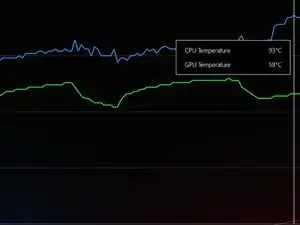
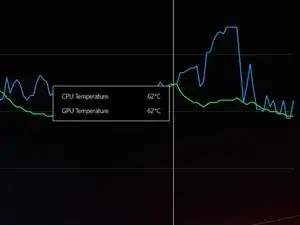
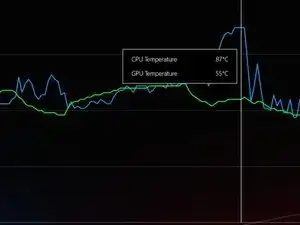
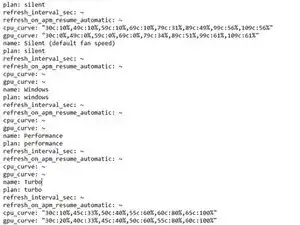
Für diesen Test habe ich 3DMark Time Spy ohne die Demo mit einer angepassten Lüftereinstellung benutzt. Das Profil war für beide Tests auf Turbo eingestellt.
-
Um dein Gerät wieder zusammenzubauen, folge den Schritten in umgekehrter Reihenfolge.
10 Kommentare
I used metal tweezers and my laptop won’t turn on now. What did I do?
Mason -
Did you manage to get an answer to this? I didn't use metal tweezers but my laptop won't turn on and it's blinking as if it's trying to run but it can't!
Open up chips and look if there are cracks on chips, if there are, then you got a dead chip.
You have probably created a spark between the tweezers and the laptop circuit while the battery power is still on, bring it to a repair shop that provides micro soldering service and let them fix it.
Jerry Li -
I followed this and even used ifixit tools and now my laptop won't boot. No bios, no charge light, no cpu light, no fans. I followed it exactly, grounded myself, didn't touch the motherboard, didn't even get up as to not accidentally generate static, worked on concrete and a wooden table, none of the connections are loose or damaged. It just won't turn on. What happened and how can I fix it?
I’d go in and check for any connections on the motherboard that you may have missed and also look out for any broken ones. Try reseating any connections such as the battery connector and display cable.
For anybody using this method leave it for a professional or risk frying your motherboard. It's a death trap. Once the metal plug gets in contact with your mother board it fries everything. I need re pasting but haven't tried this method. I'm scared to.
Sunfin -
I recently did this. Some things I would amend however.
In step 2, when the battery is unplugged push the power button 3-5 times and hold it down for 5-10 seconds, just in case the capacitors are still holding charge. This might be what happened to the user who had his device short.
I left the coaxial cables attached, in step 3, and just removed the screw holding in the Wi-Fi card, moving the whole assembly aside.
Also in step 5, I had issues with the power connector. I had to redo the connection several times before the device turned on.
It's not mentioned anywhere, but you should definitely have a small brush ready to clean the fans. If you are scared of doing the re-paste, cleaning the fans out may do enough to get you by.
Lastly, I used 3.5g of Noctua NT-H2. I was nervous that 1g of paste wouldn't be enough, and I think that was a good assumption. I've seen several posts/videos that suggest using K5 Pro on the VRM's, it doesn't appear that's needed, but we shall find out.