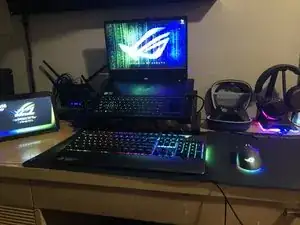
Einleitung

Dies ist ein sehr simpler Teardown/ simple Reparatur/ Upgrade, wie auch immer man es nennen mag. Aber für die Menschen die neu mit Reparaturen anfangen haben, werde ich es herunterbrechen in eine einfache Anleitung. Ich führe dies mit dem GX531GS von Asus durch, doch der Auseinanderbau ist sehr ähnlich bei allen Asus Zephyrus Gaming Laptops mit der vorgesetzten Tastatur.

  1. HWAEPFkJGHDWpJL2
    HWAEPFkJGHDWpJL2
    5nQ11RrCX33QSLyl
    kyEW5mPqY6kPFWXk
    • Stecke alles, was von außen an das Laptop angeschlossen ist, aus.

    • Schalte das Laptop komplett ab.

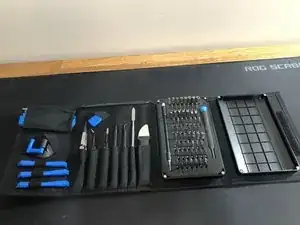
    • Stelle sicher, dass du diene Werkzeuge beisammen und genug Platz hast, ungestört zu arbeiten

  2. RPtFlFIYju5HthYS
    RPtFlFIYju5HthYS
    JQkOM6wD2TP2aWTA
    LHgRGyUUyPyJ4xqL
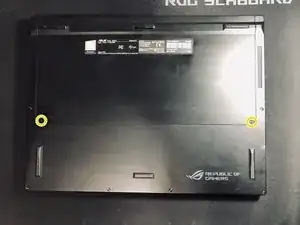
    • Drehe das Laptop um und entferne die 4 PH0-Schrauben.

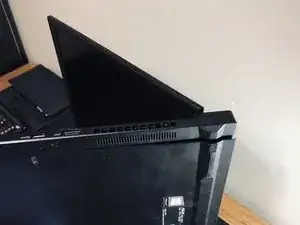
    • Öffne das Laptop zu ungefähr 45° und drehe es auf die Seite, wie im Bild gezeigt. Aus dieser Position kannst du die Abdeckung einfach herausziehen.

    • Wenn du Probleme hast, öffne oder schließe die Abdeckung ein wenig. Wenn du die richtige Position gefunden hast, benötigt man keine Kraft und man kann sie einfach herausziehen.

  3. Wph4nySNW3ar33OY
    Wph4nySNW3ar33OY
    HcGZIqjlYkcJPtDi
    pxpHHUCrdRXEO1fJ
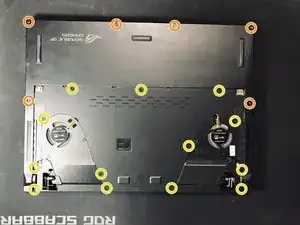
    • Entferne die 13 PH0-Schrauben

    • Du musst nur die eingekreisten Schrauben entfernst. Es gibt einige, die nicht entfernt werden müssen.

    • Entferne die 6 Torx T5-Schrauben

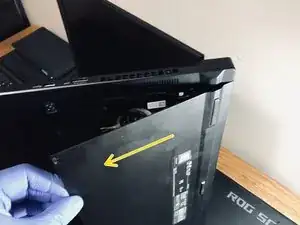
    • Drehe das Laptop um und heble vorsichtig unter der Abdeckung, wie in Bild 2 gezeigt.

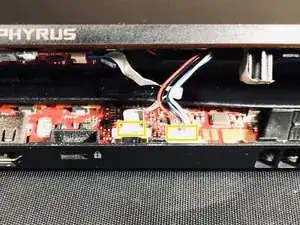
    • Sobald sie gelöst ist, ziehe die zwei gelb markierten Kabel die an das Mainboard angeschlossen sind, wie in Bild 3 gezeigt.

    what are those cables for ?

    Can Daryal -

    The big 4-way plug is the speaker connector.

    The small ribbon cable is for the power status, HDD status and the charging LED’s.

    J P -

  4. IDRiZINVAST1nmPZ
    IDRiZINVAST1nmPZ
    qUWIVWDplGQukEjk
    VNHXELWl5dRi42UX
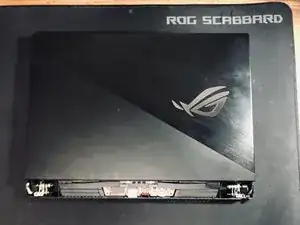
    • Es sollte nun wie in Bild 1 aussehen.

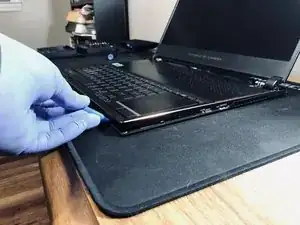
    • Öffne den Deckel des Laptops. Heble an der Kante(Bild 2 und 3).

    • Arbeite dich um das gesamte Gehäuse herum, bis es Komplett gelöst ist, aber hebe die Tastatur noch nicht hoch.

  5. R2fGI6DZWUUoTKfW
    R2fGI6DZWUUoTKfW
    5GVcgQXkArg3PoqR
    DWYQVpEnLRiHcpnu
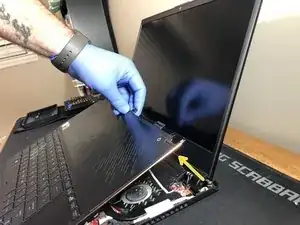
    • Hebe die Tastatur sehr vorsichtig von der Seite, welche am nächsten an dem Bildschirm liegt. Hebe jedoch nicht so weit das die Kabel unter Spannung stehen.

    • Wenn du genug Platz hast um hineinzugreifen kannst du die 4 ZIF-Verbinder lösen und die gesamte Tastatur beiseitelegen.

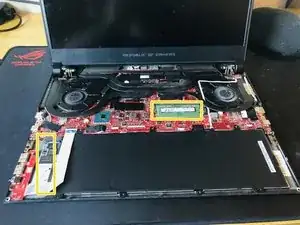
    • Das Laptop sollte nun offen vor dir liegen.

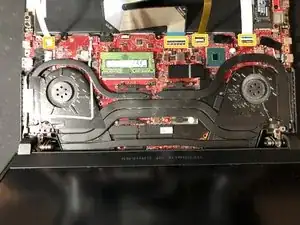
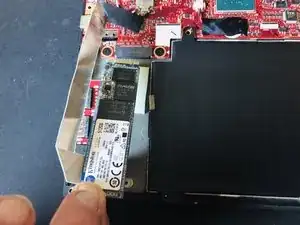
    • Entferne die SSD und die RAM.

  6. 2UutSvIAlHg2LSVb
    2UutSvIAlHg2LSVb
    W1MGsKQjpq2YxYfk
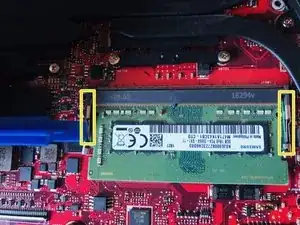
    • Drücke die Halterung rechts und links von der RAM nach außen. Die RAM wird in einem 45° Winkel vom Mainboard abstehen. Du kannst sie einfach herausziehen.

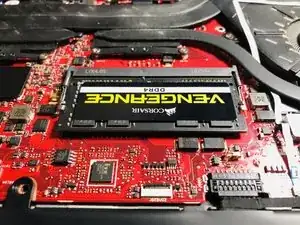
    • Nehme deine neue RAM und drücke sie runter bis es klickt und sie fest an ihrem Platz sitzt.

  7. EAg1CkYdEXIE6Dyw
    EAg1CkYdEXIE6Dyw
    UVFuDZUTEN5nfnVh
    hpA2qUCbRUIYEehT
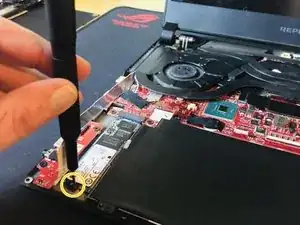
    • Falte das Kabel welches die SSD verdeckt und entferne die Schraube.

    • Hebe die Festplatte vorsichtig am selben Ende nach oben, bis sich das darunter liegende Wärmeleitpad löst. Sobald man das Pad gelöst hat, kann man die SSD aus ihrem Sockel ziehen.

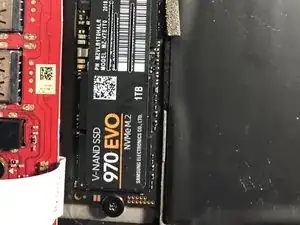
    • Installiere die neue SSD und sichere sie mit der Schraube.

    what size of nvme 80 or 110

    NARUTO -

    Hey, sorry this reply took so long. I Didn’t catch the email when it first showed up. If you still need to know, it is 2280.

    TooMuchSauce -

  8. lM2hXVXaxPdeWgvC
    lM2hXVXaxPdeWgvC
    ZKWjPni3roie6rmu
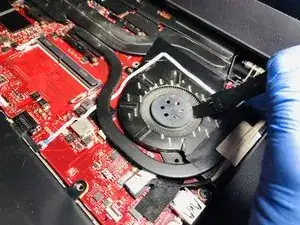
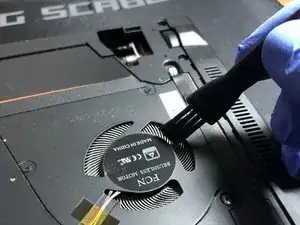
    • Reinige die Lüfter von oben und von unten. Entferne so viel Staub wie möglich. Sobald du fertig bist, baust du ihn in umgekehrter Reihenfolge wieder zusammen.

Abschluss

Um Ihr Gerät wieder zusammenzusetzen, folge den Schritten in umgekehrter Reihenfolge.

TooMuchSauce

Mitglied seit: 30/12/18

1533 Reputation

34 Kommentare

What about the software on the old drive, operating system and all? How to clone the m.2 drive?

Steve Del Hoyo -

I used an external m.2 enclosure like the one I’ll link below and the free maxium reflect software to clone my existing drive. Once the swap is completed you can use the enclosure with your old ssd as an external drive if you want. https://www.amazon.com/Sabrent-NGFF-Alum...

TooMuchSauce -

The $12 or $45 one? There are two on that Amazon link

willshahbazian -

The product on that link has changed but I would use the $50 one depending on the SSD you buy.

TooMuchSauce -

Thank you! It worked for me

willshahbazian -

Thank you for the clear instructions with screen shots. Replaced memory and nvme M. 2 drive on my laptop and working great.

Venkat Tummala -

Probably a very long shot but considering the memory is a 2666 do you think this 32gb ram module would be compatible?

https://www.scan.co.uk/products/32gb-1x3...

Vitor Leitão -

I considered that same 32gb stick. ASUS lists the laptop capable of up to 24gb of ram but upgrade websites sell the laptop with 40gb. So the 32 go can work I just don’t know if they had to update the bios to make it work. Just remember that you have 8 GB soldered to the board and if you put anything other than 8 GB in the slot you will lose dual channel mode. This will cause you to lose performance in games but game performance in activities that are taxing on memory. I actually switched mine back to the 8 GB stick after I did these upgrades.

TooMuchSauce -

Zephyrus S models can only handle 24GB RAM one is attached to the motherboard (8GB), so the biggest one is 16GB

Rolando Fuentes -

I just followed this and upgraded my laptop with a single 32GB Crucial stick and it worked without having make any BIOS changes. So now my laptop has a total of 40GB. I use it for game dev and it works just fine

Abey Miranda -

Hello, do you have the specs of the SDD? Samsung is faster? Did you notice?

The enclosure you post seems that not work with this kind of SSD… I like the idea…but want to be sure

Thanks!!!

Rolando Fuentes -

Hi, I upgraded the SSD mainly for more storage space. The Samsung drive is faster but I did not notice any difference in load times or anything like that.

TooMuchSauce -

Can you answer Roland Fuentes question about the enclosure you linked not working with the kind of SSD you have pictured. The amazon link specifically states “Note: It doesn’t support M.2 NVMe PCIe SSDs” which is the pictured SSD you use. Curious if you used this enclosure to clone on the new samsung SSD because I’d like to do this upgrade myself.

Jeff Redland -

Hey, sorry this reply took so long. I havent checked ifixit in a while. The enclosure worked fine for me. I only used it to clone my drive. Im not sure if it ran at full NVME speeds but it worked fine. I shopped around for quite a while because I wasnt sure what to buy because the drive that comes in the Zephyrus is keyed different than the Samsung (*original has 2 slots and Samsung has 1) even though they are both NVME. I took a chance on that enclosure and it worked.

TooMuchSauce -

Just wanted to say thanks for super clear instructions and screenshots you made for this guide. I used it to upgrade my son’s Asus ROG Zephyrus S with a Samsun EVO 970 Plus 1TB drive.

I used Macrium Reflect Home edition (Free) to clone his old 512GB INTEL M.2 SSD that came with the laptop to his new Samsung Evo.

If anyone needs the instructions on how to clone the disk with Macrium Reflect the easy way, you can find them here: Cloning a disk

Also in case you are not proficient in this process, please remember that when cloning the disks all 4 Windows partitions will clone as they are on the old disk. This means that in order to expand the OS partition to use all available SSD space, you will most likely have to manually add first 3 partitions (EFI, MSR, Recovery) to your destination, and then lastly manually add OS partition, to be able to expand it (dragging the slider) to use up all available space.

Hooba -

This is great! I have taken apart hundreds of laptops in my 30+ years working on computers and it is a rare treat to have such a perfectly documented road map to follow rather than just start unscrewing and prying. Thank you very much for posting this.

bgsbnyzx11 -

One or more of my fans are making a new noise intermittently at low rpms . I’ve contacted asus but they don’t sell the fans so I could replace them. Anyone have any advice what I can do to find new fans that fit in my gx531gs?

Larry Ortiz -

Hi, I have the same exact problem with my zephyrus m gu502gu , it appears that rattling sound is produced by the fan being off axis ,this seems to occur only at low rpm’ s , at higher rpm’ s the fan is able to recenter itself , hence the rattling sound disappearing. i was able to find a replacement fan on aliexpress , just by typing the fan model name in the search bar. Ting to re-lubricate the fans with mineral oil yielded no success them being brush less fans.

Mihai Croitoru -

how should i remove the heat sink to repaste thermal compund on it

Shrirang Khachane -

I never did the repaste but I found this video showing how to on a GX701 Zephyrus S. https://www.youtube.com/watch?reload=9&v... It is in Chinese but you can still follow it easily.

TooMuchSauce -

I got to the remove keyboard step and could not proceed. Something was holding the keyboard down. I couldn’t get in there enough to see what it was clearly but it looked like a ribbon cable had been taped down or something. Any advice or ideas?

alex mage -

The most likely answer is that you maybe forgot to remove a screw. It is unlikely a taped down ribbon cable but not impossible. They would’ve needed it open far enough to get their hand in there to tape it. Is any of the keyboard coming free? Are you disassembling the same model as the one in the guide?

TooMuchSauce -

Ok, on my model, GX631GW I had the exact same problem.

The keyboard was stuck to the battery and when I was trying to remove the keyboard it was lifting the battery up as well, right in the middle of the laptop.

After getting it apart I couldn’t find any trace of an adhesive or double sided tape.

My guess is that the standoff that is embedded on the keyboard side gets stuck inside the opening in the battery frame.

The easiest way to free them is to start by going to the left side of the laptop, prop the two parts apart just far enough so that with a light you can inspect the inside.

Verify that your laptop is stuck at the same point as mine!

Then, with a long, thin, plastic tool, wedge between the standoff and the battery frame and twist to push them apart (imagine twisting a flat head between two surfaces, it should cam and push the two apart).

Then continue on to the next steps in the guide.

This is a crucial step, ensure that you don’t snag the ribbon cables at this point because parts can be difficult to get.

J P -

Good Night,

Just made all the operation and switched from the original intel to the WD Blue SN550 1TB but the Notebook seems not to recognize the SDD.

The notebook get stuck into the first screen and I could not put it to get to the BIOS. When I´ve put back the old SSD it comes back to work normally.

Any tip ?

DANIEL TAVARES -

hi, can u please advice me if the W , A, D,S and SPACE BAR can be replace, there is some wear down

daniel hdz -

Hey, I wish I could help but the touchpad went out on mine and I’ve yet to find a replacement. The only keyboard/touchpad parts I’ve been able to find are on ebay and it’s either just the metal frame or its the entire assembly in used condition for $300-500 which I refuse to pay. I contacted ASUS directly and they said they wont sell parts like that. You have to send your laptop in for service which also costs a fortune. Sorry man.

TooMuchSauce -

Muchas gracias!!!!!!!! me salvaste, mi computadora hacia ruido en el cooler, y la limpie y le puse WB40, ahora funciona perfecto!!! gracias

Lucas Recoaro -

Hello, Your guide is pretty comprehensive, keep up the good work.

I had a couple of questions.

I have an Asus Zephyrus S GX531-GWR ,

is it possible to run 2 external monitors (not mirroring) for this Laptop?

Hiren patel -

Hey. Yes you can add a 32gb stick. And I extend my desktop ina triple monitor setup daily. It handles it with ease.

TooMuchSauce -

I'm really interested to know the difference in performance between the standard 16GB dual channel memory setup and an upgraded version to 40GB, would you mind sharing a benchmark that includes your RAM speed? It would be a huge job to install new memory just for it to be inadequate from a performance standpoint and I'd like to only have to open up the laptop once as I'm already doing a battery replacement.

Thanks for any advice.

J P -

Do you have any information or where I can get the schematics of the motherboard of the asus gs531gs

Edison Salazar -

once you add the new SSD how do you get the computer to use the new SSD as well as the original

David Smith -

i would recommend cloning your original ssd using an external dock or adapter. I purchased a UGREEN brand Sata / NVME hard drive enclosure and then used it to clone my original ssd and put in a 2TB ssd in the laptop. Afterwards now I have the original ssd as a backup device in the enclosure now.

robert ratliff -

Is there a way to bypass the connection to allow for the bios screen to appear on an external HDMI screen? I've updated my RAM and SSD, but as the display is having issues, I cannot accept the new updates

Dave Martin -