Einleitung

In dieser Anleitung wird gezeigt, wie der Akku eines Dell XPS 13 9360 Laptops ausgetauscht wird. Die Bilder und Informationen in dieser Anleitung stammen aus der Bedienungsanleitung dieses Computers.

  1. PmAyxVBqXypG5tyT
    • Öffne die Klappe der Systemabdeckung mit deinen Fingerspitzen.

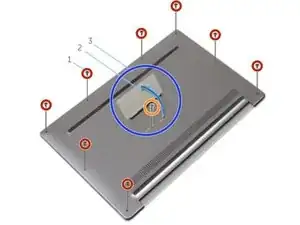
    • Entferne die Schraube (M1,6x6), mit der das untere Gehäuse an der Handballenauflage befestigt ist.

    • Entferne die acht Schrauben (M2x3, Torx), mit denen das untere Gehäuse an der Handballenauflage befestigt ist.

  2. 6IuTtlqeSgtJtfOw
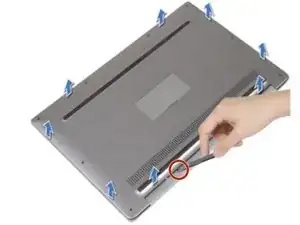
    • Heble das untere Gehäuse vom hinteren Ende des Computers aus mit einem Spudger aus Kunststoff ab.

    • Hebe das untere Gehäuse von der Handballenauflage ab.

  3. 1LgycUAY2lKxXmtk
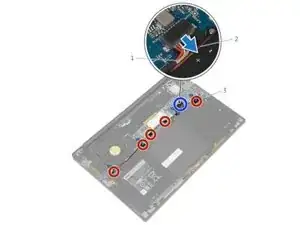
    • Trenne das Akkukabel von der Systemplatine.

    • Ziehe das Klebeband ab, mit dem das Lautsprecherkabel am Akku befestigt ist.

    I didn't have any such tape, took me a few minutes to figure out

    calle -

    There was a little adhesive foam protective pad placed on top of the seam between the battery cable connector and cable receptacle on the computer. Peel off the foam pad in order to separate the connector from receptacle. It detatches simply by sliding it out from the receptacle body. This is easy by curling index finger resting the finger nail on top of the connector, almost like you would scratch an itch. (This was the only part of the repair that was challenging, because not obvious how to do it with the foam pad stuck on the connector.)

    JRK -

    The battery connector has a small nub in the centre that holds it in. Once you remove the foam pad on top, you might need to press lightly in on that nub while you pry the connector out from the edge.

    Pete Goodall -

  4. yJTMGn2dOLfG1hZv
    • Entferne die Schraube (M1,6x4), mit der der Akku an der Handballenauflage befestigt ist.

    • Entferne die drei Schrauben (M2x2), mit denen der Akku an der Handballenauflage befestigt ist.

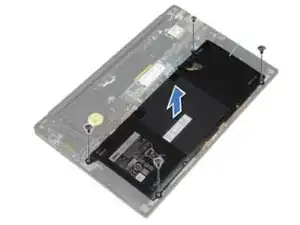
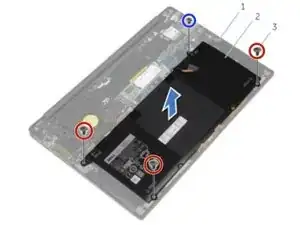
    • Hebe den Akku von der Handballenauflage ab.

    • Drehe den Computer um, öffne das Display, und drücke die Netztaste etwa 5 Sekunden lang, um den Computer zu erden.

    Bonsoir

    Merci d ajouter dans la procédure qu il faut également débrancher rebrancher la pile CMOS. Et suivre les instructions à suivante si le portable ne veut plus démarrer comme ça a été le cas pour moi. Je me suis fait une belle frayeur 😱

    https://www.dell.com/community/fr/conver...

    Maxfacel -

Abschluss

Um den Akku zu ersetzen und dein Gerät wieder zusammenzubauen, folge den Schritten dieser Anleitung in umgekehrter Reihenfolge.

Max Kletskov

Mitglied seit: 22/04/20

41027 Reputation

17 Kommentare

Thank you for the guide! This was not too tough a repair and now my laptop is as good as new!

Russ Williston -

Took me about ten minutes to do this on my spouse’s laptop. The parts that took the most time were unplugging the battery and peeling the speaker wire tape. I suspect someone that’s never opened a consumer electronic before could get this fix done in 10 - 40 minutes.

Christopher Hall -

I had some problems with the M2x2 screw on the lower left corner of the battery, which almost got stripped using the Phillips #0 from the iFixit kit. I had to remove the other screws first and then rotate the battery around the remaining one to loosen it a bit, then managed to unscrew it with the Phillips #1.

José Luis -

So impressed with the quality of the website, the clarity if the guide, the quality of the toolkit, all the packaging, and not least, the whole attitude and ethos of the company about avoiding waste and empowering self-help. A+, 5☆ rating all around.

JRK -

Great.
My battery had already been replaced by a Dell repair technician, so I found I had to temporarily displace a taped pair of wires, otherwise no pitfalls.
Other than the case is razor-sharp - beware running the spudger along the edge that you don't cut your fingers!

Patrick Martin -

Absolutely wonderful.

Took less than 10 minutes.

Omar J -

For me, this was not so straight forward like for everyone else.

After I put in the new battery, the laptop was completely dead, not a single sign of life. Also with the old battery, it did not boot anymore, nor with the charging cable. All appeared to be, as if the motherboard got fried or something.

I actually managed to get it running again. I think the trick was to disconnect the battery, as well as the small CMOS battery (on the right side of the big battery, small and round) for at least 10 minutes. Afterwards, my computer booted normally again, and everything was good, even with the new battery.

This appears to be some strange Dell issue, but luckily I got it fixed. I hope this helps someone in the future!

Cheers

DesperateCookie -

Thank you! This definitely helped me. Mine also was dead after following the battery replacement instructions and because I saw your post, I followed your instructions and got back on track. I really appreciated your post.

jgprus -

Thanks

Got the same issue on my xps, completely dead after battery replacement. It has works with CMOS tips 👍

Maxfacel -

The instructions were great. Took a little bit of creative thinking to remove two screws. Saved myself $80 for a tech.to replace the battery. Ian MV

Ian MV -

Wonderful guide, thank you! Made this replacement extremely painless, took about 15 minutes overall and the laptop is happily charging up now :)

dumpsterqueen -

The instructions were clear, and it took me about 20 minutes to complete. The battery is charging now - so far so good!

Ben Hopkins -

First ifixit repair. instructions were very clear. time estimates are accurate. Thanks so much!!

JayD -

Many thanks. This worked perfectly.

Christian Meißner -

Thanks for this guide. I thought the battery replacement process would be quite more difficult due to how compacted this laptop is, but I have to admit it's a quite easy and achievable task which oneself can do.

My old battery lasted around 10-15 minutes, which required the laptop to be always plugged, and now I can use without any chords again :)

Orestes Cifre -

I ordered this replacement in 2022, and recently my laptop has been giving me the error the battery is not OEM so it won’t recognize it anymore. Does anyone have a fix for this? I have tried the unplug AC, unplug batter, plug AC, boot normally shut down, plug battery back in and it works for a few seconds when I boot it back up and then then the laptop just force shuts down.

rudra patel -

I'm happy I ordered the kit, including the Essential Electronics Toolkit; it made the battery replacement process go quite smoothly. Info for first-timers like me: don't be alarmed by the effort required to pry off the back cover once the screws have been removed. If you have the right tools and proceed gently but with authority it will come off and the rest of the project is very straightforward when you follow the guide. Un-plug of the old battery and plug-in of the new one were a bit challenging, but just look everything over with a magnifying glass before you begin and again, be gentle. My battery is now doing the initial calibration routine but it looks like this will turn out to have been a good quality fix.

David Williams -