Einleitung

Für die aktualisierte Version der Anleitung hier klicken. Diese Anleitung ist nur für historische Zwecke archiviert.


  1. d4dlLhKy4BBopKMR
    d4dlLhKy4BBopKMR
    k2WqKJVEtDes4Ca2
    • Entferne acht 4 mm Torx T5 Schrauben von der Rückabdeckung.

    Missing a step about removing the tiny Phillips head screw under the XPS flip up cover in the middle. Also, there are hooks all the way around the cover so it doesn’t simply lift off.

    curtis_p_brown -

    What about step 3???

    Peter Hecht -

    Please dont hurry , take your Time to follow this procedure. It takes 20 min (not 5) and step 4 requires half of this Time. Good luck.

    Peter Hecht -

    +1 Peter Hecht is right - getting the little clips the back is snapped on with is time consuming and a bit fiddly for people not used to “spudging” off covers. Starting from the back is the key those come loose much easier and help with the rest

    Doug Steinschneider -

    Great guide. It took me 20 minutes and there were no surprises. Battery installed. :)

    dhenniga -

  2. 2TNJ3aF1OiC3dQrY
    2TNJ3aF1OiC3dQrY
    RKMGHiGBGvwUs2b6
    • Heble mit einem Plastiköffnungswerkzeug die mit "XPS" markierte Klappe in der Mitte auf.

    No flap or screw on the XPS 9370, just a press-fit latch at the centre of the cover. This can be gently prised off.

    Alan Thomas -

  3. TtZb5DNBruSpJQiH
    • Entferne die einzelne Kreuzschlitzschraube unter der Klappe.

    XPS 13 9370 doesn't have it.

    Kes Bond -

  4. SV3vQLxNPuaLAJc2
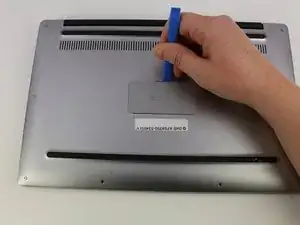
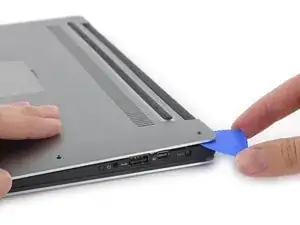
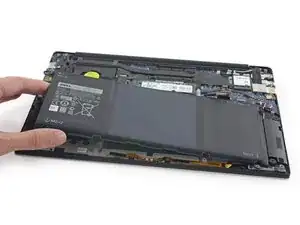
    • Heble mit Plektren oder einem Plastikwerkzeug die Gehäuseklammern auf. Beginne dabei an der hinteren Kante.

    It’s not that easy to lift actually, cause there are latches. Had t release them gently all around beforehand.

    Davit Barbakadze -

    Also there’s one additional screw under that plate on the bottom!

    Davit Barbakadze -

    Maybe the later models are different, since it should be from the front: https://www.youtube.com/watch?v=xFIE2SKs...

    shigmas -

    Very difficult step, Proceed very carefull

    Peter Hecht -

    If you are replacing the battery of a 9360 or latter (2016 onward) make sure to do the FRONT first. There are latches on the back that you may break if you try to force it open that way. After prying up the front and the sides, just lift up the front like you would open a hinged box. You shouldn’t feel that much resistance as the back hinges off towards you after you’ve lifted it around 30-40 degrees.

    Giacomo P -

    Very easy with XPS 13 9370 - just used my nails (rather short!)

    Kes Bond -

  5. SclHTlmfKvgauUBi
    • Entferne die untere Abdeckung.

    good evening, is there a site that sells the back part because it's broken

    marios cocka -

    good evening, is there a site that sells the

    back part because it's broken

    marios cocka -

  6. xOVtCEsgTbREfTYL
    xOVtCEsgTbREfTYL
    qFNPUbfQsBdlUaty
    • Entferne die vier 3 mm Kreuzschlitzschrauben #0 von jeder Ecke des Akkus.

    There are two additional screws holding sound speakers.

    Davit Barbakadze -

    And there is a another small screw holding the battery right above the “M1 6x4” print.

    curtis_p_brown -

    You also do not need to remove any speaker screws or the speaker, you just have to remove the tape holding the speaker wire to the battery.

    curtis_p_brown -

  7. HhDh3XGhuQo3WcrU
    HhDh3XGhuQo3WcrU
    LgMA5uGJwVaBDh5g
    • Das Batteriekabel mit dem Anschluss zum Akku ziehen, um es vom Anschluss zu trennen.

    • Nicht nach oben ziehen.

    This is a redundant step (disconnect the battery in step 6).

    William Cummings -

  8. XK14WEDKdKGuVOZe
    • Die Klebebänder lösen, die die Lautsprecherkabel am Akku befestigen.

    • Die Lautsprecher müssen nicht entfernt werden, nur das Klebeband, damit der Akku unter den Kabeln entfernt werden kann.

  9. pbfpsDnER5fqy4uy
    • Den Akku entfernen.

Abschluss

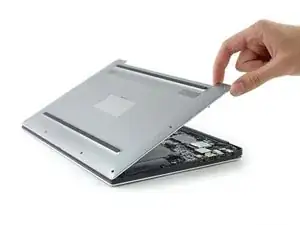
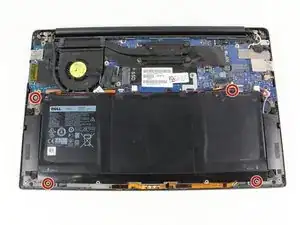
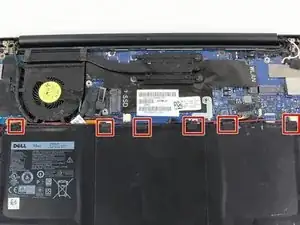
Um dein Gerät wieder zusammenzusetzen, folge den Schritten in umgekehrter Reihenfolge.

Ella Herrmann

Mitglied seit: 24/04/17

1696 Reputation

6 Kommentare

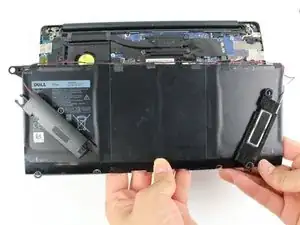
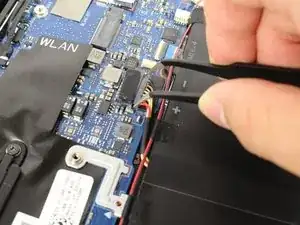
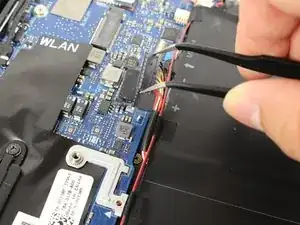
There is a #00 Phillips under the XPS cover on the bottom. Also one of the #0 screws holding the battery down is #00. It is not necessary to remove the speakers but the wires are taped to the battery so pick and remove the tape.

scott Brawner -

Took me about 45 minutes.

Couple of complexities:

1. The speaker removal, it’s easier just to unscrew and pull out that way. Moreover, it’s easier the same way to replace, the problem is if you push in the speakers can remain wobbly unless you properly attach to the flexible plastic things.

2. When replacing the screws on the battery, do the little screw first. It shows it on the images, but doesn’t mention it, it’s a different sized screw (step 3).

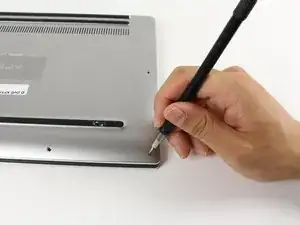
3. Removing the screws on the back of the laptop is tough unless you have a good screw driver. In the end, I bought one from China from Aliexpress that was bang on what I needed.

Daniel Offer -

Does anyone have a source for a replacement battery? I checked Amazon but reviews were sketchy at best.

Andrew Chervenak -

I was concerned about the Amazon reviews as well. I ordered my battery directly from Dell for $85.
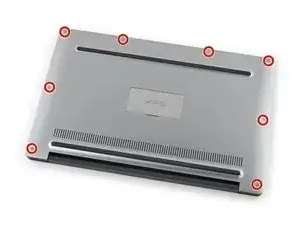
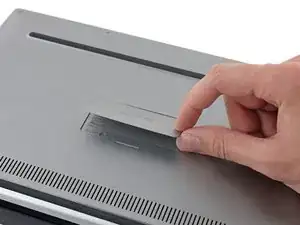
Samuel Adams -

Great guide! Came in real handy when I needed to replace a swollen battery.

Although the speaker removal part can be skipped completely.

Just remove the 4 Philip battery screws and peel off the black tapes securing the red/white speaker wires would be sufficient to allow the battery to slide right off.

Michael Wu -

Excellent guide. It took me about 20 minutes and I’m a complete novice to this stuff. I didn’t need to lift the speakers at all.

I got my battery from Duracell Direct (UK), for half the price Dell were charging and thanks to this guide giving me confidence I’ve made the change early enough that my keyboard has dropped straight back into shape and isn’t deformed any more. Am very happy. Thanks

MaddyL -