Einleitung

Mithilfe dieser Anleitung kannst du die CMOS Batterie in deinem Mac mini (2024) wechseln-

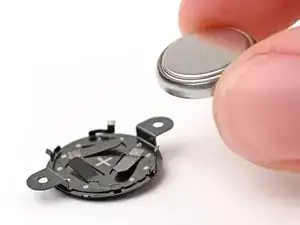
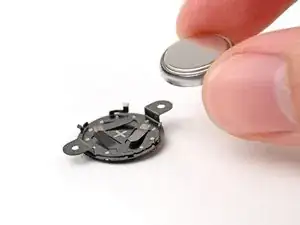
Die Batterie ist eine Standard 3V BR1632 Knopfzelle.

  1. 2AOCDRumFYCwLHDo
    2AOCDRumFYCwLHDo
    oPNVEBC3oT2PmroR
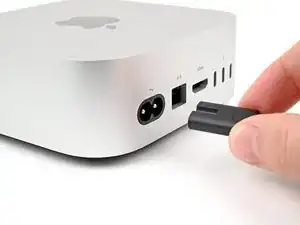
    • Fahre deinen Mac mini vollständig herunter und stecke alle Kabel ab.

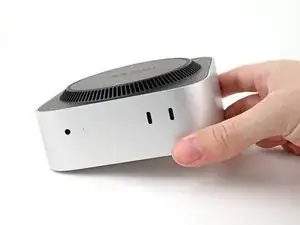
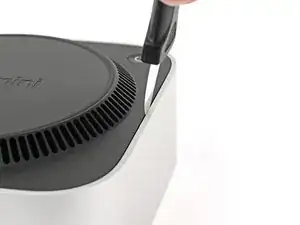
    • Drehe deinen Mac mini um und lege ihn auf eine saubere, flache Oberfläche, um Kratzer auf dem Gehäuse zu vermeiden.

    Den Mac vorm ausschalten noch vom Account trennen. Sonst kann es zu Schwierigkeiten bei der Neuanmeldung kommen.

    MacGyverModeOn -

  2. GAqAsFlbHCjSAv5v
    GAqAsFlbHCjSAv5v
    CRy6ImTIPFvNigGN
    XCXS3xLkfcRUsRMF
    • Ein Jimmys oder ein anderes Metallwerkzeug kann das Aluminiumgehäuse zerkratzen, funktioniert allerdings für diesen Schritt sehr gut. Folge der alternativen Anleitung um das Zerkratzen zu vermeiden.

    • Setze einen Jimmy in die Naht zwischen der Bodenplatte und dem Gehäuse ein.

    • Heble die Bodenplatte nach oben, bis ein Spalt entstanden ist.

    • Alternativ kannst du auch einen Spudger in einen Lüftungsschlitz stecken, so dass eine Lücke entsteht, die groß genug für ein Plektrum ist.

    • Lasse den Jimmy unter der Bodenplatte stecken.

    It is much easier to get the plastic "pick" under the cover by inserting it UNDER the metal blade (between the blade and the aluminum case) while the blade is more vertical, then bringing the blade down on top of the pick, forcing the fan cover edge up higher. From that position, the pick can easily be pushed in further under the cover and to one side. In other words, instead of putting the pick in OVER the metal blade as shown, put it UNDER. This also protects the aluminum from damage marks of the blade.

    SteveTheMonk -

  3. oIn1d3q2dsgFbK4P
    oIn1d3q2dsgFbK4P
    HqjtQvKCBFw2J4PR
    GqIosShyLUtCj1nG
    • Setze ein Plektrum in den eben erzeugten Spalt ein.

    • Entferne den Jimmy.

  4. a1s5oNAhMIPhEdZF
    a1s5oNAhMIPhEdZF
    OjcPUDbawZTxsBPI
    3iNDpG2UcdWeM3Wp
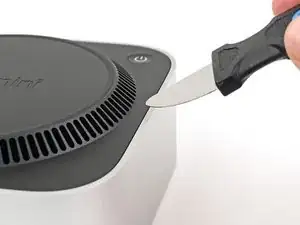
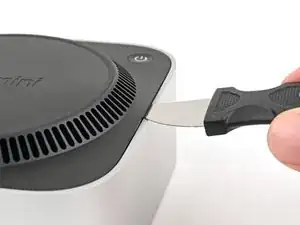
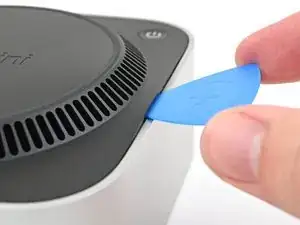
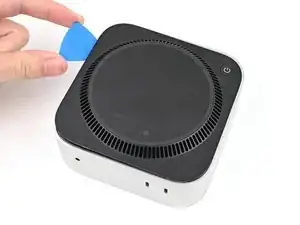
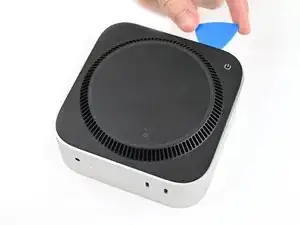
    • Schiebe das Plektrum an der Bodenplatte entlang, bis du spürst, dass es an einem Stift hängen bleibt.

    • Es gibt insgesamt vier Stifte—einen in jeder Ecke der Bodenplatte.

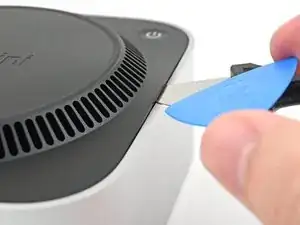
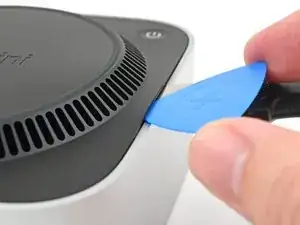
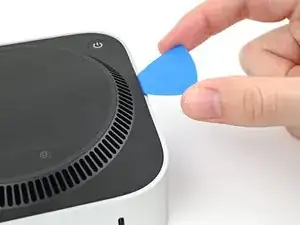
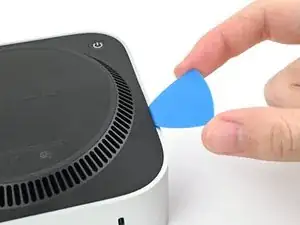
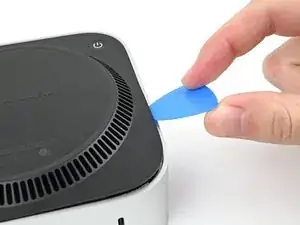
    • Verdrehen das Plektrum, um den Stift aus seiner Öffnung zu lösen.

  5. cOUhCJYM1rcSehRM
    cOUhCJYM1rcSehRM
    UdUOJBvlO1sVS62f
    RdtnPQiopAujHrbS
    • Fahre mit dem Plektrum weiter um die Bodenplatte herum, um alle Stifte zu lösen.

    • Setze das Plektrum nicht tiefer als etwa 2,5 cm ein, wenn du es in der Nähe der Einschalttaste entlang führst, du könntest sonst das Kabel beschädigen.

    • Drücke beim Zusammenbau fest um den Rand der Bodenplatte herum, bis du spürst und hörst, dass alle vier Stifte eingerastet sind.

    "Don't insert the pick more than an inch near the power button" is incorrect wording.

    I think you mean "Don't insert the pick less than an inch from the power button".

    David -

    Hi David!

    For that warning, it's about not inserting the pick too deep under the bottom cover that you risk hitting the cable as you work around the perimeter. The wording is confusing though, so I'll change it!

    Alex Diaz-Kokaisl -

  6. vZyG2Wn2rE61iQM2
    vZyG2Wn2rE61iQM2
    hBV4exmuJXURVt5B
    • Entferne die Bodenplatte nicht, sie ist immer noch mit einem Kabel am Mac mini angeschlossen.

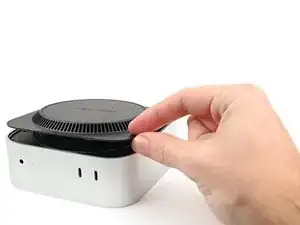
    • Hebe die Bodenplatte an der Kante gegenüber der Einschalttaste hoch und klappe sie um, damit das Kabel zur Einschalttaste zugänglich wird.

    There are three electrical connectors in this disassembly operation. Having experienced the fragility of these connectors on previous macs, I chose to NOT DISCONNECT any of them, and it actually SAVES TIME fiddling with them.

    IT IS NOT ESSENTIAL to disconnect ANY of these connectors. And it is safer, particularly if you are not experienced. Just take your time and be gentle moving the cover and fan out of the way and resting to the side to get to the SSD screw. It REALLY IS UNNECESSARY TO DISCONNECT ANY CONNECTORS.

    SteveTheMonk -

  7. OMZdwUb1RCYfr43I
    OMZdwUb1RCYfr43I
    P2UWtvWdIv1Y1FXJ
    • Das Kabel zur Einschalttaste ist sehr empfindlich. Du musst es nicht abtrennen, um an innere Bauteile zu gelangen, du musst aber die Bodenplatte gut abstützen.

    • Um das Kabel abzutrennen und die Bodenplatte zu entfernen, folge den nächsten beiden Schritten.

    • Wenn du das Kabel nicht abtrennst, dann stütze die Bodenplatte ab, damit das Kabel nicht zu stark angespannt wird und überspringe die nächsten beiden Schritte.

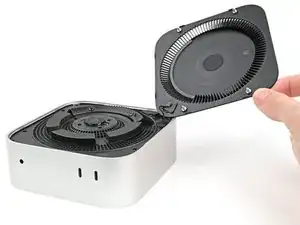
    • Fasse das Kabel der Einschalttaste nahe am Ende an, ziehe es aus dem Anschluss heraus nach oben hin (nicht nach hinten sonst reißt der Stecker ab) und trenne es ab.

    It's not necessary to remove the power connector and remove the bottom cover (the next step), just flip it over gently to take out the 3 screws underneath (in Step 9).

    James -

    Skip this step, really fragile connector

    Ravire -

    it tore open immediately. DO NOT TRY THIS.

    Chad Prestridge -

    Nicht notwenig man kann den Bodenteil einfach "überlegen"

    Christian Studer -

    Change these instructions, I also damaged my connector.
    This one is different from other connectors, pull up, not along the length of the cable.

    Or even better just move it aside or use the 4 Torx to remove it.

    James -

    How did you fix the connector afterwards? I‘ve the same problem. I broke the connector…

    Christof -

    Please change these instructions I just ripped the cable out before reading the comments

    Sully -

    And one more connector just died!

    Johannss -

    Sorry, what do you do if the connector pulls apart? Utterly evil design. This step needs a rewrite and a serious warning on it!!!!!

    Adam P -

    Achtung, den Connector auf keinen Fall lösen. Bei mir ging dieser kaputt - hoffe, ich kann ihn noch reparieren!

    Christof -

    another wrecked connector come on fix it change this step

    Donald Gillis -

    Broke mine as well. DON'T DO THIS STEP!!!!!!!!!!!!!!!!!!!!!

    djdubcom -

    The 13 comments on this step should've tipped me off, but alas, another one bites the dust. On the bright side, I can see this as a grand opportunity to DIY my own power button and glue it onto a sensible place instead of the underside like a psychopath lol

    Davis Diercks -

    I didn't see the comments at first... was consternated about the direction "...pull it away from it's connector", which isn't clear. As others have said: don't pull it sideways/along the wire, lift it upward, towards your face. Like a Lego block. I was lucky - I didn't break my connector, but was using a small tool to lightly help pry it up.

    JFixIt -

    Another broken connector! Really bad instruction.

    Jon Hutton -

    Hätte ich nur die Kommentare gelesen! One more broken connector...

    raimund.kirchschlager -

  8. kIgBGpKoOr1RhIMk
    • Entferne die Bodenplatte.

    The power button is better to be completely unscrewed then to pull at the connector as it shattered in a 8th of a second.

    Chad Prestridge -

  9. 6EA6gfGB5gX2bFGZ
    6EA6gfGB5gX2bFGZ
    cj3MXqqRBAUYmJ2S
    • Verfolge während der gesamten Reparatur jede Schraube und achte darauf, dass sie genau dort zurückgesetzt wird, wo sie herkommt.

    • Der Mac mini verwendet zwar Torx Plus-Schrauben, normale Torx-Bits funktionieren aber auch. Achte auf konstanten, nach unten gerichteten Druck, um ein Ausreißen zu verhindern.

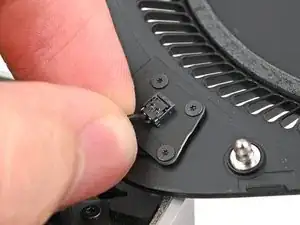
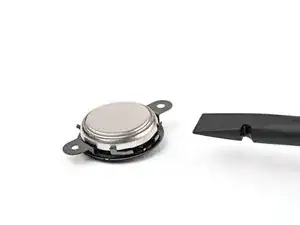
    • Verwende einen Torx Plus 3IP-Schraubendreher, um die beiden 2,1 mm langen Schrauben zu entfernen, mit denen die CMOS-Batterieschrauben gesichert sind.

  10. WXUjC2Cbg5CykRiC
    WXUjC2Cbg5CykRiC
    rBga1AGPgk2QOOYw
    • Hebe die CMOS-Batterie und ihr Gehäuse von der Innenplatte ab und entferne sie.

  11. YEeWYtRbRZJW1XBW
    YEeWYtRbRZJW1XBW
    IuHqjeNrkLNQUHTv
    WeNeoBitrxObMIBP
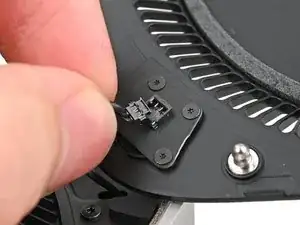
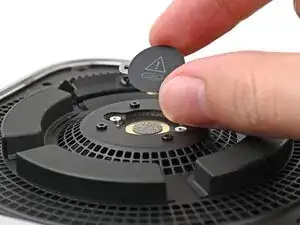
    • Verwende das flache Ende eines Spudgers oder deinen Fingernagel, um die CMOS-Batterie aus ihrem Gehäuse zu heben.

    • Lege beim Wiederzusammenbau die flache, glänzendere Seite der Batterie in den Bereich des Gehäuses mit dem Pluszeichen.

Abschluss

Um dein Gerät wieder zusammenzubauen, befolge diese Anweisungen in umgekehrter Reihenfolge.

Bringe deinen Elektroschrott zu einem zertifizierten Recycling-Unternehmen.

Die Reparatur verlief nicht wie geplant? Versuche es mit der Grundlegende Fehlerbehebung, oder bitte unsere Mac mini (2024) Answers Community um Hilfe.

Alex Diaz-Kokaisl

Mitglied seit: 16/01/22

168562 Reputation

0 Kommentare