Einleitung

Diese Anleitung wurde von iFixit-Mitarbeiter:innen verfasst und ist keine offizielle Reparaturanleitung von Google. Hier erfährst du mehr über unsere Qualitätsstandards.

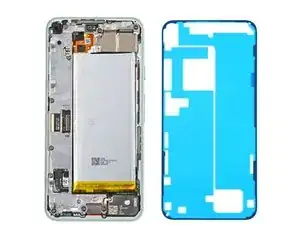
Diese Anleitung zeigt, wie die Display-Klebefolie im Google Pixel 5 nach einer Reparatur wieder angebracht werden.

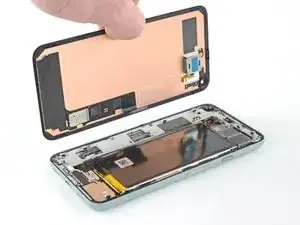
Das Display muss vorher ausgebaut worden sein. Wenn das noch nicht passiert ist, dann folge dieser Anleitung.

Diese Anleitung wurde mit einem Pixel 5 erstellt. Es gibt leichte visuelle Unterschiede, das Verfahren ist aber grundsätzlich gleich.

  1. JYWxJHegqKR2SCgH
    JYWxJHegqKR2SCgH
    o6RNrOvjHAGea66P
    Ucg5eIJPimcklas1
    • Nimm eine Pinzette und löse soviel von den Kleberresten wie möglich ab.

    • Schabe mit dem flachen Ende des Spudgers die letzten Kleberreste ab.

    • Benutze keine Metallwerkzeuge, dadurch wird der Rahmen zerkratzt.

    • Reinige die Klebeflächen auf dem Rahmen mit hochkonzentriertem Isopropylalkohol (mindestens 90%ig), damit der neue Kleber gut haftet.

    This part was strangely frustrating, not matter how much I poked or tweezed I couldn't seem to get the old stuff to come off... but finally using the pointy end of the spudger I got just the right angle to loosen under a nice chunk and then I was able to use the tweezers to pull pretty much all of it off in one satisfying strip. It's attached to plastic underneath and you really can't ruin what it's resting on with the spudger but with the adhesive all still in place I wasn't certain what I was looking at and I was afraid to try too hard.

    Determined, but distracted -

  2. 1ywd4JTEyBP2XhVP
    1ywd4JTEyBP2XhVP
    GcSnqpI4gPQKETBL
    NLuCbPnKaB6uYqCN
    • Beseitige auf gleiche Weise die Kleberreste vom Display.

    • Benutze keine Metallwerkzeuge, dadurch wird das Display beschädigt.

    • Verwende kein Isopropylalkohol nahe bei der Halterung der Frontkamera, dadurch würde ihr Kleber gelöst.

  3. yRJ13QEgjBRXIiCY
    • Benutze die Frontkamera und die Ecken, um die Klebefolie korrekt auszurichten.

  4. S3J5qetNxZDLKlh6
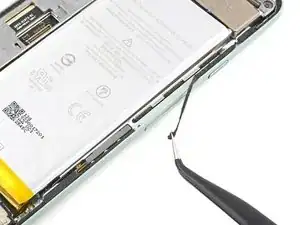
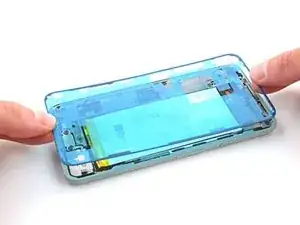
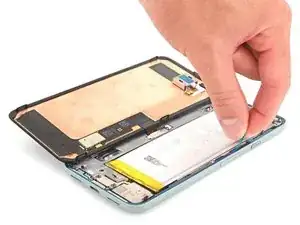
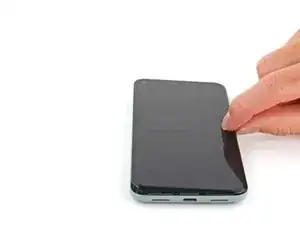
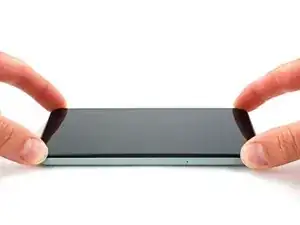
    • Ziehe die durchsichtige Schutzfolie ab, damit die Klebeflächen für den Rahmen freigelegt werden.

  5. AJD2lhJeFGwSSEv1
    AJD2lhJeFGwSSEv1
    fFZSAHDgGSvUuCtQ
    • Arbeite bei diesem Schritt sehr sorgfältig! Der Kleber haftet sehr stark, wenn er einmal festklebt, kann er nicht mehr neu ausgerichtet werden. Falsch aufgeklebte Folie kann dazu führen, dass die Versiegelung nicht funktioniert.

    • Lege die Klebefolie auf den Rahmen ab.

    • Beim genauen Ausrichten helfen die Frontkamera und die Ecken.

    This clearly does not work. The adhesive is stuck to the clear plastic and wont come off.

    You included a gel pouched that needs warmed. Is that relevant to this step? Its not mentioned here...

    Ran Vaknin -

  6. Z5ZiSYUOOeIaJqKT
    Z5ZiSYUOOeIaJqKT
    VcYDOLdEGNwcJqKW
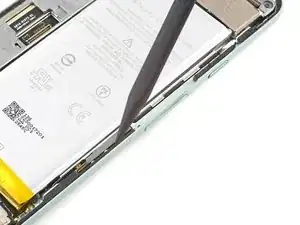
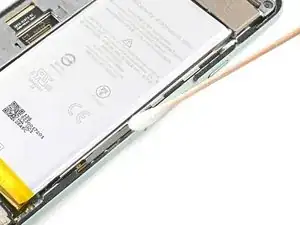
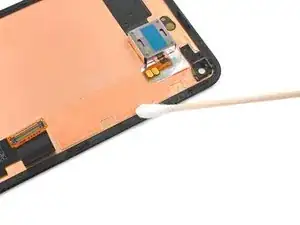
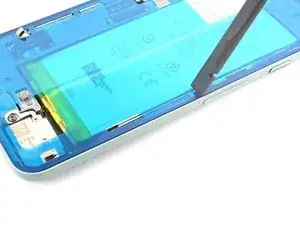
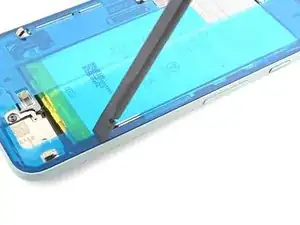
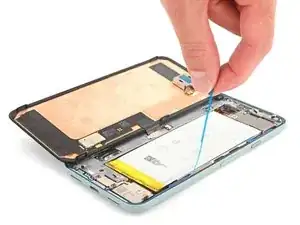
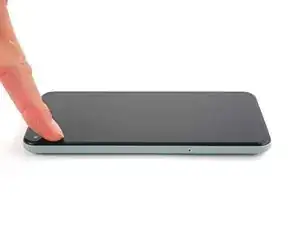
    • Drücke die Klebefolie mit dem Fingernagel oder dem Spudger auf dem Rahmen fest.

    • Fahre rund um den Rand herum, damit der Kleber gut am Rahmen haftet.

  7. ekDKBgCVIMjnPNjT
    ekDKBgCVIMjnPNjT
    aqqJOKjblLMWj4DE
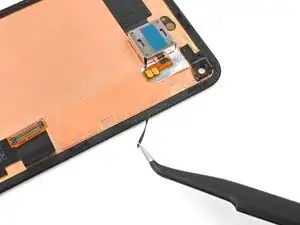
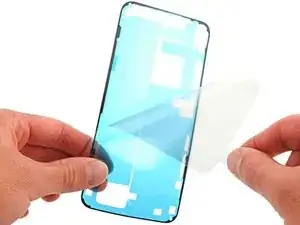
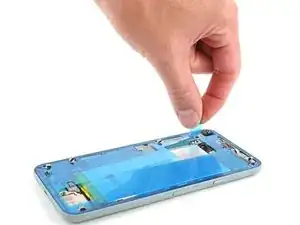
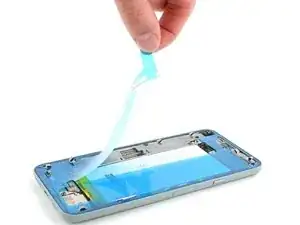
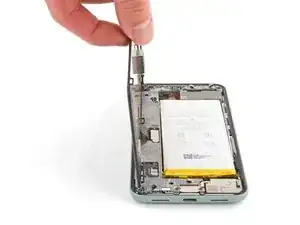
    • Fasse die blaue Plastikschutzfolie in der Mitte mit den Fingern und ziehe sie vom Smartphone ab.

    • Es sollte noch ein dünner, mit blauer Schutzfolien bedeckter Rand stehen bleiben.

    The final protective layer of plastic came off with the blue sheet when I did this step, but I was able to work around that by keeping a piece of stiff plastic over the edge of the phone as I struggled to connect the screen cable.

    Determined, but distracted -

  8. vcQrEGFjLNb1CVa4
    vcQrEGFjLNb1CVa4
    iTXrKUhJMDVpoLVU
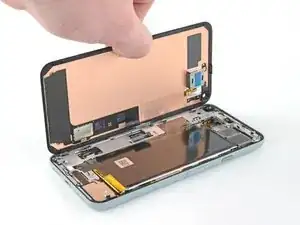
    • Folge der Anleitung zum Displaytausch in umgekehrter Reihenfolge, um das Display wieder anzuschließen.

    • Vergiss nicht, die Halterung des Displaysteckes wieder einzubauen.

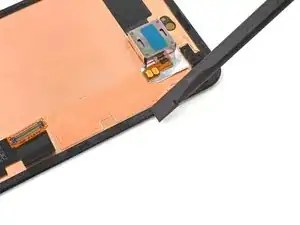
    • Wenn du das Display ausgetauscht hast, dann kontrolliere die Öffnung für die Frontkamera im Display und entferne eventuell vorhandene Schutzfolien.

    This step took forever. Had to hire someone to do it because I was struggling for almost an hour, and even he had trouble with it.

    I also want to echo what someone else said in the original screen tutorial: make sure you remove the plastic with the red flap from the front facing camera lens on the new screen. There are two temp adhesives to remove for that one.

    ccc -

  9. 3oHX2cQUMeqaqZZr
    3oHX2cQUMeqaqZZr
    WgukNoJvnnPVul2F
    • Ziehe die blaue Schutzfolie ab, um den Kleber für den Rand freizulegen.

    I waited to peel the final strip till i had the screen in position but not clicked down.

    This minimized the chance of dust.

    I did have to pull just the beginning of the tab so it was peeking out before resting the screen down like that.

    Stephen Cass -

  10. h6SsqIEOCtjngqiG
    h6SsqIEOCtjngqiG
    d16uNUL4AiPuTxTJ
    uu3MIQQ2YAODMIJj
    • Lege das Display auf den Rahmen auf.

  11. LkVWujcOOSDYFuWQ
    LkVWujcOOSDYFuWQ
    aWmPeIgWG5DQtoBt
    • Drücke die Ecken des Displays auf den Rahmen fest.

  12. c5g6KtULPCQQVtD2
    c5g6KtULPCQQVtD2
    H6WBUCy2bOGuiTTk
    IHfqUKmZ4SkYZxNZ
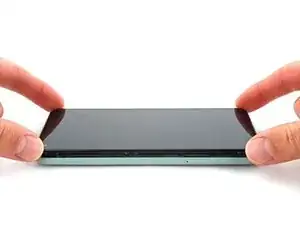
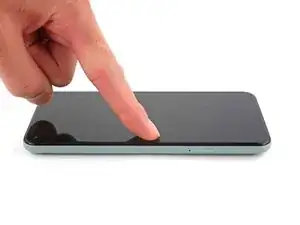
    • Drücke die Ränder des Displays fest.

    • Fahre rund um den Rand herum, damit der Kleber gut haftet.

    • Du kannst das Display um den Rand herum erwärmen, so wird der Kleber weich und haftet noch besser.

Abschluss

Lief die Reparatur nicht wie geplant? Probiere zunächst einige grundsätzliche Lösungen oder frage in unserem Forum nach Hilfe bei der Fehlersuche.

Chayton Ritter

Mitglied seit: 21/08/20

23139 Reputation

5 Kommentare

Pretty easy. Maybe 20 mins job. Nice guide.

Toby Phillippe -

What is the stack of books for?

ccc -

Hey there!

Usually you would place a stack of books or 2L+ bottle of water on top of the device to apply extra force to the adhesive and leave it for some time, like 30-60 minutes. That would ensure better adhesion for the replacement screen. It is not necessary nowadays, but it's an old-school style way of gluing things together and seasoned repair techs still place something heavy on top of the device when replacing glued-in components

Nastya Grifon -

Excellent instructions. I was able to get through this no problem.

Chrystian -

Bought the kit and followed this guide, worked perfectly. Thanks Ifixit for helping me fix my phone.

David Helton -