Einleitung

In dieser Anleitung wird der Austausch des Akkus im Samsung Galaxy S10 gezeigt.

Der Akku ist stark verklebt. Klebstoffentferner von iFixit oder hochkonzentrierter Isopropylalkohol (mind. 90%) vereinfacht den Ausbau des Akkus.

Achte darauf, Ersatzklebestreifen oder Tesa Klebeband zur Hand zu haben, um den Akku und das Rückgehäuse wieder anzukleben.

Falls dein Akku aufgebläht ist, musst du entsprechende Vorsichtsmaßnahmen treffen und darfst dein Gerät nicht erhitzen.

Entlade deinen Akku aus Sicherheitsgründen auf unter 25%, bevor du dein Gerät auseinanderbaust. Falls der Akku während der Reparatur versehentlich beschädigt wird, ist so das Risiko eines gefährlichen Feuers oder einer Explosion geringer.

Bei manchen Schritten sind unter Umständen vorher der untere Mittelrahmen/die Lautsprechereinheit entfernt worden. Zum Austausch des Akkus müssen diese Komponenten nicht ausgebaut werden.

  1. BOTuIKImcEsVyvLH
    BOTuIKImcEsVyvLH
    eCjFXP1W4M6VxntQ
    SW2McIMxOQBXdudo
    • Schalte dein Smartphone aus und trenne es vom Stromnetz, bevor du beginnst.

    • Erhitze einen iOpener und lege ihn zwei Minuten lang auf die rechte Kante der Rückabdeckung.

    • Man kann auch einen Fön, eine Heißluftpistole oder eine Heizplatte benutzen. Man muss allerdings darauf achten, das Gerät nicht zu überhitzen, da sowohl das Display als auch der interne Akku sehr hitzeempfindlich sind.

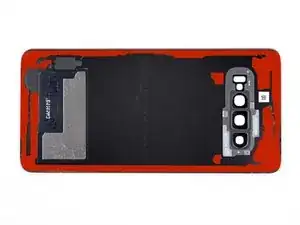
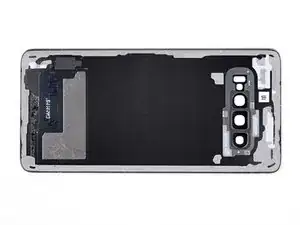
    • Während du wartest, schaue auf das Bild der entfernten Rückabdeckung und merke dir, wo sich der Kleber befindet.

    I think we should mention that the glass needs to be barely too hot to touch to determine when it's hot enough that a pick can be slid underneath.

    Or we can mention a thermometer temperature, but most diy people probably don't have a thermometer to check.

    A lot of people seem to have issues using the iopener to unglue phone parts like back glass (can Google it), likely because the glue didn't get hot enough, so mentioning the desired touch temperature can be helpful for DIYers to ensure that their glue is sufficiently weakened and they can begin working off the part.

    (Just being hot isn't enough for glue to weaken, as you can probably attest to if you've ever had your phone get really hot but the back cover never came loose)

    A X -

  2. pvp5QqK6q2INIOSw
    pvp5QqK6q2INIOSw
    6RcP5dPE1OTYZMlw
    cNWAYxvQ5QIc2MHu
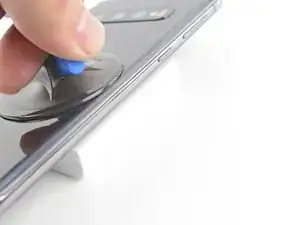
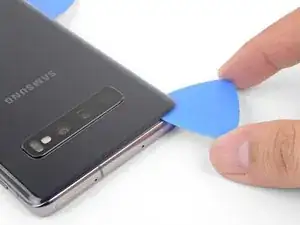
    • Lege die erhitze rechte Kante des Geräts auf etwas, was ca. 1,3 cm hoch ist, um das Gerät für das OpeningTool vorzubereiten.

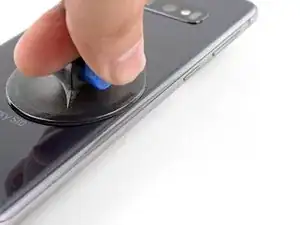
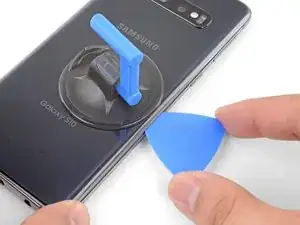
    • Halte die linke Kante des Geräts mit deinen Fingern fest, damit es nicht abrutscht. Ziehe mit konstanter Kraft am Saugheber.

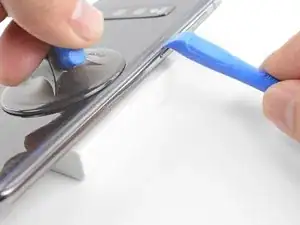
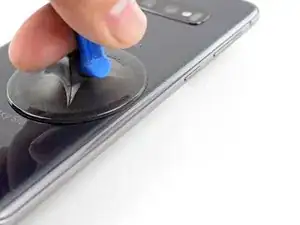
    • Drücke die Kante des OpeningTools in die Lücke zwischen Rückabdeckung und Rahmen.

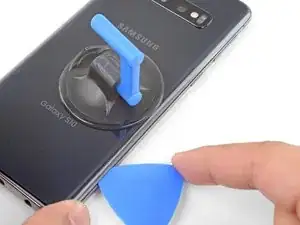
    • Schiebe das OpeningTool hin und her, um die Rückabdeckung zu lockern.

    Will the Suction Cup work with a cracked back?

    Red Royal -

    Might be hard with the suction cup on a cracked back. I'd rather break it off and buy a new back (it's super cheap, around 10$ online).

    Guenter -

    Yes! Apply a layer of packing tape to the cracked back cover first, and the suction cup will adhere to the smooth tape surface.

    Arthur Shi -

    I will open the one that I am taking out of the computer now and then I will follow where it is

    cabdi salaan -

    Am besten 2 mal gut erwährmen. Danach geht das öfnen top.

    Martin Thiel -

    Please help me my phone failed and screen is distracted and when I change my screen not work functional and it is vibrate and move from one step to another without my permission and plea help and what I'do.

    Dame Dame Kebade -

  3. JdXMpUxPMBWOM6cS
    JdXMpUxPMBWOM6cS
    w6i4NwEfSD1CCH4q
    vVmiMOyKISOjvGUX
    • Erwärme einen iOpener und lege ihn zwei Minuten lang auf die gleiche Kante des Handys auf.

    • Setze einen Saugheber auf die Rückseite des Gerätes, so nah wie möglich in der Mitte der rechten Kante (wo der Kleber am dünnsten ist).

    • Ziehe gleichmäßig mit relativ viel Kraft am Saugheber, um eine Lücke zwischen dem Rahmen und der Rückseite zu öffnen.

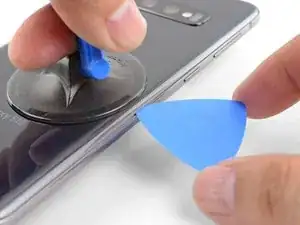
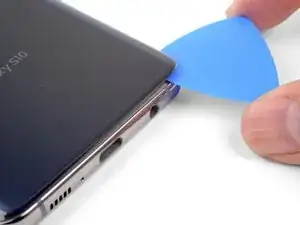
    • Setze die Spitze eines Plektrum in den Spalt.

    • Der Kleber ist sehr stark ist und die Toleranzen sind eng, du brauchst wahrscheinlich mehrere Versuche, um einen Spalt für ein Plektrum zu erzeugen.

    • Falls du Schwierigkeiten hast, einen Spalt zu erzeugen, war der Kleber noch nicht genügend geschwächt. Erhitze die Kante nochmals und wiederhole den vorherigen Schritt. Das Glas ist heiß genug, wenn du es kaum noch anfassen kannst.

    • Du kannst versuchen ein paar Tropfen hochkonzentrierten Isopropylalkohol (mindestens 90%ig) in die Lücke zu tröpfeln, um den Kleber zu lösen.

    • Wende mit dem Plektrum nicht zu viel Kraft an, sonst könnte das Glas der Rückabdeckung brechen.

    I had trouble lifting up to create a gap. What I did is watch Jerry rig everything's teardown and he said the back glass must be barely too hot to touch in order for the adhesive to weaken.

    So I heated the iOpener till it was too hot to touch, but not so long that it would burst. Put on right edge for a few minutes. Then I lift with the suction cup, using my middle finger and thumb to grip the sides of the phone and my pointer finger to pull up on the suction cup .

    I cleaned the glass with an alcohol wipe beforehand to make the suction cup stick better, though I'm sure any cleaning method that removes fingerprints will help.

    I couldn't make as big a gap as shown in the picture, but I was able to stick my metal jimmy tool carefully into the crack between the glass and the metal frame and it was just enough to slide the tool a little. And I was very careful since it's a metal tool. After that I could stick the plastic pick in and slice the adhesive and then that gets you started removing the back cover. Reheat often to weaken and slice adhesive. STOP and reheat if it even gets a little harder to slice. DON'T risk cracking the glass.

    A X -

    I think we should add that they should treat the back glass as gently as a raw eggshell. That's because I thought I wasn't applying excessive force and caused the glass to crack, but I didn't understand what counts as "excessive force." (A bit vague)

    What excessive force actually means is as soon as you feel any resistance at all when slicing glue with the pick, stop and apply more heat before continuing. The glass can crack very very easily, when pressure is applied in only a small section.

    A X -

    See for me it was weird, the glass was weirdly weak. I just put the iOpener in the microwave and put it on there until it was almost too hot to touch and went around, the gap was like 0.5cm already, so I just went around and it came all off in like 10 seconds, I was kind of happy how easy it was, but sadly I went around too fast and now there's a line crack at the top left of my back glass, it's not sharp so it doesn't bother me.

    Oliver Fallon -

  4. KrxueC2Y4SYsJnOw
    KrxueC2Y4SYsJnOw
    JplpUUV6xGskGeXn
    syWrI2LMh4WREk6B
    • Schiebe das Plektrum an der Kante entlang, um den Kleber durchzutrennen.

    • Versuche nicht den Kleber an den Ecken zu durchtrennen, bevor du mehr Wärme zugeführt hast. Die Rückabdeckung könnte sonst brechen.

    • Lasse ein Plektrum in der Lücke stecken, um zu vermeiden, dass sich der Kleber wieder verbindet.

  5. SPIusbpCMjutVaZe
    SPIusbpCMjutVaZe
    trPeWgTOtRvVq2gM
    • Lege einen erhitzen iOpener auf die untere Kante und warte zwei Minuten.

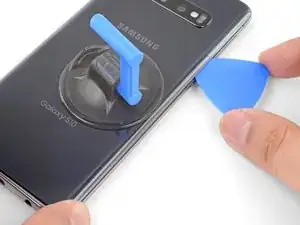
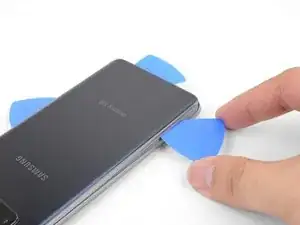
    • Setze ein Plektrum in die rechte Kante, in der Nähe der unteren rechten Ecke.

    • Schiebe das Plektrum vorsichtig um die Ecke. Schiebe das Plektrum weiter durch die untere Kante und über die untere linke Ecke.

    • Falls das Schneiden schwieriger wird, verwende wieder den iOpener

    • Lasse das Plektrum in der Lücke, um zu vermeiden, dass sich der Kleber wieder verbindet.

  6. OS62cDANwiOD3dfZ
    OS62cDANwiOD3dfZ
    AYMenH5IPmIDuFTx
    6U2yctlR6O4thvXb
    • Wiederhole die vorige Schritte an den verbleibenden Kanten.

    • Achte beim Schneiden durch die Ecken darauf, dass diese gut erhitzt sind.

  7. RPxDgPhDg5pxaEsM
    RPxDgPhDg5pxaEsM
    2lNBD2KT1FMIn6aL
    ArfZMO3JvGPGDQxi
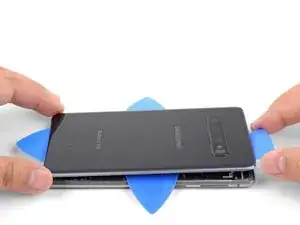
    • Wenn du alle Kanten durchtrennt hast, verdrehe ein Plektrum leicht, um die Rückabdeckung vom Rahmen abzuheben.

    • Hebe die Rückabdeckung langsam an. Nutze Plektren, um verbliebenen Kleber durchzutrennen.

    • Entferne die Rückabdeckung.

    • Beim Zusammenbau ist jetzt gute Gelegenheit, das Gerät einzuschalten, um alle Funktionen zu testen, bevor du die Rückabdeckung wieder anklebst. Achte allerdings darauf, dein Gerät wieder auszuschalten, bevor du weiter daran arbeitest.

    • Folge dieser Anleitung, um die Rückabdeckung wieder einzubauen, die Kameraeinfassung zu übertragen und neue Klebestreifen zu befestigen.

    • Wenn du willst, kannst du die Rückabdeckung auch einbauen, ohne neue Klebestreifen zu benutzen. Entferne größere Klebstoffreste, die ein glattes Aufliegen der Rückabdeckung verhindern. Lege die Rückabdeckung auf und erwärme sie. Drücke sie anschließend fest. Sie ist dann zwar nicht mehr wasserdicht, aber normalerweise hält sie noch fest genug.

    Thank's for the help I will try to repair my phone with a new battery all on my

    ron hayes -

  8. NBfOnOc5Ne3pSnVZ
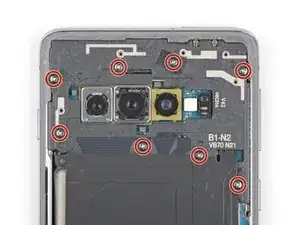
    • Entferne die acht 4 mm Kreuzschlitzschrauben, mit denen der obere Mittelrahmen befestigt ist.

    ネジが堅くて回らず、緩める方法はありますか?

    win1683 -

    ネジロックが原因である可能性があるため、iOpener で熱を加えてみてください。

    Oliver Fallon -

  9. i1SvNwTTPtbjZFAt
    i1SvNwTTPtbjZFAt
    6S1YuVbRp1BAxo2W
    • Der Mittelrahmen wird noch durch ein paar Plastikklammern um die Kante herum befestigt.

    • Setze die Spitze eines Spudgers in die Kerbe in der rechten Kante des Mittelrahmens nahe der Taste " Lautstärke +".

    • Heble nach oben, um den Mittelrahmen vom Smartphone zu lösen.
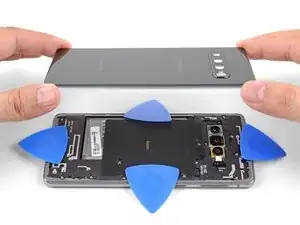
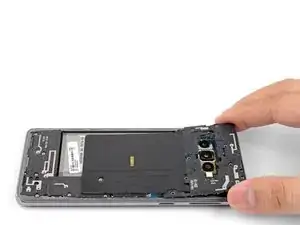
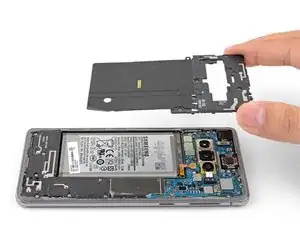
    Bei mir war die Kerbe durch den Klebstoff komplett verdeckt. Am bestern den Kleber vorher entfernen. Dann geht es einfacher.

    Martin Thiel -

  10. rqEg2ThYsWuRrF6t
    rqEg2ThYsWuRrF6t
    b6jUyYpeZntHclyD
    TrZeM2AWaG3DnpUV
  11. 2j6qHfuIlKbYTk14
    2j6qHfuIlKbYTk14
    4SMkg6BeITfAM4HT
    ISPpTKGXZJTOYRFZ
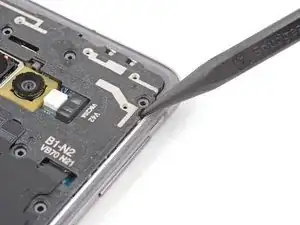
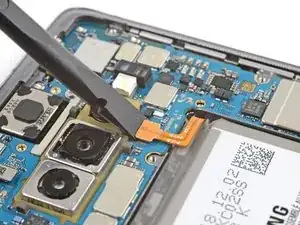
    • Setze das flache Ende eines Spudgers unter den Akkustecker, der unterhalb der Rückkamera am Motherboard befestigt ist.

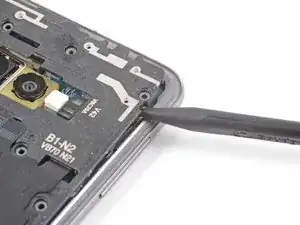
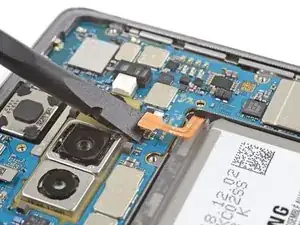
    • Heble nach oben, um den Stecker aus seinem Anschluss zu lösen.

    • Wenn du Stecker wie diesen hier trennst, musst du darauf achten, dass du dabei nicht versehentlich die kleinen Komponenten, die sich um den Anschluss herum befinden, beschädigst.

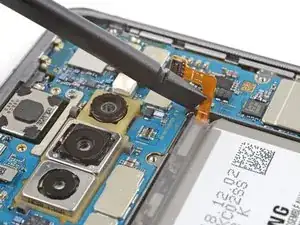
    • Schiebe das Flachbandkabel des Akkus vorsichtig von seinem Motherboard-Anschluss weg, damit es sich nicht versehentlich wieder verbindet.

    Between this step and the next (Step 12, Battery), the lower mainframe is removed in the images but there is no instruction to do so. I was able to remove the battery (1 min of heating with iOpener, plus 8 total drops [2 in each corner] of 90% IPA) without removing this lower mainframe.

    Claire Porter -

  12. sUvTYyqwo5TcvuwS
    sUvTYyqwo5TcvuwS
    buYxiSpVP1ybGpCM
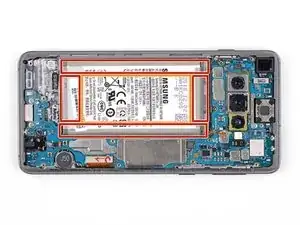
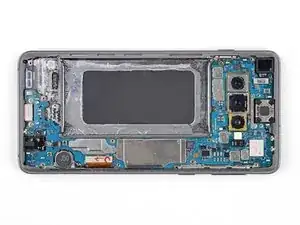
    • Der Akku ist stark verklebt. Folgende Bereiche unter dem Akku sind markiert:

    • Der Rahmen, an dem der Akku sehr stark verklebt ist.

    • Ein Ausschnitt im Rahmen, der die empfindliche Displayeinheit darunter freilegt. Sei vorsichtig, wenn du in diesem Bereich hebelst, du riskierst sonst Schäden am Display.

  13. HPCFfsCgLWajnbmN
    HPCFfsCgLWajnbmN
    TosWLnOEcefoILB2
    CCPWKNfPBx4LySGB
    • Klebstoffentferner oder hochkonzentrierter (mehr als 90%) Isopropylalkohol vereinfacht den Ausbau des Akkus sehr.

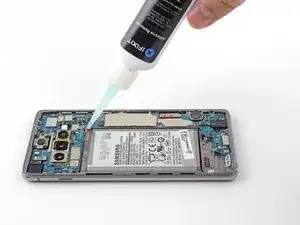
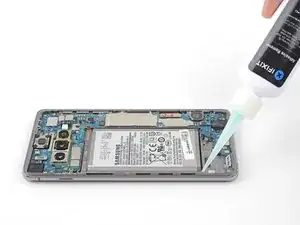
    • Wenn du Klebstoffentferner benutzt, folge zuerst diesen vorbereitenden Schritten.

    • Tröpfle 1-2 Tropfen Isopropylalkohol oder Klebstoffentferner in jede Ecke des Akkus.

    • Achte darauf, dass du nicht mehr als ein paar Tropfen auf einmal hineingibst. Die Flüssigkeit könnte sonst durch den Ausschnitt im Rahmen (unter den Akku) laufen und die darunterliegende Displayeinheit beschädigen.

    • Lasse ihn eine Minute einwirken, um den Kleber aufzuweichen.

    • Alternativ kannst du auch einen iOpener erwärmen und zwei Minuten lang auf die rechte Vorderseite des Smartphones legen (oder so lange, dass du am Akku die Wärme spüren kannst).

    • Erwärme den Akku nicht direkt. Erwärme nur die Vorderseite des Displays über dem darunterliegenden Akku. Vermeide es, den Akku zu überhitzen, er könnte sich entzünden.

    Was passiert wenn trotz des Adhesive Removers der Kleber am Akku sich einfach nicht lösen will?

    leowider -

    Erstmal, Zeit lassen und nichts erzwingen. ;) Am besten erhitzt du dein Gerät nochmal, um den Kleber zu weich zu bekommen und versuchst es dann nochmal. Das ist leider sehr zähe Arbeit, die nur in Ruhe funktioniert.

    Fabian Neidhardt -

    Destroyed my display by applying too much alcohol since the battery wouldn't come off. Beware! Display died 4 hours afterwards during use.

    oromis995 -

    Thank you for the warning. sorry that happened! :/

    A X -

    I tried a few drops of isopropyl alcohol 91%, but the battery was still firmly stuck. I was too scared to use more alcohol so I heated the right side of the screen with an iOpener.

    And once the battery felt warm, I was able to pry between the frame and the right side of the battery using triangle plastic pick. Pry, applying upward force to the battery. I kept prying on the side, moving up and down the side and prying again, till the battery popped out. It popped out on the top left corner for me, personally.

    I did what the person in this video did: https://youtube.com/clip/UgkxDMPJGQ5EOkd...

    A X -

    Can anyone else share their experiences with using Isopropyl Alcohol? Can it damage the S10's screen? If so, how much will damage the screen? I'm only asking because I tried heat alone with the iOpener and didn't get anywhere, so I'm going to try Isopropyl Alcohol tommorrow.

    Oliver Fallon -

    Im sorry about my late reply. I myself stopped after a few drops since it didn't seem to weaken the glue enough and I read the scary comment about it destroying the display. I heated up the screen glass till it's barely too hot to touch. And they should be enough to loosen the glue. If it gets too cool then you have to heat the scren up again till it's barely too hot to touch. (I tried to add this detail to the guide, but perhaps they did not approve my edit.)

    But it sounds like other people may have been successful with the alcohol, I just didn't want to take the risk

    A X -

    I ended up using Isopropyl Alcohol and only a few drops because I heard of people destroying their display's if they used too much, because the underside of the display is below the battery and I got it out!

    Oliver Fallon -

    I had to apply iOpener heat and 91% alcohol four times before getting the battery to pry.

    Ron Satour -

    I'm not weak, but this step almost made me cry. So my first piece of advice to everyone is to stay calm. It will come off, you can outsmart the glue, just use creativity, not force. Since all my plastic tools bent instead of moving the battery, I ended up using an old sunglass lens - and it worked! It's sturdy and thin enough, plastic and the curve helps lift the battery.

    Merida, the brave -

  14. HJNDRGvfpoIQNFQU
    HJNDRGvfpoIQNFQU
    gCPZNwNQT6XtXHBK
    IfoEULGHhSILMSxs
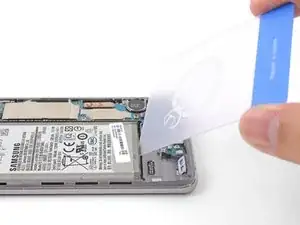
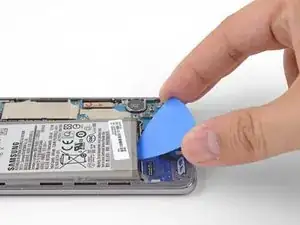
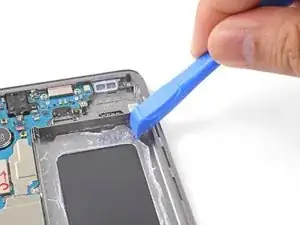
    • Setze die Ecke einer Plastikkarte in den Spalt zwischen Akku und dem unteren Mittelrahmen.

    • Heble den Akku gleichmäßig und fest aus seiner Vertiefung heraus.

    • Falls sich der Akku nicht bewegen lässt, ist der Kleber nicht ausreichend aufgeweicht.

    • Versuche, ihn mit einem Plektrum, einem Plastiköffnungswerkzeug oder einem Spudger herauszuhebeln. Benutze keine Metallwerkzeuge.

    • Wiederhole den Vorgang mit dem Klebstoffentferner/Isopropylalkohol und versuche es erneut.

    • Erwärme den Kleber erneut mit dem iOpener.
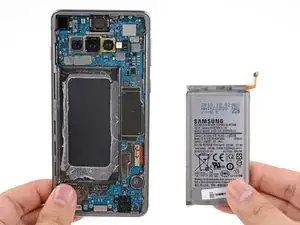
    This is the only real challenge in changing the battery.

    My steps:

    1. add isopropyl alcohol and let it soak for a min or two

    2. use the blue opening tool to see if there is any movement (I guess it is not moving)

    3. use the card (really the card - which is not a part of the battery replacement kit, or cut out a thing plastic card from the packaging yourself)

    4. use the card to get under the battery. cut through the battery on the bottom side and the lower half of the left side. you should see that glue is coming up (even if just a bit) - make sure youre only a few milimeters under the battery

    5. check if the blue opener allows you lifting the battery (maybe use a sudger too)

    6. If not movement, add a bit more alcohol and WAIT

    7. cut through the glue around the left lower edge again. use the opener again

    repeat 6 and 7 if still no success

    do not add alcohol everywhere, dont use too much of it

    dont use other tools or any extensive force on the battery

    Guenter -

    Thanks for the helpful advice!

    A X -

    One thing that i noticed because mine was not moving at all was to insert the blue opening tool from where the connector head part is and just gently move it underneath the grey part of the battery and just slide it in a bit

    LegendaryGamer -

    What if you don't have an opening card or blue pick

    Debby -

    The repair kit should come with the picks, but if you don't have them you could try using a spudger although it might be difficult because it might not be able to fit under the battery.

    Oliver Fallon -

    Das Akku geht wirklich sehr schlecht raus. Am besten geht es wenn das Display mit dem iOpener 3 mal erwärmt wurde und danach ein paar Tropfen Kleberentferner, 4 je Ecke. Danach mit dem Spudger an der linken untern Ecke anheben. Der Rest geht dann ganz einfach.......

    Martin Thiel -

    Eng Translation of Martin Thiel's comment:

    The battery is really bad. It works best if the display has been heated 3 times with the iOpener and then a few drops of adhesive remover, 4 per corner. Then use the spudger to lift the bottom left corner. The rest is then very easy.......

    A X -

    picks were too flimsy, I ended up using a plastic tire lever. (after heating it and adding alcohol multiple times)

    chris briend -

  15. CAmPMiJ4soSADqkb
    CAmPMiJ4soSADqkb
    a1AdLG6QYmvVD5TZ
    • Entferne den Akku.

    • Nach dem Ausbau darf der Akku aus Sicherheitsgründen nicht wiederverwendet werden. Ersetze ihn durch einen neuen Akku.

    • Wenn du Isopropylalkohol oder Klebstoffentferner verwendet hast, dann lasse das Gerät zehn Minuten lang austrocknen, bevor du den neuen Akku einbaust.

    • Der Einbau des neuen Akkus und der neuen Klebestreifen wird in dieser Anleitung beschrieben.

    It doesn't look like any battery adhesive comes with the kit, can I use tesa tape instead?

    Gavin McBride -

    The kit should come with adhesive stripes. These are from Tesa, but are for repairs like this. You could also buy adhesive stripes for your phone. There are several ways to keep the battery in place, but I prefer the stripes from iFixit.

    Kongoduff -

    Yea, the kit doesn't come with pre-cut adhesive, but it comes with strips of Tesa tape. Just make sure you don't put the strips on the place that didn't have adhesive originally, because that's the bottom of the screen.

    Oliver Fallon -

Abschluss

Um dein Gerät wieder zusammenzubauen, folge den Schritten dieser Anleitung in umgekehrter Reihenfolge.

Folge dieser Anleitung, um einen Akkuzyklus-Reset durchzuführen und den neuen Akku zu kalibrieren.

Entsorge deinen Elektromüll fachgerecht.

Lief die Reparatur nicht wie geplant? In unserem Antwortenforum kannst du Hilfe bei der Fehlersuche finden.

Arthur Shi

Mitglied seit: 03/01/18

296783 Reputation

25 Kommentare

Selbst als Selbständiger muss man ab und zu nachforschen, dank dieser Webseite-Info habe ich mich vergewissert dass ich alles genau so richtig wie beschrieben und auf den Bildern machen wollte.

Danke dem Autor dieser Information.

MFG

AK Computer Service

Alfred K. -

Sehr gut. :) Dafür gibt’t diese Seite.

Fabian Neidhardt -

You need to screw the midframe down again before trying to do a power on test, not just reconnect the battery. If you don’t, you’ll get an overheat error icon (red thermometer in yellow warning triangle) when trying to power it on because the NFC sensor is on the midplate and the pogo pins connecting it need screw down pressure to make a solid connection. (No I don’t know why NFC is needed to power the phone on, or why its absence shows as an overheat error.) After figuring this out (shut out to Go Cell Phone Repair on Youtube) the battery repair worked fine.

Dan Neely -

I had the same issue. I was stressing out so bad haha, but everything worked out fine in the end :)

mvdboomen -

The iFixit kit to replace the battery in S10 worked fine, including the heating sausage. Jus need to take your time and take great care to follow the instructions in order. The most stressful bit was getting the new adhesive in the correct spot to achieve a flawless finish. It is brilliant that these phones are repairable and that there is so much support for same. Shame on you Apple. We have to stop throwing repairable things away, both to save money and to save the planet. Thanks iFixit.

Bill Green -

Don't do what I did and flood the battery with isopropyl alcohol because it seeped into the screen and after a few hours the screen stopped working altogether. Very costly mistake!

monty plt -

Same, wish I had read the comments beforehand.

oromis995 -

thanks for that pointer. I read it before I started the replacement and I only used a bit of alcohol which did no harm. thanks a lot!

Guenter -

Hallo zusammen,

insgesamt hat es geklappt, wobei sich der Deckel des S10 fast zwei Stunden geweigert hat sich zu öffnen. Trotz des Wärmekissens und dem Einsatz eines Heißluft-Föns. Letztlich hat es dann doch ohne Beschädigungen zu verursachen funktioniert.
Allerdings ist der von iFixit gelieferte Akku nicht besser als der alte Akku. Der alte Akku hatte 82 % und der von iFixIt gelieferte neue Akku hat (trotz Kalibrierung) nur eine Kapazität von 85 % (2800 mAh). Maßnahmen wie Akkuschutz-Laden auf 85 %. haben nichts gebracht.
Es wäre ein voller Erfolg gewesen, wenn das Ersatzteil auch die gewünschte Qualität gehabt hätte. Ich habe extra den teureren Akku von iFixIt gekauft, statt anderer Alternativen.
Zurückschicken bringt nichts, denn dann muss ich das Handy wieder zerlegen. (: Insgesamt bin ich sehr enttäuscht von IFixIt.


Gruß Michael

Michael Lorenz -

After replacing the battery, the battery will not charge anymore. What to do?

jacquelineslavenburg -

I was ultimately successful with this repair but don't make the same mistake as me: I was so focused on removing the back panel that I didn't realize I was actually removing the screen, so of course I broke it while doing so. Luckily I was able to replace that as well, but would have preferred not to pay for a new one!

Melissa L -

Great instructions and nothing that doesn't work as explained. My advice on a few steps:

* I didn't use the iOpener, a hairdryer did the job in NO time. I see absolutely no risk of breaking the glass when heated properly and using the plastic openers as shown. make sure you cut through the glue properly and you should be fine.

* You WILL NEED the adhesive removal / softener because that battery glue is nasty! I used isopropyl alcohol to soften the glue (there is this plastic thing that allows you to add alcohol in smaller doses. LET IS SOAK for a min or two! However, to really remove the battery, I just cut the flat plastic case (in which the battery shipped). This is a typical packaging plastic which is very flexible and flat and perfectly bends to reach below the battery and cut through the plastic ( you could also use those flat plastic cards shown and sold here on ifixit too).

Great product!

Guenter -

Leider wurde von ifixit nicht erwähnt, dass mein Originalakku 4000 mAH , aber der ifixit-Akku nur 3300 mAh hat.

Das ist fast 1/4 weniger, ich bin enttäuscht !

Gescha Wedel -

Wo hast du denn die Angabe von 4000 mAH gefunden? Steht das auf dem Akku? Weil Samsung selbst für das Galaxy S10 3100 mAH angibt.

Fabian Neidhardt -

I used a hypodermic needle to apply 91% alcohol to the corners of the battery. Being extra careful not to use any more than needed. A few drop will do it.

Michael Raines (Elguapo) -

Vielen Dank dank dieser Anleitung konnte ich meine es sehen reparieren. Was mir noch gefehlt hat in der Anleitung war wo ich die Klebestreifen anbringen muss und wie ich die Klebestreifen anbringen muss

Mat S -

Dafür gibt es eine extra Anleitung: https://de.ifixit.com/Anleitung/Vorgesta...

Fabian Neidhardt -

What if you don't have a card or pick

Debby -

Thank you very useful

Asmeer Really nice -

I bought this battery back in March of 2023. The repair was super easy and the hardest part was cleaning the old adhesive from the frame which took over an hour!. Unfortunately just like a lot of people mention the battery quality of this particular kit seems to be iffy. The battery life is hardly any better than my original 4 year old battery which was around 67% health. This new iFixit one is estimated to be around 74% by accubattery even after a whole year of use and cycles. I've tried every single method to recalibrate/reset my battery cycle count without much of an improvement. 3.5-4 hours is the absolute most I'm able to get out of my device of moderate continuous usage. Fortunately i did contact iFixit and they gave me a full refund but until they fix this issue with their supplier of this particular battery i cannot recommend it. I'm saying that because I'm sure other batteries are fine. This isn't to prevent ppl from buying iFixit batteries I'm sure they are great but unfortunately just not this one.

Random 4400 -

Process was fairly straightforward and I like the kit. In my personal experience I did have few minor complications: (1) the battery cable was around 2mm longer than the original one and you have to fold it a slightly to get it connected, (2) unlike what is shown in tutorials, most of the adhesive was stuck to my phone and was a nightmare to remove, I was scratching the frame of my phone for hours with IPO 100 trying to get adhesive off one tiny black glob at a time, (3) I am not sure why, but the top-left corner of my phone is still sticking up a bit - it is fine but I might need to open it up again to double check and see if I can make it flush. Overall the kit works well, and it was not too difficult. My phone looks pretty good. Next time perhaps I would double-check that the back panel can be pushed down fully flush with the frame before adding adhesive, and/or look harder for any raised parts of the internals.

Mark Connelly -

I agree with this comment and that the battery cable is a few mm longer than original one; I ended up just bending it at the junction with the battery to give it a little more curvature and then it snapped into the receiving connector just fine. Sounds like this is what you did too.

Claire Porter -

I just completed this repair (took me 45 min to remove battery, including 10 min to let isopropyl (IPA) dry, and 10 minutes to reinstall battery. I chose not to replace the adhesive as plenty of mine was left and was sticky and not folded upon itself).

A couple notes:

* heat is your friend! I had no issues getting off glass/battery by using the iOpener to apply heat as instructed. 2 applications of heat were sufficient for me

* I used 8 total drops of IPA and my screen is completely fine. During the 10 min dry, I had the phone screen-up to prevent IPA from pooling into the display (use gravity to your advantage).

* Step 12 shows removing the lower mainframe; I didn't do this and I easily got out the battery. If you don't have the plastic card tool - use a lens from an old pair of sunglasses. The rigidity of the lens + its curvature makes it the perfect tool to remove the battery.

Thanks for the great guide, and good luck!

Claire Porter -

I agree with this comment and that the battery cable is a few mm longer than original one; I ended up just bending it at the junction with the battery to give it a little more curvature and then it snapped into the receiving connector just fine. Sounds like this is what you did too.

Claire Porter -

Perfect :) Dug out my old S10 for my son to use - now with a brand new battery it should last him a good while !

Paul Hutchison -