Einleitung

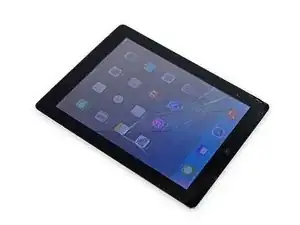
Benutze diese Anleitung, um den Akku in dienemiPad zu ersetzen.

Falls dein Akku aufgebläht ist, musst du entsprechende Vorsichtsmaßnahmen treffen.

  1. CR4uCijdW1OugLYO
    CR4uCijdW1OugLYO
    H1FdIigqyDXVftPq
    juxJIpQPuYHqjCn5
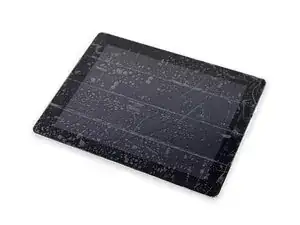
    • Wenn das Glas deines Displays gesprungen ist, klebe es mit Klebeband ab, um weitere Brüche zu verhindern und Körperverletzungen während der Reparatur zu vermeiden.

    • Lege überlappende Streifen durchsichtiges Packband über das Display des iPads, bis die gesamte Fläche abgedeckt ist.

    • Das hält die Glasscherben zusammen und sorgt für strukturelle Stabilität beim Hebeln und Anheben des Displays.

    • Versuche, den Rest der Anleitung genau wie beschrieben zu befolgen. Wenn das Glas jedoch einmal zerbrochen ist, wird es wahrscheinlich weiter zerspringen, während du arbeitest, und du musst eventuell ein Werkzeug aus Metall zum Hebeln verwenden, um das Glas herauszuholen.

    • Trage eine Schutzbrille, um deine Augen zu schützen, und pass auf, dass du das LCD-Display nicht beschädigst.

  2. MxqCUTyahFyGCMUM
    MxqCUTyahFyGCMUM
    dhC3co6rmldN4VR3
    • Das auf den Fotos gezeigte iPad kann etwas anders aussehen als dein iPad, aber die Vorgehensweise ist die gleiche.

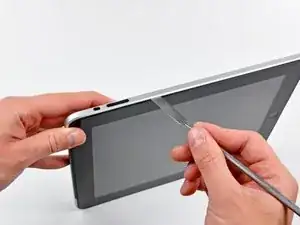
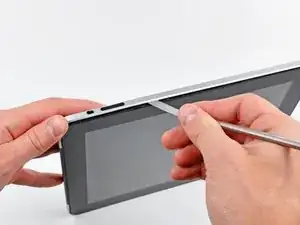
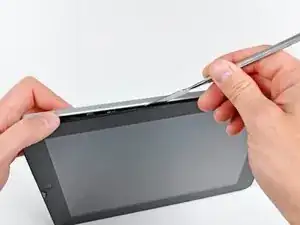
    • Setze einen Spudger aus Metall zwischen der rechten Kante der Displayeinheit und der Rückabdeckung ein.

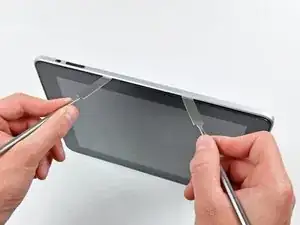
    • Drehe den Spudger von dir weg, um die Laschen an der oberen Kante des Displays zu lösen.

    Ok, a word of caution that can't be overstated. The off screen switch, the lock swith, and the volume switch can all be broken easily. I would stay away from this area completely. The bracket on the off switch is tack welded and can be broken. The volume/lock swith can be malformed to become unusable. So avoid the area and you will be better off.

    Carl Rossi -

    Most of the spring clips mounted to the digitizer panel (sandwitched between the LCD display mount tabs and digitizer frame) are guaranteed to break. I recommend just purchasing a set (I found on one Amazon for less then $6). With that said, even though I broke most of mine while removing the glass panel/frame assembly, I was able to remount the glass. It seems fairly secure, but I'm going to put the iPad (3G/Wifi) in a case, anyway.

    stevetsi -

    Pas besoin de pistolet a chaleur, il faut juste faire sauter les clips qui maintiennent l'ensemble écran et LCD. Bien commencer par la droite, car se sont juste des picots en plastique a faire sauter par dessus le rebord en alu, puis soulever la partie du bas en cassant les 4 clips ( pas moyen de les garder entier). Ensuite la partie gauche (avec 6 clips) se détachera facilement. La partie haute n'est pas éclipser mais retenus par un cable.

    tibo -

    Yes, most of the clips break easily, but I was able to reassemble the iPad by putting the left side in first at an angle, and then snapping in the rest of it. Even though most of the clips break, it still holds together pretty tight.

    Peter Hillman -

    not all clips break, and there are so many clips that despite breaking 2-3 clips it still fitted in nicely, if you do not have a metal spudger you can use any pack of screw drivers whose other end looks like the metal spudger, that’s about it, as far the instruction goes they are good for battery replacement.

    ztauseef -

  3. T3kjASSHLhfC6JOI
    T3kjASSHLhfC6JOI
    SIplIyVGNK1QC161
    • Setze einen zweiten Spudger aus Metall zwischen die obere Kante der Displayeinheit und die Rückabdeckung, damit die Laschen nicht wieder einrasten.

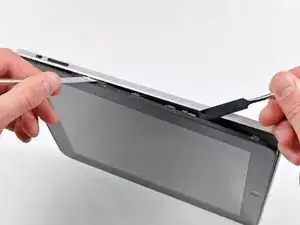
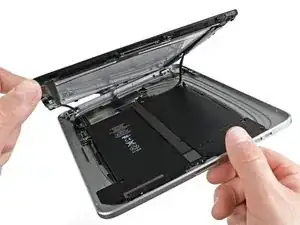
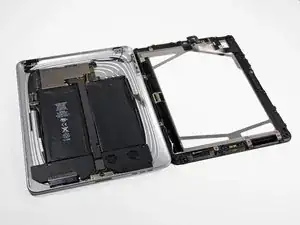
    • Heble die Displayeinheit von der Rückabdeckung ab.

  4. PEMgUMQuViASOYwo
    PEMgUMQuViASOYwo
    PmVL6K4PfQUYuEnC
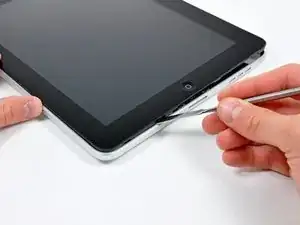
    • Heble die Display Einheit entlang der unteren und linken Kante des iPads weiter von der Rückabdeckung ab.

    • Sei besonders vorsichtig, wenn du dich der oberen Kante des iPads näherst. Das Flachbandkabel des Touchscreens befindet sich in der Nähe der Kante der Rückabdeckung und kann leicht beschädigt werden.

    Be very careful as the left side has plastic pins that go into the cover, the right side and bottom have metal clips which break easily.

    After unlocking the left side, pull away from the right side, as to save the metal clips.

    Neven Dilkov -

    During reassembly, it can be difficult to get the clips back into the body. I found that I had to put two (sturdy) metal spudgers on either side of the lower-right clip in order to gain enough space to get the clip into the body. Even then it required a fair amount of force (obviously not so much as to damage the display).

    cgkemper -

  5. XTsZrsSq6rdV63XG
    • Hebe die Displayeinheit an der unteren Kante von der Rückabdeckung ab.

    • Hebe die Displayeinheit nicht zu weit vom Rest des iPads ab, da ein empfindliches Antennenkabel, das nur wenig Spiel hat, die beiden Komponenten noch miteinander verbindet.

    There are four black angle metal foil corner pieces that just fall out of the case. They are about 4 mm long and 2mm on each leg. Have no clue what they do or where they go.

    Carl Rossi -

    That's probably broken Metal Display Clips. Easy to replace, but you'll need to purchase a set of new clips. Luckily, they're not expensive :-)

    orb -

    The display data cable may be glued into place along the right and top side of the right battery. You should use an iPod opening tool to pry it away from the adhesive. This will allow you to get a wider opening between the display and iPad body in order to access and remove other cables.

    cgkemper -

    The photo above is the Wi-Fi version because the cellular communication board is missing in the photo. As I lifted the display, following the instructions, one of the cellular antennas snapped right out of the copper connector exposing bare wire. No big deal because it is an iPad 1 and no one would ever use cellular with an original iPad anyway. Not these days. But be very careful lifting the display because the antenna wires for the cellular board are very short and break easily.

    Peter Hillman -

  6. 2WFnGCBH2T3Uc6h4
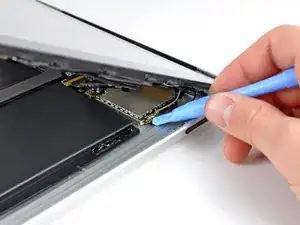
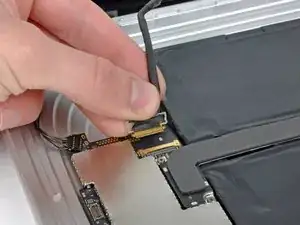
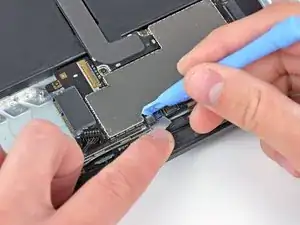
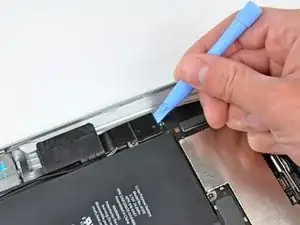
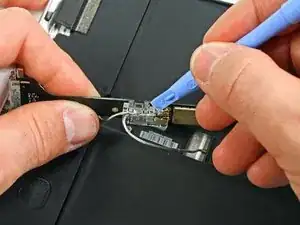
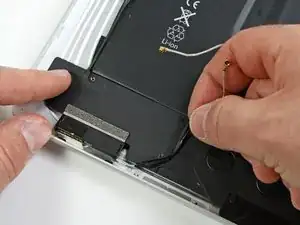
    • Benutze das flache Ende eines Spudgers, um den Antennenstecker, der sich am nächsten an der Unterseite des iPads befindet, aus seinem Anschluss auf der Kommunikationsplatine zu hebeln.

    Whats this antenna for? What is I accidentally tore it out? what will it affect?

    Laith -

    This is the GSM antenna cable connector.

    orb -

    did u find out what it did as I pulled the whole connector socket off can this be repaired

    dods -

    The antenna cable is easily broken when separating the screen from body.

    The whole antenna can be purchased for about $5 new on eBay.

    mpaint -

    Is there a tutorial? Mine broke and I did buy part. However, only thing I find is how to replace lcd. Just need how to replace 3G antenna.

    Marvin Dizon -

    I just need how to replace 3G antenna. Is there a tutorial? Mine broke and I did buy part. However, only thing that I find online is how to replace lcd.

    Marvin Dizon -

    There are 2 small cable with golden connector plugged into the sockets,

    unfortunately the lower one the cable and golden connector is broken when I move the display assembly off, what shall I do to fix it:-(

    oliveryb -

    Some know the function of these 2 cable? My lower cable broken with the golden connector...

    oliveryb -

    Mine broke and I simply soldered a new one on the bottom part of the old one, where the plastic wire cover ended. It worked. :)

    jessamy99 -

  7. IUEnPwHYdRl15lCH
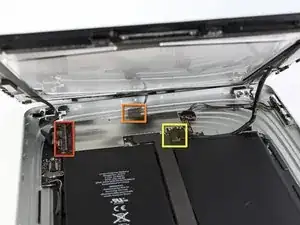
    • In den folgenden Schritten wirst du die drei Kabel, die die Displayeinheit mit dem Logic Board verbinden, abtrennen. Die Kabel sind für die folgenden Komponenten:

    • Digitizer

    • Umgebungslichtsensor

    • Display-Datenkabel

  8. Osn5Mjog5LhnLRH2
    Osn5Mjog5LhnLRH2
    YcGdCmJXbExa2ke5
    Qr1fOvjrj4WeIvfJ
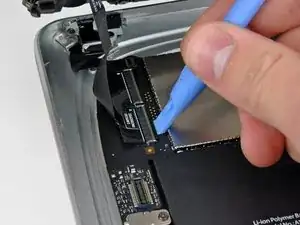
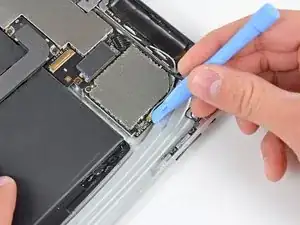
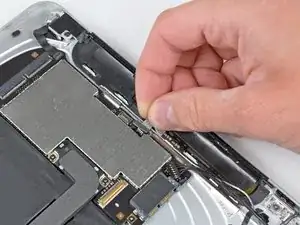
    • Benutze die Kante eines iPod Öffnungswerkzeugs, um die Halteklappen hochzuklappen, die die Flachbandkabel des Touchscreens in ihren Anschlüssen auf dem Logic Board halten.

    • Achte darauf, dass du die Halteklappe hochklappst, nicht den Anschluss selbst.

    • Ziehe die Flachbandkabel des Touchscreens gerade aus ihren Anschlüssen heraus.

  9. Tyf3AERL2ERFsQKy
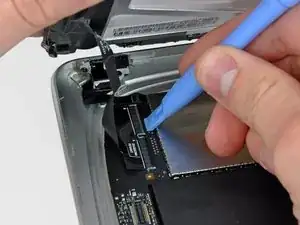
    • Verwende ein iPod Öffnungswerkzeug, um den Stecker des Umgebungslichtsensors aus seinem Anschluss zu entfernen, indem du ihn vorsichtig nach oben hebelst.

  10. ddRTUuGDKNBk2bh6
    ddRTUuGDKNBk2bh6
    21FKNBGre42J6UWA
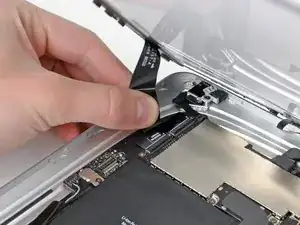
    • Trenne das Datenkabel des Displays von der Hauptplatine, indem du die Metallhalterung an der schwarzen Kunststofflasche hochklappst.

    • Ziehe den Stecker des Kabels von seinem Anschluss ab.

    • Ziehe den Stecker parallel zur Oberfläche des Logic Boards.

    For iPad Wifi Users, there is a ‘3D Antenna’’ cable that also needs to be removed. This is not covered in this tutorial. Here is a YouTube link to that covers this procedure. https://youtu.be/iD8kGSD5r0A

    Amanda May -

  11. TM1PHArEjFrxUOCp
    • Entferne die Displayeinheit von der Rückabdeckung.

  12. Ylyh1FNJkQtsFU5P
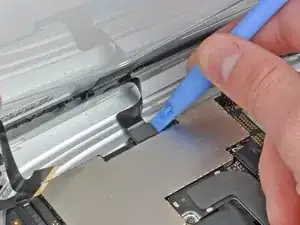
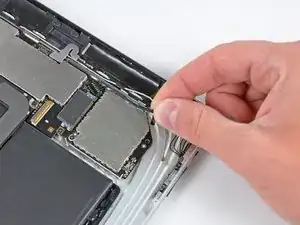
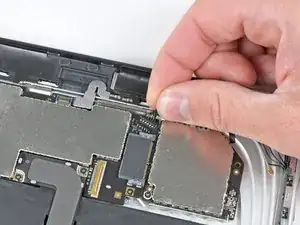
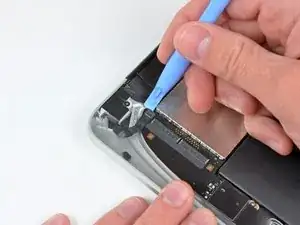
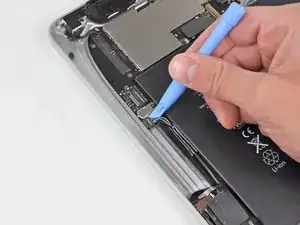
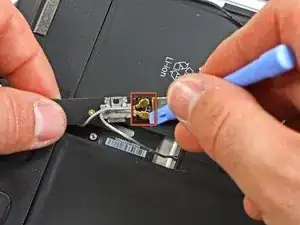
    • Benutze die Kante eines iPod Öffnungswerkzeugs, um den verbleibenden Antennen Stecker vorsichtig von der Kommunikationsplatine zu hebeln.

    Replacing the communications board is a very delicate process. Be warned. I got to this point with only a bracket or two broken and when reseating the communications board, one of the connector wafers cracked. Hopefully it will still work but I suspect I will need to find a replacement.

    Berach Productions -

  13. mvBaIoZyiGhGZ2kA
    mvBaIoZyiGhGZ2kA
    uwoq6XCOmxqUy2ES
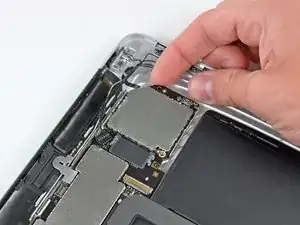
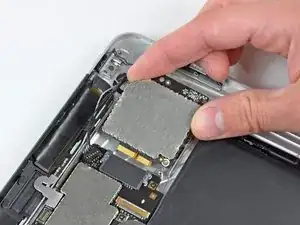
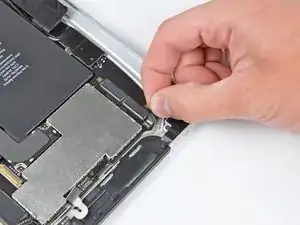
    • Entferne das Kabel der Steuertaste an der oberen Kante der Kommunikationsplatine.

    • Ziehe das Kommunikationskabel nach oben, um seinen Stecker aus dem Anschluss auf dem Logic Board herauszuziehen.

  14. xhvTTYNQdlFh4b4r
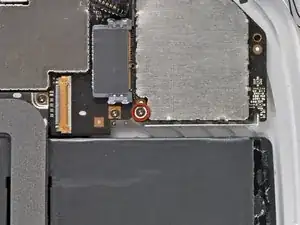
    • Entferne die einzelne T5 Torx-Schraube, mit der die Kommunikationsplatine am Rückgehäuse befestigt ist.

    for me it was t3 torx

    Chris Willberg -

  15. 6oU4EkwSYAMrjjQx
    6oU4EkwSYAMrjjQx
    cox3NSGQ265rGTGl
    • Hebe bei Bedarf die rechte Kante der Kommunikationsplatine nach oben, um sie von dem Klebepad am Rückgehäuse zu lösen.

    • Ziehe die Kommunikationsplatine von ihrem Anschluss am Logic Board ab.

    There is some strong adhesive along the upper right corner of the control board holding in place to the bottom cover. I found that some drops of alcohol along that edge and slightly lifting gently with a spudger will release the adhesive enough for you to slide the control board out of the socket.

    Gregg Stanley -

  16. oqXDrLonpAXRlmAj
    • Ziehe die EMI-Abschirmung aus Gummi, die den Anschluss für die GPS-Antenne abdeckt, vorsichtig ab.

    • Verwende die Kante eines iPod Öffnungswerkzeugs, um die Halteklappe des GPS-Flachbandkabels am Anschluss auf dem Logic Board hochzuklappen.

    • Achte darauf, dass du die Halteklappe aufhebelt, nicht den Anschluss selbst.

  17. 2tdETtVPltZ1xOHw
    • Ziehe das Flachbandkabel der GPS-Antenne aus dem Anschluss.

  18. bPgMnq5qqOfS2BdQ
    bPgMnq5qqOfS2BdQ
    AsBxSW1UVl61P3Rv
    • Benutze die Kante eines iPod Öffnungswerkzeugs, um die Halteklappe an der Kopfhörerbuchse/dem Anschluss für das Mikrofon aufzuhebeln.

    • Achte darauf, dass du die Halteklappe aufhebelst, nicht den Anschluss selbst.

    • Ziehe das Flachbandkabel für die Kopfhörerbuchse/das Mikrofon aus dem Anschluss.

    • Ziehe das Kabel in Richtung der linken Seite des iPads.

  19. U1PjGlvb1lgLal2S
    • Verwende ein iPod Öffnungswerkzeug, um den Stecker der SIM-Platine aus seinem Anschluss auf dem Logic Board herauszuhebeln.

    • Dieser Stecker kann mit schwarzem Klebeband abgedeckt sein. Verwende eine Pinzette, um das Klebeband vor dem Heraushebeln abzuziehen.

    Some iPads have a black tape that keeps the connector in place, you will have to remove it.

    Walter Ferlazzo -

    Cut the tape holding the SIM board connector to the logic board.

    anonymous 9861 -

  20. m6b56IUvh4nChsGB
    • Biege das SIM-Kabel zur Unterseite des iPads, um an den Stecker des Lautsprechers zu gelangen.

    • Benutze die Kante eines iPod Öffnungswerkzeugs, um den Stecker des Lautsprechers nach oben und aus seinem Anschluss auf dem Logic Board herauszuhebeln.

    • Heble von unten her an den Kabeln.

  21. Yx3V3sVHQOVtvFfs
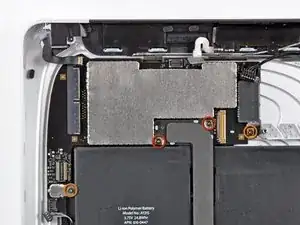
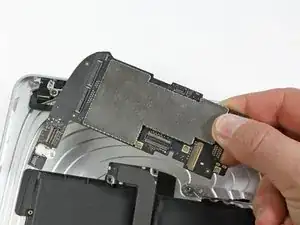
    • Entferne die folgenden Schrauben, mit denen das Logic Board an der Rückabdeckung befestigt ist:

    • Zwei 4,56 mm T5 Torx Schrauben.

    • Zwei 3,76 mm T5 Torx Schrauben.

  22. OQPbGssmLBCoucQs
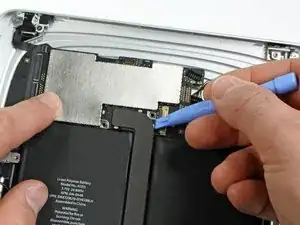
    • Benutze die Kante eines iPod Öffnungswerkzeugs, um den Stecker des Dock-Kabels vorsichtig nach oben vom Logic Board abzuhebeln.

  23. pPoqXXL6Sn2WsEDZ
    • Hebe das Logic Board aus dem Rückgehäuse heraus.

  24. 2xeVEKHPqgBn6cqj
    2xeVEKHPqgBn6cqj
    U5tLgyKk5oKP5r2V
    • Benutze die Kante eines iPod Öffnungswerkzeugs, um die SIM-Platine vom Kleber zu lösen, mit dem sie am Rückgehäuse befestigt ist.

    • Entferne die SIM-Karte aus deinem iPad.

  25. opRyqPvOlN2LiIaR
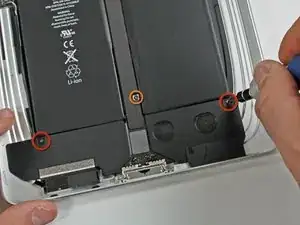
    • Entferne die beiden 2,84 mm T5 Torx Schrauben, mit denen die Lautsprecher-Einheit an der Rückabdeckung befestigt ist.

    • Entferne die einzelne T5 Torx Schraube, mit der die Mitte des Dockkabels an der Rückabdeckung befestigt ist.

  26. ZZDONgoGvM6SHd1n
    • Entferne die beiden 2,84 mm T5 Torx-Schrauben, mit denen das Kabel des Dock Connectors am Rückgehäuse befestigt ist.

  27. ItCsToRyjD1BFG3c
    • Verwende ein Öffnungswerkzeug für den iPod und baue vorsichtig die Kunststoffabdeckung aus, die die WiFi/Bluetooth-Platine und das Kabel des Dock-Steckers abschirmt.

  28. cSSkCTWLV1mFQWBB
    • Heble die Wi-Fi- und Bluetooth-Antennen vorsichtig aus ihren Anschlüssen auf der Wi-Fi-/Bluetooth-Platine heraus.

  29. i3NHfX6CM6pWAboN
    • Hebe das Kabel des Dock Connectors aus dem Rückgehäuse heraus.

  30. RFIOfyUnSjwXThuC
    RFIOfyUnSjwXThuC
    JnGscVQFi4KgQhCV
    • Löse das Lautsprecherkabel von der linken Seite des Gehäuses.

    • Entferne die WLAN-Antenne aus ihrem Kanal in der Lautsprecher-Einheit.

  31. xb4H3QPEVfRpwiJR
    xb4H3QPEVfRpwiJR
    SdEf1jEwbKrRSZlA
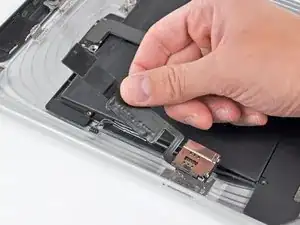
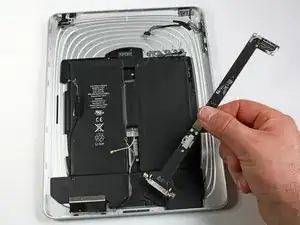
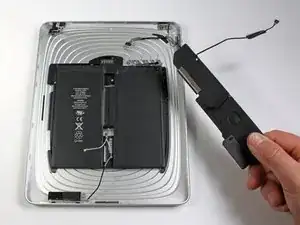
    • Hebe die Lautsprecher-Einheit an und schiebe sie nach vorne, bis die Anschlüsse die Unterseite des Gehäuseunterteils freigeben.

    • Entferne die Lautsprecher-Einheit aus dem Rückgehäuse.

  32. Fn4jymP3SNGeB4lo
    Fn4jymP3SNGeB4lo
    Rr6Rlx1kJEc6YZEv
    • Der Akku ist durch eine übermäßige Menge an Klebstoff am Rückgehäuse befestigt. Gehe mit Geduld und Vorsicht vor.

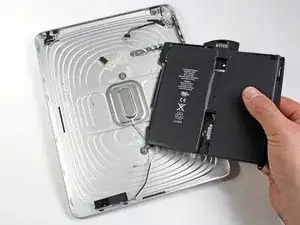
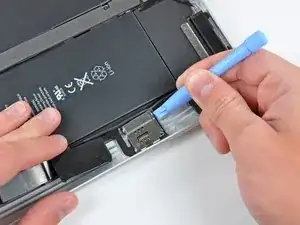
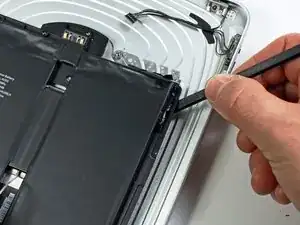
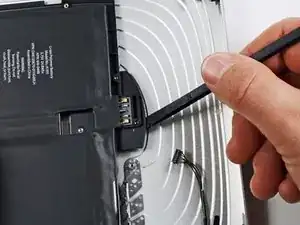
    • Verwende das flache Ende eines Spudgers, um den Akku vorsichtig aus dem Gehäuseunterteil zu hebeln.

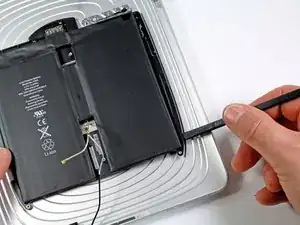
    • Vergrößere den Spalt vorsichtig weiter, indem du mit dem Spudger an der rechten Seite des Akkus entlangfährst.

    • Heble weiter, bis die rechte Seite des Akkus von der Rückabdeckung gelöst ist.

  33. gsP1vIXYIUIK6HOQ
    gsP1vIXYIUIK6HOQ
    LxckjwSCPLm1COWK
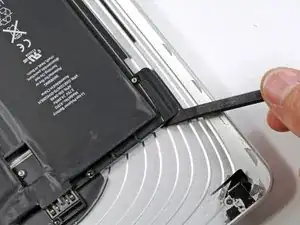
    • Schiebe das flache Ende eines Spudgers unter die obere Kante des Akkus und trenne den Kleber weiter ab.

    • Fahre damit fort, bis die Oberseite des Akkus von der Rückabdeckung gelöst ist.

  34. F2vJ2nVSlOimCGr3
    F2vJ2nVSlOimCGr3
    PmGvaM4TfZf3uXn6
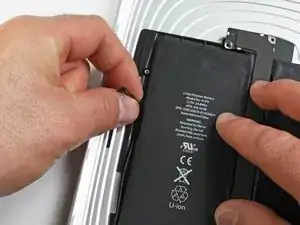
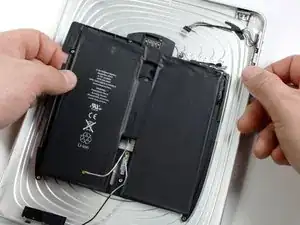
    • Wenn genügend Spielraum vorhanden ist, ziehe den Akku mit den Händen von dem Kleber ab, mit dem er noch an der Rückabdeckung befestigt ist.

    • Entferne den Akku aus dem Rückgehäuse..

Abschluss

Um dein Gerät wieder zusammenzubauen, folge den Schritten dieser Anleitung in umgekehrter Reihenfolge.

Andrew Bookholt

593241 Reputation

13 Kommentare

Everything done, battery charges but screen not responsive to touch when trying to input password. It switches on/off fine and I'm able to swipe the lock button but can't input password. Any suggestions? Thanks.

Rene Alexis Penaloza Munoz -

Battery replacement of my son's 2011 iPad 1. Once more invaluable help from ifixit as with an earlier G5 Dual 2.5 and also an iMac 27.

After the battery replacement some non responsive areas on the touch screen. Review revealed I had not relocked the digizer cable and once I did this with yet more replacement clips applied then a return to perfect function. Thanks for the invaluable help. Steve Henderson, Perth, Australia.

Steve Henderson -

Great tutorial.

One thing i am not sure how to do is the battery pack itself, Where will i find the adhesive ? Thank you.

Cedric H.

tipex -

You don’t need adhesive with a new battery pack. It will hold in place with the existing adhesive and once the iPad is reassembled, it won’t fall apart.

Peter Hillman -

I replaced the battery in my old iPad 1 Cellular model. What a PITA. You’ll break most of the clips, but it still holds together pretty well. There is a high risk of breaking the cellular antenna wires because the photo in this guide opening the display is for the Wi-Fi version, leaving out the location of the cellular board and the short length of the antenna wires. So one of the cellular wires broke the moment I raised the display, unaware that the wires were short. The wire pulled right out of the copper connector. No big deal. I replaced the battery just for fun to see if I could resurrect this old iPad that would no longer turn on. So I did it and it is back together and everything works except cell service, but I would never use cell service with it anyway. Wi-Fi works because the antenna is the Apple logo. Nice to boot up iOS 5.1.1, but it is worthless these days.

Peter Hillman -

My old 3G iPad 1st generation won’t turn on because it needs a new battery. Trying to decide if it’s worth spending the money to replace the battery myself. Guess it could still be used to watch movies on Netflix via wifi and view pics.

Resist -

Hello! All went well until first power-up after reassembly. Screen looks fine, even got the right date/time but no touch response. What to do? Check digitizer cables?

Matso Limtiaco -

Hi there, from what you described I would say to re-seat the digitizer flex cable, it would be going in the 2 connectors in upper left (left side of the logic board) Might be just bad connection there.

Andy -

I needed this guide so that I could access my Alchemy Synth app (which is now unavailable on the App Store). I ordered my battery, followed the instructions, and now I am on cloud nine! Thank you so much for this information.

Gaylon Franks -

these instructions have worked out great. thank you

ztauseef -

just finished. I would not have thought it would be that many steps.

usmclau -

If you prefer to watch a video of disassembly/reassembly, I have successfully completed the whole process ;) You can see it here:

.

Apple iPad 1st Gen No Power Fix - disassembly & battery replacement (https://www.youtube.com/watch?v=3eEbdCMr...)

.

So you can see screen removal and reattachment, motherboard removal, battery replacement etc. This even includes replacement for the infamous screen clips ;)

The clips WILL break, at least some of them, so don't stress about that. These are cheap to replace, but if you don't have somewhere to source it from you can usually get by with the remaining intact clips. You really don't need all of them to be in place! You may want to re-distribute the clips though, as often you will have one side with almost all clips intact, and one side where all clips are broken.

Just Make It -

Can you deliver to Nigeria?

Nweke Isaiah -