Einleitung

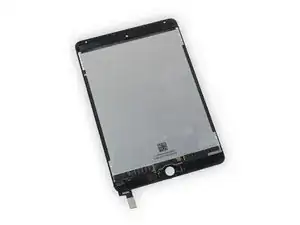
Folge den Schritten dieser Anleitung, um die Displayeinheit deines iPad mini 4 LTE, inklusive LCD und Touchscreen Glas, zu ersetzen.

Dies erfordert den Ausbau des Bildschirms und das Übertragen des Home Buttons auf dein neues Ersatzteil. Um die Touch ID Funktionalität beizubehalten, musst du den originalen Home Button auf den neuen Bildschirm übertragen.

Je nach Ersatzteil musst du unter Umständen auch den Standby-Sensor für die Nutzung von SmartCover übertragen, was das Entlöten eines Kabels erfordert.

Einige Bilder dieser Anleitung stammen vom WiFi-Modell und zeigen eventuell leicht verschiedene Bauteile. Das Verfahren ist aber grundsätzlich gleich, außer wo es besonders beschrieben ist.

  1. Z3ZkOmwOKyXWUNuQ
    Z3ZkOmwOKyXWUNuQ
    IAGJdRgEFMnCOZYS
    n6M1TYTSoV56yymc
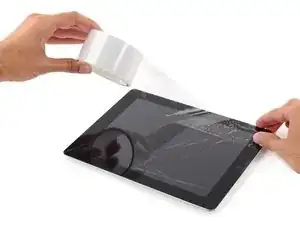
    • Wenn dein Display gebrochen ist, verhindere weiteren Bruch und schütze dich durch Abkleben des defekten Displays vor Verletzungen.

    • Klebe überlappend durchsichtiges Klebeband (Paketklebeband) auf das komplette Display. Wenn das Glas extrem gesplittert ist, klebe mehrfach die Bruchstelle ab.

    • Dies schütz dich vor Glassplittern beim Arbeiten mit dem Display.

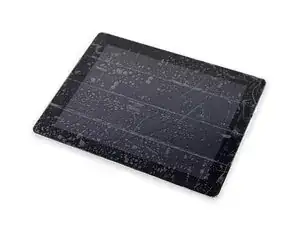
    • Folge der Reparaturanleitung so gut es geht. Wenn das Glas einmal gebrochen ist, wird es wahrscheinlich weiter brechen. Vielleicht musst du sogar einen Metalspatel verwenden, um das Display zu entfernen.

    • Schütze deine Augen! Während der Reparatur kann es vorkommen, dass kleinste Teile in die Augen gelangen könnten. Keine Reparatur ohne Schutzbrille.

  2. HaIxvTqYrjFRYmFf
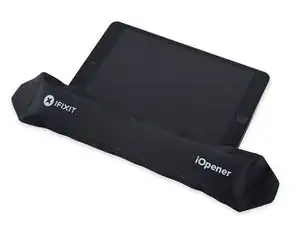
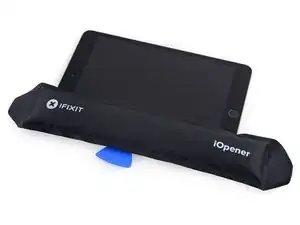
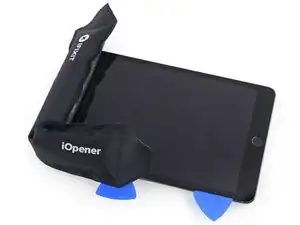
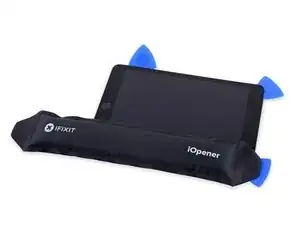
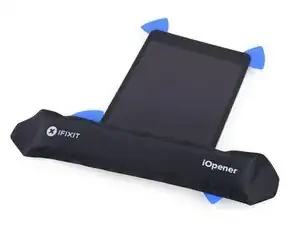
    • Platziere den erhitzten iOpener auf der linken langen Kante und lasse ihn etwa 2 Minuten in dieser Position.

  3. 13rFSRL3NS4fCQUu
    13rFSRL3NS4fCQUu
    C61ZvErpTPRvm3FK
    1TsMJjmwTMVmHTIa
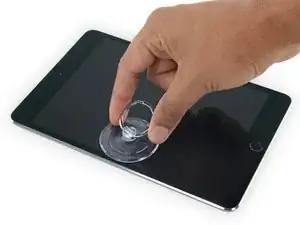
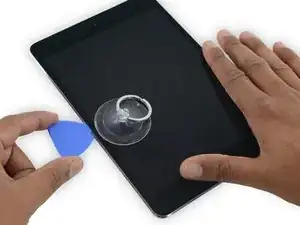
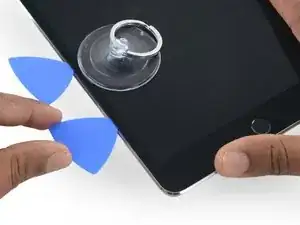
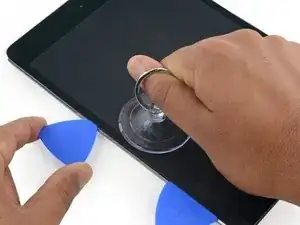
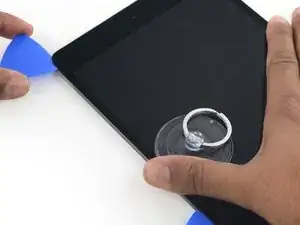
    • Platziere mittig einen Saugheber auf der angewärmten Seite.

    • Achte darauf, dass der Saugheber komplett auf dem Glas aufliegt.

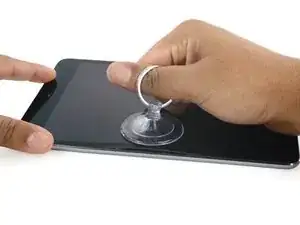
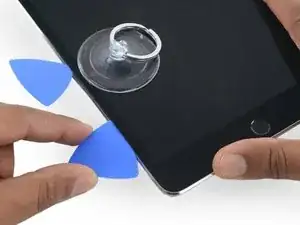
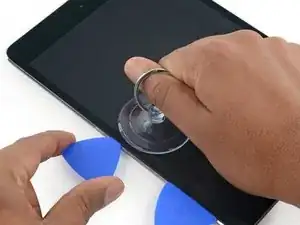
    • Halte das iPad mit einer Hand nach unten und ziehe den Saugheber mit gleichmäßiger Kraft nach oben, um einen Spalt zu erzeugen.

    • Je nachdem, wie alt dein Gerät ist, kann das Ablösen schwierig sein. Wenn du Probleme hast, erwärme die Stelle noch einmal und versuche es wieder.

    • Hebe das Glas nur soweit an, dass du ein Plektrum einführen kannst – je mehr du das Glas öffnest, desto eher kann das Glas Risse bekommen.

  4. ohUAS1Ykl4EUbSwG
    ohUAS1Ykl4EUbSwG
    ScjggYUdT4DXsNOK
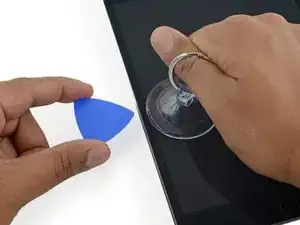
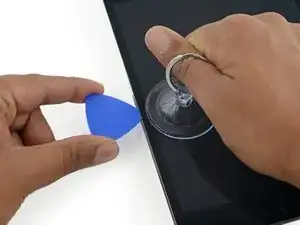
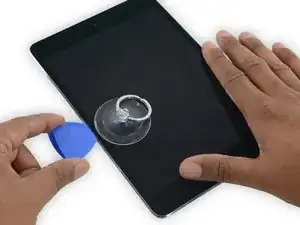
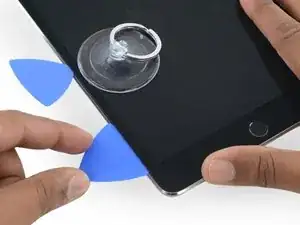
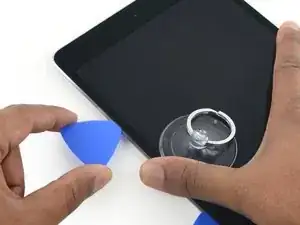
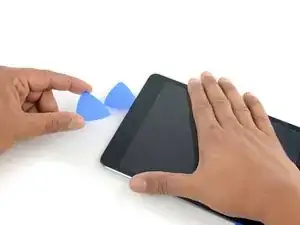
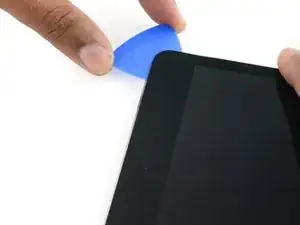
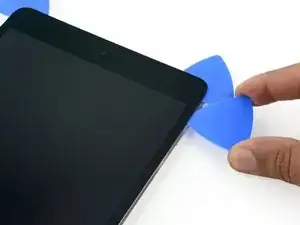
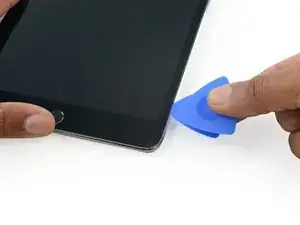
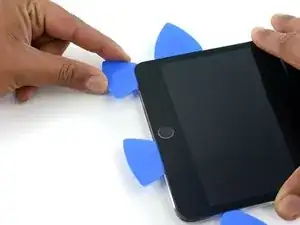
    • Während du das Display mit dem Saugheber anhebst, führe ein Plektrum in die Lücke zwischen dem Glas und dem iPad Gehäuse ein.

    • Führe das Plektrum nur etwa 2 mm tief ein. Falls du das Plektrum zu weit einführst, kannst du das Display, die Hintergrundbeleuchtung oder den Touchscreen beschädigen.

    “Don't insert the opening pick any deeper than the black bezel on the side of the display. Inserting the pick too far may damage the LCD.”

    Unfortunately, you only know you have inserted it too far when you have, and you start seeing little bubble veins form between the glass screen and the LCD.

    The adhesive can be very stiff/hard, and if pushing through it can result in the pick plunging into the LCD when the adhesive finally gives way.

    Take your time, use alot of heat, and if you need to try and push the pick in, try and do so in a slicing motion along the edge, use the wide edge, or hold the pick so that your finger will hit the edge of the screen before the pick tip will pass the bezel.

    lucanos -

    Adhesive strips are only 1mm wide on sides. Up to 5mm wide top and bottom. I used the Isclack. Screen seemed ok bending without breaking. Worth looking for a photo of the replacement adhesive strips so you know what you have to separate. Be extra careful at the lower right corner where the cables are.

    ian cheong -

    This is a failure of a guide as it doesn’t tell you to insert at a downward angle so you don’t potrude into the LCD… Now I have to spend more money to replace the screen as I pushed adhesive between the LCD and the screen even though I went no farther than a millimeter short of the screen...

    Alec -

    can you open the right side if the left is too cracked to use a suction cup on?

    clark overhiser -

    This guide needs amending urgently.

    You MUST NOT put the pick or whatever you are using more than 2mm under the sides of the screen, or you will cut through the adhesive tape securing the backlight assembly to the LCD glass.

    This will push adhesive into the viewable area of the LCD and cause the backlight assembly to no longer be secured against the LCD fully.

    I now need a new screen.

    This line below from the guide is absolutely INCORRECT and will ruin your expensive display:

    ”Don't insert the opening pick any deeper than the black bezel on the side of the display.”

    The black bezel is 5mm to 6mm wide; you MUST NOT insert anything to that depth or you will destroy your display. 2mm maximum!

    jamesqb2001 -

    thanks. will take this into account for my repair

    Adab Abu -

    I too damaged my display because of this absolute nonsense (The German version, which I used, still had this INCORRECT portion in it). I can't believe how long it took iFixit to update this, even though people have been reporting this for years on end. Sadly iFixit still haven't updated a variety of other things that are still at the very least high risk instructions. I just messaged them the other day, but they don't seem to care about or understand the remaining issues that this guide has. At least they updated one of the most severe things, but they just plainly told me 'I'm wrong' about the rest. I liked iFixit it so far, and I've worked on a variety of (difficult) repairs - but this experience was a very huge let down.

    Mac Stevenson -

    A few thoughts after opening a number of Mini 4’s.

    1) if the display is warm enough you can squeeze the digitizer and LCD back together after a minor incursion with the opening pick and it will reseal.

    2) I’ve started going in at the top just to the right of the camera (I use an iFlex to get in then switch to a pick). Then I run down either side with my fingers choked up on the pick so there only a mm or 2 sticking out. Usually after running down one side, I can get the display open enough to get the pick in behind the LCD when I do the other side

    Stow -

  5. TUkUdEMQJclDVNsZ
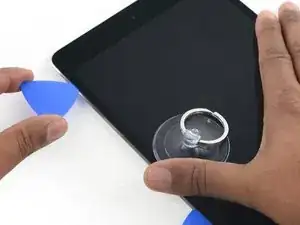
    • Erhitze den iOpener erneut, platziere ihn an der gleichen Stelle und lasse ihn ein paar Minuten dort liegen.

    • Achte darauf, den iOpener während des Reparaturvorgangs nicht zu überhitzen. Warte immer mindestens zwei Minuten, bevor du den iOpener wieder erhitzt.

    If your iPad is cold, consider leaving the iOpener on for longer than 5 minutes. The aluminum housing is a very large thermally dissipating mass and will quickly cool off the glass and make you have to start over and wait the 10 minutes to reheat. There’s a very slim window in which you’re able to insert the pick into the glass adhesive before it solidifies once again. I’ve been fighting with it for like 20 minutes following these instructions and it’s not working. You really need to leave it for longer than just 5 minutes to get the back housing hot too.

    Crystal -

    Heat is essential. I used a 3d printer’s heated set at 65 degrees. Chris Storer’s stip above saved me as you really need to let it sit for quite a while to soften the adhesive. Since I was doing a battery change, I heated both sides as the aluminum back is a huge heatsink that really sucks up the heat. Don’t try forcing it; if the suction cup isn’t pulling a gap in the screen, leave it on the heater for additional time.

    garbage911garbage -

    Love the 3d printer idea, I hadn’t thought of that! I have used a heat gun as well but you have to be very careful to not use too much heat. Also watch for inserting the pick too far, it is really easy to delaminate glass from the display!

    russ -

  6. CqMR4hHhWIXsHe31
    CqMR4hHhWIXsHe31
    cxBVHNUwDC4RX1cZ
    Jnv4Ppg4Y5ZUBVkB
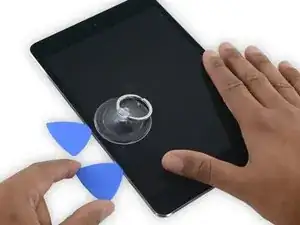
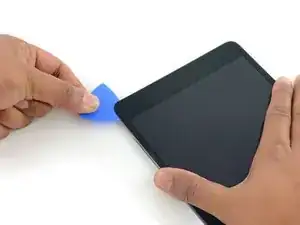
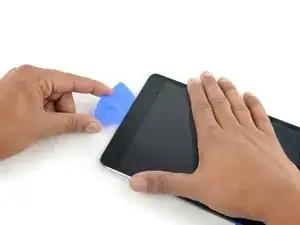
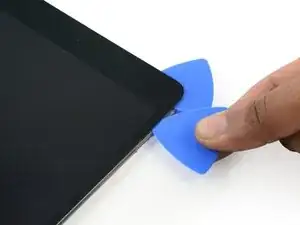
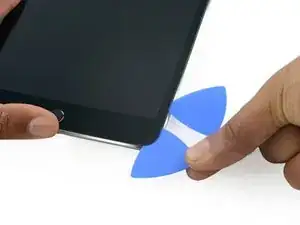
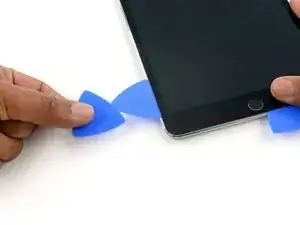
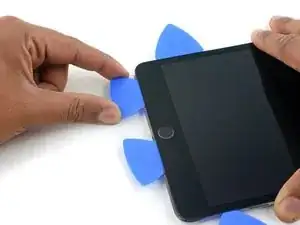
    • Führe ein zweites Plektrum neben dem ersten ein und ziehe es vorsichtig nach unten, um die Klebeverbindung des Displays zu lösen.

    • Wenn du einen großen Widerstand spürst, halte an und erwärme das iPad nochmals mit dem iOpener. Wenn du zu viel Kraft aufwendest, kannst du das Display irreparabel beschädigen.

    I have found that wedging a blue pry tool in between the frame and the glass can give you a better edge enough to slide the pick in.

    Crystal -

  7. WOS4ZM3eJLkCskJC
    WOS4ZM3eJLkCskJC
    Hnga6OLRAMAifQgv
    ypBjyNU4PUckUhxI
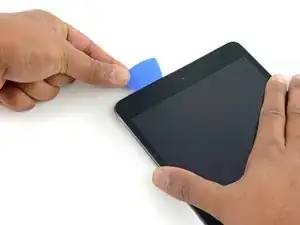
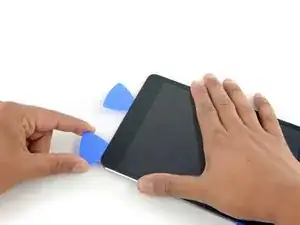
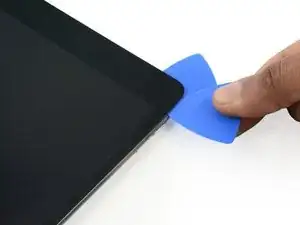
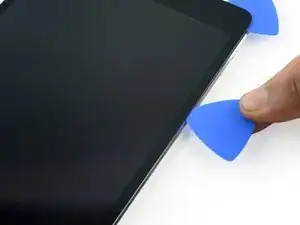
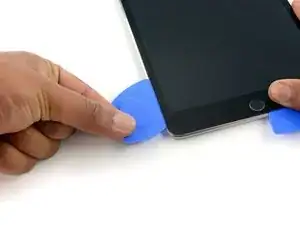
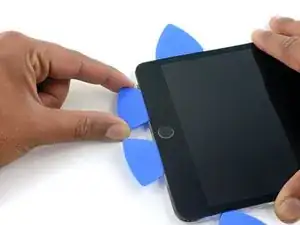
    • Schiebe das Plektrum weiter an der Seite des Displays herunter, um den Kleber zu lösen.

    • Falls das Plektrum im Kleber stecken bleiben sollte, dann "rolle" es die Seite des iPads entlang, um weiterhin den Kleber zu lösen.

  8. g4K1TQaPG4Pcsian
    g4K1TQaPG4Pcsian
    nTaLoCMLNmMdWXfP
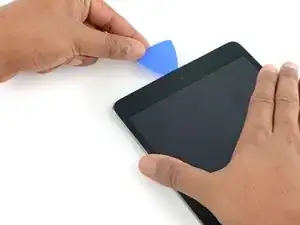
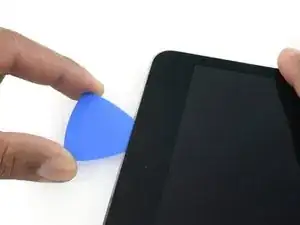
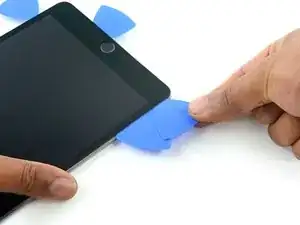
    • Nimm das erste Plektrum, das du eingesetzt hast, und schiebe es nach oben zur oberen Ecke des iPads.

  9. UbCbTICAd1Qenj1D
    • Erhitze erneut den iOpener und lege ihn auf die obere Kante des iPads über die Frontkamera.

    • Achte darauf, den iOpener während der Reparatur nicht zu überhitzen. Warte mindestens zehn Minuten, bevor du den iOpener erneut erhitzt.

    • Wenn du einen flexiblen iOpener hast, kannst du ihn so umbiegen, dass sowohl die obere linke Ecke als auch die obere Kante gleichzeitig erhitzt werden.

  10. ZMS55hkNx4hdDBSU
    ZMS55hkNx4hdDBSU
    Q5nLFBwJGyFQJD6K
    ajQfyycssK2puFRL
    • Schiebe das Plektrum um die obere linke Ecke des iPads, um den Kleber zu trennen.

  11. eoxpXig3yZbNJ5LM
    eoxpXig3yZbNJ5LM
    2UQdxX1TXSBtPnV1
    QJJjM65RQqa2bBUY
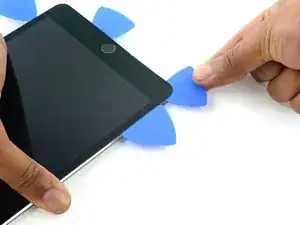
    • Schiebe das Plektrum entlang der Oberkante des iPads und halte kurz vor der Kamera an.

    • Wenn du die Frontkamera erreichst, ziehe das Plektrum etwas heraus und schiebe es weiter an der Oberkante entlang.

    • Vermeide es, das Plektrum über die Frontkamera zu schieben, da du sonst unter Umständen Kleber auf die Linse schmierst oder die Kamera beschädigst. Die folgenden Schritte erklären genau, wie man es am besten vermeidet, mit der Frontkamera ins Gehege zu kommen.

  12. 2biNwid2uuwBB1dI
    2biNwid2uuwBB1dI
    upKYLNsBIufNuJLK
    lXpUpqTV2IROQlUM
    • Lasse ein Plektrum kurz nach der Frontkamera im iPad stecken.

    • Nimm ein zweites Plektrum und setze es links neben der Kamera ein, wo gerade eben das erste Plektrum war. Schiebe es zur Ecke zurück, um jeglichen Kleber vollständig zu lösen.

    • Lasse das zweite Plektrum an Ort und Stelle, um zu vermeiden, dass sich der Kleber in der Ecke beim Abkühlen wieder verbindet.

  13. RBiTBQ1bfbLVlBEQ
    RBiTBQ1bfbLVlBEQ
    QoYVVDyCjOGlRV4w
    • Setze das vorherige Plektrum tiefer in den iPad ein und schiebe es von der Kamera weg zur Ecke.

  14. pIBSCEPokwTEi1cH
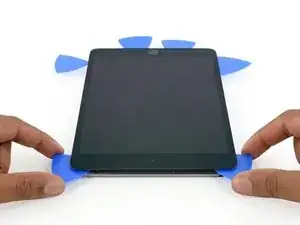
    • Lasse die drei Plektren in den Ecken des iPads stecken, um zu vermeiden, dass sich der Kleber des Frontpanels wieder verbindet.

    • Erhitze den iOpener erneut und lege ihn auf die übrige lange Seite des iPads entlang der Lautstärke- und Verriegelungstasten.

  15. ICjU4SsE5PcBHfLj
    ICjU4SsE5PcBHfLj
    XHaDLfDSSEKIKO2S
    4MPJUfjxWS21GryD
    • Setze ein neues Plektrum ein und schiebe es entlang der rechten Kante des iPads herunter und trenne so den Kleber auf.

  16. EDS62uJdC4StMJC4
    EDS62uJdC4StMJC4
    6FSbjKEpCFQttuXP
    DYTVSLmFJPWPjOo6
    • Schiebe das Plektrum weiterhin die rechte Kante entlang herunter, falls nötig, erhitze die Kante erneut mit dem iOpener.

    • Achte darauf, das Plektrum in der Nähe der unteren rechten Ecke nicht zu weit hineinzuschieben, sonst könntest du das Displaykabel beschädigen.

  17. WiN5Njbf4TAxgH6j
    • Lasse die Plektren an Ort und Stelle und erhitze den iOpener erneut.

    • Denke daran, den iOpener nicht zu überhitzen, erhitze ihn nicht mehr als ein Mal alle 10 Minuten.

    • Lege den erhitzten iOpener auf die Seite mit dem Home Button und lasse ihn dort ein paar Minuten, um den Kleber unter dem Glas aufzuweichen.

  18. KV3iXayvjLwbPJgy
    KV3iXayvjLwbPJgy
    tut5k1RijNURbajb
    krtEFHCd1XVwjLQp
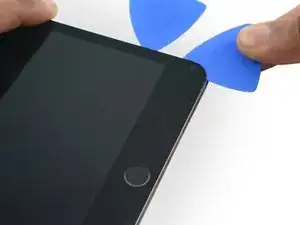
    • Setze ein neues Plektrum an der unteren rechten Ecke des Displays ein, und zwar unter dem letzten Plektrum, das du benutzt hast, um die rechte Kante herunter zu schneiden.

    • Schiebe das neue Plektrum um die untere rechte Ecke des Gerätes.

  19. fPQkoQKAuO4UQw52
    fPQkoQKAuO4UQw52
    njXRBDjMIAIN3kLl
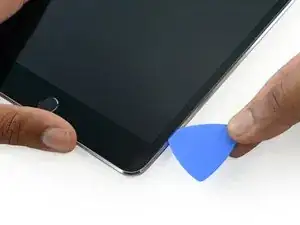
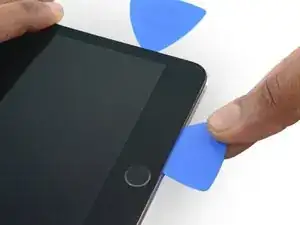
    • Schiebe das Plektrum von der unteren rechten Ecke an der Unterkante des Gerätes entlang. Halte etwa 1,2 cm kurz vor dem Home Button an.

  20. TyQ2yT4inXSfLZnt
    TyQ2yT4inXSfLZnt
    GJ3JqPpVjZVTbFjD
    • Setze ein letztes Plektrum an der unteren linken Ecke des iPads ein, direkt unter dem bereits vorhandenen Plektrum.

  21. 6FCir6UTX1LB11oa
    6FCir6UTX1LB11oa
    I5wxHRns6QLtaanf
    • Schiebe das Plektrum um die untere linke Ecke des iPads.

  22. xvXZkOKET1oQ1aeM
    xvXZkOKET1oQ1aeM
    YmcQTJpRREZ6EI6m
    dJISOpWxsTNHryjV
    • Schiebe das Plektrum weiterhin an der unteren linken Kante des Displays entlang in Richtung Mitte des iPads, bis es ungefähr 1,2 cm vom Home Button entfernt ist.

  23. kKFZvGgiSl6PxHNZ
    kKFZvGgiSl6PxHNZ
    L6v3qnXBSmPS3yQc
    CAtEvbHqdCLRe6Xf
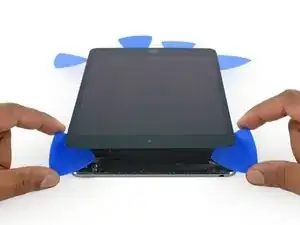
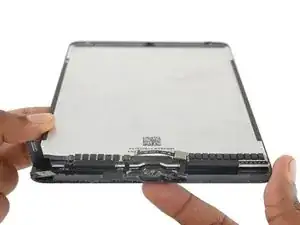
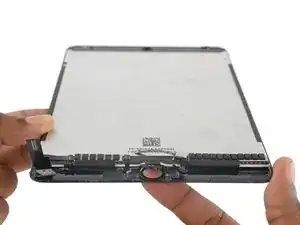
    • Verdrehe die beiden Plektren an der Oberkante des iPads, um den letzten Kleber abzulösen, der das Display befestigt.

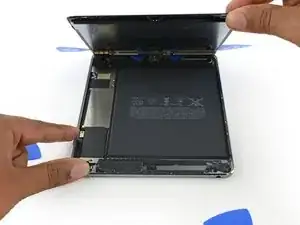
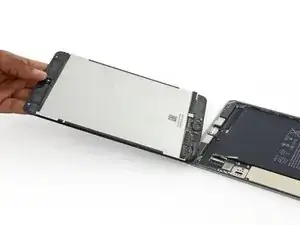
    • Hebe das Display von der Oberkante her ab, um das Gerät zu öffnen.

    "Twist the two picks at the top edge of the iPadTwist the two picks at the top edge of the iPad "

    When I did this twisting motion, and I thought I was being gentle, one of the picks cracked nearly in half. That adhesive is very strong! I probably did not cut into it far enough before applying the twisting to open the screen.

    jharrison -

  24. HuCZ4RSC3OeD2SPw
    • Halte die Displayeinheit senkrecht zum iPad, bis es getrennt ist, um zu vermeiden, dass irgendwelche Kabel zu sehr überdehnt werden.

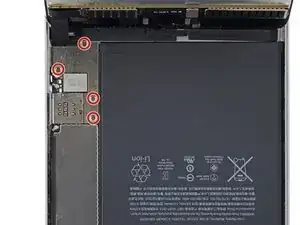
    • Entferne die vier 1,2 mm Kreuzschlitzschrauben über der Halterung des Akku-/Displaysteckers.

    What you need to do is move the display inboard up to the edge area of battery! That will relieve all the stress on the cables. Simply holding it straight up is not enough, especially later when you go back to reconnect the cables and the bracket over the connectors.

    Fixrights -

  25. XsVsuhgEytEEGimp
    • Entferne die Halterung des Akku-/Displaykabels.

    Your bracket may look different to this. Mine had a black covering on the long edge being held between the fingers in this illustration. Same screws, same position, just a different color.

    lucanos -

    Is it the end of the world if the bracket is not reinstalled, will the device function normally or will it eventually have issues with the connectors coming loose following shock?

    Thomas Langford -

    Note that the left had side of the bracket hooks under a lip on the edge of the case. Always recommend to replace connector brackets. If you forget and leave it out, best to buy a new set of adhesive strips for the day when the connector comes loose.

    cheongi -

  26. 65BhfgXkOlXaBvGT
    65BhfgXkOlXaBvGT
    tEO1KyYA1gDhHXJI
    • Wenn du irgendwelche Steckverbindungen vom Logic Board löst, dann achte darauf, den Stecker gerade hochzuheben, um zu vermeiden, dass der Anschluss vom Logic Board abgerissen wird.

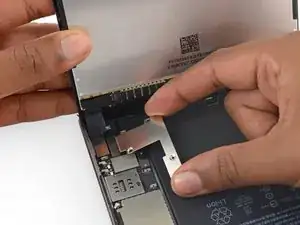
    • Benutze das flache Ende eines Spudgers, um den Akkustecker von seinem Anschluss auf dem Logic Board zu trennen.

    • Biege das Flachbandkabel des Akkusteckers leicht nach oben, damit es nicht wieder Kontakt bekommt und das iPad einschaltet.

    When i was starting to disconnect the lcd to the board i hit the black film and it lit and now even the new display wont display anything how to fix it? The black film near the lcd connector.

    tyroon_jul27 -

  27. 2OmuQfiSkd3nOajM
    2OmuQfiSkd3nOajM
    VdJvJQTT4eBsv3TT
    AJQFcH1bohquqhRJ
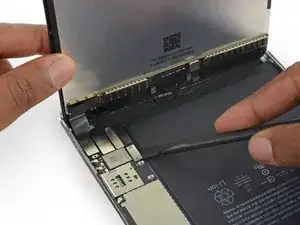
    • Benutze die Spitze eines Spudgers, um den Stecker des Displaydatenkabels aus seinem Anschluss auf dem Logic Board zu lösen.

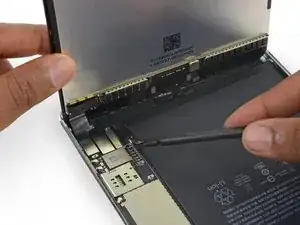
    • Benutze die Spitze eines Spudgers, um den Stecker des Touchscreen-Kabels aus seinem Anschluss auf dem Logic Board zu lösen.

    • Wenn du diese Stecker wieder einsetzt, dann drücke sie von einem Ende her zum anderen fest. Wenn du sie in der Mitte festdrückst, verbiegst du sie unter Umständen, was zu Schäden oder einer schlechten Verbindung führen kann.

  28. pJeomsvRagHRujMD
    • Entferne die Displayeinheit.

    • Um deine Displayeinheit wieder einzubauen, musst du die Display-Klebestreifen ersetzen. Benutze unsere Anleitung zum Einsetzen von Display-Klebestreifen, um die Display-Klebestreifen anzubringen und das Gerät zu verschließen.

    Ich habe eine Bücherstütze benutzt um das Display in senkrechter Position zu halten, während ich die vier Schräubchen gelöst habe.. So zieht man nicht so an den Flexkabeln….!

    Fridtjof Schüssler -

    Because the 3-piece adhesive strips shown in the Display Adhesive Application Guide link were different from iPad Mini 4 Adhesive Strips (item code IF316-013-1), it wasn't easy to figure out the exact location of the bottom adhesive. It would be helpful to include a separate application guide or an additional picture showing the exact location of each strip) on the guide.

    Christian Kim -

  29. YIWJlXemLhd26vBi
    YIWJlXemLhd26vBi
    xiE15owPeShDTgGt
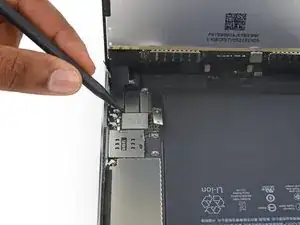
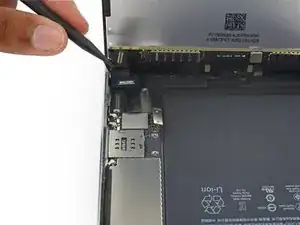
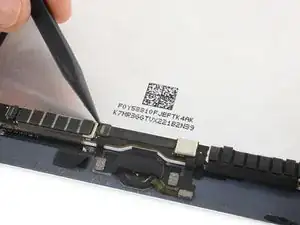
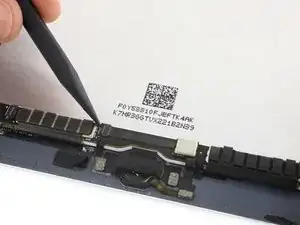
    • Benutze die Spitze eines Spudgers, um den Halteriegel am Home Button ZIF Anschluss nach oben zu klappen.

  30. 6AGN1gFMcWMru6SC
    6AGN1gFMcWMru6SC
    EmoaHUbfxYDVBZPp
    2Vm2WVRKeUMONc5b
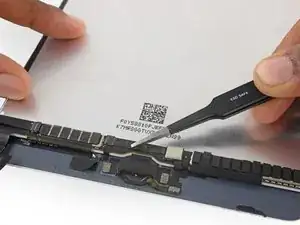
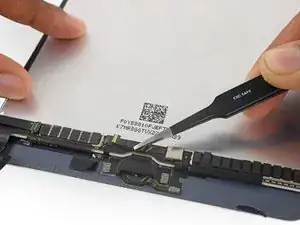
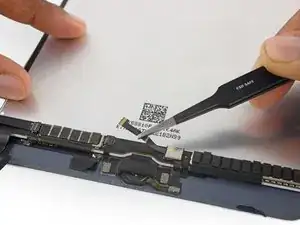
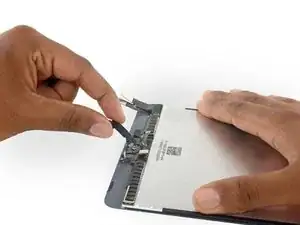
    • Benutze eine Pinzette, um das Home Button Flachbandkabel aus dem ZIF Anschluss zu lösen.

    • Löse das Kabel bis zur EMI Abschirmung ab.

  31. mRn2qRRRmDF6gNCL
    mRn2qRRRmDF6gNCL
    GTTuxo6dVM1kutQM
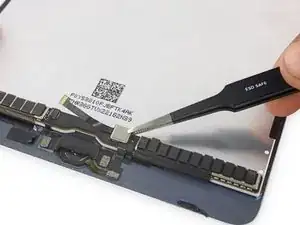
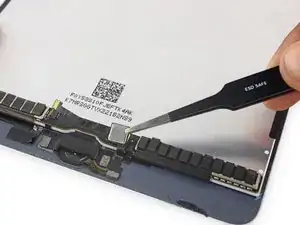
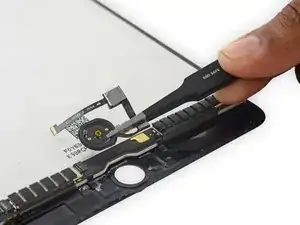
    • Benutze eine Pinzette, um das Hardware-Kontrollmodul des Home Buttons von der Displayeinheit wegzuheben.

  32. RMDRlKkoH2AZ6J1n
    RMDRlKkoH2AZ6J1n
    S5hy44bRgDUm4YAE
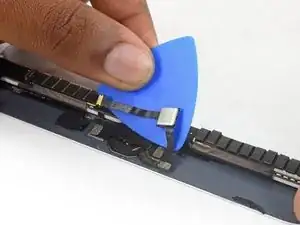
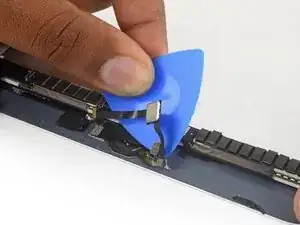
    • Benutze ein Opening Pick (Plektrum), um weiterhin das Home Button Flachbandkabel von der Displayeinheit zu lösen.

    • Wenn du Metallwerkzeuge benutzt, um dieses Kabel zu lösen, verkratzt du unter Umständen das iPad Glas und entfernst etwas Farbe.

  33. ElX4kkpOCiYC3cqT
    ElX4kkpOCiYC3cqT
    ULmdhQrOelFT4cpi
    BhYe11A6GqiPEZrr
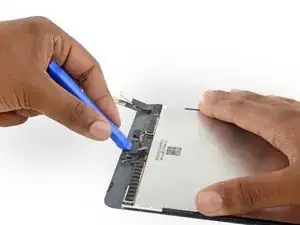
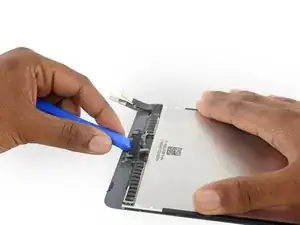
    • Benutze ein Öffnungswerkzeug aus Plastik, um die Halterung des Home Buttons von der Displayeinheit wegzuhebeln.

    • Wenn du diese Halterung austauschst, ist es empfehlenswert etwas stark haftendes Klebeband zur Befestigung zu benutzen.

    The tip about the high-bond tape is great, but high-bond tape is something that should be mentioned at the beginning in the list of supplies we need. Because I have the whole thing taken apart, and now I’m told I need something that I don’t have on hand. So what am I supposed to do, just let everything sit around open, until I get to the store to see if they have some high-bond tape?

    Robb M -

  34. moUHJdAQ5SNgPdpo
    • Erhitze einen iOpener und lege ihn über die Unterkante des Frontpanels, um den Kleber aufzuweichen, mit dem der Home Button befestigt ist.

    what is another option if you dont have heat iopener

    premal06 -

    A hairdryer and much patience

    BeLeFu -

  35. 6LcqkORVer25bXAf
    6LcqkORVer25bXAf
    AHCKCsLCMGMPgGOD
    • Der Home Button ist mit einer dünnen empfindlichen Gummidichtung befestigt, die leicht am Frontpanel festgeklebt ist.

    • Drücke den Home Button langsam nach oben und aus der Displayeinheit heraus, um die Dichtung vom Frontpanel zu lösen.

    • Achte darauf, dass die Dichtung nicht reißt. Wenn der Kleber ausreichend erhitzt wurde, löst sie sich mit leichtem Druck vom Frontpanel.

  36. TyKbYQw5OlRT5YSU
    • Entferne die Home Button Einheit.

    What is the proper way to reinstall the home button bracket?

    chris crawford -

    Specific instructions to reassemble and use the gasket are needed, indeed. This manual falls really short. Just reverse steps won’t do.

    carolaclavo -

  37. ddMtBHYCjXVdLSDS
    ddMtBHYCjXVdLSDS
    gmIGOePfoDyVYXvS
    LMCdCNIsGpWeHHIL
    • Untersuche dein Ersatzteil und dein originales Display sorgfältig, um sicher zu gehen, dass sie passen.

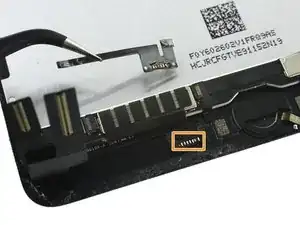
    • Unter Umständen fehlt bei deinem Ersatzteil der Standby-Sensor, der für die Nutzung von SmartCover notwendig ist. Wenn du diese Funktion beibehalten möchtest, musst du die Komponente übertragen.

    • Entlöte die sechs Lötpads unten links am Display, um das Kabel der Sensoreinheit zu entfernen.

    This is an important step that’s missed by a lot of people resulting in negative reviews on replacement screens. Screen suppliers never mention this step or people would not buy from them. Save yourself a headache and time and buy a screen-digitizer with the sleep/wake sensor already soldered.

    Thomas Tommy -

    Is there any reason to replace this if you won’t use it? If I don’t move over the old sensor, will it still work? I’ve never soldered something this small and expensive before.

    drumminherbie -

    hab es ohne gemacht, da es auch keine lötstellen gibt - seither gibt es gar keine Standyby funktion mehr!

    junk -

    LÖSUNG: in den Systemeinstellungen “anzeige und Helligkeit” Sperren/entsperren deaktivieren.

    junk -

    Was meinst du damit “weil es keine Lötstellen gibt”? Sind auf deinem neuen Display keine Lötstellen gewesen wo du den Sensor hättest dran löten können?

    Funktioniert dein Lösungsweg für dich noch: “anzeige und Helligkeit” Sperren/entsperren deaktivieren“ ?

    Ich stehe vor der gleichen Herausforderung und will ungern löten und würde mich über eine Antwort freuen :/

    eugen_roth -

    This is something that should be mentioned in the beginning of the article, or even as a *warning, so people know what they’re getting into PRIOR to taking the entire iPad apart.

    Robb M -

    I replace my iPad mini 4 screen-digitizer and did not have to replace this sensor because it did not have one, but the new screen-digitizer came with the sleep/wake sensor in place. Small electronics needs careful and tedious work. Thanks iFixit for the instructions to fix my iPad. I have to mention that I am a technician from the old school.

    wogriffith -

    What is the name of this component? I left this out and now the smart cover isn't working. T.T

    이규한 -

Abschluss

Um dein Gerät wieder zusammenzubauen, folge dieser Anleitung in umgekehrter Reihenfolge.

Evan Noronha

Mitglied seit: 06/02/15

226862 Reputation

3 Kommentare

Please post a caution about the home button ribbon cable. I was removing it from an extremely damaged screen and I accidentally slightly ripped it. Now I’m not sure what to do :( If I had known about the problems associated with changing a touch ID home button I would have been 100x more cautious but I’ve only ever had to fix my Mini 2 before so this wasn’t an issue.

Patrick Giordano -

I have an iFixit replacement screen (C-stock) that has some existing adhesive already on it, but there are a few parts of the adhesive that are folded over on itself. I also have replacement adhesive. Two questions:

Should I replace the existing, possibly-worn adhesive with new adhesive, or is it better to stay with the already-applied adhesive?

Should I warm up the adhesive when I’m applying the screen back onto the body? Or should I keep it room-temperature?

Michael Innes -

Just want to say Thank you for for the guide and what i can only describe as the perfect pctures to go along! Nice1

phill baker -