Einleitung

Diese Anleitung zeigt, wie die Apple Watch 7 geöffnet werden kann.

Hinweis: der Öffnungsvorgang ist für das 41 mm und 45 mm Modell der Apple Watch 7 gleich. Die Anleitung gilt für beide Versionen.

Die Anleitung zeigt die Mobil/LTE Version der Uhr, die GPS -Version ist aber ganz ähnlich.

Zum Zusammenbau benötigst du passende Klebestreifen.

  1. g4NHgj5wrfnjMahA
    g4NHgj5wrfnjMahA
    xTZ1GA2PKFUCnbIo
  2. FnTpaqgKULmDRCwo
    FnTpaqgKULmDRCwo
    ECZpAvNs3nXFmeyJ
    4VtQl5SckbBLUgWb
    • Der Spalt zwischen Display und der restlichen Uhr ist sehr eng, deswegen brauchst du ein dünnes Metallwerkzeug z.B. das iFlex zum Auftrennen.

    • Schütze deine Finger, indem du sie aus der Reichweite des Trennwerkzeugs hältst. Benutze im Zweifelsfall einen stabilen Handschuh, z.B. aus Leder oder einen Gartenhandschuh.

    • Drücke nicht zu stark auf das Werkzeug, es könnte abrutschen und dich oder die Uhr verletzen.

    • Benutze eine Schutzbrille. Wenn du beim Öffnen Fehler machst oder zu stark drückst, könnte das Glas so brechen, dass Splitter herumfliegen.

    • Befestige das Armband, oder löse es ab, je nachdem, wie sich die Uhr gut halten lässt.

    Destroyed my watch screen using this method. See other comments in step 4. Do not recommend using a knife right where the data cable is.

    Joe -

  3. ktCYvAZvdBaAVjn4
    • Lege einen erwärmten iOpener mindestens zwei Minuten lang zum Aufweichen des Klebers auf das Display.

    • Du kannst auch einen Haartrockner, ein Heißluftgebläse oder eine Heizplatte verwenden. Sei aber vorsichtig, das Display und der Akku sind beide sehr hitzeempfindlich.

    • Wahrscheinlich musst du den iOpener mehrmals erwärmen und wieder auflegen, bis der Kleber richtig weich ist.

    Can confirm that if you want this to work, pop the iopener in for around 45seconds and then let it sit on the watch for 6 minutes, 2 minutes is just not enough.

    Jeremiah Yoder -

  4. mNPkSkkjWONJCvaJ
    mNPkSkkjWONJCvaJ
    dAAMLTBhDevpcZBl
    W2qbZlLXTFXJcnVK
    • Fasse das iFlex oder das Werkzeug nicht an den Kanten an, sie sind scharf. Am besten schützt du deine Hände mit Handschuhen.

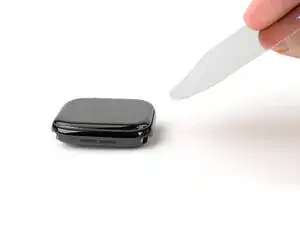
    • Setze das iFlex schräg nach unten geneigt zwischen die Unterkante des Displays und den Rahmen ein.

    • Bei der Apple Watch 7 ist das Display auf der Rückseite mit einer Kunststoffblende ausgestattet. Wenn du das Display wiederverwenden willst, dann vermeide es, mit dem Werkzeug zu stark zu drücken, sonst könnte sich das Display von der Blende trennen.

    Tried this for almost an hour, and I could not lift the display off at all. Broke the screen and chipped pieces of the screen as well.

    Excalibert89 -

    me too, I broke the screen

    twstanek@gmail.com -

    Yeah prolly gonna suggest an actual spudger for this step, or to be more detailed. Kept reheating the IOpener every 10mins keeping the watch under it for 5mins etc and it never budged after 3 hours of fiddling. Eventually broke the fine edge of the blade and scratched the casing, now the blade can't catch the groove and $8 down the drain.

    Jeremiah Yoder -

    As experienced with the user above I tried heating it up with the IOpener 6x every 10 mins and it’s still tough to open. At first I left it a full 10 minutes to try and soften the adhesive. Then the advised 1 min and 30. it still won’t lift up. A spudger will definitely help but will prolly break it if pulled too much.

    Neal Quioyo -

    Four rounds with the iOpener I got it open... but then.... a cascade of errors...

    At some point while opening I saw a flash of lines across the screen. Significant?

    Cleaned adhesive off the case and screen for an hour with Q tips and alcohol... perfect...

    The replacement adhesive was not like in the photo, the tab to peel it was on a different corner, not a good start, it was very hard to position maybe easier for a lefty. Since it was so difficult to position, the blue protective cover was gone by the time It was well positioned with a spudger so once it was ready to test, it was sealed and the question will always be, is a cable unseated or was the display damaged opening it as it failed, it's awake, display is dark, it vibrates and makes noises with find my, but...

    So I tried to reopen it and check the cables and the glass popped off the OLED, the new adhesive which I worked so hard to ensure integrity for unfortunately gripped way too well. I'll have to destroy it to pull off the display. :(

    David Neff -

    No dice. Used the iOpener three times, then cut my finger open because there was no good place to hold the watch when the blade slipped. I give up.

    Roxanne Harvey -

    I tried it exactly this way of opening the display with the exact same tools as given here. starting with peeling on the short screen side with the fine blade. But then white lines appeared on my screen... Why? because exactly at that spot are the flat cables connecting the screen with the watch. Such a stupid recommendation from iFixit. It seems like they just copied the text over from another repair without validating it. now I broke not one but two watch displays because of that. I am very diappointed. I dont recommend doing this repair by yourself....

    Marlon Repair -

    I got it to work with a single heating of the iOpener. Heat the iOpener and set it on the watch as described for 90 seconds. Using the edge of the knife (I used an exacto knife), gently press the edge into seam between the glass and case, you'll see it sink in very slightly. Pull the edge out, move it down along the seam a couple millimeters, and then press it into the seam again. Keep working it down along the seem, slowly pressing the edge of the knife in and pulling back. After about a minute of this the edge of the glass started separating from the case, and I was able to negotiate the corner with the knife. I stuck a spudger underneath the raised edge and continued working around the screen edge until it was completely separated.

    Levi Noecker -

    Same issue as others. Using an exact at the position described cut the data cable to the screen and destroyed my watch. Will be requesting a refund.

    Jeremy Harkin -

    Just destroyed my watch. Followed the instructions exactly as described. The place where they tell you to put the knife is where the data cable is, now my watch just shows random lines. The screen was not even lifting off yet, I had just pushed the knife at that spot and pried up.

    Joe -

    Same here. I just destroyed my 45mm stainless steel Watch series 7 by following this guide. As soon as i inserted the blade not even a millimeter in the position shown in the pictures (bottom end of the display) is seem to have seperated important display data lines. There is not even a warning for this in the instructions. I could have used the watch perfectly fine for several more months, the battery was just at 75% capacity. Now i have to decide between trying to fix it with an expensive replacement display or buy a new watch! Not happy, will be contacting customer service asap.

    noname -

    Same from me, this instruction destroyed my 45 mm watch as well. The display is broken and the new Akku doesn't work, because the connector is broken.

    Fritz -

    Se avessi letto prima i commenti precedenti non avrei neanche tentato la sostituzione della batteria, in quanto in questo passaggio quasi sicuramente danneggerete lo schermo come ho fatto io e altri che hanno provato, in pratica anche se il vetro rimane intatto, gli strati che compongono lo schermo si scolleranno tra loro e non funzionerà più, inizialmente vedrete comparire delle righe gialle e questo significa già che lo schermo è già andato. Adesso non mi rimane che buttarlo perché spendere altri 150€ per lo schermo nuovo non ne vale la pena su un dispositivo così vecchio, inoltre ho la batteria e l'adesivo che avevo già acquistato e le politiche di reso ti fanno desistere da rispedirla indietro per una spesa così bassa quale la batteria. Quindi il mio consiglio principale è non tentate neanche di aprirlo e semmai proprio volete provarci, acquistate la batteria dopo aver portato a termine la rimozione della vecchia.

    Gianluca Risso -

    Exactly the same issue as the users above. If you insert a tool at the bottom edge as shown, you are very likely to damage a ribbon cable going to the screen, resulting in the screen malfunctioning (vertical white bands in my case), and your watch will be ruined. I think you're better off starting from the lower half of the left edge (near the speaker, the opposite side from the buttons). I wish I'd read these comments before trying my repair.

    Ken -

  5. qcAFYN456Fktvi3A
    qcAFYN456Fktvi3A
    Rg6EpXOWfIw5edb3
    • Wahrscheinlich benötigst du mehrere Versuche, um das Display nach oben zu hebeln. Wenn es schwer geht, erwärme nochmals und versuche es erneut.

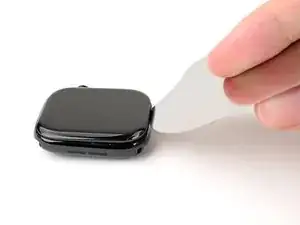
    • Drücke den Rahmen der Uhr fest mit einer Hand nach unten, damit sie stabil liegt.

    • Hale das iFlex mit der freien Hand und drücke die Kanten zusammen, damit es steifer wird.

    • Das iFlex sollte leicht"U"-förmig sein.

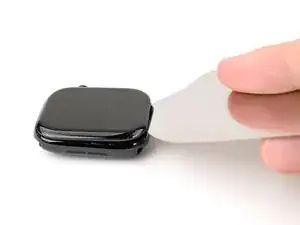
    • Heble das Display so weit hoch, dass das iFlex flach liegt.

    • Das iFlex sollte nicht zu tief eingeschoben werden, damit die Displaykabel nahe bei der unteren rechten Ecke der Uhr nicht beschädigt werden.

    • Lasse das iFlex unter dem Display stecken.

  6. hNabUXvmqiPK2cer
    hNabUXvmqiPK2cer
    iY3vsGbVJVHUXFXZ
    cgp6xT2ms4HVgLRV
    • Schiebe das Plektrum nicht tiefer als 3 mm unter das Display, wenn du den Kleber aufschneidest, du könntest Bauteile im Inneren beschädigen.

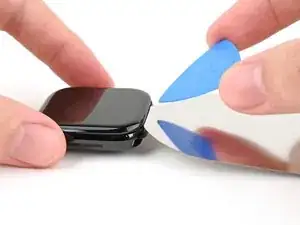
    • Halte das iFlex flach, um einen Spalt zwischen dem Display und dem Rahmen zum Einsetzen des Plektrums zu erhalten.

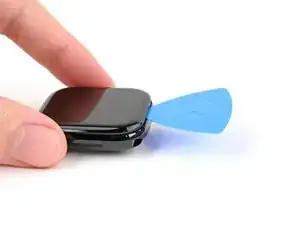
    • Setze ein Plektrum zwischen Display und iFlex ein.

    • Entferne das iFlex.

  7. dkxlAeM1MViCRxTa
    dkxlAeM1MViCRxTa
    KwdaeFiZmnXQhTuZ
    • Schiebe das Plektrum um die untere linke Ecke herum und an der linken Kante nach oben.

  8. XCnXYLRNRhCAJO1U
    XCnXYLRNRhCAJO1U
    TZXuIMSMmZOAgOOP
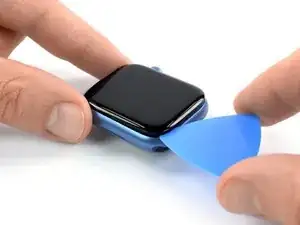
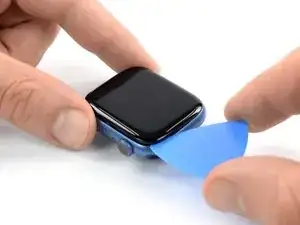
    • Schiebe das Plektrum zum Auftrennen des Klebers um die Ecke herum und an der langen Kante entlang, die der Krone gegenüber liegt.

  9. TeDnSZwQFWKIs4tE
    TeDnSZwQFWKIs4tE
    aRkX5qdXC6OLZW5C
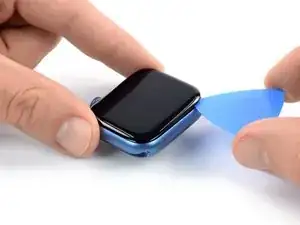
    • Schiebe das Plektrum zum Auftrennen des restlichen Klebers um die Ecke herum an der kurzen Kante nahe bei der Krone entlang.

    • Versuche noch nicht, das Display ganz zu entfernen, es ist immer noch angeschlossen.

  10. v1aVyJreRCFADCLQ
    v1aVyJreRCFADCLQ
    yeDQkyadMLhYJkvO
    ACIxpnQp1MGnYusv
    • Achte darauf, dass du das Displaykabel beim Aufklappen des Displays nicht zu stark anspannst.

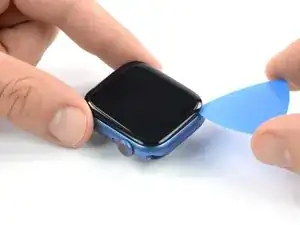
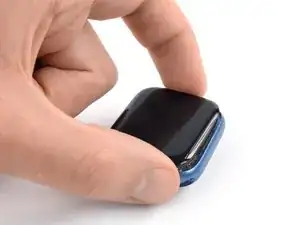
    • Hebe das Display hoch und ziehe es behutsam zur Krone hin.

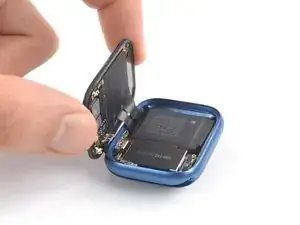
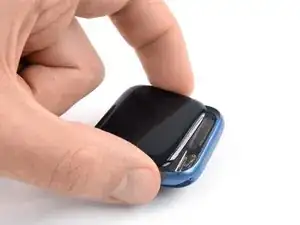
    • Klappe das Display etwa rechtwinklig auf.

    Hallo, ich habe leider beim Ausbau des Displays das Flexkabel beschädigt was zum Akku führt. Wie lässt sich dieses Kabel denn bitte tauschen? LG Thomas

    Th Ba -

Abschluss

Schalte nach der Reparatur - wenn möglich - die Uhr ein und teste sie ausgiebig, bevor du sie wieder zuklebst.

Um die Apple Watch Ultra wieder zusammenbauen, folge den Schritten in der Reihenfolge.

Reinige beim Zusammenbau die notwendigen Stellen mit Isopropylakohol (mindestens 90%ig) und bringe neue Klebestreifen.

Bitte entsorge deinen Elektroschrott fachgerecht.

Lief die Reparatur nicht wie geplant? Frage in unserem Forum nach Hilfe bei der Fehlersuche.

Dominik Schnabelrauch

Mitglied seit: 23/11/16

253821 Reputation

0 Kommentare