Einleitung

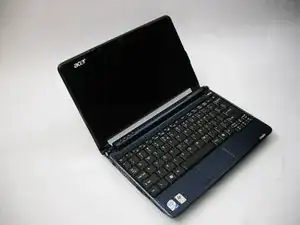
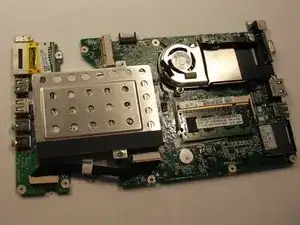
Verwende diese Anleitung, um die Festplatte im Acer Aspire One ZG5 auszutauschen. Nach dem Entfernen der Hauptplatine lässt sich die Festplatte leicht austauschen.

  1. naTflZh26KaS3x6V
    • Drehe das Notebook um, sodass sich der Akku oben befindet und von dir weg zeigt.

  2. DRgkWXRoFNEbXDOk
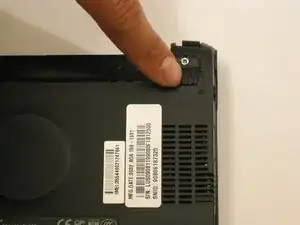
    • Entriegle den Akku, indem du den Schalter in der Nähe des linken Scharniers nach links in die "entriegelte" Position schiebst.

  3. p4BamwCYLJNZLTYA
    • Schiebe die Verriegelung am gegenüberliegenden Scharnier vom Schloss weg, während du gleichzeitig den Akku nach oben drückst.

  4. mypM1auXeDVeYjnu
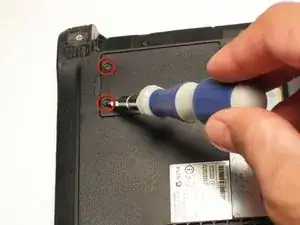
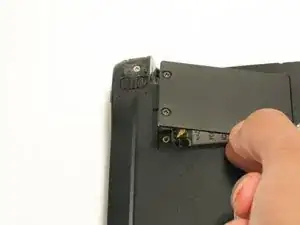
    • Löse vorsichtig die beiden Kreuzschlitzschrauben #0 in der kleinen Abdeckung, die die WLAN-Karte abdeckt.

    • Diese Schrauben sind in die Abdeckung eingebaut und dürfen nicht vollständig entfernt werden.

  5. X4SIiJCBljpxjDr6
    • Hebe die Abdeckung an und entferne sie vom Gehäuse.

  6. BdmrwVTHpIP1CHO5
    • Trenne die beiden Antennenkabel von der linken Seite der WLAN-Karte ab.

  7. tPSSajWYXVnh1fus
    • Entferne die einzelne 3,9 mm Kreuzschlitzschraube #1 unten links an der WLAN-Karte.

  8. FHVmVmsqBrUb6WWr
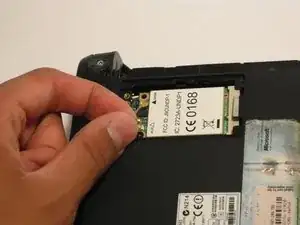
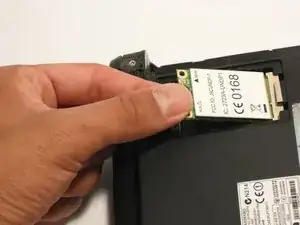
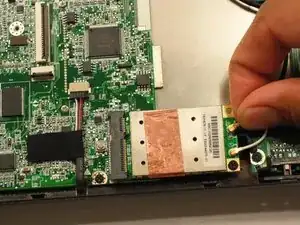
    • Hebe die linke Seite der WLAN-Karte vorsichtig an und schiebe die Karte aus ihrem Steckplatz heraus.

    mi lap NO tiene wireless card

    gustavo cordova -

  9. d5xwUQms1MVp42yn
    • Drehe das Notebook um und klappe das Display auf, sodass die Tastatur zu dir zeigt.

  10. QJ5RKJgepO116E6u
    QJ5RKJgepO116E6u
    XbSbdGRLKmBBxbtq
    QCsmKrWRNgagra5O
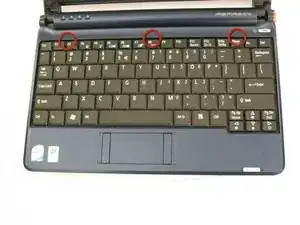
    • Oben auf der Tastatur befinden sich drei Laschen.

    • Beginne mit dem Spudger in Richtung Display und drücke jede Lasche von der Tastatur weg.

    • Wenn du zur nächsten Lasche übergehst, stelle sicher, dass die vorherige Lasche nicht in ihre ursprüngliche Position zurückspringt.

    It isn't obvious how to keep the previous tab from latching again. This is where I got stuck. It is like there needs to be something like a pick but smaller.

    BruceW55 -

  11. aNpF5efmQ4OZxbBO
    aNpF5efmQ4OZxbBO
    4SWWULjBYZwT5j3b
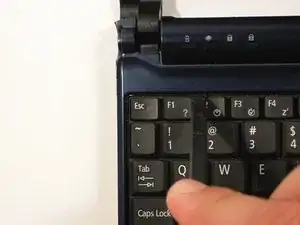
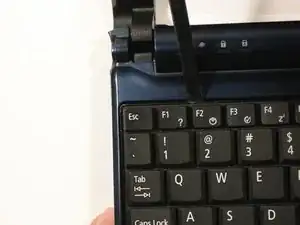
    • Hebe die Oberseite der Tastatur an. Wenn sie sich nicht leicht anheben lässt, befinden sich möglicherweise Laschen an den Seiten – verwende ein Werkzeug, um diese zur Seite zu schieben, und/oder bewege die Tastatur seitlich hin und her.

    • Es gibt ein kurzes Flachbandkabel, das die Tastatur mit dem Notebook verbindet.

  12. G1tECahc6AUGXUHx
    G1tECahc6AUGXUHx
    sOG5RGecLhOOADGN
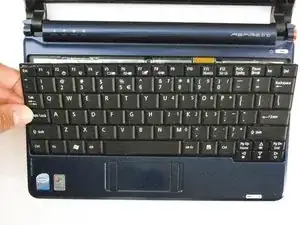
    • Trenne das Flachbandkabel ab, indem du das schwarze Kunststoffscharnier anhebst und das durchsichtige blaue Kabel entfernst.

    my keyboard ribbon face damaged. how to repair?

    musa musa -

  13. D24TnM65sGihuGBf
    • Klappe das Display zu und drehe den ZG5 so um, dass das Akkufach zu dir zeigt.

  14. GjhxNByu6vrepNHc
    GjhxNByu6vrepNHc
    rXGajilxKPWSrwXp
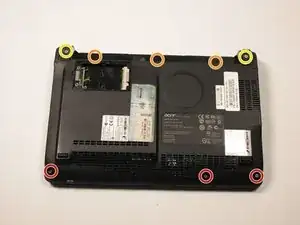
    • Entferne drei 5,8 mm lange Kreuzschlitzschrauben #0 von der Gehäuseunterseite.

    • Entferne drei 3,9 mm lange Kreuzschlitzschrauben #1 vom Akkufach.

    • Entferne zwei 5,8 mm lange Kreuzschlitzschrauben #0 unter den Füßen nahe bei den Scharnieren.

  15. ApcTINtvUyKsGPEe
    • Drehe das Netbook um und öffne das Display, so dass der Ausschnitt für das Display zu dir zeigt.

  16. A4pySPYGCUXIgxON
    A4pySPYGCUXIgxON
    yJY5LB2yDGTqSLaU
    KEWZQA1QQQAKrj1M
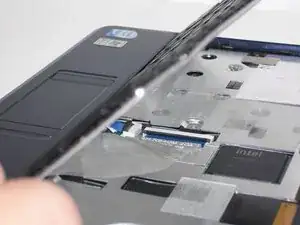
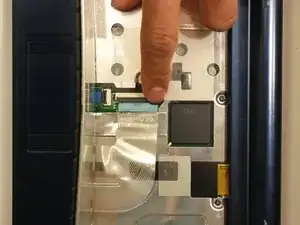
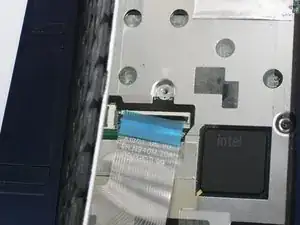
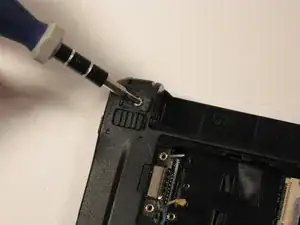
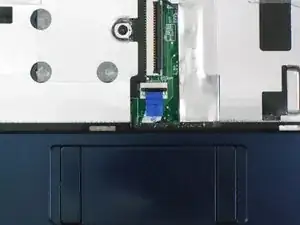
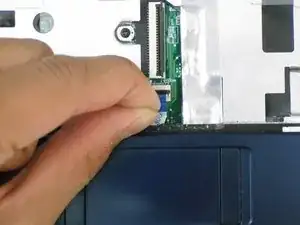
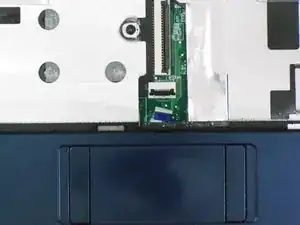
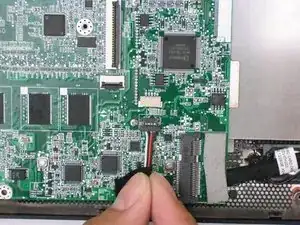
    • Klappe den Sicherungsbügel am ZIF-Anschluss des Trackpadkabels hoch.

    • Ziehe das Flachbandkabel an der blauen Lasche aus seinem Anschluss auf der Hauptplatine heraus.

  17. o1Y5eQeDY6QMIMjp
    o1Y5eQeDY6QMIMjp
    tOxkXVDBWIZQkaKC
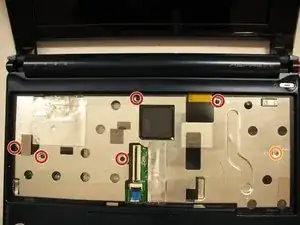
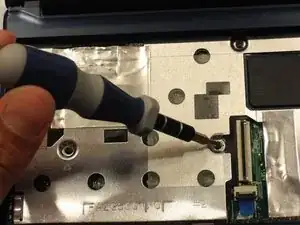
    • Entferne die fünf schwarzen 4,7 mm langen Kreuzschlitzschrauben #0 von der Metallplatte.

    • Entferne die silberne 4,3 mm lange Kreuzschlitzschraube #00 von der rechten Seite der Metallplatte.

  18. JlC1mokVJKXSE46A
    JlC1mokVJKXSE46A
    1W65s1XhyAZHKp2u
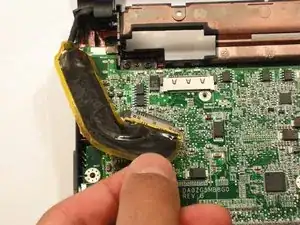
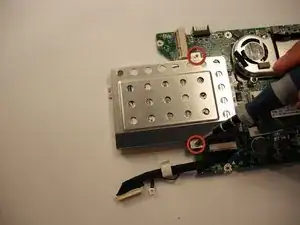
    • Setze einen Spudger oder ein Öffnungswerkzeug aus Kunststoff nahe am Scharnier in die Naht zwischen den beiden Gehäuseteilen ein. bei den roten Ringen

    • Schiebe den Spudger zur Vorderseite des Gerätes hin und löse dabei die Clips, mit denen das Gehäuseoberteil befestigt ist.

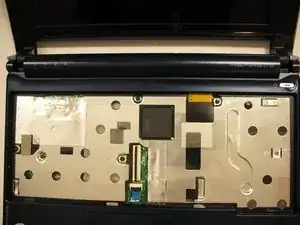
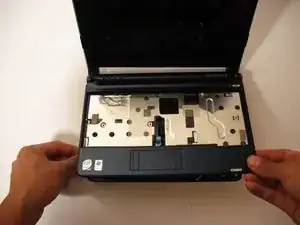
    • Hebe das Gehäuseoberteil behutsam ab.

  19. fZXrhDHDkbaJeoAQ
    • Trenne die beiden Antennenkabel an der rechten Seite der Drahtloskarte ab.

  20. DocloY6JdjAUHqHg
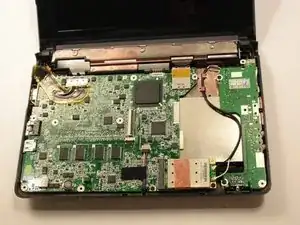
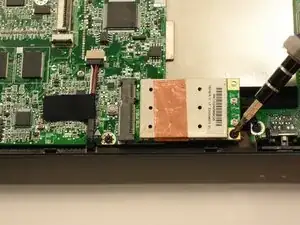
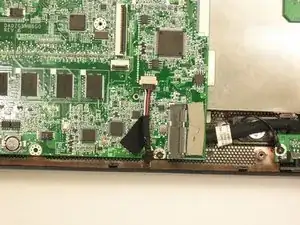
    • Entferne die 3,9 mm lange Kreuzschlitzschraube #1, mit der die Drahtloskarte befestigt ist.

  21. NWsBUSWHRhxXvAPL
    • Ziehe die Drahtloskarte vorsichtig nach rechts aus ihrem Anschluss heraus.

  22. APlZ5NhFmdsjFur6
    • Trenne das Displaykabel oben links an der Hauptplatine ab.

  23. 3xvYEkfLmC1iqrQB
    3xvYEkfLmC1iqrQB
    vLhxylKm2uyablVm
    • Trenne das Lautsprecherkabel von seinem Anschluss auf der Hauptplatine ab.

  24. mkjfu2vuYBotWY4c
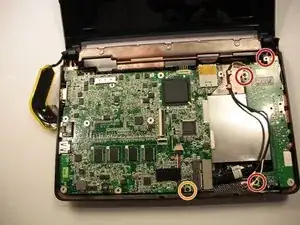
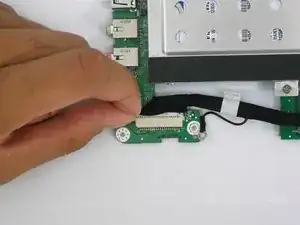
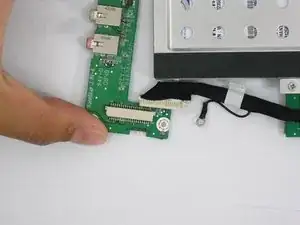
    • Entferne drei 3,9 mm lange Kreuzschlitzschrauben #1 von der kleinen Platine für die Eingänge.

    • Entferne drei 3,9 mm lange Kreuzschlitzschrauben #1 vorne an der Hauptplatine.

    • Bei manchen Modellen ist diese Schraube 4,7 mm lang.

  25. OCDXXMWCQLuRLTrN
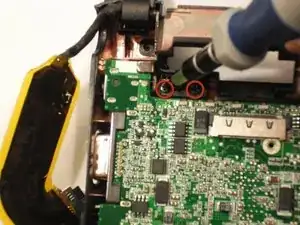
    • Entferne die beiden 4,7 mm langen Kreuzschlitzschrauben #1, die das Display mit der Hauptplatine verbinden.

  26. hCmlPRSsS6u2iaxD
    • Hebe die Platine für die Eingänge an der rechten Gehäuseseite behutsam nach oben.

    • Diese Platine ist mit einem kurzen Kabel an der Hauptplatine angeschlossen.

    I took apart an SSD variant. At this step, there were two screws holding the SSD down, but the SSD did not come out with the main and daughter boards. Detaching the I/O cable freed the mainboard to come out with or without the daughterboard.

    unixusr -

    there are 2 silver screws that need to be removed in this step your picture shows them still installed (one is located neer audio plug, the other is located neer keyboard plug) in step 27 (next step) they have been removed without mention

    Scott Riley -

    I have added 1 gb of memory to my ZG5 thanks to this helpful guide. Total cost, including a spudger and a new mini screwdriver, to tackle the 00 Philips, GBP 17.57

    I fear I haven't put the trackpad connector back properly, but device works great with a wireless mouse. Very many thanks.

    John Serocold -

  27. quCdZkemWQHJ5IA2
    • Hebe die Hauptplatinen-Einheit aus dem Gehäuse.

  28. IqvIMuWoCesOxyTY
    • Drehe die Hauptplatine um, so dass das RAM oben liegt.

  29. BDRbpOCxp5GQq6NH
    BDRbpOCxp5GQq6NH
    ZaVi5ni3KeELZTWu
    • Trenne die Platine für die Eingänge von der Hauptplatine ab.

    This step (29) isn’t required to remove the hard disk drive.

    montazmeahii -

  30. DCEwUF6teHHE46uL
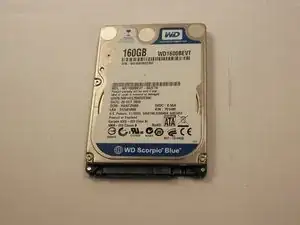
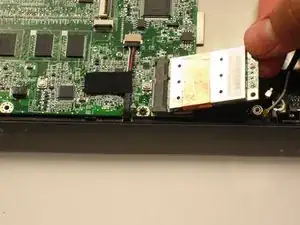
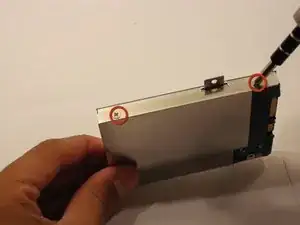
    • Entferne die beiden 4,7 mm langen Kreuzschlitzschrauben #0, mit denen die Festplatte befestigt ist.

    La notebook trae el disco duro en la parte de atrás? Por dónde va el ventilador?

    Julio Cesar Roman Gonzalez -

  31. iyV6ZHSVNVK6iBsD
    • Hebe die Festplatte gerade von der Hauptplatine ab.

    don't pull upward, pull to the side away from the plug on the motherboard (pull it to the right).

    Okovermeke Amglight -

  32. 1FaADZeO5OEgxFkk
    • Entferne die vier 3,9 mm langen Kreuzschlitzschrauben #1 vom Festplattenkäfig.

    • Es befinden sich je zwei Schrauben an den Seiten des Festplattenkäfigs.

  33. FPJ2aCsxrqRVxEtW
    • Entferne die obere und die untere Hälfte des Festplattenkäfigs vom Laufwerk.

Abschluss

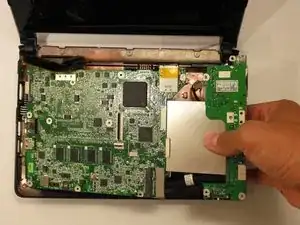
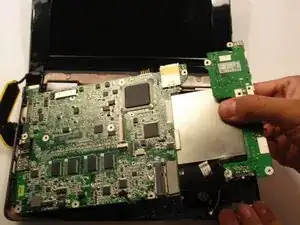
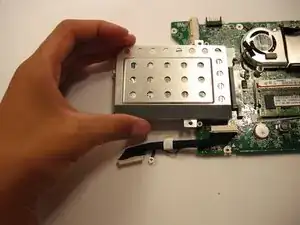
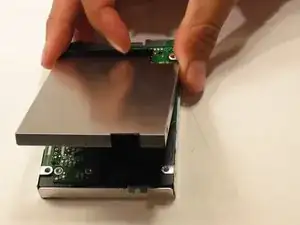
Um das Gerät wieder zusammenzubauen, befolge diese Anweisungen in umgekehrter Reihenfolge.

Doug Gallatin

Mitglied seit: 05/10/10

6385 Reputation

14 Kommentare

Excellent guide. This "student" should be promoted to "instructor" right away. Many thanks.

Rudy Fernandes -

This guide helped a lot with refurbishing my old ZG5. It now has a case that is not cracked, 1.5 GB memory, and a 240GB SSD. I get to put off Windows 10 for a while longer.

James Stallings -

Thanks a lot! i already upgrade memory from 1 to 1.5 on my acer. But i have a question, does the aoa 150 works faster with a ssd disk? i want to try with one of 240 gb. Anyone try it?

Martiniano Vera Enrique -

Not the easiest upgrade I've ever done (perhaps the most difficult, actually), but I got it done. Removing the keyboard was the trickiest step for me. Be patient. If you can work one of the corner releases, you can put a flat-blade screwdriver under the corner of the keyboard and work on the other releases (starting at the far corner, then the centre).

The other tricky problem I had was getting the little ribbon cable for the trackpad properly reconnected after completing the project. (I thought the keyboard cable would be the tricky part, but it turns out to be pretty easy.) Be patient and you'll be fine. You may want to test (with a mouse handy) before you reinsert the keyboard.

Thanks very much for this howto!

Jim MacKenzie -

I had one of these little beasts that my son gave away about 6 years ago. The person he gave it to returned it to him a month later because it would not turn on. It was a case of the boot sector problem that plagues the ZG5. I performed the repair described on the Acer web site and it has been running fine ever since. After installing Linux Mint (dual boot), it was finally given away again last summer. Now it seems it is coming back to me. This might be the time to upgrade it with an SSD. Thanks for this tutorial. I will probably be making use of it over the next few weeks.

Chuck Pilger - 02/23/2017

Chuck Pilger -

Ok I'm ready to take the plunge and install an ssd. Which version of Win 10 works well? Or, how about win7, which I always liked? Pete Lunde 07/13/2017

Quasimodo -

I tried both Windows 7 and 10. I'd say to upgrade the memory to max (1.5GB) before trying to run ANY version of Windows. Also, while 7 ran nicely enough with that upgrade, I think Linux works even better. Windows 10 (32-bit, of course) runs, but it was way too slow to be comfortable for me to use. Of course, Windows 10 has more built-in protections against malware, so there are trade-offs to consider. If you don't *need* to run any Windows-only apps, though, at least try Linux on a Live USB and see how you like it.

pacmanmaster -

I used this guide to upgrade the hard drive, upgrade the memory (from 1GB to 1.5GB), and replace a busted internal WiFi card (upgrading from 802.11g to 802.11n in the process!). It can be done, but I will say that removing the keyboard is harder than it should be. In doing so, I broke one of the clips that holds it in. It still works great, but the keyboard now bounces a little. Be careful with that step!

Overall, considering that the ease of replacing these three parts once opened, it's a shame that Acer made it so HARD to open (safely).

I installed Windows 7 when I upgraded it, and it ran fine (but a bit pokey). I upgraded to Windows 10, and it worked, but it was even slower. After I migrated away from using apps on this machine that required Windows, I installed Linux Mint exclusively (had it dual-booting before), and it works better than it did with either Windows 7 or 10. (Note: To insure Linux compatibility, I used an Intel-branded WiFi card, which I checked for compatibility beforehand).

pacmanmaster -

Parts list shows SSDs compatible with MAC computers, are they also compatible with Aspire one ZG5?

Johnson -

I would like to replace the HDD with an SDD. Are there any specific SDDs that would work best for the MB Connection?

scottfabo01 -

Scott, I assume you mean SSD, which stands for Solid-State Drive, and not SDD (whatever that stands for).

Michael Walsh -

Many thanks for this guide. I was able to replace the disk without any problem

Marco Manna -

Its 2024, following your excellent instructions I have just successfully replaced my aging hdd with a new ssd. Many Thanks

barneeyebay -

I've got LMDE 32bit running on my Aspire One for Amatuer Radio use. Following the guide to upgrade both the memory and the original 120G HD with a SSD. This is a fantastic guide to disassembly. I'm the original owner and it's got 16 year old dust that needed cleaning out as well. Thank You!

Lewis Burmeister -