Einleitung

Um an den Akku des Yoga Book X90F zu gelangen, musst du zunächst die Anleitung zum Entfernen des unteren Bildschirms bzw. der Tastatur ansehen. Sobald der untere Bildschirm entfernt ist, benötigst du lediglich eine Pinzette und ein Plektrum (oder ein dünnes Hebelwerkzeug), um den Akku vorsichtig herauszuhebeln. Der Akku kann mit Hilfe der folgenden Troubleshooting Seite diagnostiziert werden.

Der Akku versorgt das Gerät mit Strom. Ein schwacher oder defekter Akku kann dazu führen, dass das Gerät Aufgaben nicht zuverlässig oder nur für kurze Zeit ausführt.

Bevor du mit dem Austausch beginnst, schalte das Gerät bitte vollständig aus und trenne alle externen Stromquellen, z. B. das Ladegerät.

Gehe beim Entfernen des Akkus vorsichtig vor, da er sich beim Ablösen von der Platine verbiegen oder beschädigt werden kann.

  1. GfiXLIojsSUJi5ab
    • Schalte das Gerät aus und trenne es von der Stromversorgung, bevor du mit diesem Vorgang beginnst. Ein Heißluftgebläse oder ein Haartrockner eignet sich, um den Kleber, der den Bildschirm hält, zu erwärmen. Erwärme die gesamte Fläche des unteren Bildschirms.

    • Beim Zusammenbau in umgekehrter Reihenfolge wird neuer Kleber benötigt.

  2. 3BrEC6bOykXD1wwL
    3BrEC6bOykXD1wwL
    3KKv4g6TIeaTOZRA
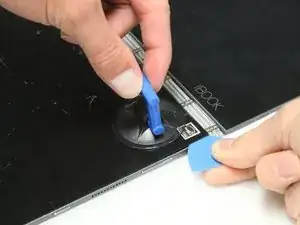
    • Sobald der Kleber erwärmt ist, nimm den iFixIt-Saugnapf und hebe eine Ecke an. An dieser Stelle sollte sich der Bildschirm vom Kleber lösen.

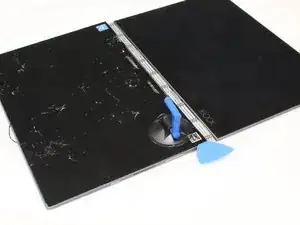
    • Während der Bildschirm angehoben ist, füge das Plektrum ein, um den Bildschirm vorsichtig abzuhebeln.

    • Der Bildschirm kann leicht zerbrechen, da er dünn und empfindlich ist.

    basically by this technique the screen WILL be cracked (as the images here show, and as I was actually expecting sadly). I wonder if there is a safer technique to remove the screen, even though it is too late for me now?

    Mark Rohde -

    I also &&^&@@ up the screen following this guide. Too bad, the thing costs 160 euros.

    tanner85 -

    This is barbaric work. The keyboard is broken at the edges. In other words, it's not just the battery that needs to be replaced 😁 It wasn't heated enough at the edges. You shouldn't tense up

    Ricsi Fusti -

  3. lJCgjSvDX24FgliB
    • Während der Bildschirm angehoben ist, setze die Kunststoff-Plektren ein. Erwärme den Kleber und verwende anschließend das Bildschirm-Entfernungswerkzeug, um sicherzustellen, dass der Bildschirm nicht mit zu viel Kraft abgehebelt wird.

  4. RAHkaeBokaPINODL
    RAHkaeBokaPINODL
    Lb3n3Hp24H2bbuug
    U1rIZuDiQVcdPoZK
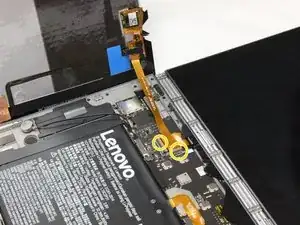
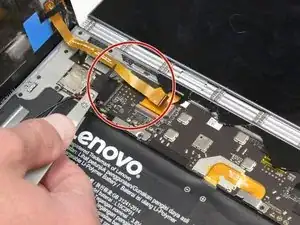
    • Nachdem der Bildschirm geöffnet wurde, ziehe das Kabel vorsichtig mit einer Pinzette heraus und.trenne das Flachbandkabe abl, das den unteren Bildschirm mit der Hauptplatine verbindet,

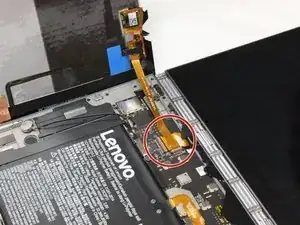
    • Wenn sich schwarze Abdeckungen auf den Laschen befinden, wie im zweiten Bild gezeigt, entferne diese vorsichtig mit einer Pinzette.

    • Weitere Informationen zu Zero Insertion Force (ZIF)-Steckverbindern findest du in dieser Anleitung.

  5. T1hMTUIBnMeFbCJR
    • Trenne den unteren Bildschirm vom Gerät und entferne ihn.

  6. FXtpUD1Ot1I4KeBx
    FXtpUD1Ot1I4KeBx
    w1mGF23SRYrfT4io
    h1JMxjqElfOTaG1g
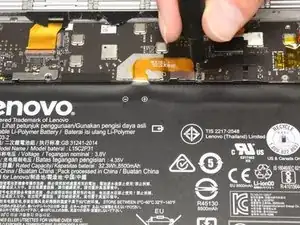
    • Entferne mit einem JIS-Schraubendreher #0 die einzelne 8-mm-Schraube.

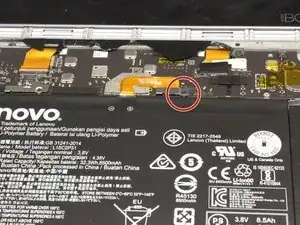
    • Trenne anschließend das Akkukabel von der Hauptplatine (Motherboard).

    there was a screw in this position in my tablet, but not connected to the ribbon in anyway. Also, it was an extremely soft screw, just ground away under the appropriate screwdriver!! so lucky it didn't need to be removed!

    Mark Rohde -

  7. NAKPHJFaLZ2E1JyB
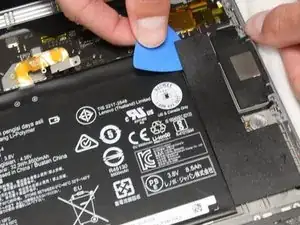
    • Entferne die zwei schwarzen Streifen auf beiden Seiten des Akkus mit einem Plektrum, um den Weg für den Akku frei zu machen.

    Maybe it depends on the particular placement of the battery, but I can't see the need for this step unless the black strips have been very poorly placed.

    Mark Rohde -

  8. I5L5GxZlZy54IorS
    I5L5GxZlZy54IorS
    QEAOfIRbHKhxI35M
    • Der Akku ist im Rahmen des Computers verklebt.

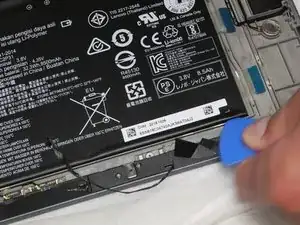
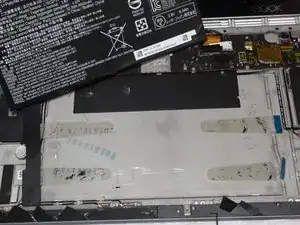
    • Schiebe das Plektrum unter den Akku und arbeite dich vorsichtig rund um den Akku herum, um ihn zu lösen.

  9. UejGBWMBFhktppBr
    • Sobald sich der Kleber vom Akku zu lösen beginnt, entnimm den Akku aus dem Gerät.

Abschluss

Um dein Gerät wieder zusammenzusetzen, folge diesen Anweisungen in umgekehrter Reihenfolge.

Für eine optimale Leistung solltest du nach Abschluss dieser Anleitung deinen neu eingesetzten Akku kalibrieren.

Bringe deinen Elektroschrott zu einem Zertifizierten Recycler.

Parker Mumaw

Mitglied seit: 28/09/21

157 Reputation

7 Kommentare

Make a plan to replace the keyboard/second screen after installing a replacement battery.

Mark Rohde -

How to calibrate the battery?

Janet Davidson -

I like how the screen is broken in the pictures from step 1 to step 2. :P

emmerycheung -

Thanks for the writeup! too bad the cost of replacement parts make this repair almost not worth the effort. =(

Jonathan Lin -

Excellent but i find nowhere an explanation of how to reassembly, mainly how to adhere the keyboard glass surface to the base chasis. I mean, is still usable the same original adhesive heated in the first step or a two sides adhesive frame has to be placed after removing the old adhesive (or just aplying a sort of glue -¿wich one?-). I’ not sure I’ve made it clear, I hope yes. Thanks in advance.

Cesar -

1) The original adhesive would be 100% unusable. You can use a double-sided red table from 5mm to 10mm. Rule of thumb for future repairs, put in the cover/screen/part and the chassis you want to glue together. Also, wear heat-resistant gloves and when you stick them together, reheat the areas and press and move your finger along the path of the tape to soften the glue and remove any imperfect bonding.

2) If tape is not your forte, you can use T8000 black/clear glue but be aware that you must be fast. This glue can dry in less than a minute! Also, you must be frugal with its use because it's very sticky and can make a mess.

3) Finally, and this is an ABSOLUTE MUST, if there are any cables, antennas, plastic covers, or flex cables in the path or near the areas where you need to put glue or tape, put Kapton tape on top before anything else.

George Cristodoulou -

For easier separation, when there is glass involved, you can use isopropyl alcohol. Put it in a small plastic bottle with a small opening, the best for this are medical bottles you can buy in a pharmacy and also put the tip of a syringe so you can have total control of the dosage you use and also you can put the liquid in tiny dosages along the path of the adhesive, effectively loosening the adhesive even further.

George Cristodoulou -