Einleitung

Diese Anleitung zeigt, wie die CMOS Batterie im e Dell Vostro 3550 ausgetauscht wird. Wenn der Computer die Zeit und das Datum vergisst, muss wahrscheinlich diese Batterie getauscht werden.

  1. XJFTki1QKER1pSfr
    • Schiebe die Entriegelung des Akkus in die "Offen"-Stellung.

    What size is the battery? Does it have a pigtail?

    R. Castano -

    CR2032 button battery

    Azrael Tee (KJ) -

    Remove all the screw, include that 2 cover with rubber on corner. Else you cant remove palmrest assembly at step9

    Azrael Tee (KJ) -

  2. jnWm5I41ILAK2KsA
    • Schiebe den Akku heraus und entferne ihn.

  3. pPCCNp1kRLcrHe6S
    pPCCNp1kRLcrHe6S
    5fKgZSaGiQ5gWbb2
    uGnPqMCUPK1ACZDQ
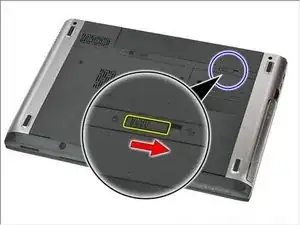
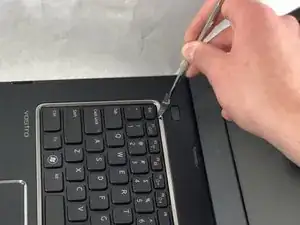
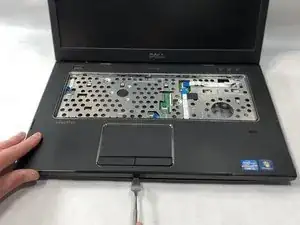
    • Drehe den Computer seitlich zu dir. Klappe das Display auf, um an die Tastatur zu gelangen.

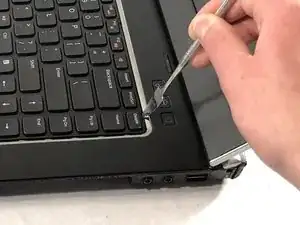
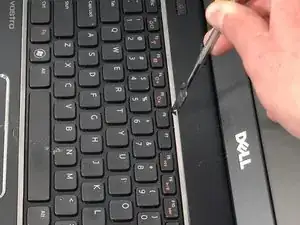
    • Heble die Tastatur mit einem (Metall-) Spudger nach oben. Die Tastatur wird von drei Clips festgehalten, alle drei müssen gelöst werden.

    There are four clips, not three

    Tyler Durden -

  4. MiCUf5ROYFwHgcwE
    MiCUf5ROYFwHgcwE
    hqk4d3wKn2luWBOA
    uVJvcPP5ALjMYE1X
    • Hebe die Tastatur behutsam hoch, bis das Flachbandkabel sichtbar wird.

  5. xTYgNIgCIJYITSbS
    xTYgNIgCIJYITSbS
    qR23jlmvmfV6SUm2
    • Klappe den schwarzen Sicherungsbügel am Anschluss des Tastaturkabels nach oben.

  6. TmqpYgvDObyw2SFi
    TmqpYgvDObyw2SFi
    sa4cVXJaFHxAQvPK
    NXmP2FkUnSFcPlpb
    • Ziehe das Tastaturkabel aus dem Anschluss heraus.

    • Entferne die Tastatur.

    Do not pry the base. This will deform the aluminium keyboard base.

    Release the clips at the top of the keyboard, 4 of them, not 3. Gently pry the top as you release each clip. The keyboard will lift towards you from the top.

    Do you even do this or do you just offer an opinion?

    FFS.

    J S -

    I followed the steps outlined in this repair guide and I had no issues at all. Do you think the issue is that you are not mechanically inclined? If you deformed your keyboard base that is a shame. FFS

    Mike Hock -

  7. yJh6Io1plQOVk3ay
    yJh6Io1plQOVk3ay
    uKgilHgyt1Ar6pB3
    vIuyKUoeOUayYiAX
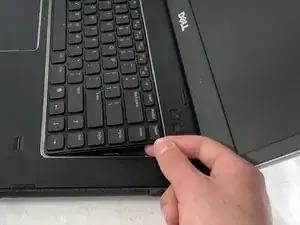
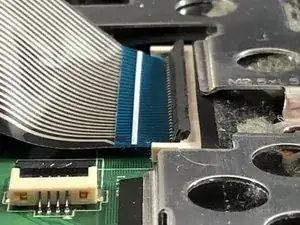
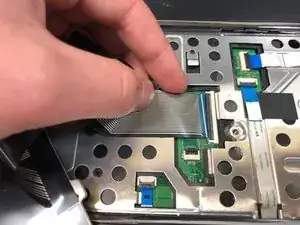
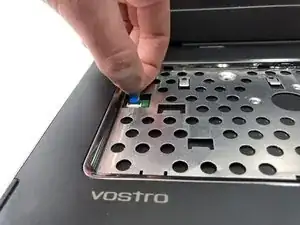
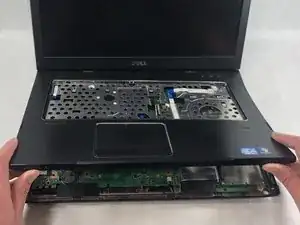
    • Löse das kleine Kabel, welches links am Computer angeschlossen ist.

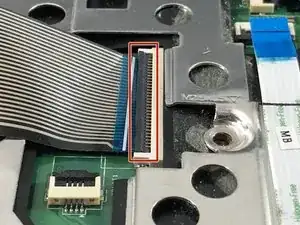
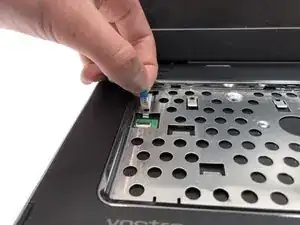
    • Löse genau so die anderen drei am Computer angeschlossenen Kabel.

  8. 4NEKDihmOj1jU5IA
    4NEKDihmOj1jU5IA
    JAvUNs3XKRYYWpFa
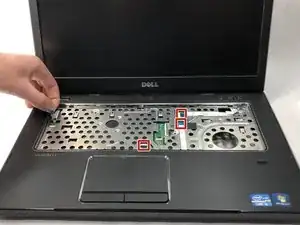
    • Entferne die beiden 5 mm langen Kreuzschlitzschrauben #0 ganz links und ganz rechts am Käfig für die Hauptplatine.

    There are four screws on this bracket that need to be removed.

    Tyler Durden -

    Hi, there are also seven screws on the lower side that need to be removed. Four screws are located near the screen hinges, one is located in the centre of the shell and two are located near front corners, each covered with a small rubber pad.

    Emanuele -

  9. 3XllgLL2MWYD1ZSS
    3XllgLL2MWYD1ZSS
    XvQDiNMxRUIhItox
    RlnLqjtHuwreUWsR
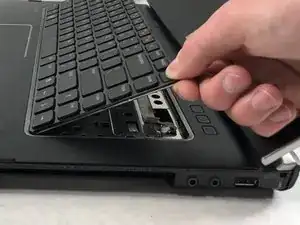
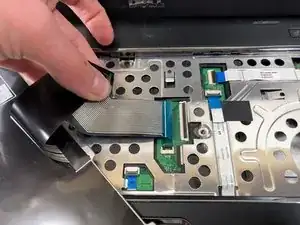
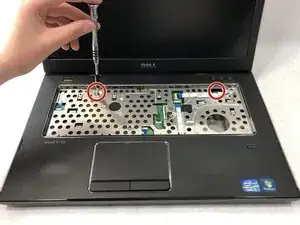
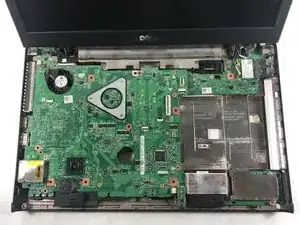
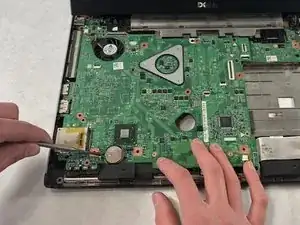
    • Heble die Handballenauflage mit einem (Metall-) Spudger vom Gehäuseunterteil ab.

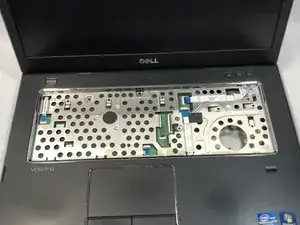
    • Hebe die Handballenauflage ab, die Hauptplatine wird sichtbar.

    It took me a good 20 minutes to figure this out but there’s a screw that has been skipped over here in the bottom left corner. Underneath one of the rubber bits.

    Daniel Carroll -

    Sorry! It took us a very long time to figure this out too. Not sure if we had a screw there or was missing.

    Dylan J. Souza -

    This wasn’t easy. I had to unscrew most of the screws from the bottom of the laptop to get this piece off. After this, Finding the battery and replacing it was the easy part

    Robin Jackim -

    Well I also managed to do it and it worked. Must say, I had to unscrew ALL the screws on the back of the laptop to be able to get to the CR2032 battery.

    Yvonne van Duyker -

    This has to be one of the worst guides I've read on here. You need to remove ALL the screws on the back of the device to remove the top panel.

    Tyler Durden -

  10. U3BDTpkdDXiARlLO
    U3BDTpkdDXiARlLO
    oeNTLCJThfs3le3P
    L6T4gOQZaaff32uB
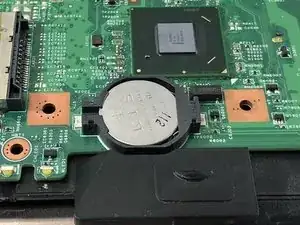
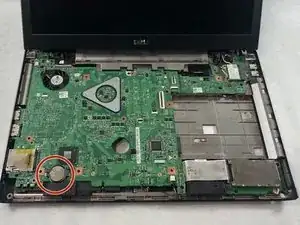
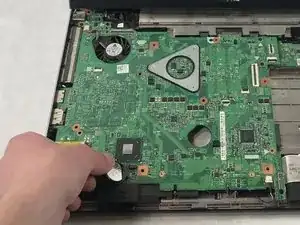
    • Heble die CMOS Batterie mit einem Spudger aus Kunststoff von der Hauptplatine ab.

    • Entferne die CMOS Batterie.

Abschluss

Um dein Gerät wieder zusammenzubauen, folge den Schritten in umgekehrter Reihenfolge.

Dylan J. Souza

Mitglied seit: 22/03/19

781 Reputation

4 Kommentare

Thank you, this saved my day.

Two small things:

- In step 7 I needed to remove four screws (visible in the picture).

- In order to perform step 9, I needed to remove seven screws from the bottom case.

Serge Helfrich -

Glad you found it helpful!

Dylan J. Souza -

Note: before step 9, we need to remove all the screws from bottom before open the cover!

Thanks for all, it´s helped me A LOT!!!!!

Rodrigo Tognin -

Thank you for the documentation. I have a Vostro 3450, and the keyboard removal process is identical. Then the CD drive has to be removed to access the circuit board, and the battery is located on the back of the board, so you have to remove it. It took me two hours. You should replace the battery very quickly, otherwise, settings might be corrupted. In my case, the bootloader was damaged afterward, and the MBR had to be rebuilt.

Arnim Loets -