Einleitung

Diese Anleitung wurde von iFixit-Mitarbeiter:innen verfasst und ist keine offizielle Reparaturanleitung von Google. Hier erfährst du mehr über unsere Qualitätsstandards.

Diese Anleitung zeigt, wie du den Akku im Google Pixel 7 austauschen kannst.

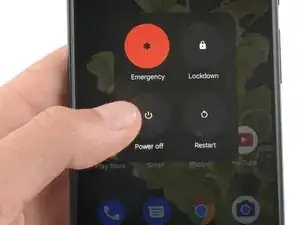
Bevor du dein Handy auseinanderbaust, achte darauf dass der Akku unter 25 % entladen ist. Du reduzierst so das Risiko eines Brandschadens während der Reparatur.

Wenn dein Akku aufgebläht ist, musst du geeignete Vorsichtsmaßnahmen treffen.

Achtung: Das Pixel 7 enthält Laser der Klasse 1. Wenn du es auseinandernimmst, könntest du unsichtbarer Infrarotstrahlung ausgesetzt sein.

Ob dein Gerät nach der Reparatur noch wasserdicht ist, hängt davon ab, wie gut du es beim Zusammenbau versiegelst. Die IP-Zertifizierung wirst jedoch verlieren.

Zum Befestigen von Bauteilen während des Zusammenbaus benötigst du

Ersatzklebestreifen.

  1. RH1hNR5DYvEMTNGX
    RH1hNR5DYvEMTNGX
    kUNSpM2wM3aEGX23
    • Entlade den Akku vor Beginn der Reparatur auf unter 25%. Ein geladener Akku kann sich entzünden, falls er beschädigt wird.

    • Schalte das Smartphone vollständig aus und entferne jegliche Kabel.

    i replaced my pixel 7 screen, I noticed that my proximity sensor is no longer working, I have tried to calibrate it using 3rd part apps and it ddisnt work,i tried using developer settings to switch the proximity sensor and i also updated my android version...all these didnt work

    Ian -

    If you can't power down your device because the screen is cracked (in my case, the AMOLED didn't light up at all anymore) and the touch is broken, you can also press power, volume up, and volume down all at the same time for 20-30 seconds. This will actually power off the phone, and not restart it (for that, you would hold the power button and volume up for a while).

    Max -

  2. uWsCCoGWV5JIrUns
    uWsCCoGWV5JIrUns
    qBuyTnEhoZIp4ycS
    rCPFaRmEDnGc6YSe
    • Das Display des Google Pixel 7 ist mit einem Sicherheitsrahmen verklebt und mit Rasten befestigt.

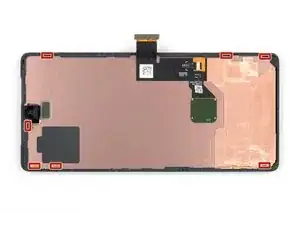
    • Achte darauf, dass du die Plektren unter den Sicherheitsmaßnahmen einsetzt, damit sich das Display nicht vom Schutzrahmen ablöst.

    • Setze die Spitze des Plektrums nicht tiefer als etwa 3,5 mm ein, damit die Bauteile im Inneren und die Rasten nicht beschädigt werden.

    • Rund um das Display gibt es verschiedene Rasten. Wenn dein Plektrum während des Displayausbaus stecken bleibt, hast du es wahrscheinlich zu tief in das Display eingeschoben.

    I accidentally removed the screen from the safety frame. Thankfully, this wasn't a big issue since my screen was broken anyway. In that case, you can still easily pop up the frame, and carefully remove the remaining glue with some pliers afterward.

    Max -

    "During the removal procedure, make sure to insert your opening picks in the right position"

    But then don't share what that position is, or even how to start.

    Great way to start the guide. Fills me with so much confidence in doing a $150 repair.

    Off tonyoutube to find someone who did q better job at a guide.

    HA Halleman -

    Hi there! I apologize that the instructions were not clear. I have updated the guide to clarify where the right place to insert the opening picks.

    Alex Diaz-Kokaisl -

    @hahalleman :

    I think there is no need to be sarcastic. These people owe you nothing, and they created a 30-step guide to help us repair our stuff, so at least show a bit of gratitude.

    If you miss something, you can politely ask. I'll teach you, since it seems you parents didn't:

    "Can you please explain better how to insert the opening picks?"

    You are welcome.

    Jaume Devesa -

  3. uNWQn4O2iyarfTwP
    uNWQn4O2iyarfTwP
    X4Mot1WmVF3dl5H6
    hwdBtFR1G1bs6cUM
    • Die nächsten drei Schritte beschreiben die Anti-Clamp, ein Tool, das das Öffnen von Geräten erleichtert. Wenn du dieses Werkzeug nicht verwendest, gehe drei Schritte nach unten für eine Alternativmethode.

    • Eine vollständige Anleitung zur Benutzung der Anti-Clamp findest du hier.

    • Falls das Display beschädigt ist, kannst du es mit einer Schicht durchsichtigem Klebeband ankleben, damit der Saugheber besser haftet.

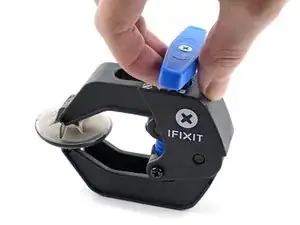
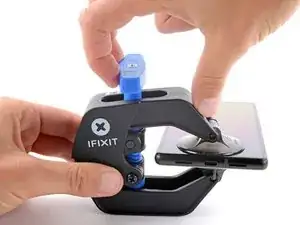
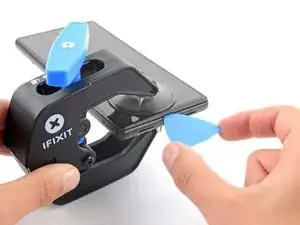
    • Ziehe den blauen Griff nach hinten, um die Arme der Anti-Clamp zu öffnen.

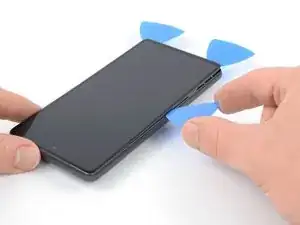
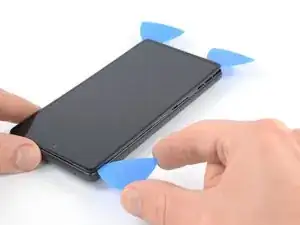
    • Schiebe die Arme entweder über die linke oder rechte Kante deines Smartphones.

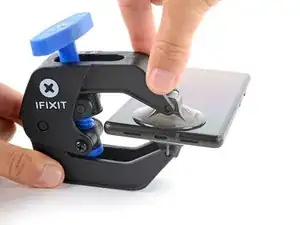
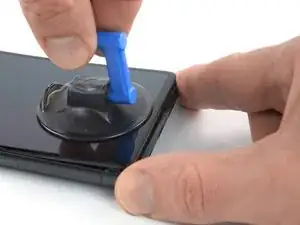
    • Positioniere die Saugheber nahe der unteren Kante deines Handys, einen auf der Vorderseite, den anderen auf der Rückseite.

    • Drücke die Saugheber zusammen, um sie auf dem Display zu befestigen.

    • Falls die Oberfläche des Handys für die Saugheber zu rutschig ist, um gut zu haften, kannst du zuvor eine Klebeband-Schicht anbringen, um eine griffigere Oberfläche zu erzeugen.

  4. C5UOdfJGyBNrPmud
    C5UOdfJGyBNrPmud
    NT1pkIvVebv5WAbQ
    5q3uaImPG2XtyBUP
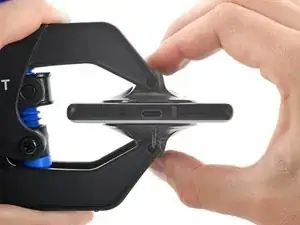
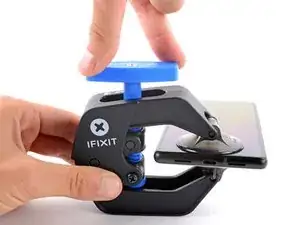
    • Drücke den blauen Hebel nach vorne, um die Arme zu arretieren.

    • Drehe den Hebel im Uhrzeigersinn um 360 Grad oder so weit, bis die Saugheber anfangen sich zu dehnen.

    • Stelle sicher, dass die Saugheber weiterhin korrekt zueinander ausgerichtet sind. Falls sie zu rutschen beginnen, löse sie leicht ab und richte sie wieder korrekt aus.

  5. iu5TEcPWZeWgMueB
    iu5TEcPWZeWgMueB
    iklY4LILrc5nWFlx
    mI2NZfhUYJ3QJbYH
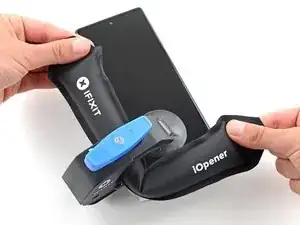
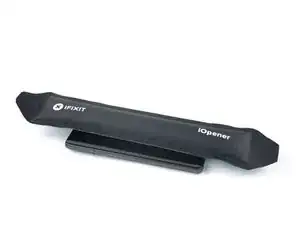
    • Erhitze einen iOpener und schiebe ihn durch die Arme der Anti-Clamp.

    • Hierzu kannst du auch einen Haartrockner oder eine Heissluftpistole verwenden - jedoch kann starke Hitze das Display und/oder den Akku beschädigen, daher empfiehlt es sich, mit Vorsicht vorzugehen.

    • Falte den iOpener, sodass er auf der unteren Kante des Smartphones liegt.

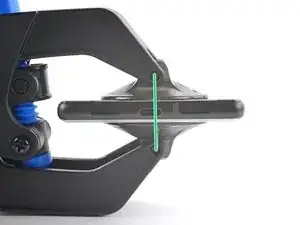
    • Warte eine Minute, sodass sich der Kleber durch die Hitze aufweichen kann, und sich eine kleine Lücke bildet.

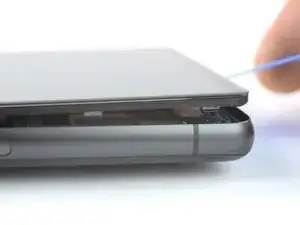
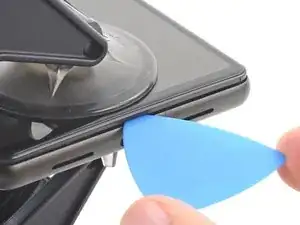
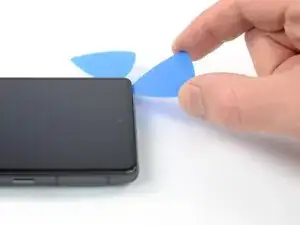
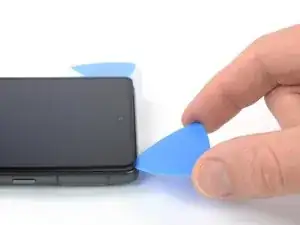
    • Schiebe ein Plektrum unter den Displayrahmen, sobald die Anti-Clamp eine ausreichend große Lücke erzeugt hat.

    • Falls die Anti-Clamp keine ausreichend große Lücke erzeugt, erhitze das Display weiterhin und drehe den Hebel noch einmal eine halbe Umdrehung im Uhrzeigersinn.

    • Drehe den Hebel jeweils nicht mehr als eine halbe Umdrehung (180 Grad) auf einmal, und warte anschliessend eine Minute, bevor du weitermachst. Gib der Anti-Clamp ausreichend Zeit, ihre Arbeit zu erledigen.

    • Überspringe die nächsten zwei Schritte.

  6. 6cKgLNhBJSeuArNm
    • Lege einen erwärmten iOpener zum Lösen des Klebers mindestens drei Minuten lang auf das Display.

    • Du kannst auch einen Haartrockner, ein Heißluftgebläse oder eine Heizplatte verwenden, achte aber darauf, dass du das Gerät nicht zu stark erwärmst. Die Kante sollte so heiß sein, dass du sie grade nicht mehr anfassen kannst.

    This guide is a bit all over the place. Most of the previous pictures show the iOpener being placed on the left side first (with the device having the camera facing upwards)

    However this pictures shows placing the iOpener on the right side. Does it matter? Is there a best practice side to pry first?

    Zachary (Zach) -

    I left my iOpener on the phone for a out 5 or more minutes, but the bag should have been hotter I think (I put it in the microwave about 35 seconds, 30 is recommended starting amount). I highly suggest making sure the phone is well heated before taking the screen off because I think that is the only way to make the adhesive easier to get off. I spent probably 30-45 minutes just scraping off adhesive with the tweezers.

    Samuel Y -

  7. CexARCSAqGYQbmha
    CexARCSAqGYQbmha
    4gF4DCWXWHNS2aGI
    gfaVVfZV1RGTbMLx
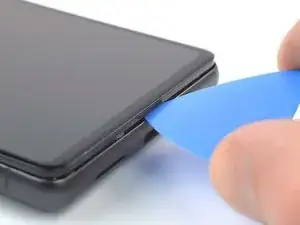
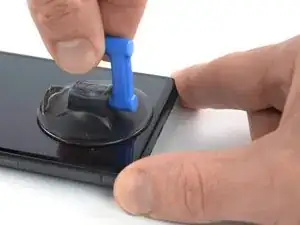
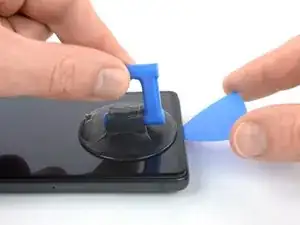
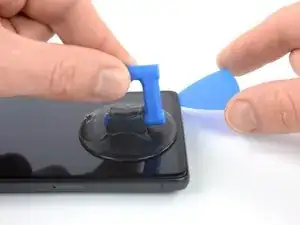
    • Wenn sich das Display warm anfühlt, dann bringe einen Saugheber am unteren Displayrand an.

    • Wenn das Displayglas stark zerbrochen ist, dann sorgt eine Schicht von durchsichtigem Klebeband dafür, dass der Saugheber besser haftet. Du kannst auch sehr starkes Paketband anstelle des Saughebers verwenden. Wenn gar nichts davon geht, dann kannst du den Saugheber mit Sekundenkleber festkleben.

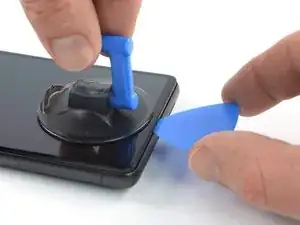
    • Hebe das Display zusammen mit dem Schutzrahmen mithilfe des Saughebers hoch, bis ein kleiner Spalt zwischen dem Display und dem restlichen Smartphone entstanden ist.

    • Je nach Alter deines Smartphones kann dies etwas schwer gehen. Wenn das so ist, dann erwärme die Unterkante nochmals und probiere es erneut.

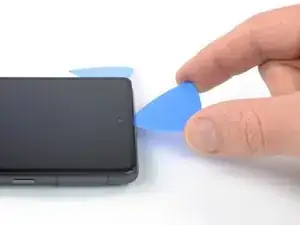
    • Setze ein Plektrum in den Spalt ein.

    If you're having trouble getting the first pick in, try a different hand position than what is shown. Grip the suction cup's handle with your index finger, and keep your thumb and middle finger on either side of the screen. Choose a forgiving surface underneath in case you slip. Then hold firmly and keep it stable (no need to really push down). Just be prying it open deliberately and evenly. Then take your pick and use gentle prodding, experimenting with your angle and pressure, feel around. That should be all you need to get in.

    Orin Zebest -

  8. IBUeZvgemYHWImZc
    IBUeZvgemYHWImZc
    2SO1E2gi6C2FiaZI
    • Damit dein Handy nicht beschädigt wird, darfst du das Plektrum höchstens 2,5 mm weit einführen, wenn du den Displaykleber durchtrennst. Sei besonders vorsichtig in den folgenden Bereichen:

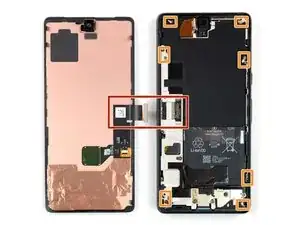
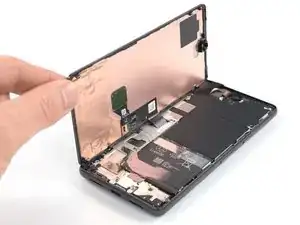
    • Das Displaykabel befindet sich etwa auf halber Höhe (ein wenig darunter) an der linken Kante des Handys. Achte darauf, das Kabel nicht zu zerreißen.

    • Rund um die Einfassung des Handys gibt es mehrere Federkontakte. Achte darauf, dass du sie nicht verbiegst.

  9. wtdv5UrUMow2CECH
    wtdv5UrUMow2CECH
    djiNoNgaVURRqAnE
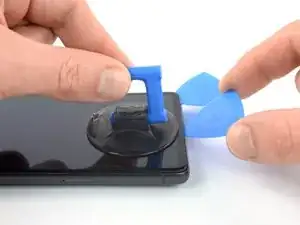
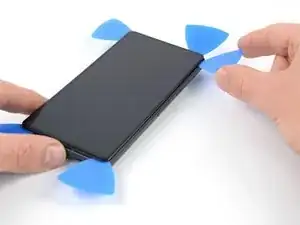
    • Schiebe das Plektrum zum Auftrennen des Klebers zur unteren rechten Displayecke hin.

    • Lasse das Plektrum stecken, damit sich der Kleber nicht wieder verbinden kann.

  10. BvVyMHlKdFsfT4jJ
    BvVyMHlKdFsfT4jJ
    STqP6jEultQQM41x
    • Setze ein zweites Plektrum an der Unterkante ein und schiebe es zum Auftrennen des Klebers zur unteren linken Displayecke hin.

    • Lasse das Plektrum stecken, damit sich der Kleber nicht wieder verbinden kann.

  11. 3TahkFe4ry6RCiY4
    3TahkFe4ry6RCiY4
    3JU6OqcJvHWxqoST
    6ZPHWVqkfEhNxfpF
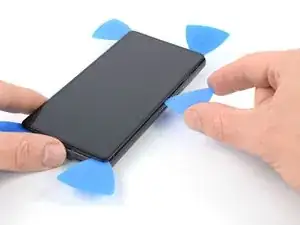
    • Setze ein drittes Plektrum unter die linke untere Displayecke ein.

    • Schiebe das Plektrum zum Auftrennen des Klebers und Lösen der Rasten an der linken Displaykante entlang .

    • Lasse das Plektrum in der linken oberen Displayecke stecken, damit sich der Kleber nicht wieder verbinden kann.

    Heating is crucial - don't force the pick. If it feels hard to push through, stop, and reheat the edge you're working on.

    The iOpener cools down too quickly. Ideally you should use a thermometer to monitor the temperature - the ideal temperature is around 55 Celsius. I found that I had to reheat the iOpener twice while working through the four sides of the phone. Each time I found the iOpener cool to around 40C (and no longer just a little too hot to the touch), and heated it back up for 10 seconds.

    YMMV and read the iOpener safety instructions carefully.

    Max Z -

  12. RAqKHAsrl3xCRUU1
    RAqKHAsrl3xCRUU1
    snvx1NYmrDPfUDaX
    cnPPFVoxMmq3nELB
    • Wenn der Kleber zu zäh zum Aufschneiden geworden ist, dann ist er wahrscheinlich zu sehr abgekühlt. Erwärme ihn 1 - 2 Minuten lang mit einem iOpener oder einem Heißluftgebläse.

    • In der Nähe der Frontkamera darfst du das Plektrum nur mit der Spitze (2 - 3 mm tief) zum Aufschneiden verwenden, damit die Kamera nicht beschädigt oder verunreinigt wird.

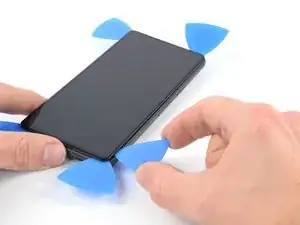
    • Setze ein viertes Plektrum in die obere linke Ecke des Displays ein.

    • Schiebe das Plektrum zum Auftrennen des Klebers an der Oberkante entlang.

    • Lasse das Plektrum in der oberen rechten Ecke stecken, damit sich der Kleber nicht wieder verbinden kann.

    This is the only slice that makes me nervous. Never had a problem, but yeah... extra care because of the camera.

    Orin Zebest -

  13. PnfIw3f25Eqr1XHF
    PnfIw3f25Eqr1XHF
    KenvqZiSWYaywVKu
    TZuqyojhZfgKo23H
    • Setze ein fünftes Plektrum in die rechte Displaykante ein. Schiebe es unter der rechten Kante zum Auftrennen des restlichen Klebers und Lösen der Rasten an der rechten Kante entlang.

    • Entferne das Display noch nicht ganz, es ist immer noch über ein Flachbandkabel am Gerät angeschlossen.

  14. rhQqo5C35FvoYK3U
    rhQqo5C35FvoYK3U
    IrVMIJexBS6bDSeP
    jLlFZYjxMwL21C2X
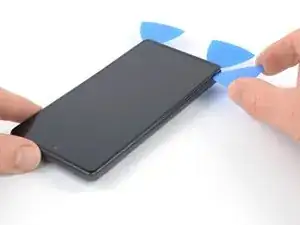
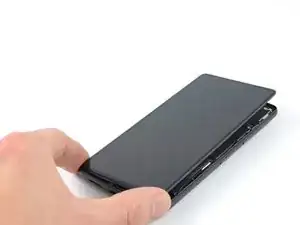
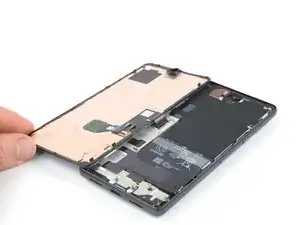
    • Klappe das Smartphone behutsam wie ein Buch von der rechten Displayseite her auf.

    • Verdrehe das Display nicht und bewege es nicht zu weit vom Rahmen weg, damit die Kabel nicht beschädigt oder zu sehr belastet werden.

    • Lege das Display mit dem Bildschirm nach unten parallel zum Rahmen ab, bevor du fortfährst.

    The adhesive still sticking to the screen might trip you up... don't let it pull the screen in weird ways. Just pick that stuff off and the screen sits perfectly next to the phone, as pictured.

    Orin Zebest -

  15. PSmtyE4SOWOdAwOu
    PSmtyE4SOWOdAwOu
    EP6lSfkEvCqupEtr
    • Die Displaykabelhalterung sitzt sehr fest. Es braucht etwas Kraft, um sie zu lösen.

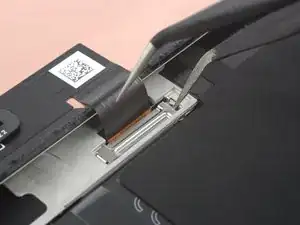
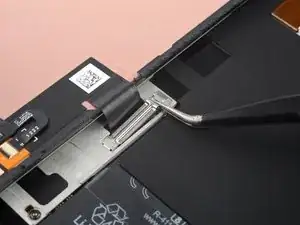
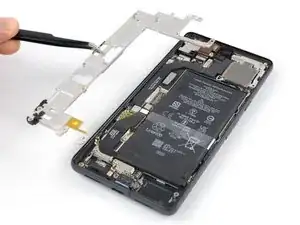
    • Setze eine Pinzette mit einer Spitze in die Öffnung am oberen Ende der Displaykabelhalterung ein.

    • Drücke die Pinzette nach innen, heble nach oben und löse die Halterung ab.

    The way this piece is wedged in there can be a difficult to imagine, so you may need to apply force at a different angle than you expect. I bent mine a few times, but just bent it back into shape with no issue.

    Orin Zebest -

    This was a pain to get out! Felt like I was going to rip the whole cable out. But it popped out eventually.

    Alex Thengvall -

    I found this much easier to remove than put it back.

    If you insert the tweezers exactly as in the picture and push like suggested, it will come out.

    Andrea Caltroni -

    This was tricky to put back at first, but once I realized you just needed to insert the one tab into the slot and push straight down with firm, controlled force, it clicked into place. You can use the spudger's flat side to help apply pressure on the length of the tab farthest away from the screen ribbon.

    Ashley Papineau -

    WARNING: pressing inwards or downwards with the tweezer will destroy the connector! Please add this warning to the guide as I'm now out of a working phone and the cost of the kit, not to mention a brand new battery now destined for the landfill. Very disappointed.

    Che Yu L -

  16. WKPNiJHhVHnhCorC
    WKPNiJHhVHnhCorC
    LhAcZy62xFSngm3n
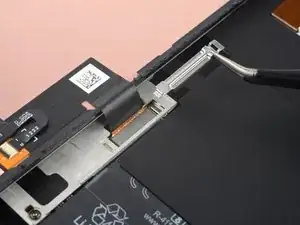
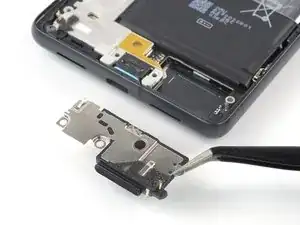
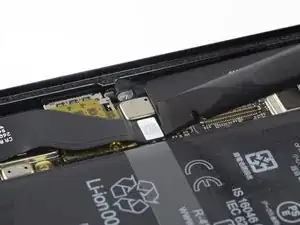
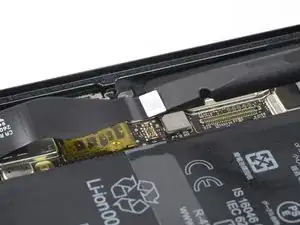
    • Ziehe die Displaykabelhalterung mit einer Pinzette unter dem Mittelrahmen heraus in Richtung der Kameras und entferne sie.

    I forgot to replace this the first time. It's not a dealbreaker (phone works fine without it), but if you ever open your phone again you must be super-extra careful -- nothing is securing the connection.

    Orin Zebest -

    I bent the top of the bracket backwards by accident, but it released easier this way. Then I just bent the bracket back before putting it back.

    Also, make sure you add the adhesive before plugging the new screen in.

    Samuel Y -

  17. jRnnMxxSKtAwg2aW
    jRnnMxxSKtAwg2aW
    HaPX5khLMl4bDRNB
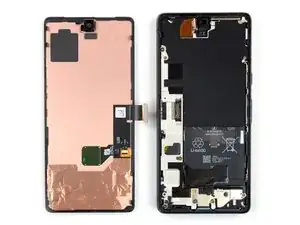
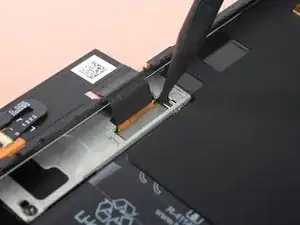
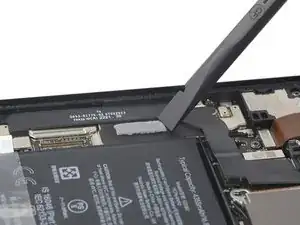
    • Heble den Displaykabelstecker mit einem Spudger senkrecht nach oben aus seinem Anschluss heraus und löse ihn ab.

    • Um Steckverbinder wie diesen wieder anzubringen, bringe ihn in die richtige Position und drücke dann vorsichtig auf eine Seite, bis er dort einrastet. Wiederhole das auf der anderen Seite. Drücke dabei nicht auf die Mitte. Wenn der Steckverbinder nicht in der richtigen Position ist, können die Pins verbogen werden, was zu irreparablen Schäden führt.

    Getting the press connector aligned properly is a very fiddly task and impossible without a light touch and several tries. My only advice is to take a break if you get frustrated. There's no 'click' or anything to help you notice that you've got it right. But when you do, it'll just... fit. And you'll probably think, "wait I did it? oh, not as hard as it sounded. just took awhile."

    Orin Zebest -

    Beware! I tried using the forceps instead of my finger and I ended up tearing into the ribbon cable. So be careful and use your finger if possible. I wouldn't use a sharp tool like I did. There are a couple Youtube videos that probably can help if you search "pixel 7 screen replacement". Sadly I didn't do that first.

    Alex Thengvall -

    Be careful not to hit any circuitry or jumpers in the process. They are so tiny that I did and now sound doesn't work on my bottom speaker. There's a YouTube video on this topic. Take your time!

    Louie Popov -

    Very easy to pull out but tricky to put back in place because it's difficult to align it with the socket that you barely see.

    Use the iFixit Opening Tool and press gently on one side (left worked for me) until you don't see it moving anymore. There is no clear click when it's in place.

    Andrea Caltroni -

    As others mentioned, reattaching the connector is fiddly! For me, it was the most difficult part of the entire battery replacement project. Take your time and use a magnifying glass if necessary.

    Sparky1991 -

    The blue pick worked better than the tweezers & the bracket came out easy after watching a video, way more easier. SMH

    Stephen -

    The blue pick worked better than the tweezers & the bracket & the flex cable with the spudger; I watched a video & it saved me from buying a new screen or bracket, edited*

    Stephen -

    Tip: in the PCB, there's a mark in the bottom-right corner of the socket indicating where the corner of the connector should be placed. Aligning the connector to that corner helped me plug it in again.

    Adrià -

  18. YK4OACsKc5awwAm5
    • Die Display-Rückseite des Pixels ist sehr empfindlich. Ein kleiner Kratzer oder eine Delle reichen aus, um das Display zu beschädigen.

    • Folgendermaßen kannst du Schäden an deinem Display oder dem Ersatz-Display vermeiden:

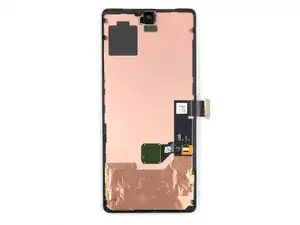
    • Fasse das Display nur an den Kanten an.

    • Wenn du das Display auf deine Arbeitsfläche ablegst, achte darauf, dass nichts den unteren Bereich des Displays berührt. Lege das Display auf ein weiches, fusselfreies Tuch ab.

  19. BoCjkJcuFRI2e25m
    • Löse das Display vom Smartphone ab.

    • Während des Zusammenbaus:

    • Überprüfe, ob alle Schrauben fest sind und kein Teil lose ist.

    • Verbinde das Display und teste dein Smartphone, um sicherzustellen, dass es funktioniert. Schalte es dann wieder aus und mache mit dem Zusammenbau weiter.

    • Bringe an den notwendigen Stellen neuen Kleber an, nachdem du die entsprechenden Bereiche mit Isopropylalkohol (mindestens 90%ig) gereinigt hast.

    • Wenn du beim Zusammenbau vorgeschnittene Klebestreifen verwendest, dann folge dieser Anleitung.

    • Wenn du beim Zusammenbau vorgestanzte Klebefolien verwendest, dann folge dieser Anleitung.

    • Beim ersten Bootvorgang nach der Reparatur wird das Display eine Kalibriersequenz durchlaufen. Berühre es dabei nicht, es könnte sonst falsch kalibriert werden, was zu Problemen mit dem Touchscreen führen kann.

    Be carefull after removing the screen to not lose the tiny gasket arount the proximity sensor, I suggest to remove it using a pair of twizers before the next step. That gasket is very important to ensure the correct behavior of the proximity sensor, without it it will read the screen as an obstacle and be always on

    stefifox -

  20. 14imDI25DUIx1yGK
    14imDI25DUIx1yGK
    TFYpSGAObkMQVbOn
    56Lyx2AoExgaqrTE
    • Achte darauf, deinen Akku nicht mit dem Werkzeug anzustechen oder zu verbiegen. Aus einem beschädigter Akku können gefährliche Chemikalien austreten oder er kann in Brand geraten.

    • Ziehe das schwarze Silikonpad mit einer Pinzette vom Akku und vom Mittelrahmen ab.

    For me, some of the graphite foil also came up with the silicone pad. be careful

    Shantanu Wanivadekar -

  21. VDPIZdKfH3wuXY2B
    VDPIZdKfH3wuXY2B
    CXSDIgr4kqK4EUu3
    UVO1ulPhOufQgl1P
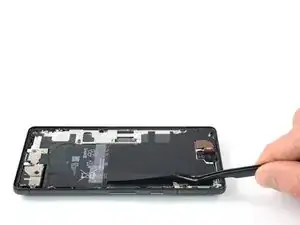
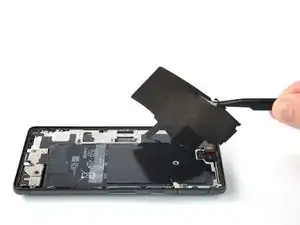
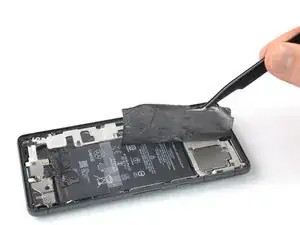
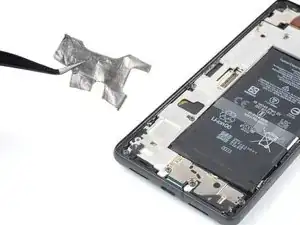
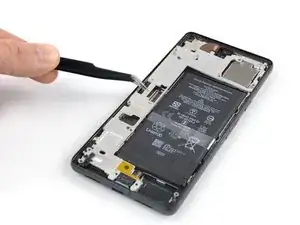
    • Ziehe die obere Graphitfolie vorsichtig mit einer Pinzette vom Akku und vom Mittelrahmen ab.

    • Wenn sie sich nicht leicht ablösen lässt, dann erwärme sie zwei Minuten lang mit einem iOpener, damit der Kleber aufweicht.

    For me, an upper layer of graphite foil came up, leaving a silver-ish graphite layer still stuck on top my battery and other assembly. It took a lot of time to clear all of that. Do heat it properly before removing it. Also using the pointy tweezers just tore the foil over and over again. IG I don't know how to use them properly

    Shantanu Wanivadekar -

    You need a lot of patience here but the tweezers are very helpful at the beginning. When you can grip it with your fingers, you can use those. Go slowly to avoid it breaking.

    Andrea Caltroni -

    If the graphite foil delaminates, use packing tape to tape over the residue, and it will come off very easily.

    Max Z -

    Packing tape idea works great. I also found that it came off easier if I started pulling it off at the bottom (over the battery), it came off easy. The lower graphite foil issue only occurred when I started at the top as shown in the pictures.

    Bill W. -

  22. ViHZySMPUa3YJNXP
    ViHZySMPUa3YJNXP
    EtIxr6sbQbvRHxan
    FlDBAAhxsnmbbJaR
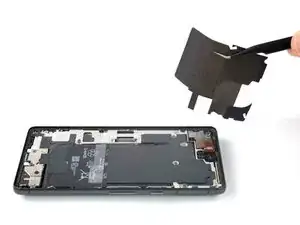
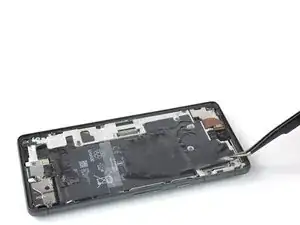
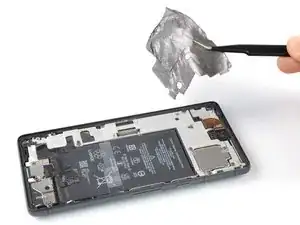
    • Ziehe die untere Graphitfolie vorsichtig mit einer Pinzette vom Akku und vom Mittelrahmen ab.

    • Wenn sie sich nicht leicht ablösen lässt, dann erwärme sie zwei Minuten lang mit einem iOpener, damit der Kleber aufweicht.

  23. pbbhTvbOv51oPAWq
    pbbhTvbOv51oPAWq
    X5krQjmm3scjBR2E
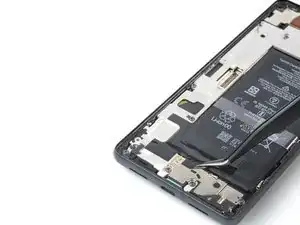
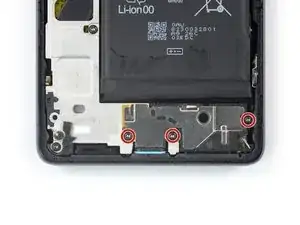
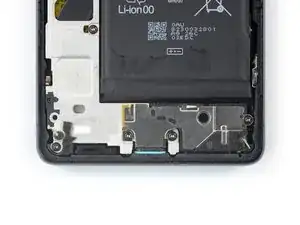
    • Entferne die drei 5,1 mm langen Torx T3 Schrauben, mit denen der Lautsprecher befestigt ist.

    I'm really struggling to unfasten these. Help!

    abbida sultana -

  24. bNE1RIGFBYEeKcqZ
    bNE1RIGFBYEeKcqZ
    wmVWfVHUkYc2kScS
    • Hebe den Lautsprecher mit einer Pinzette aus seiner Vertiefung heraus und entferne ihn.

  25. JxTWHWI1ZEti1kDp
    JxTWHWI1ZEti1kDp
    tb5RIJQqmyQZGUEN
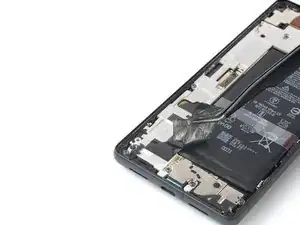
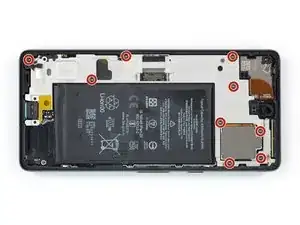
    • Entferne die neun 5,1 mm langen Torx T3 Schrauben, mit denen der Mittelrahmen befestigt ist.

    DO NOT remove the T3 screw in the upper right corner of the device (lower right most screw in picture). Its sole purpose is to hold the selfie cam module bracket in place, and doesn't even attach to the midframe at all. There are now 8 screws to remove, not 9.

    Scott Wilhelm -

    Is there a different model with a slightly different frame? the 3 screws along the long right side are partially or completely covered by the frame on my phone

    Ramon van Voorst -

  26. OoT3ECRbkjHTrU5U
    OoT3ECRbkjHTrU5U
    vleQwMUKxf6UlKXs
    WwCHUMeEJDwyGDvL
    • Entferne den Mittelrahmen mit einer Pinzette.

    • Überprüfe beim Zusammenbau die Wärmeleitpads. Wenn eines beschädigt ist, dann entferne es, reinige die Kontaktfläche mit hochprozentigem Isopropylalkohol (mindestens 90%ig) und einem fusselfreien (Mikrofaser-)Tuch. Bringe dann ein neues Wärmeleitpad an.

    You can also remove the loose small frame from the top right corner, since mine just fell out when i turned my phone upside down

    Choju Jansen -

  27. 6BrgM6SJIEyyahJY
    6BrgM6SJIEyyahJY
    AQMSn2QGAih3B6Cn
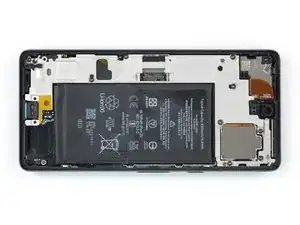
    • Heble den Stecker des Akkukabels mit dem Spudger nach oben aus seinem Anschluss heraus und trenne ihn ab.

    You can see kapton tape in this pic next to the battery connector. There is another small piece not pictured along the left edge of the battery just next to the piece you can see. I got iso on that small piece and it slid under the battery on me, but I didn't see it until I got the battery removed and had no idea where it came from. The new battery has kapton preinstalled to guard against a few components housed very close to the battery. Make sure that doesn't dislodge during install.

    Scott Wilhelm -

  28. MEBSIEQJ3cDOcppX
    • Lege einen erwärmten iOpener zum Aufweichen des Klebers mindestens drei Minuten lang auf die Rückseite des Gerätes.

    • Du kannst auch einen Haartrockner, ein Heißluftgebläse oder eine Wärmeplatte benutzen. Achte aber darauf, dass das Gerät nicht zu heiß wird, du solltest es gerade noch an den Kanten anfassen können.

  29. FYPgWCphG1UMHnsN
    FYPgWCphG1UMHnsN
    OHNxRytTeLULCuGi
    l4rWPfIHHieHJmoJ
    • Löse die Akkuzuglaschen mit der Pinzette oder deinen Fingern vom Akku ab.

    Easier to use the spudger, to prevent damaging/puncturing the battery

    Choju Jansen -

  30. VKtWXkejogB1FQKf
    VKtWXkejogB1FQKf
    2fRE5ec2E31Epl4a
    IGrOxwXXBfgPc21s
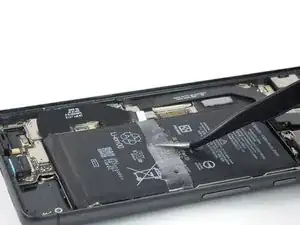
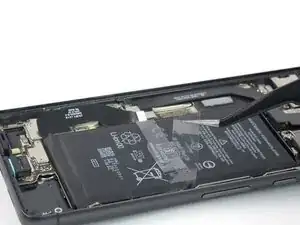
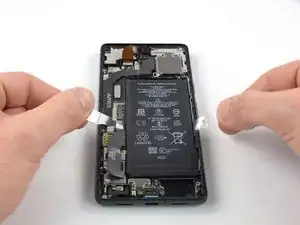
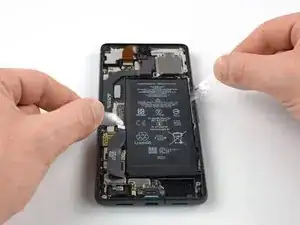
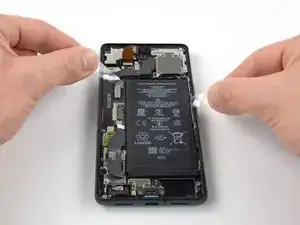
    • Ziehe die Akkuzuglaschen in einer sägenden Bewegung hin und her unter dem Akku entlang und trenne so den Kleber auf.

    • Arbeite langsam. Es kann leicht vorkommen, dass dir eine der Laschen versehentlich entgleitet und unter den Akku rutscht.

    • Wenn der Kleber zäh wird, dann erhitze ihn erneut und warte, bis er weich wird.

    • Wenn du den Streifen verlierst oder zerreißt, dann benutze eine andere Methode, die im folgenden Schritt gezeigt wird.

    The tabs broke pretty early in the process. The battery is not completely glued to the bottom but has 2 glued sections in the upper and lower part.

    I didn't use heat or alcohol but dental floss to break the adhesive. Not all dental floss is the same so, if the one you have breaks, try another brand.

    If you're alone it's more difficult but doable. Block the phone putting something between the phone and yourself and slowly use the floss as a saw. Protect your fingers from being cut because the glue is pretty resistant. Once you do one sections of the glue, put the spudger below to prevent it from attaching again.

    Andrea Caltroni -

    The previous comment is spot on! The adhesive is on the upper and lower ends of the battery, not in the middle, and much larger area on the upper part of the battery. Be sure to do the sawing motion at the top first. I found it was essential to loosen the upper adhesive area first. My plastic strips broke so I had to resort to alcohol and patience to loosen the upper adhesive.

    Sparky1991 -

    Be gentle, go slowly, and use 99% iso since it dissolves adhesive better and evaporates faster. As soon as you remove the graphite foil get some alcohol in there to get things started. Add a few drops at a time, wait a few seconds, and reapply. My old battery had 2x the adhesive at THE BOTTOM as does the replacement.

    Scott Wilhelm -

    Towards the top right of the battery is a flex cable for the power button and volume rocker, which I managed to break and now need to replace too, so do go very slowly and carefully in getting the battery out.

    Greg Clark -

  31. kBtRpff6NmtSHLeX
    kBtRpff6NmtSHLeX
    AIPOCWLYmqIRlHKI
    cFaCowwFmjvbDqou
    • Wenn du den Akku nicht mit dem Zugstreifen ablösen könntest, dann benutze folgende Methode:

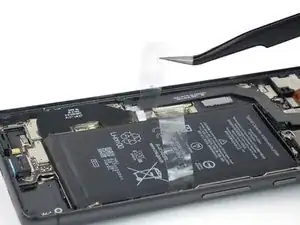
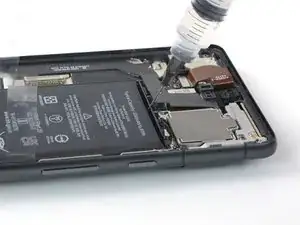
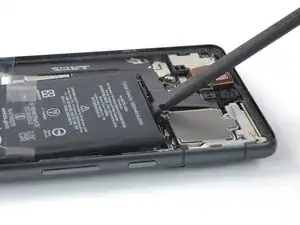
    • Tröpfle etwas hochkonzentrierten Isopropylakohol (mindestens 90%ig) in den Spalt an der Oberkante des Akkus.

    • Tröpfle aber nicht zuviel Alkohol ein, sonst könnten sich die NFC-Antenne und die Ladespule unter dem Akku ablösen.

    • Lasse den Alkohol etwa eine Minute lang wirken, bis der Kleber weich ist.

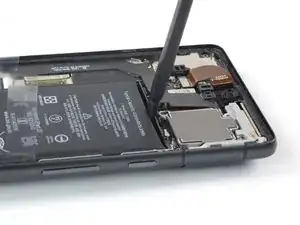
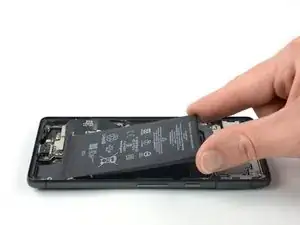
    • Hebe die Oberkante des Akkus behutsam mit einem Spudger oder einem Plektrum soweit an, bis du ihn mit den Fingern fassen kannst.

    • Gehe behutsam vor und erzwinge nichts. Es genügt, wenn du langsam und gleichmäßig drückst, dann löst sich der Akku vom Rahmen.

    • Achte darauf, den Akku nicht mit deinem Werkzeug anzustechen oder zu verbiegen. Aus einem beschädigten Akku können gefährliche Chemikalien austreten oder er kann in Brand geraten.

    If you don't have isopropyl alcohol, just buy it. I'm serious.

    But if you don't have it, like me, you can try heating the top of the battery every 30 seconds, with a 30-second interval (where you check to see if the battery has come loose). This ended up ruining all my spudgers, but I was able to get the old battery out.

    Алимжан Габит -

  32. qW1YsQlIgHytFWKu
    qW1YsQlIgHytFWKu
    d2CijPPmXxQe2aZQ
    liG5k3cSY1KwfqTE
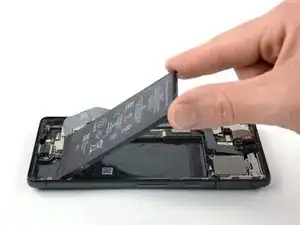
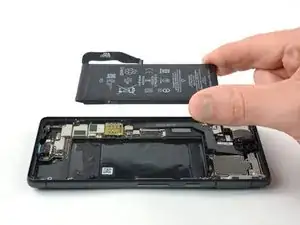
    • Kippe den Akku aus dem Gerät, damit sich der restliche Kleber löst.

    • Entferne den Akku.

    • Baue einen verformten oder beschädigten Akku nicht wieder ein, das wäre ein Sicherheitsrisiko.

    • So wird der Akku wieder festgeklebt:

    • Bringe vorgestanzte Klebestreifen oder doppelseitiges Klebeband in der Vertiefung für den Akku an den Stellen an, wo das alte vorher auch war, nicht direkt auf den Akku.

    • Schließe den Akku vorläufig an der Hauptplatine an, damit er seine korrekte Position findet. Trenne ihn dann wieder ab.

    • Achte darauf, dass der Akku mittig in seiner Vertiefung sitzt und der umlaufende Spalt überall gleich breit ist.

    • Drücke den Akku fest.

    The replacement battery in my kit had adhesive on it already.

    Sparky1991 -

    The kit comes with thermal paste. This is an old device, and that original paste is definitely dry. Definitely don't even question it. Replace it.

    Scott Wilhelm -

    Thermal paste isn't used from the factory. A thermal pad (kind of a sticker) is used on the midframe. As long as the pad is not torn or scratched, it can be re-used.

    Liam Dietle -

Abschluss

Um dein Gerät wieder zusammenzubauen, folge den Schritten dieser Anleitung in umgekehrter Reihenfolge.

Damit der Akku beste Leistung bringt, solltest du ihn nach der Reparatur neu kalibrieren.

Das Gerät ist mit einem eingebauten Diagnosetest ausgestattet. Hier siehst du, wie du das Pixel Diagnostic Tool starten kannst.

Vergleiche das Ersatzteil mit dem Originalteil. Eventuell musst du fehlende Teile übertragen oder Schutzfolien vom Neuteil abziehen, bevor du es einbauen kannst.

Entsorge deinen Elektromüll sachgerecht.

Hat die Reparatur nicht ganz geklappt? Versuche es mit ein paar grundständigen Lösungen, ansonsten findest du in unserem Google Pixel 7 Forum Hilfe bei der Fehlersuche.

Dominik Schnabelrauch

Mitglied seit: 23/11/16

253821 Reputation

15 Kommentare

I assume the IP68 rating is gone after this. Is there a way to bring it back?

Albert -

Top Anleitung vielen Dank dafür. Schön viel Bilder und gut erklärt worauf man achten muss.

Benedikt -

Just completed a Pixel 7 battery replacement using this very detailed guide.

Here are my key takeaways:

Screen Handling: Protect the front camera lens and camera cavity in the screen from dust/fingerprints post-removal. Store the screen assembly face-up in a clean container to prevent dust.

Battery Flex Cable: Replacement batteries may have longer flex cables than the OEM. Probably also have to follow how it's bent.

Bloated Battery/Frame Separation: If the battery swelling has caused frame separation, find an alternate entry point to avoid further damage. For re-adhering the screen plastic frame, B7000 or E7000 adhesive works well, use sparingly and clean excess.

Battery Removal: The most challenging aspect of this repair is definitely removing the original, often strongly adhered battery.

Ranjeet Joshi -

worst replacement repair i ever had to do. removing adhesive, removing the SUPERGLUED battery. had limited tools to my disposal (only the kit). $@$* took me hours but it's finally done. thank you for the guide.

bruh -

Tolle Anleitung!

Die Batterie ließ sich allerdings nur mit schwerem Gerät (einer kleinen Kombizange aus dem Werkzeugkoffer) und ordentlich Hitze entfernen. Ohne diese Hilfsmittel ist dem Kleber nicht beizukommen.

Jan B. -

This was a surprisingly difficult repair for two reasons.

First and most difficult part is getting the battery out. I would highly recommend NOT using the plastic to “saw” the battery out like they recommend in this guide. I did that and it damaged the volume flex cable somehow and now my volume buttons don’t work. It also felt terrible trying to saw the battery out and I only managed to get it out of the top battery adhesive. (It felt like a hack, not the proper way you’re supposed to do it) The bottom adhesive is even bigger so I just heated the back of the phone and pried it out after sawing through the top adhesive.

Instead, I would just heat the battery adhesive from the back, use some alcohol, and then pull the battery up with the plastic tabs.

The second thing that added to the length of this repair is it took forever to get all the screen adhesive off. On other phones it comes off pretty cleanly, but this one I had to scrape off tiny little bits at a time. Took like an hour and a half just for that.

phatcorns -

Great guide! I only wish I had looked up more tips on battery adhesive removal before struggling with the tabs and iopener tubes for way too long. You have to really heat it much higher than you think. I followed these pixel 9 pro instructions to use a hair dryer for 3 minutes and the battery popped right out once I used the plastic spudger on the top side of the battery (I had already broken the tabs from earlier).

Google Pixel 9 Pro Akku tauschen

Tiffany H -

Where's the video?

Mohammad Zakriya -

What is the consensus on the importance of the graphite foil? I did a rush job removing it because my phone was wet and getting very hot. Anyways, the foil is one step from ruined, and I would like to put it back together before I am likely to receive replacements. Would it be fine for a week or so before I took it back apart to finish?

Keaton F -

Hello, this battery has a fast charge like the one that originally came with the cell phone?

Jorge Mayorga -

Vielen Dank für die Anleitung!

Good instruction as well as some helpful comments to different steps. You should absolutely but the battery with the kit, especially the heating banana and the spudger.

I spent probably 5 hours, 4 of which were the removal of adhesive, which I sliced straight in the middle and had to clean both from the back as well as from the front.

I also accidentally partly separated one part of the plastic screen border from the screen and had to buy the t8000 glue to fix it (I did not removed it completely and didn't clean the adhesive up, but I also added a bit more glue on the inside glue along the inner side to make it a bit more splash proof)

Overall, thank you and ifixit for the tooling and instructions, and no thank you to Google for multiple levels of adhesives (2x graphite, 1x silikon foil, having to remove mid frame, joke of a battery tab and heat pad which also had to be replaced, because it was inadvertently smudged during battery removal)

Olexandr -

Excellent guide, thank you! I was able to successfully replace my Pixel 7's battery without any issue.

I thought the screen removal would have been the hardest step, but no, it was one of the easiest.

Instead, removing the adhesive residue from the display and from the frame was absolutely horrendous. Couldn't scrape it off; 99% Isopropyl Alcohol didn't help too much either. Instead I had to soften it section by section with IPA then tear bits off repeatedly with packing tape / duck tape, all while avoiding breaking the panel or bending spring contacts or leaving too much dust in the phone. Took me 3 hours to clean everything. Perhaps after 3 years my phone's adhesive has degraded too much?

Would love some suggestions to do this more quickly and easily.

On the other hand this gives me more assurance that I did the right thing by replacing the battery on my own. I don't think most repair places would spend this amount of time cleaning the residue, and will end up compromising the waterproofing.

Max Z -

I was able to follow this guide and get the battery successfully replaced, and reassembled. The order of reassembly was a bit difficult to keep straight, and I ended up connecting the screen too soon and had to disconnect/reconnect it again after mostly installing the surrounding gasket/seal for the screen.

It also seems, like others have posted, that I managed to break the volume controls on the Pixel 7. They still click, but the device doesn't register any input. The only way of really controlling the volume now is to enable the accessibility menu that pops out some touch buttons to control phone functions. Unfortunately that menu isn't really configurable to just volume controls. Really frustrating.

I looked into figuring out if replacing the volume buttons/controls was feasible, but it'd require completely disassembling the phone as in this guide (again, including the new battery) and also removing the earphone and motherboard to be able to get to the damaged cable. I can't imagine going through that again.

shadowimmage -

What is the thermal paste needed for? The iFixit kit supplies thermal paste, but it also looks like it has some sort of plastic applying tool AND the graphite foil?

potato63821 -

Wie das Display eingeklebt wird fehlte leider wäre nützlich gewesen 🥴

Uwe Heidemann -