Einleitung

Diese Anleitung zeigt, wie der Akku der Big Jambox getauscht wird. Um den Akku abzutrennen, musst du an eine kleine Tochterplatine gelangen.

  1. FbdZmkEPUobQUF52
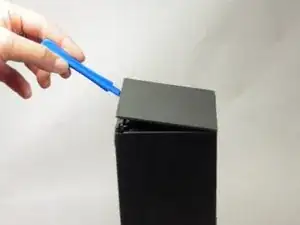
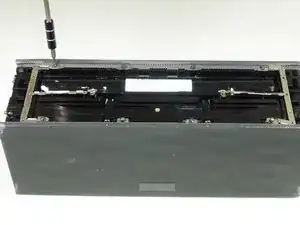
    • Setze ein Hebelwerkzeug in die Mitte der Nähte für die beiden Endkappen ein. Arbeite dich um die Endkappen herum und trenne sie ab.

    • Die Kappen werden von Clips festgehalten. Arbeite sehr vorsichtig.

    Can someone show the clips please in a photo?

    kenneth keen -

  2. gpR1qeYVfuiKrJPf
    gpR1qeYVfuiKrJPf
    4Xapn3AX3HIZYmBZ
    htYRDmTSEfZLbJMj
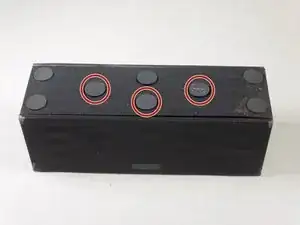
    • Drehe die Jambox mit der Unterseite nach oben. Löse die angezeigten Gummipropfen ab, eventuell benötigst du ein Öffnungswerkzeug dazu.

    • Es genügt, wenn du sie nur halb anziehst. Sie kleben dann später wieder besser fest.

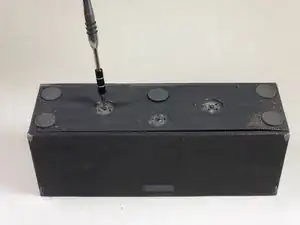
    • Entferne die drei 7,0 mm langen Torx T6 Schrauben unter den Gummipropfen.

    • Lege die Schrauben getrennt von den anderen beiseite.

    I used rubber cement to reattach the pads. That will hold them in place and be easily removable in future.

    David Robinson -

    Can someone show a picture of the screws…and where they screw not…even just for form’s sake?

    Thousand Sunny -

  3. GVMKQYqV4vHagsML
    GVMKQYqV4vHagsML
    mxDNbPDkIpXGSfS5
    ZcDVcDPp2jorIIPE
    • Drehe die Jambox so, dass das Logo zu dir zeigt. Stelle sie dann mit der linken Endkappe nach oben auf.

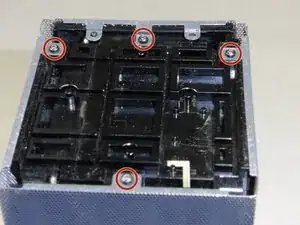
    • Entferne die vier 9,7 mm langen Torx T6 Schrauben.

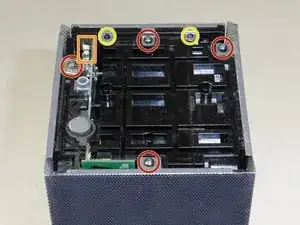
    • Löse vorsichtig die Laschen aus ihren Verankerungen, dann kannst du den Boden entfernen.

    • Drehe die Jambox um, so dass das rechte Ende oben liegt. Auf dieser Seite befindet sich das USB-Kabel (der Metallkontakt für die Erde ist orange markiert). Wiederhole die beiden vorherigen Schritte.

    Make sure you pay close attention when removing the screw marked with a red circle that is in the left most position, as there’s a small grounding plate that will be completely unrestrained and free to get nice and lost only to be found later leaving you not knowing what the hell it is or where it came from should you not secure it before removing the panel that that screw secures. That grounding plate is crucial for the safety of yourself and your speaker, because it bridges the USB-micro power input jack to the metal frame. That means that should you lose it and put the speaker back together without it, your speaker will not be able to ground out and should there occur any surge during your charge cycle, like during a freak lightning storm, or whatever, your speaker won’t able to discharge that surge, which will no doubt fry your speaker, and likely kill whomever poor bastard happens to grab the speaker, say to turn it off during said storm as a safety precaution. SAFETY FIRST!

    Thousand Sunny -

    Btw, the screw I mentioned is shown in the third picture, since that small detail might have some play over success or failure in finding it…lol. Whoops.

    Thousand Sunny -

  4. Sh3tMvExQQTIIqZy
    • Heble die Bodenplatte nach oben.

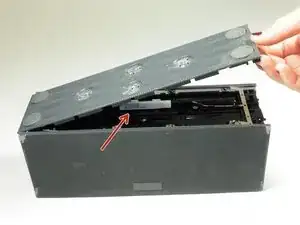
    • Ziehe die Bodenplatte ab. Das erfordert etwas Kraft, da sie festgeklebt ist.

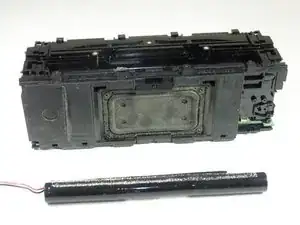
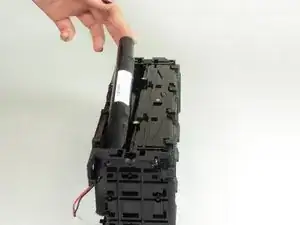
    • Der Akku wird sichtbar.

    No glue on mine. Only two clips on each side (that you can see clearly in step 3 picture).

    Do not use force or you will break those clips.

    Jay -

    @jemdem (I assume this is the “Jay” involved) after looking at the pictures 3.1, 3.2, 3.3, I still don’t see what I would normally expect a “clip” to look like. Maybe the corners act as clips? If not, I can’t ‘clearly’ determine them, but it’s a fairly busy looking area with lots of recesses and all, so maybe they’re just blending in well?

    Thousand Sunny -

    There’s a plug on each foot in one of the corners that isn’t meant to be removed. The left one and the right one (when viewed so the writing appears correct way up), both have three pins and one plug, with the pins occupying three of the four corners (northeast, northwest etc.) and the plug occupying the remaining fourth corner. The left foot has pins in the upper right, upper left and lower left, and the plug which is part of the foot and plugs into the frame, is in the lower right corner, while the right foot is opposite, having pins in upper left, upper right and lower right, and the plug in the lower right. If that was too many ‘left’s and ‘right’s to follow along with, then just remember that the plug is on the lower-inside corner on each. The screw is in the center of each foot. If you pull too hard, or attempt to guide your pick/spudger all the way around when separating the foot, you could slice it right off, though adhesive will be needed for reapplying so severing isn’t the end of the world.

    Thousand Sunny -

    This is a reply to the third comment, and sorry for the reply not being immediately following, or better still, not a reply, and instead just correcting my comment, but I can’t edit it…anyway, I noticed a mistake in my description. The plug on the right foot is in the lower LEFT corner, not the Lower right. My apologies to anyone who followed my instructions about that foot and ended up damaging it.

    Thousand Sunny -

    …continuing, the last foot needing removed is the upper center, when viewed so the writing on the feet is correct way up. And the plug on that foot is in the upper position, so only separate the bottom and both sides to access the screw in the center.

    Thousand Sunny -

    After continuing with the side pieces, the ‘clips’ that were holding the end pieces on were indeed at the corners and are NOT visible, clearly or otherwise. In fact only the ‘well’ or socket that each of the clips insert into are clearly shown, however the clips themselves are on the end caps, not the main body. If the speaker you are working on appears to have been dropped before and the corners are at all crumpled inward, take extra care to try and straighten them back to original shape before attempting to unclog the caps because not doing so could result in the clips breaking off. This may sound difficult, but I managed to straighten out all eight corners of the one I’m working on with no issues using a pair of needle nose pliers that are toothless so as to not introduce any bite patterns to the grill.

    Thousand Sunny -

  5. 4eLBA2VEVUdE31sC
    4eLBA2VEVUdE31sC
    ZpLHTRAIClrqjMfQ
    • Fotografiere das Gerät von oben, bevor du weiterarbeitest. Beim Zusammenbau musst du wissen, wie die metallenen Stege angebracht sind.

    • Drehe die acht 9,8 mm langen Torx T6 Schrauben heraus. Entferne die metallenen Stege.

  6. mE1t61rJL3kgyFPA
    • Heble die Seiten der Jambox vom Gerät ab.

    It was at this precise moment (removing the shell) that I felt a small part hit my knee as it fell from the assembly and land in the carpet. It appears to be a small stainless grounding tab (clip) that I THINK came from the mounting pole beside the Micro B port and may act as a support and ground for the body of the port. Seems to fit but I dunno.

    Comotoes -

    It is a grounding clip and does belong on the power input jack and must be there if you want your speaker to safely ground out in case of a surge. Don’t lose it a please do put it back when reassembling your speaker. Also, it helps to read the comments attached to each step, if you had you would have read my comment regarding exactly this issue in previous steps. I’m glad you at least didn’t lose it when it fell, as it’s not something that is obvious when missing and most people wouldn’t even notice if it was lost.

    Thousand Sunny -

  7. SvF3JIkTNocSEpQL
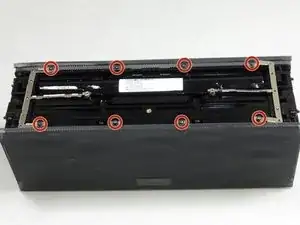
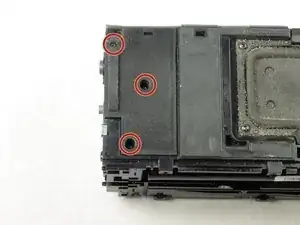
    • Lege das Gerät so, dass der Akku nach vorne zeigt. Entferne die drei 9,5 mm langen Torx T6 Schrauben.

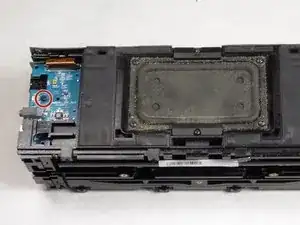
    • Hebe die kleine Kunststoffplatte hoch, die Platine darunter wird sichtbar.

  8. eQDQTrtxMvI6LYbt
    eQDQTrtxMvI6LYbt
    IDRtsHS44FECAvBO
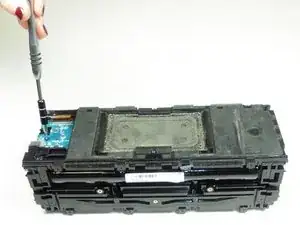
    • Entferne die 7,4 mm lange Torx T6-Schraube, mit der die Tochterplatine befestigt ist.

    • Hebe die Platine vorsichtig zur Seite.

  9. QmhisyJgqAFGMeEO
    • Ziehe das rote und schwarze Kabel von der Unterseite der Platine ab, um den Akku abzutrennen.

    The aux board in this photo is flipped over. Also, watch out for the power button as it is a completely separate assembly that just sits in there.

    Jeff -

  10. BBZVtxr6HlIaYRNn
    BBZVtxr6HlIaYRNn
    FdAl1vPReGlgceCv
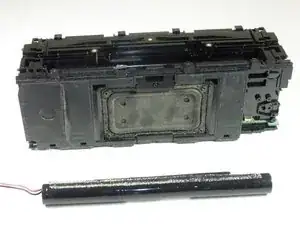
    • Der Akku ist mit doppelseitigem Klebeband in der Jambox befestigt. Löse ihn mit den Fingern ab.

    • Setze einen neuen Akku ein. Gehe die Schritte rückwärts, um ihn anzuschließen.

    • Achte beim Anschließen des roten und schwarzen Kabels darauf, dass die Kabel von Stiften getrennt werden. Sie dürfen beim Einbau nicht beschädigt werden.

Abschluss

Um dein Gerät wieder zusammenzubauen, folge den Schritten in umgekehrter Reihenfolge.

Abby Cybula

Mitglied seit: 02/04/15

2010 Reputation

33 Kommentare

Where do I buy the battery.

Kevin Foti -

http://www.ebay.com/itm/322588700358?ul_... :Here is someone who made and sell the battery for Jambox and Big Jambox, i hope this could be helpful

Lin -

да где аккумулятор купить то?

speedlexx -

на рынке покупаются стандартные 18650 и меняются на старые акку из колонки. что б пошла зарядка нужно дать больше ток.

цена вопроса ~ 1200₽ с работой

Max -

Where do I go to purchase a battery?

Edward Brown -

http://www.ebay.com/itm/JAWBONE-Big-JAMB... Here is someone who made and sell the battery for Jambox and Big Jambox, i hope this could be helpful

leandro -

I have been a tech for over 40 years. You did an outstanding job with description and great photos. Tech's are not know for this.

Harbhajan Khalsa -

This looks like a great guide. However, I've had this speaker less than a year and my battery should not be needing replacement. It won't hold a charge and I've tried all the other troubleshooting ideas except taking it apart, unconnecting and then connecting again.

John M -

Hey John...me too! I called their customer service and because my Jambox is just over 1 year old they said there was nothing they could do. They suggested I buy a new one!

I tried their suggestions: https://jawbone.com/support/articles/000...

No luck...it works fine if plugged in, but has to stay that way.

let us know if you find any answers! Thanks!

deb -

Here's what worked for me.

1) I followed all of the instructions above

2) I simply unplugged the battery,

3) plugged in the electrical charger cord

4) powered on the Jambox. it worked just fine

5) powered it off,

6) plugged the battery back in (white and red wires) and let it charge

7) put the jambox back together

Aaron McLean -

I put out battery from device, bought 3 standard battery 18650 for laptop and changed with old.

You should give more than 12v to start charging.

All costs less 20$.

Max -

Does anyone know what type of screwdriver to use for the screws under the rubber circles?

ceciseggie -

T6 same as others. don’t be surprised if the machine thread nut that is molded to inside doesn’t break off i just tighten them back with cover off and put some epoxy glue as i reattached cover

Edward M -

Was Hoping to Find this Process for JawBone Original -

I have two of these now maybe 5 yrs old - and both need new batteries.

But from what I see here - Looks like it'll be battle of Discovery -

Then figure out where to get the batteries.

In the meantime I received new Pelican 1050 case to keep them in

along with cords, etc. Perfect fit - bullet proof protection,

and playing music, just pop open the lid,, sounds great.

Philscbx -

My speaker doesn't work at all with USB charge nor regular charge.

Is that still battery? I am not sure about that because if it was the battery by having it plugged in it should work but here I have it plugged in and it doesn't work that makes me think that it's not the battery what do you guys think

Kasia -

I got a replacement battery for JAWBONE Big from ebay, it works great! here is the link:

https://www.ebay.com/itm/322783742637

Lin -

I did the procedure of removing battery and plugging in charger then reinstall battery. worked for me. the tiny screws are a pain. also panel that covers bottom with rubber pads has three machine threaded screws had two of three broken off. i epoxied then back to base.

Edward M -

The metal grounding clip fell off before I could see how it’s attached. I’m looking at Step #3 and the metal grounding clip indicated in orange, but the picture is a bit fuzzy and I can’t tell how it’s attached. Can anybody attach a photo or describe how it’s supposed to be attached? Thanks in advance!

John R -

Here is where you can find a good battery. https://www.ebay.com/itm/192329093200

tkuan -

excellent instuctions>

nisiwills -

I’ve had my Big Jambox—which preformed perfectly—for at least five years. Just replaced the battery following these excellent instructions. If the new battery lasts half as long as the first one , I will be happy! Great product. Sorry the company failed.

nisiwills -

Many thanks for these clear instructions. Did the replacement with a battery from AliExpress, now my speaker has new life.

Andrew Yerkes -

On the button side, beware the Earthing tab that sits above the charging port. You can tell when you re-assemble as it is the only tab that doesn’t have any paint on it. Also - top tip, when putting on the button end panel, keep your finger pushed on the BT pairing button to make sure it goes in the appropriate hole. I didn’t do this the first time, and the peg missed the hole and made the button stand out (and was unusable). In my frustration to remove the end panel again - I broke one corner :(

Great Tutorial, thank you.

Slh Ply -

Very simple install, a couple different options on Amazon come with the screw driver needed for under $30. Compared to how much the speaker cost new, this simple repair is well worth the time, even for a busy person. Thank you for the write up!

Tye Wilhelm -

easy peasy… thanks for the help!

Bryan Ripley -

Take a picture of the bottom of the big jambox so you can put the rubber feet back into the same location/orientation. Put the jawbone logo on the front of the big jambox in the photo so you know which side is the front/back. The rubber feet ONLY fit in the same spot that they came from - they have unique holes on the bottom of the feet that only fit into their respective locations on the case. The photo in this guide of the bottom of the big jambox does NOT have the feet in the correct locations. Thanks for the guide - 2023 putting new battery in to keep the tunes going!

djc6 -

What is the battery? Horrible to have to ask this really. Why is everything so hidden and coded? I am sick to death of this secretive nonsense.

Break Apple -

Please tell us what the battery is. These silly comments giving an ebay address are ALL EXPIRED and of no use - just adding frustration. If you had given an image in the first place then we could simply install one and get over this automated trash. Expose the criminals who are wasting the earth's resources through greed. I suspect that two 18560 batteries are inside this trash made in usa.

Break Apple -

Amazon has the battery now if your still looking. Just type in "jawbone, big jam box battery" and many come up. They even come with instructions so a lot of people must be doing this repair on these old speakers. I did it for one I fished out of he garbage and it works great!

Talkie -

電源座壞了

去那裏可以換修

程淑英 -

Really helpful guide, thanks! Living in Alaska, I can't have replacement battery packs shipped from Amazon, so I had to replace the bad 18650 cells in the old/bad pack with new ones previously obtained for another project. That was pretty straightforward, but... should you do it... be aware that the battery module circuit board inhibits current flow until it has been plugged into the motherboard, and then energized with external power. And then it all fires up and works! Weird but true, so don't despair when you take your VOM to the disconnected plug and it looks dead.

Doug Franklin -

Instructions and battery worked great. Probably 35 minutes start to finish. I bought my own T6 screwdriver FYI. Be patient.

C Smith -

Just want to add many of the batteries on Amazon come with a t6 screwdriver but you're way better off buying your own quality set. The one it comes with is cheap and will strip screws.

Talkie -