Einleitung

Wenn dein LG G8 ThinQ Probleme hat, die Ladung zu halten oder sich unerwartet ausschaltet, hilft dir diese Anleitung beim Austausch des Akkus.

Der Akku ist die Hauptenergiequelle des Geräts und kann bei Beschädigung verschiedene Probleme verursachen. Sieh dir die Fehlerdiagnose-Seite an, um zu entscheiden, ob dieser Austausch für dich notwendig ist.

Bevor du das Gerät öffnest, entlade den Akku auf unter 25 %.

Aufgeblähte Akkus können sehr gefährlich sein – trage daher eine Schutzbrille und arbeite mit besonderer Vorsicht.

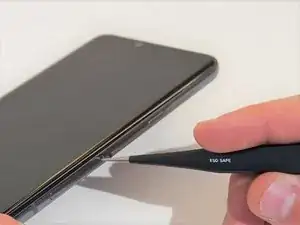
Dieses Smartphone verwendet einen starken Kleber am Akku und an der Rückabdeckung. iFixit’s Klebstoffentferner oder Isopropylalkohol mit hoher Konzentration (90 % oder mehr) erleichtern den Ausbau erheblich.

Der Klebstoff kann ersetzt werden, um eine werksnahe Passform und Optik wiederherzustellen.

  1. Dm6AYHDyRJ4oetYG
    Dm6AYHDyRJ4oetYG
    c6L6UBjoUhUaXfcy
    QunDvvUS24YHj2JD
    • Schalte dein Gerät vor Reparaturbeginn aus und ziehe alle Kabel ab.

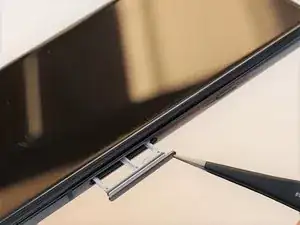
    • Drücke ein Sim-Auswurfwerkzeug in das Loch an der unteren rechten Seite des Smartphones ein.

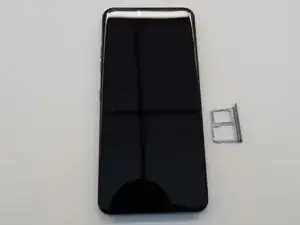
    • Entferne die SIM Karte und den Einschub.

  2. DjE4LjwjuSYCTvdq
    DjE4LjwjuSYCTvdq
    Hp1JOXt2WvBOqfDn
    rN4fFstKOvCmXSiE
    • Lege das Smartphone mit dem Display nach unten auf die Arbeitsfläche.

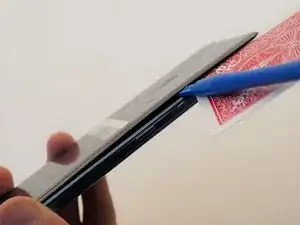
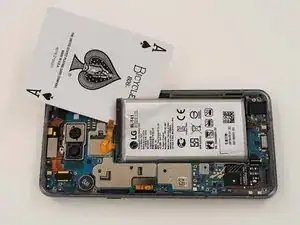
    • Schiebe geeignete Werkzeuge, z.B. Spielkarten zwischen die Rückseite und den Rahmen des Smartphones ein, um die Clips und den Kleber zu lösen.

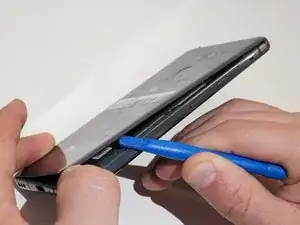
    • Drücke die Rückseite gleichmäßig vom Smartphone weg.

    • Wenn der Spalt groß genug ist, setze ein Öffnungswerkzeug ein und heble die Rückseite ab.

    This is where I started to ponder for the first time because my camera looks different.

    I also have a LG G8 ThinQ but maybe the european version

    Thomas Wiele -

  3. UBdsBxNSQ65LQSLG
    UBdsBxNSQ65LQSLG
    SM6lJIWNBcupSYN1
    VbrV14ZG24L3eDZb
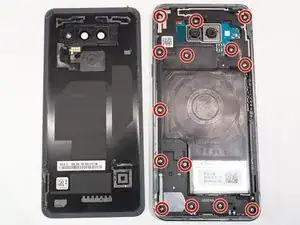
    • Entferne die vierzehn Kreuzschlitzschrauben #000, mit denen der Mittelrahmen befestigt ist.

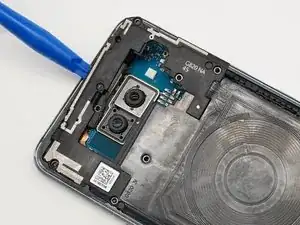
    • Heble mit einem Öffnungswerkzeug rund um den Mittelrahmen herum und entferne ihn vom Smartphone.

    and here it is true, the screws are in a different place. The sound system on the bottom is also different

    Thomas Wiele -

  4. HT2saavn3AlUKChl
    HT2saavn3AlUKChl
    qtSYAGmWXNW6ou3T
    fvJEaDrXFupqqAHD
    • Heble den Lautsprecher mit einem Öffnungswerkzeug heraus und entferne ihn vom Smartphone.

  5. GApKJtG5CJSQKMk1
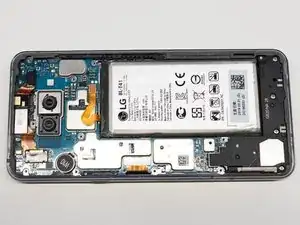
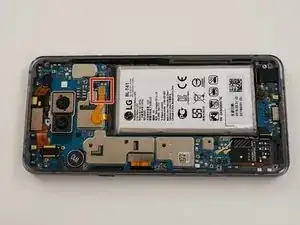
    • Drehe das Smartphone um, so dass das Display oben liegt.

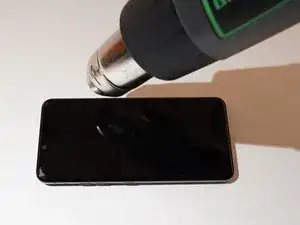
    • Erwärme den Kleber unter dem Akku. Du kannst dazu eine Heizplatte, einen Haartrockner oder ein Heißluftgebläse verwenden.

    • Überhitze das Gerät nicht, der Akku und das Display sind sehr hitzeempfindlich.

    • Der Kleber weicht nicht so leicht auf, du musst es wahrscheinlich mehrfach versuchen.

  6. TOcZtFWibQYouDAp
    TOcZtFWibQYouDAp
    SZ2GwHLhomMAwWnh
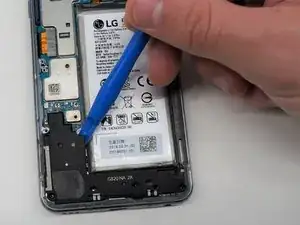
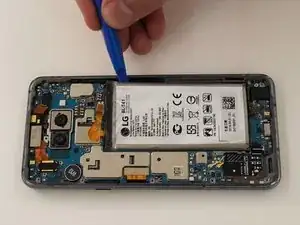
    • Heble das Flachbandkabel mit einem Öffnungswerkzeug vorsichtig nach oben und trenne den Akku ab.

    the battery type of my LG is "BL-T43"

    Thomas Wiele -

  7. lBZshqlXYHkQwJQO
    lBZshqlXYHkQwJQO
    XD3AOQOLw1GF3ta5
    WtbTAItY2wKmgBJA
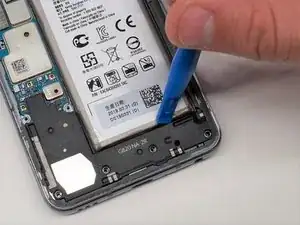
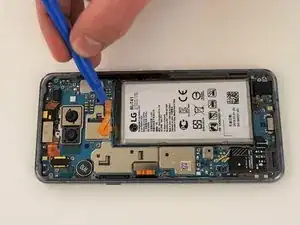
    • Heble mit einem geeigneten Werkzeug, z.B einer Spielkarte oder einem Öffnungswerkzeug rund um den Rand des Akkus herum.

    • Wenn sich der Akku nicht leicht lösen lässt, ist der Kleber wahrscheinlich nicht weich genug. Erwärme den Akku nochmals oder tröpfle etwas hochkonzentrierten Isopropylalkohol unter den Akku. Lasse die Flüssigkeit einige Minuten lang wirken und versuche es nochmals.

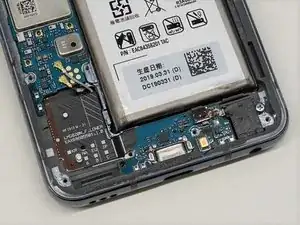
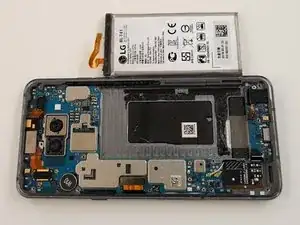
    • Entferne den Akku vom Gerät.

    Although it is a different phone, the instructions were helpful.

    Unfortunately, my battery exchange was pointless.

    I think my USB socket is defective and unfortunately I can't find any instructions for it at the moment.

    But if anybody want, i can send a few pics from the repairing

    Thomas Wiele -

Abschluss

Um dein Gerät wieder zusammenzusetzen, folge den Anweisungen in umgekehrter Reihenfolge.

Lauren Maynor

Mitglied seit: 17/09/21

115 Reputation

6 Kommentare

You don't use any heat to remove the back glass panel? Just suction cup and prying?

CarnalT -

Yep need heat to remove the back. Glass shattered on mine. Ifixit needs to fix this guide.

Bryan Ransom -

Success! I documented the process using ifixit tools on https://waynedavis.com

Wayne Davis -

thanks for your tutorial man it helped me a lot

John Eric Limbago -

Very helpful tutorials guys. Im in need of replacing my battery in my g8. 2 questions. Do you need to remove the speaker component at the bottom left in order to replace the battery? Some videos i watched they didnt remove it. 2nd question is how to i get the back cover back on after replacing the battery? Is there a specific adhesive i can get?

Johnny XRay -

This is basically exactly the same process to open the LG G7 ThinQ. Right: on the first time ever, use some source of heat or a hairdryer to soften the glue on the back. I have a few "ice/heat gel packs" and I heat on the microware. Put it 20-30 seconds interval (up to 2 minutes) to get a good amount of heat. Massage/squish the pack to mix the gel. Helps tremendously.

When a corner lifts, things get a lot easier - keep adding cards/guitar picks.
Now the battery itself is a major pita to get it loose. I'd recommend isopropyl alcohol as the guide mentions.

You can also use an old credit cart beveling an edge to try to pry the battery. Be patient.

I usually don't put glue back to hold the battery as the remainder of the old glue is enough. Have done it 3 times for my daughter's phone.
A little amount of glue with the kit, would be nice but since it stays in its case, the remainder of glue is also usually enough to keeps things close... no more waterproof seal though.

Alex De Lara -