Einleitung

Diese Anleitung zeigt, wie der Akku im Lenovo ThinkPad P1 2. Generation ausgetauscht wird. Die Informationen und Bilder stammen aus dem Service Handbuch des Computers.

  1. nQMatlUBLpjPFQgE
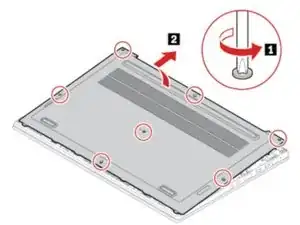
    • Entferne die sieben Schrauben, mit denen die Bodenplatte befestigt ist.

    • Entferne die Bodenplatte.

  2. WofotqIGVsABd4VS
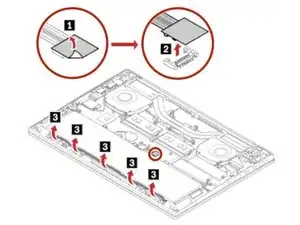
    • Ziehe den Isoliertaufkleber vom Akkustecker ab.

    • Ziehe den Akkustecker in Pfeilrichtung, um ihn abzutrennen.

    When Lifting up on the battery connector begin by lifting/leveraging the end of the connector away from the wires/ribbon first. When I tried to lift under the wires end it seemed firm...too firm to comfortably lift without risking breaking the connector on the MB. When I started with the outside end away from the wires that tilted up easier and then the other end of the connector snapped out. Just be careful and don't rush.

    fluxcomputerrepair -

  3. 4hE56fMOLa1wvaL6
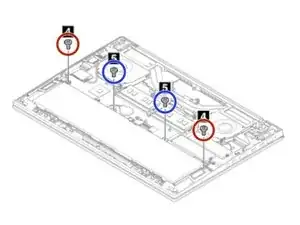
    • Entferne die zwei M2 × L4 mm Flachkopfschrauben

    • Entferne die zwei M2 × L5 mm Flachkopfschrauben.

  4. hJfaFTAbhFoUeShD
    • Entferne den Akku.

Abschluss

Um das Gerät wieder zusammenzubauen, folge den Schritten in umgekehrter Reihenfolge.

Max Kletskov

Mitglied seit: 22/04/20

41675 Reputation

3 Kommentare

Great Thank you for info

Brad -

Will this battery generate a Bios not authentic battery warning? Other replacement batteries would not charge in my P1 Gen2 ThinkPad.

hello -

Is it compatible for Lenovo Thinkpad P1 Gen1 Type 20MD ?

k2ki -