Einleitung

Diese Anleitung zeigt, wie die Hauptplatine im Lenovo ThinkPad X1 Carbon der 6. Generation ausgetauscht wird. Schalte das Gerät vor Reparaturbeginn aus und ziehe alle Stecker ab.

  1. NFtYMIq2pIVe1NLS
    NFtYMIq2pIVe1NLS
    f3HPZLtAIooGCgUh
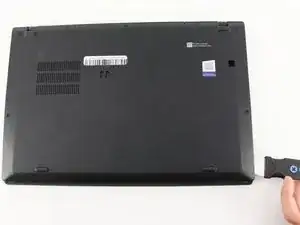
    • Benutze einen Kreuzschlitzschraubendreher #0, um die fünf Schrauben zu entfernen, mit denen die Rückseite befestigt ist.

    • Die Schrauben lassen sich nicht komplett aus der Rückseite entfernen. Lockere sie also einfach soweit es geht.

  2. HKMFZVKrjam3PWWH
    HKMFZVKrjam3PWWH
    6ZP1DMLSvgYbwIhX
    • Benutze einen Jimmy, um die Rückseite direkt an den Fixierstiften anzuheben.

    • Auch wenn im Bild ein Metallwerkzeug zu sehen ist, empfehlen wir ein Öffnungswerkzeug aus Kunststoff zu verwenden, um eventuelle Schäden zu minimieren.

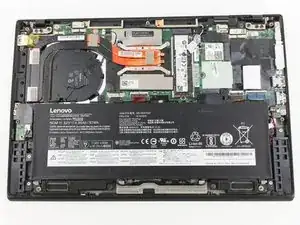
    • Entferne nun die Rückseite.

    • Falls du beim Anheben der Rückseite Widerstand spürst, kontrolliere die Schrauben und stelle sicher, dass sie komplett gelöst sind.

    I thank you for these instructions. They were quite helpful and I successfully replaced the fan. There is one thing however. Your instructions stated the following: "Be sure to pull on all of the cables at the same time."

    I disagree. One should never pull the wires. I was able to nudge the one part of the connector loose from the other part that it fit into." I then put the new fan in and gently and carefully pushed the connecting parts together.

    Otherwise, your instructions were clear and to the point. Thank you very much

    ALAN L SILBERLIGHT -

    The image shows prying the cover open at the bottom right. In fact, there are tabs securing the bottom edge to the frame. The cover needs to be pried open at the top edge. Once the top edge is released, the cover can be shifted slightly toward the top of the image to disengage the tabs at the bottom.

    This error, along with the similar error about removing the battery in step 4, suggests that the instructions were written with the laptop in the opposite orientation than what is shown in the images.

    EatCroc3 -

    I also don't believe that the iFixit Jimmy is necessary - in fact, it might scratch up the exterior paint of the X1 Carbon Gen 6. Instead, I find the triangular iFixit picks are more appropriate for the task: iFixit Plektren (6er Pack)

    Also, at least for my unit, the lid comes off easily and I only use the plastic picks if there's any resistance and I don't want to risk breaking any of the clips.

    Tai Lam -

  3. qhmY6XdAvKVFNxAH
    qhmY6XdAvKVFNxAH
    wwcFArcOSjnCHqDn
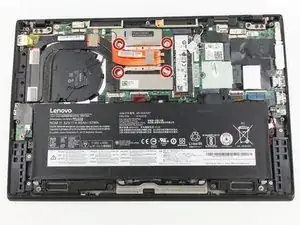
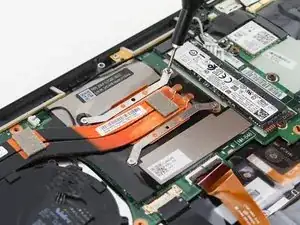
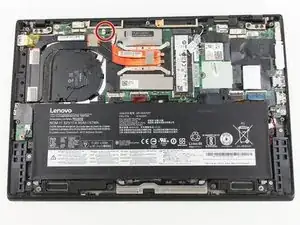
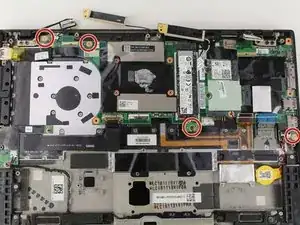
    • Entferne die vier Kreuzschlitzschrauben #0, mit denen der Lüfter an der Hauptplatine befestigt ist.

    • Die Schrauben bleiben in der Halterung des Lüfters stecken. Drehe sie so weit auf, bis sie gelöst sind.

  4. aMMMTniEMpcgpPNQ
    aMMMTniEMpcgpPNQ
    PpOegsZ3XWGSZIjL
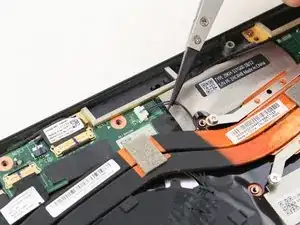
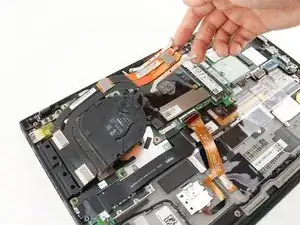
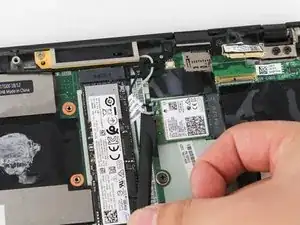
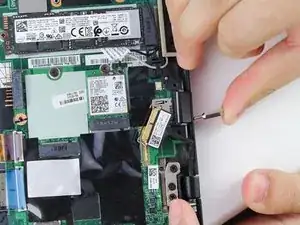
    • Ziehe die Anschlusskabel des Lüfters vorsichtig mit einer Pinzette mit Kunststoffspitzen oder deinen Fingern zur SSD hin und trenne sie ab.

    • Ziehe an allen Kabeln gleichzeitig.

  5. uC1onxvZgBvYZvdB
    uC1onxvZgBvYZvdB
    4BvO2WRgSnCwYEaC
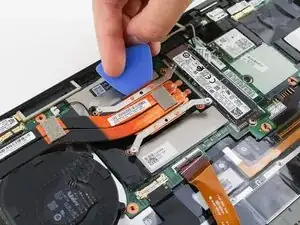
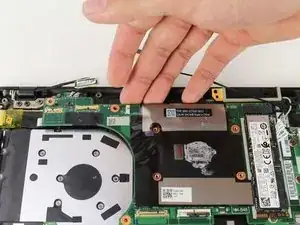
    • Hebe die Halterung des Lüfters mit einem Plektrum nach oben.

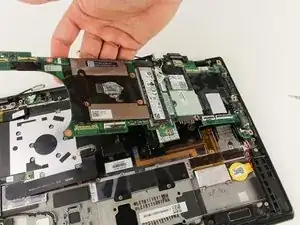
    • Ziehe den Lüfter behutsam schräg aus seinen Anschlüssen heraus.

  6. 6SJT3usU3JCaLUyh
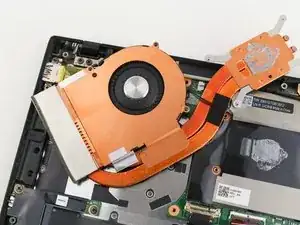
    • Drehe den Lüfter um, so dass das Innere frei liegt.

    • Nun kannst du, wenn nötig, den Lüfter reinigen oder die Wärmeleitpaste erneuern.

    All good. But most of us occasional Fixit-ers don't happen to have thermal paste lying around. Would have been helpful to include it in your list of necessary parts and tools. Otherwise, instructions were clear as crystal and worked as advertised. Tx!

    ESR Westchester -

    Great call out! I updated this guide to include the Thermal Paste as a required component. Thank you!!

    Matt Zieminski -

    I'm about to do this repair, and I'm planning to use Honeywell PTM7950 SP rather than thermal paste. It occurred to me that maybe I should ask the experts if this is a good idea. PTM7950 has rave reviews on heat conductivity, and it appears that it will fit fine under the fan. But am I missing a problem that will come back to haunt me someday?

    BiggerHammer -

    It's probably fine to use Honeywell PTM7950, just make sure to perform a CPU-intensive tasks (such as synthetic benchmarking) so that any pockets of air can escape after initial post-market application. If it doesn't perform as intended, then you can always remove it and use a more conventional thermal paste on the CPU.

    Tai Lam -

    There is one detail that many videos/guides almost never explicitly mention: you don't put any thermal paste on the smaller "die" for the X1 Carbon Gen 6 - and you only catch this if you see others cleaning the original thermal paste for the first time.

    * This is mentioned in the description of a video from Duraputer in February 2024: https://youtu.be/VLb8vIzdi6s

    * This is also mentioned in a pinned comment of a video from Salem Techsperts in October 2022: https://www.youtube.com/watch?v=TAIypDVt...

    Tai Lam -

    Thank you. Mine just died

    nitsudg13 -

  7. GZFJBWkwYJkMFyfN
    GZFJBWkwYJkMFyfN
    bw5ZEThJZVKXf5AY
    WPoKMcMScsyUVjCH
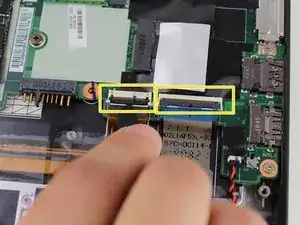
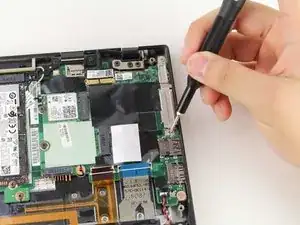
    • Trenne die sieben Flachbandkabel ab, mit denen die Hauptplatine am übrigen Gerät angeschlossen ist.

    • Trenne das letzte Flachbandkabel in gleicher Weise ab.

    • Die Stecker, Anschlüsse und Kabel sind sehr empfindlich. Arbeite sehr vorsichtig.

    • An den rot oder orange markierten Kabeln musst du den Sicherungsbügel aus Kunststoff mit einem Spudger anheben.

    • Der Sicherungsbügel muss soweit hoch gehoben werden, bis er frei ist.

    Somewhere between these steps the battery was removed. Can you add a step here describing that?

    Bill Brown -

    Battery removal starts on Step 3 above.

    steve mooers -

  8. eHB1NuUYSS1shKi1
    eHB1NuUYSS1shKi1
    dBbXW4rWWHhRPEYH
    • Setze einen Spudger unter die Kabel, um sie von der WLAN-Platine abzulösen.

    • Du kannst dazu auch eine Pinzette oder einen Haken benutzen.

  9. KUOkLsHuPlic1Abq
    KUOkLsHuPlic1Abq
    qQymAfXKCbCRwtLy
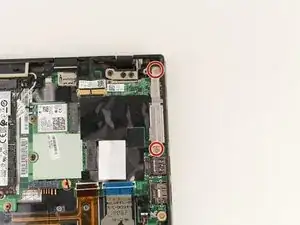
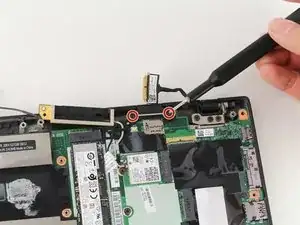
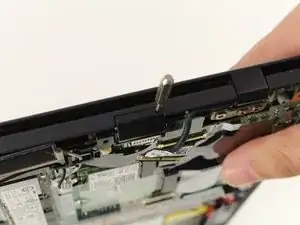
    • Entferne die drei Kreuzschlitzschrauben #0, mit denen die Halterung der Anschlüsse befestigt ist.

  10. 2encdQRY4paUUIUp
    2encdQRY4paUUIUp
    PxUnpfu4JQfLYkJ4
    • Der Antennenhalter dient auch als Befestigung der Hauptplatine am Gerät.

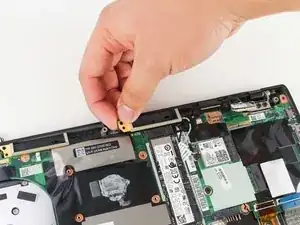
    • Entferne die beiden 3 mm langen Kreuzschlitzschrauben #00, mit denen der Antennenhalter befestigt ist.

  11. mNj1iXjXeZ5OjYQC
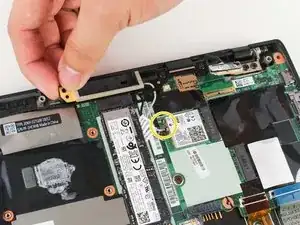
    • Fasse den Halter an der Stelle, wo er festgeschraubt ist und hebe ihn zu dir hin. Ziehe ihn dann zur Seite mit der Schraube hin weg und entferne ihn.

  12. xWydShsFLYmgaiQH
    • Hebe die Stecker am schwarzen und am weißen Antennenkabel aus dem Anschluss hoch. Fasse nur am Stecker, nicht am Kabel.

    The detaching of the connectors is done in step 8 already

    Peter -

  13. yHsSueMOhWCWSqvw
    • Der SD-Kartenleser ist direkt am Gerät befestigt.

    • Entferne die beiden 5 mm langen Kreuzschlitzschrauben #0.

  14. cmRYZ2tYyXvLBMlh
    cmRYZ2tYyXvLBMlh
    G3VWSr1SFgGoNBkN
    • Drücke mit einem geeigneten Werkzeug zum Entfernen von SIM-Karten in die Öffnung am SIM-Kartenleser, um ihn vom Gerät zu lösen.

  15. BECvab43JdKeHf4G
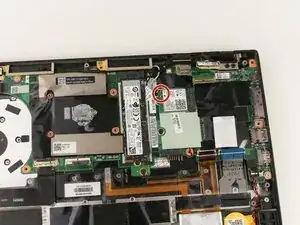
    • Entferne die letzten vier 3 mm langen Kreuzschlitzschrauben #00, mit denen die Hauptplatine befestigt ist.

  16. MRXRsNH32PVOoI1V
    MRXRsNH32PVOoI1V
    oWwAJdI4mVw5Hau5
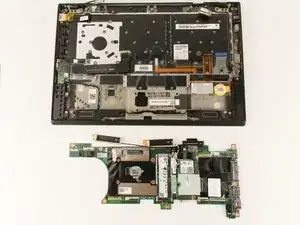
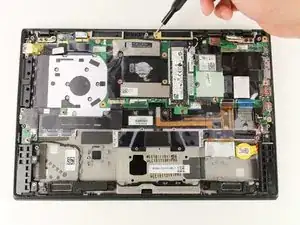
    • Hebe die Hauptplatine am oberen Rand zu dir.

    • Ziehe die Hauptplatine von den Eingängen weg und entferne sie.

Abschluss

Um dein Gerät wieder zusammenzubauen, folge den Schritten in umgekehrter Reihenfolge.

Michael Megna

Mitglied seit: 23/01/20

1431 Reputation

3 Kommentare

Step 3 should be removing the battery. There are 4 screws to do this.

Jesse Corbel -

is it true these boards have a problem and stop functioning? I bought it at Costco 2-3 years ago. My computer won't power on and my local tec shop thinks this is the problem. I like it bc is light and small and since I paid $1100 for it I think I should get a little more life out of it, right? I just bought a new battery too. thanks.

(X1 Carbon 6th Gen - (Type 20KH, 20KG) Laptop (ThinkPad) - Type 20KG; 8th Generation Intel® Core™ i7-8550U Processor(Core i7-8550U) Machine Type Model: 20KG0022US.)

foggy -

Thanks for this tutorial, any idea how I get the maintenance tool from lenovo to transfer the serial number etc.?

samized -