Einleitung

Diese Anleitung zeigt, wie du in die Logitech K860 hinein gelangen kannst.

Werkzeuge

  1. dHRnwCmuahHEhDeM
    dHRnwCmuahHEhDeM
    KltjpbfZrCd1DiG4
    • Drehe alle sichtbaren Schrauben auf der Unterseite heraus.

    • Halte alle Schrauben gut geordnet und notiere dir, wo ihr Platz ist.

    • Achtung: Es gibt Schrauben unter den Füßen und eine der Schrauben befindet sich direkt unter dem Aufkleber mit der Seriennummer. Dieser Aufkleber reißt beim Entfernen. Es könnte Probleme mit der Garantie geben.

    • Die Reparatur dieses Gerätes ist schwierig und kann leicht schiefgehen. Achte besonders auf empfindliche Kunststoffteile.

  2. DWM6hCZtGwDCCJGX
    DWM6hCZtGwDCCJGX
    EYLVEUZWKbbdZWeY
    • Nachdem die Schrauben auf der Unterseite gelöst sind kann die Handballenauflage entfernt werden. Dadurch wird die andere Hälfte des Akkufachs zugänglich und weitere Schrauben können entfernt werden.

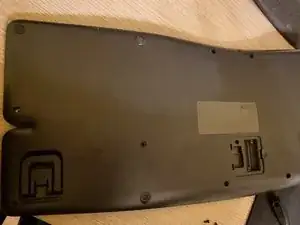
    • Löse die Clips an der Handballenauflage, drehe 4 - 5 Schrauben heraus und entferne weitere Teile.

  3. jeqvKkFdFIECjTUI
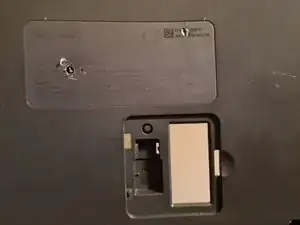
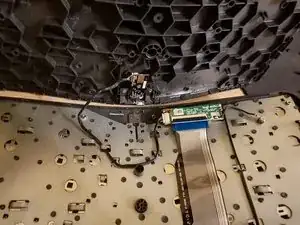
    • Wenn der Rahmen zerlegt wird, beachte, dass die Teile noch durch die Einschalttaste verbunden sind. Ziehe einen der Stecker vorsichtig wackelnd ab und lege die Bodenplatte zur Seite.

    • Nun kommt der schwierige Teil. Über die ganze Metallplatte verteilt sind dunkelgraue Kunststoffstützen, die bei der Montage durch Hitze festgeschmolzen wurden.

    • Es handelt sich um eine Art von Kunststoffnieten. Ursprünglich waren sie zylindrisch geformt. Im Werk wurde die Metallplatte eingesetzt und die Stützen wurden durch Hitze oben pilzartig verformt.

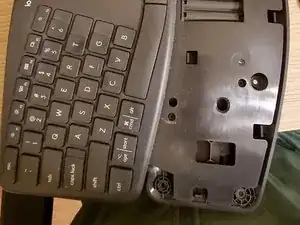
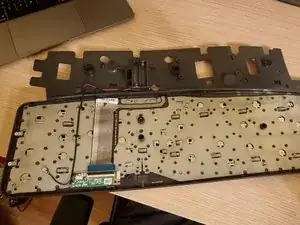
    • Um die Platte abzunehmen, müssen die Kunstoffpilze mit einem scharfen Messer einzeln abgeschnitten werden. Das lässt sich nicht rückgängig machen, beeinträchtigt aber nicht die Funktion der Tastatur. Die Bauteile werden von den noch vorhandenen Schrauben zusammen gehalten.

  4. 1W16XXXdpxoc4KmX
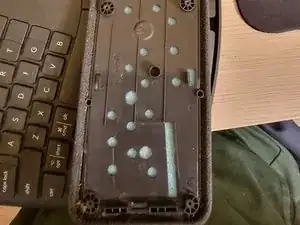
    • So sieht die Tastatur von innen aus. Du kannst noch die kleine Platine losschrauben. Du kannst auch noch die beiden Schrauben seitlich an der Tastatur entfernen.

    • Es ist allerdings fast unmöglich, die Metallplatte abzunehmen. Logitech verhindert, dass wir weitere Reinigungs- und Reparaturarbeiten vornehmen können.

    Has anyone managed to go further than step 4? My wife spilled a drink, and while we dried the keyboard out sufficiently, the keys are still sticking slightly.

    Andy Bryant -

    Unfortunately I do not see any way to further disassemble this and yes, mine are also a little bit sticky still but they became much better now after a year or so

    AlexG -

    Screw logitech for placing stickers over screws and making this one of the least-cleanable keyboards I have ever experienced. I really like it apart from that, but that’s a pretty big failing.

    imixak -

    Thanks for the instructions. Very much appreciated. I missed the location of the screw hidden under the serial number when I was being all manly and just following my nose.

    Clearly I will have to be much more careful about where I spill my coffee from now on. :o(

    Martin Moleski -

    Which it's exactly THE REASON why everyone is here, and now a single key fault that will pass for warranty (and no one want's to have to open a support ticket to logitech missing a 'e' or 'a' and wait two weeks for a replacement). There is not GOOD reason to try to remove the plastics on this keyboard, NONE. It sucks but WHY putting the note in STEP FOUR. You cannot fix anything here wo breaking ALL first.

    Before falling in hell, listen my suffering first: There AT LEAST two different SKUs for the keys JUST with GERMAN (QWERTZ) layouts (long 't' & 'n' break far too easy, one older plastics doesn't 'sit' well with modern German moulding, I have none luck finding references to bought the correct one.)

    TRUST ME: If you are !#^&@@ with a glitchy keystroke, wait to find how FAST you'll tear in half ALL; FULL RAGE, bc you broke the plastic that spring propel the key up.

    Keyboard Lover -

Abschluss

Um dein Gerät wieder zusammenzubauen, folge den Schritten in umgekehrter Reihenfolge.

AlexG

Mitglied seit: 02/12/17

304 Reputation

9 Kommentare

Great guide! the part about the hidden screw under the serial number in particular was a life saver.

One thing that's not clear is which slots take the smaller vs the larger screws, it would help to annotate that as now I'm blindly screwing whatever fits.

michaelchirico4 -

OK so IINM, the 6 small screws all go on the upper half of the reverse side. There is also one slot for a longer screw (closest to the power switch). Anyway the longer screws don't fit in the small slots so it's easy.

michaelchirico4 -

Great guide. But I have 2 buttons that are not working, if it can not get to te membrane how can i test it or clean it?

Victor Araki Miyazono -

that's ridiculous that you can't do that. I have the same issue.

Artan Muzhaqi -

some water was dropped into keyboard and some keys is not working anymore. Indeed, if it now possible to see the membrane or too much hard to put it back, it seems does not make any sense to fix it. Logitech wins...

Ferreira -

I have the same issue, water ingress…Logitech cant Help.

Bruno Bayo -

Thanks for trying...

I got three things:

1) first and foremost, you can't get at the underside of the keys to clean contacts or anything like that;

2) the wrist pad clips off (although the guide doesn't say exactly how to do so without breaking anything). Any way, you don't need to disassemble the whole thing; and

3) (my original contribution) the smaller screw come from (and go back into) holes with metal sockets in them - or at least they did on my keyboard.

Peter Lenny -

Spilled coffee on my K860 - a lot of it. Was dripping when I stood it on end. Drained it for 10 minutes, shook it, drained another 10 minutes. Then, took it apart as much as possible and popped it into a convection oven, at 140 degrees for 1.5 hours. Works great!

To clean keys, pop buttons off the brackets underneath them. Would recommend having a bunch of extras on hand before popping keys off. The process will break quite a few of the brackets.

Dan Gage -

^ IF YOU ARE READING; STOP ANY IDEAS, THINK TWICE: 140F != 140º CELSIUS.

Far from trying to prevent you to fix anything trying, I would say: DO NOT EVEN TRY A OVEN. 140 degree for anyone outside US is 140º, 40 above the boiling point of water at 1 atm. The 140 from a USer is EXACTLY 60 degrees, or CELSIUS, which, it's so round that I am afraid to even think about the molding of the K860 surviving 90 minutes at 140 degrees of the world.

Just imagine leaving the keyboard, in your car, mid summer, at noon full sun not shadows. That's 60 degrees inside the car in 10 minutes, DO YOU THINK THE MOLDING of the K860 WOULD SURVIVE 90 MINUTES?.

1. Do not use water from the tap, it's stupid, the amount of solid residue varies from potable to 'good' enough to rinse soap in a shower, from 100km around your tap.

2. Coffee is dirty water, if you like that with sugar, using hot air in any sugar not 'drained' from the water punishment, will leave you with caramel, sweet and glued forever.

(A convection oven at 60 or 140F, my ass)

Keyboard Lover -