Einleitung

Diese Anleitung zeigt, wie du an das Logic Board herankommst.

  1. dLF6KygThyYNdyCS
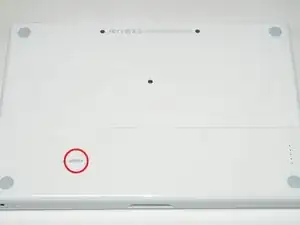
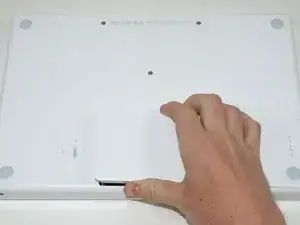
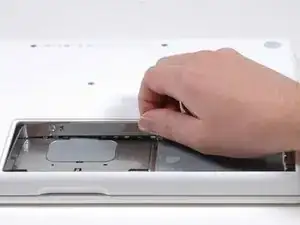
    • Nimm eine Münze oder einen Spudger (Spatel), um die Akku-Verriegelungsschraube um 90 Grad im Uhrzeigersinn zu drehen.

    I used this guide plus the Thermal Paste guide to resolve my MacBook RRS (Random Restart Syndrome) issue. My MacBook would randomly restart after the fan kicked into high speed. When I removed the heatsink I discovered an an irregular patch completely free of thermal compound of about 15-20% of the area on one of the processors. I removed and re-applied the thermal paste. I ran a memory test utility overnight that previously caused a restart after a couple of hours, and the probelm seems to be solved. TIme will tell.

    ServiceDocs -

    This guide was seriously helpful, so thanks for putting this together. I found a thick ribbon of dust/muck whatever between the fan outlet and the exhaust port that was almost as dense as felt. My fan must have been fighting like crazy trying to pass air through that blockage, which explains the high temps and excessive fan noise. Wish I'd done this sooner...

    Thanks again!

    skraggle -

    Just R&R'ed the fan in my black MacBook Core 2 Duo tonight. Took me 30 minutes tops and I was taking my time. These instructions are SPOT ON! Great job ifixit.com! Two thumbs up!

    Follow the instructions exactly as you see and have a piece of paper taped to the table next to you that you can outline all the screws you took out so you know where they go back in. I expected this to be a LOT harder, but it was one of the simplest repairs I've ever done to ANY computer!

    mikeutter -

    Piece of cake--or should I say gum. If you don't have a magnetized screwdriver, load up a stick of gum and chomp on it until it's needed then use a bit to retain screw on the driver. And if you should tear the black tape, or if the silver tape won't stick any more, just bubblegum it together. The instructions were clear and correct, which made for a very simple repair.

    Mike Woodruff -

    My battery does not pop out when after step 1. Any idea why, and how do fix it?

    Calvin -

    Zitat von Calvin:

    My battery does not pop out when after step 1. Any idea why, and how do fix it?

    Will not drop out even if you turn it upside down?

    skraggle -

    Somehow, now my isight camera doesn't work and the light is always on. Cannot figure out what I did wrong.

    josefsalyer -

    Somehow the plastic disc with the slot for a coin got dislodged from the case, and I can't seem to get it open now. Any tips/links on how to open this without the aid of the plastic disc?

    Peter Wood -

    i broke my disc off as well. I used two toothpicks to rotate the thing. hi tech.

    howard bederman -

    Outstanding guide - thank you!

    owen bullock -

    My computer will not charge when plugged in. It will stay on as ling as the plug is in the wall however if the power source gets disconnected it will shut down immediately. I removed the battery and put it back in that did not help. It worked and charged fine 2 days ago. I have a backpack with a laptop storage area. I went to hang the backpack up and it fell and ever since the battery is not functioning. Is there some fix I can try or is my only solution to replace it? I would have thought that dropping it would affect more than the battery?

    Beth Tomasek -

    Better leave the back pack where it cannot fall. Hindsight is so much better than foresight . I learned the hard way too!

    Loy Lum -

    Many of the tiny screws in this project were quite sticky. I found some blue Loctite residue that must have been when the Apple repair shop worked on the laptop years ago. I have found that it is important to hold the correct driver firmly down in the screw and then just tweak the driver in short bursts to loosen it before unscrewing it with a smooth turn.

    Patrick Langvardt -

    Be really careful while doing this to not use too much force while doing this step, because the plastic disc can break off and it can be a cosmetic issue along with functionality issue. This happened to me first hand so please take my word for it…

    [deleted] -

    Probably worth mentioning at this stage that the caddy you propose to use should not have lugs on the front corners, like those used in unibody 1278 and onwards.

    harwood -

    Hehe, still my mac os running! After, already bit more than 10 years of use!

    I put new heat paste now for the second time. Maybe this helped for staying young so long.

    Thanx for all the repair guides!!!

    Fabien -

  2. FN4ThHdXJENYggv1
    • Hebe den Akku aus dem Computer.

    I just replaced the battery as indicated (with a iFixit part), but the computer says there is no battery connected, even after letting the power plug in for more than one hour.

    Jean Wallemacq -

    I think I found the way to have the new battery to charge!!!!!

    See: https://www.youtube.com/watch?v=jRYIMDQx....

    Essentially, you have to follow a very precise order: 1/shut down the computer, 2/take off the magsafe connector, 3/remove the old battery, 4/put back the magsafe connector, 5/put the new battery, 6/power on, each time leaving a few seconds in between.

    Jean Wallemacq -

  3. wxI2pQDYMxYyon6w
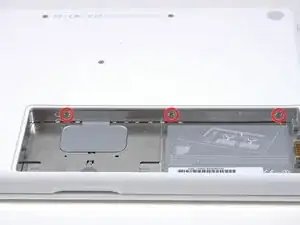
    • Entferne die drei im gleichen Abstand an der Rückwand des Akkufachs verteilten Kreuzschlitzschrauben #000.

    • Die Schrauben bleiben in der Metallabdeckung für den Speicher hängen, du kannst sie deswegen nicht verlieren.

    • Die flexible Verlängerung von iFixit ist bei diesem Schritt sehr hilfreich.

    please pay attention that screws are native to metal pieces otherwise you are going to be a stupid like me trying to unscrew unsuccessfully until I reread the guide

    manochu -

    Lay the screws out in a ”timeline” like a circle, Then when you reassemble just start from the end of the “timeline”

    decristoforo -

    The screws have to unscrewing positions, first they unscrew from the whole body BUT if you move the lid without entirely removing the screws, they will remain attached to the lid. This I find much more recomendable!

    Wytchkraft -

    I found when putting this back in that I had to use a spudger to work the mesh/foam into the slot where the memory cards are so the bracket would lay flat again when screwed back in.

    slwatts2 -

    What size screwdriver

    edward greene -

    Edward: Philips 000

    johnsawyercjs -

  4. PGJSBlvccBHSXVPO
    • Fasse die L-förmige Speicherabdeckung am rechten Ende an und ziehe sie zu dir hin, so dass die Öffnung des Akkufachs frei liegt.

    • Hebe sie dann nach oben aus dem Computer heraus.

    That looks so easy!

    caiden rutledge -

  5. 6blEAXc4lLXCJ2Bh
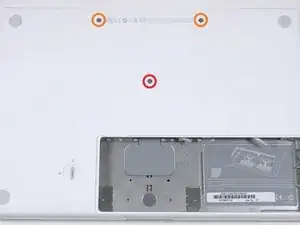
    • Entferne die folgenden drei Schrauben:

    • Eine 11 mm Kreuzschlitzschraube #00 in der Mitte des unteren Gehäuses. (Kopf: 5 mm Diameter, Dicke: 0,75 mm)

    • Zwei 14,5 mm Kreuzschlitzschrauben #00 (Kopf: 5 mm Diameter, Dicke: 0,75 mm)

    • Wenn die Schrauben im Gehäuse festsitzen, kannst du einen magnetisierten Schraubendreher verwenden, um sie herauszuholen.

    • Die kürzere der drei Schrauben kommt in die Mitte des unteren Gehäuses.

    I couldn't get the top two 11mm screws to come out, even with a magnetized driver. When I tried to keep unscrewing them, they clicked like they were spring mounted, and I didn't have any trouble leaving them in and continuing on.

    ryan64 -

    Zitat von ryan64:

    I couldn't get the top two 11mm screws to come out, even with a magnetized driver. When I tried to keep unscrewing them, they clicked like they were spring mounted, and I didn't have any trouble leaving them in and continuing on.

    I use a strong magnet to pull the screws out of their socket.

    Alaerus -

    The top two screws didn't seem to want to come out, and I saw no reason they had to, so I left them there, put a little piece of tape over each so they wouldn't fall out.

    HandyMac -

    You need to replace the shorter middle screw first, otherwise it won't tighten later since it won't quite reach the bottom.

    colmcostelloe -

    for me this was the hardest part especially the two 14.5mm that dint want to come out. keep turning the screw and slightly pressing the case down, once the screw is a little use try using finger, screw and a non metallic point to try to push them out. they arent tight but they are very hard to unscrew i almost gave up, but believe me they come out with patience

    manochu -

    I also did not find that I needed to remove the two 14.5 mm screws. I unscrewed them but they seemed designed to stay with the case and I found it did not seem to affect anything to just let them stay there.

    Alice -

  6. DtjVZJA2CTUA3iOJ
    • Sei beim Herauslösen dieser Schrauben ganz besonders vorsichtig, die Schraubenköpfe gehen leicht kaputt.

    • Um Schäden zu minimieren, kannst du die flexible Wellenverlängerung benutzen.

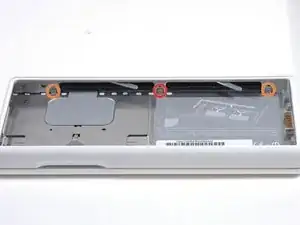
    • Entferne die folgenden drei Schrauben von der Rückwand des Akku-Gehäuses:

    • Eine 3 mm Kreuzschlitzschraube #0. (Kopf: 2,75 mm Diameter)

    • Zwei 4 mm Kreuzschlitzschrauben #0 auf jeder Seite. (Kopf: 2,75 mm Diameter)

    On this step, I encountered a problem. The middle screw was screwed in very very tightly. As a result, I ended up stripping the screw despite being very careful. I tried to use a wire cutter to remove the screw, but that did not work. I actually ended up using the wirecutter to cut the bracket off, leaving the screw screwed in. This did not affect anything. I am typing off of my replace macbook top case right now.

    The point is, BE CAREFUL! but if something does go wrong, don't fret. There are solutions.

    LaNoobieFixer -

    On a Macbook I just tore down, I found that in this step, the 4mm screw was on the left, not the right. I thought maybe someone else had it apart before and accidentally switched them so in staying true to these instructions I tried to reassemble with the 4mm screw on the right. I found it would not go all the way in. I ended up putting it back together with the 2-3mm screws on the right and the 1-4mm screw on the left.

    scottgriz -

    I didn't look closely at these screws when I took it apart, but when I went to put it back together (two weeks later) I found I had two longer (4mm?) screws, and one short one. So I put the longer ones in the two end spots, the short one in the middle; they all seemed to go in okay. (Maybe the screws got changed around the last time the cracked top case was replaced, when the MB was in the Apple shop under warranty last year.)

    HandyMac -

    Me too. I had two longer 4mm screws here, and one 3mm screw. And I didn't pay attention to what holes each screw came out of. I put them back in a random order and it seems fine.

    Thomas -

    My early 2008 MacBook was the same. 2 x 4mm in the outer and 1 x 3mm in the centre.

    Ernie K -

    You need to replace the shorter middle screw first, otherwise it won't tighten later.

    colmcostelloe -

    I needed a tweezers here. These screws are tiny!

    If you lose one you may have to remove the RAM (by pulling the appropriate lever) and gently slide out the screw.

    colmcostelloe -

    oh thanks I thought the screw was lost forever

    Ike Broflovski -

    I couldn't pull over the two 3 mm Phillips on the step 6, how could you've done it?

    Eliotus -

    To confirm what HandyMac and colmcostelloe found, some MacBooks have one 3mm and two 4mm screws in the rear wall of the battery compartment. On the one I worked on, the shorter 3mm screw came from the middle hole.

    BeatJunkie -

    please note the position of the screws because when you are reinstalling them you might get confuse. this ones go below or under (sorry English inst my first language). There are two screw holes this steps are for the ones below.

    manochu -

    Zitat von BeatJunkie:

    To confirm what HandyMac and colmcostelloe found, some MacBooks have one 3mm and two 4mm screws in the rear wall of the battery compartment. On the one I worked on, the shorter 3mm screw came from the middle hole.

    Thanks Beat Junkie, this was the situation with my Mac 2.13ghz Mid 2009 that I was putting back together. Thanks for the confirmation! (For the 6th step)

    Cong Trieu -

    For me (A1181), there were two shorter screws and one longer. The longer went on the left (a shorter screw wouldn't catch). (Not the middle that is currently in the instruction. But that could be model difference.) The middle screw started to strip the head but using a slightly larger phillips allowed me to get it out.

    Paul Collins -

    I have two MacBooks, one white and one black and both had two 3mm screws and one 4mm screw, opposite of what was in the main document

    doublel -

    In my late 2006 macbook the central screw was longer than the side screws..

    Julien Lesage -

    Mine was A1181 model, Core 2 Duo 2.16 GHz. Of course I did not keep track of the screws and ended up with two shorter ones and one longer. Replaced them with the longer one to the right of the three. Got it done with a Wiha PH00 screwdriver. Had better hold than the bit from the precision screwdriver kit.

    quentinlow -

    me too. Got it done with a iFixIt PH00 screwdriver.

    Johhnie Doe -

    Yeah, same for me, #00 worked; #0 suggested in the guide was too big. I didn’t even try #000. For 2.2GHz A1181. My screw config matched the guide, 3mm in middle, 4mm on the sides.

    Les Kitchen -

    Stripped a head on my left screw (A1181 model, Core 2 Duo 2.0 GHz). Used a precision 1.5 slotted screwdriver to get enough bite to screw it out and back in.

    Daniel -

    I couldn't get the suggested Phillips #0 tip to grab. PH#00 worked, but I found the PH#000 to work the best.

    steveeb33 -

    I found this step to be the hardest to put back because of the angle - even with iFixIt's driver Flex Extension.

    steveeb33 -

    I had two 3mm screws and one 4mm screw…. So I put the 4mm screw in the middle hole, and the 3mm screws in the outer holes.

    FixWiki -

  7. 4MqPJgssmP6AGvOt
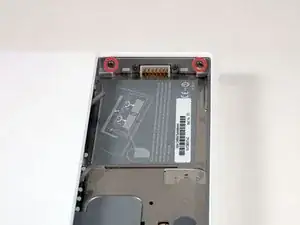
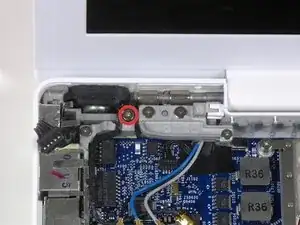
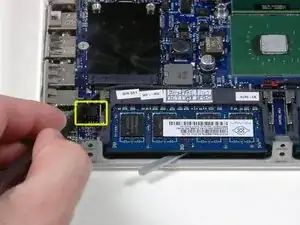
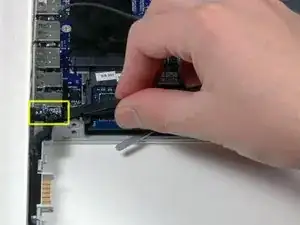
    • Entferne die beiden Kreuzschlitzschrauben auf beiden Seiten der rechten Wand des Akkufachs (nicht die, die sich direkt neben dem Akkuanschluss befinden).

    • Zwei 6,25 mm Kreuzschlitzschrauben #000. (Kopf: 4 mm Diameter, Dicke: 0,5 mm)

    The steps do not tell you what length screw that is needed to be here. What I can tell you that is the screw needs to be 5mm or 6mm, NOT 7.5 or 8mm or 9mm.

    Cong Trieu -

    Screwdriver PH0

    Projectors Band -

    For black 2.2GHz A1181, I used PH #000 as suggested by guide. My screws are both 6mm.

    Les Kitchen -

  8. xdDA5eHuaNInWRlA
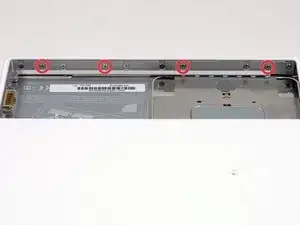
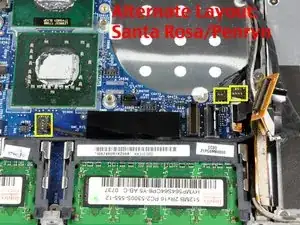
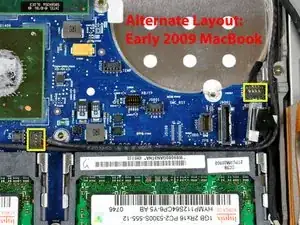
    • Entferne die vier gekennzeichneten Kreuzschlitzschrauben an der Vorderwand des Akkufachs. Wenn du von links aus arbeitest, entferne die 2., 4., 7. und 9. Schraube.

    • Vier 3,25 mm Kreuzschlitzschrauben #000. (Kopf: 4 mm Diameter, Dicke: 0,4 mm)

    It's recommended to use a PH00 screwdriver instead of the PH000.

    The PH000 is too small and you can damage the screwheads.

    Martin Born -

    Yeah, I found PH #00 better too. (For black 2.2Ghz A1181.)

    Les Kitchen -

    I used PH0 for this

    Projectors Band -

    Is there a way I can cut the bracket off? I completely stripped one of the screws?

    Austin Martin -

    I’ve done this often enough that I marked the screws to remove with red marker.

    Peter Wood -

  9. EBC44ZGj1Dj1QTlD
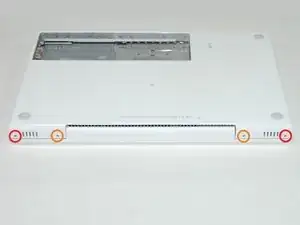
    • Entferne die folgenden vier Schrauben auf der Rückseite des Computers:

    • Zwei 11 mm Kreuzschlitzschrauben #00, mit Schaft (2,2 mm Diameter x 2 mm Länge) (Kopf: 3,2 mm Diameter , Dicke: 0,5 mm)

    • Zwei 7,25 mm Kreuzschlitzschrauben #00, mit Schaft (2 mm Diameter, 3,75 mm Länge) (Kopf: 3,2 mm Diameter, Dicke 0,5mm)

    • Beim Wiederzusammenbau kommen die beiden längeren Schrauben nach innen und die beiden kürzeren nach außen.

    Outer screws (red) are shorter (7mm long), while inner screws (orange) are 11mm.

    ptb -

    I found these screws quite loose; upon reassembly, I wanted to torque them but found the case would distort towards the center, so I had to leave them fairly loose

    David A -

    I cannot get the two outer screws out for the life of me- and afraid of stripping them. Already see I'm doing some damage. Help? What can I do?

    Olivia -

    Are you sure you have a proper screwdriver? From my experience you really need to use the correct size and not just something that seems to fit.

    Jakub Clapa -

    Olivia, you can screw back the longer screws that go on the inside. In the photo marked with orange. Then open and close the lid of the MacBook a few times. This will fit the 4 screws more properly in the steel inner-frame and they can come a little bit loose.

    Close the lid again. Leave the inner screws untouched and begin with the outer screws (marked with red) with indeed a perfect matching screwdriver head (with a big and long grip for your hand). This worked for me perfectly without damage. Success!

    S van Dam -

    When reassembling, do not fully tighten the two 11 mm (orange) screws. When the plastic starts to flex, back it off until the strain on the plastic housing is released and leave it at that. The two 7.25 mm (red) can be snug.

    steveeb33 -

    Same experience as David. Case warped and left screws a little loose.

    spadu79 -

  10. jesHGFcWjJWckGS1
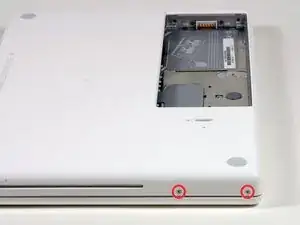
    • Entferne die beiden Kreuzschlitzschrauben von der rechten Seite des Computers. Das ist die Seite mit dem optischen Laufwerk.

    • Zwei 5,2 mm Kreuzschlitzschrauben #00 mit Schaft (Diameter: 2,3 mm,Länge: 3,25 mm) (Kopf: 3,2 mm Diameter, 0,5 mm Dicke)

    • Es ist nicht notwendig, die entsprechenden Schrauben auf der rechten Seite des Computers zu entfernen, wo sich die Anschlüsse befinden.

    The screw farthest from the optical drive would not come out, all other screws came out fine with my screw driver and the screw looks ok, any tips on how to get the screw out?

    Aidan Morey -

    With some of the screws that can happen. I had it too. This did it for the MacBook I was repairing: 1. Open the MacBook. Then press firm but gentle on the upper case with your hand or fingers while trying to loosen the screw with your screwdriver. 2. I used a different screwdriver from the same size diameter but with a much larger hand-grip. Success!

    S van Dam -

  11. rU3wVbbA1jsJBNJW
    • Ein Flachbandkabel für Trackpad und Tastatur verbindet das obere Gehäuse mit dem Logic Board, daher darfst du das obere Gehäuse noch nicht ganz abnehmen.

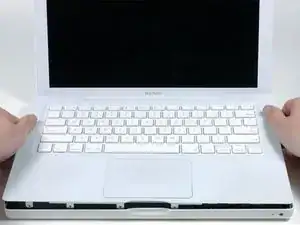
    • Verwende ein Öffnungswerkzeug aus Plastik, eine abgelaufene Kreditkarte oder eine ähnlich dicke Karte, um das obere Gehäuse aufzuhebeln, indem du in der linken oberen Ecke beginnst und dich zur Vorderseite des Computers vorarbeitest.

    • Das obere Gehäuse wird wahrscheinlich an seiner Verbindung über der Vorderkante des optischen Laufwerks hängen bleiben. Löse daher zunächst alle anderen Seiten und ziehst dann das obere Gehäuse von beiden Seiten der Öffnung des optischen Laufwerks nach oben. Auch hier kann das Einführen einer Kunststoffkarte, eines Plektrums o. Ä. hilfreich sein.

    • Wenn du das MacBook auf eine Seite stellst, um besser sehen zu können, können sich die vier grauen Kunststoffclips verschieben, die die rechte Seite des oberen Gehäuses an ihrem Platz halten. Aber keine Panik. Sie gleiten in die Schlitze an der oberen rechten Kante des unteren Rahmens, oberhalb der Vorderkante des optischen Laufwerks.

    • Achte beim Zusammenbau darauf, dass die Clips auf der rechten Seite, über dem optischen Laufwerk, fest einrasten. Sie unterscheiden sich von den Clips auf der linken Seite und benötigen daher normalerweise einen etwas festeren Druck, um einzurasten.

    There will be 4 grey plastic clips just right of the DVD drive. Note their position as they will fall out in the next steps.

    tim7866 -

    No such clips found on my early 2008 version.

    Ernie K -

    Thank you ifixit, it was huge help for me, I did it and everything just works great.....THANK YOU!

    Dako -

    As is reported above, there a 4 friction tabs that connect to the keyboard. If they do not stay in place and stick to the keyboard, the keyboard will not go back on. Just remove them and put them in the clips, with the solid clip wall to the outside of the unit, and put the keyboard back on. Do this before reconnecting the keyboard.

    David Higgins -

    I had no problem at all in this step, the left side was already unlocked when I open the MacBook, the right side was a little tricky but i was able to pull it out in less than a minute

    manochu -

    The front left had an annoying little metal strip between the outside of the case and the tab. It's very easily bent, so the tab was caught on it. I spent a good deal of time trying to push and pull various things (and even just yank the @$!^ thing off), but eventually I found that if you undo the two screws you are told not to in step 7, the battery connector can be pulled up and out, leaving enough horizontal room to pull out the metal strip (with a little bit of coercion). I left it out when I put everything back together.

    James Pearson Hughes -

    Thanks for the tip. Saved me!

    Joe -

    Because this step requires some force, make sure to double check that you got all your screws out. I finally got my gumption up to apply the necessary force required to pull up the upper case, and after 5 minutes of pulling, I look and see that the reason it wasn't coming up because I missed one screw. Ugh.

    Also, before you just shove your hands under the upper case, prying about, think twice: I cut my finger pretty bad on a sharp piece of metal.

    Thomas -

    When reassembling, take some care to align the tabs on the right hand side next to the optical drive. Rock and slide these tabs into position. Then work from right to left, as the rest of the case is quite easy to put back together.

    Andrew Dent -

    I took my mac apart yesterday to clean out the trackpad properly and after getting some 'help' from my grandfather (he lost 2 screws and snapped off a bit of the uppercase but i didn't have the heart to ask him to leave it alone) i tried putting the uppercase back on. it fits perfectly but the middle section closest to the screen appears slightly raised and when i go to screw in the four screws on the exterior of the laptop i can't because the hole is not at all aligned (and two of those four screws are very long). anyone know why this might be? can it be fixed/is it a common problem?

    Eliza -

    If the upper case sticks above the optical drive, don't pull straight up, but up and to the left at the same time.

    frood -

    Wow, pulling both up and to the left made all the difference for me, to unstick the keyboard around the optical drive.

    Neil Steiner -

    I think it is a mistake to separate the keyboard from the clips at the right side (above the optical drive) at all! Instead, after freeing the other three sides, just slide the keyboard slightly to the left, and leave the clips attached to the keyboard. For reassembly, just put the keyboard in its approximate place and slide it to the right to get those clips into position. Be sure the keyboard is really snug against the machine’s case. Then press the other three edges of the keyboard down.

    jeh -

    The plastic around the edge is very thin and cracks easily, so be gentle while using the opening tool.

    Henry S -

    On the right side above the optical drive there are little plastic braces that latch the upper case to the main body. This is the reason why the upper case might stick here. If the above step is not working, also try to gently push the upper case sideways away from the optical drive after freeing all other sides. When reassembling make sure the braces are in their slots of the main body and not attached to the upper case. If you cannot fit the upper case evenly over the optical drive, that's probably why. In this case carefully remove them and slide them back into their slots before lowering the upper case.

    Hendryk1982 -

    this guide was awesome. this step was easy for the broken macbook i salvaged and noticed because i got a factory replacement keyboard quite recently on my macbook in use, the 4 clips above the optical drive were TIGHT - it took quite a bit of pulling up before it came loose!

    Chinarut Ruangchotvit -

  12. 1NGrYHwrUGqEvy6d
    1NGrYHwrUGqEvy6d
    mneJaV6RthqCDgqo
    odIfPIcXuEgHGlCi
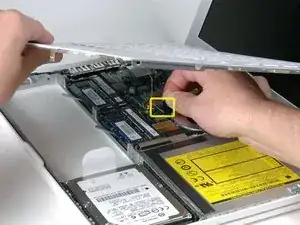
    • Halte das obere Gehäuse hoch und ziehe die schwarze Lasche am Steckerende des silbernen Flachbandkabels von seinem Anschluss auf dem Logic Board weg.

    • Wenn keine schwarze Lasche vorhanden ist, kannst du auch einen Spudger verwenden, um den Stecker vorsichtig aus seinem Anschluss auf dem Logic Board zu heben. Dieser Stecker ist hoch, heble ihn also gerade nach oben.

    • Wenn das Kabel des oberen Gehäuses beim Entfernen des oberen Gehäuses abbricht, bieten wir das Kabel einzeln an, und wir haben eine Anleitung, die den Austausch erleichtert.

    • Wenn du das obere Gehäuse entfernt hast, ist es ein guter Zeitpunkt, um Staub, Haare usw. zu entfernen. Am besten verwendest du eine Dose mit Druckluft. Wenn du einen Pinsel verwendest, achte darauf, dass die Borsten aus einem Material bestehen (normalerweise Tierhaare), das keine statische Elektrizität erzeugt, die die Elektronik zerstören kann.

    • Nach dem Wiederzusammenbau befinden sich 4 graue Kunststoffclips in den Schlitzen an der Oberseite des Rahmens vor dem optischen Laufwerk (siehe zweites und drittes Bild). Diese Clips müssen in ihren Schlitzen eingesetzt werden, damit die entsprechenden Laschen an der Unterseite der rechten Seite des oberen Gehäuses einrasten können.

    When changing the topcase remember to change the sticker with the serial also! This might be important when further service or bigger repairs by apples service are needed. The serial also helps you with identifying your macbook!

    spi -

    The entire connector broke off the logic board when I was disconnecting the keyboard just now. Be extremely careful!

    Chris -

    I tried to remove the blacktab from the logic board, however, the black tab tore apart. The logic board is okay but the keyboard connector is torn. It has some silver wires passing through a whit plastic housing. It is the first generation of MacBook Core Duo. Do you think it can be repaired?

    Roger -

    I could not get the keyboard off my the body... (black macbook I don't know if that makes any difference). It was stuck bottom left hand corner, so I had to bend whatever was stuck to get access to the logicboard etc... any reason why this is the case??

    Takuma -

    not sure if this is the place to ask but my mac. doesn't start properly now it turns on and the little light on the right side turns on but keyboard leds don't and display doesn't either any ideas please?

    carlos -

    Great repair guide! Changing the top case was pretty easy and it saved me a lot of money.

    Harry -

    it was really easy, i had no experience whatsoever installing or unistalling mac parts (or pc either). it just took me less than 25 minutes, and i just finish and Im typing from my new upper case keyboard.

    manochu -

    After a sucessful install of the keyboard, the select (mouse buttun equivalent) was found to not operate consistently. I called support and they are shipping a new one out to me. THIS is why I buy from ifixit - sure I can get a part for less elsewhere - but I would not get the service I get with ifixit - THANKS guys!!!

    jgreengold -

    Note - I agree, this was VERY easy - great pictures, perfect explanations...

    jgreengold -

    Zitat von carlos:

    not sure if this is the place to ask but my mac. doesn't start properly now it turns on and the little light on the right side turns on but keyboard leds don't and display doesn't either any ideas please?

    Did you ever find an answer for this question? My computer is doing the same thing. Thanks.

    E Chambliss -

    Zitat von E Chambliss:

    Did you ever find an answer for this question? My computer is doing the same thing. Thanks.

    no i never did couldn't get help it blows to hear someone else had the same problem...im using a windows(yuk) but im getting a new mac next paycheck. if you figure it out let me know so i can fix my other one and maybe give it to my parents

    carlos -

    Zitat von carlos:

    no i never did couldn't get help it blows to hear someone else had the same problem...im using a windows(yuk) but im getting a new mac next paycheck. if you figure it out let me know so i can fix my other one and maybe give it to my parents

    Hello, I'm following this procedure because my MacBook isn't turning on due to a failure in the MagSafe DC In board, it was not charging the battery and therefore no power going in. The case was broken duirng warranty and also the MagSafe power adapter was replaced. Now it is failing again. This is an old late 2006 MacBook. Does your Mac powers on, do you hear the chime sound? or you are stuck with a hardware failure?

    Repair232323 -

    Zitat von Francisco:

    Hello, I'm following this procedure because my MacBook isn't turning on due to a failure in the MagSafe DC In board, it was not charging the battery and therefore no power going in. The case was broken duirng warranty and also the MagSafe power adapter was replaced. Now it is failing again. This is an old late 2006 MacBook. Does your Mac powers on, do you hear the chime sound? or you are stuck with a hardware failure?

    my MacBook charges the battery and powers on i dont hear a chime and it turns on but never starts

    carlos -

    Zitat von spi:

    When changing the topcase remember to change the sticker with the serial also! This might be important when further service or bigger repairs by apples service are needed. The serial also helps you with identifying your MacBook!

    How do you do it? I can't get it out

    Superb guide thank you guys

    eli -

    This takes some nerves if there is no tab, but be confident and just prise the connector straight up.

    Andrew Dent -

    Be very careful while you pulling the black tab! It's better to use spudger to pry the connector from it's housing while you gently pulling the black tab.

    eaksut -

    Clips removal: its hard with finger to pull. It's better and easy off with a pry tool (I used a flat twiser) to pry from the bottom gently for each clips. It was so smooth and easy.

    Johhnie Doe -

    After I clean everything nice… put the cable back and DO NOT TURN ON. What the !&&* happens!? Ideias my friends? :(

    Sorry my bad english!

    glecyo medeiros -

    Getting the upper-case/keyboard off was a bit nerve-wracking. Just work away at it carefully, bit by bit.

    A small torch (flashlight for our American friends) was handy to see what was happening underneath the upper-case. Otherwise too dark.

    I used a photographic lens-cleaning blower (with the rubber squeeze bulb, just the blower, no brush) to get away the dust. Probably not as effective as canned air, but it worked well enough. I’d recommend avoiding touching anything with the tip of the blower. Keep it a few mm away.

    Les Kitchen -

    After removing the keyboard I noticed that the side clips were not attached to the body but rather to the keyboard still. Easily removed but something to note.

    Philip Lynes -

  13. 3nk1eh1gmsbyfrEZ
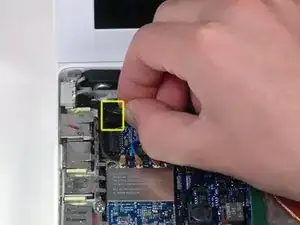
    • Der Stecker am Kabel der MagSafe-Platine ist am Logic Board eingerastet. Ziehe ihn nach rechts ab.

    On the 2.13ghz MacBooks, there is a 3mm screw holding down the Magsafe connector, when putting it back together make sure this is secured after connecting the magsafe connector to the board, otherwise you'll have a wobbly Magsafe connector.

    Cong Trieu -

    The Mag Safe connector was not budging so finally I used a 1/8 inch flat screwdriver and twisted it against the ridge on the connector alternating sides. That loosen it to allow me to pull it out to the right.

    Patrick Langvardt -

    Wondering if Magsafe board can be removed without removing the MB?

    rstone -

  14. eUIaVqnulySZJYqI
    • Entferne die einzelne 9 mm lange Kreuzschlitzschraube, die den linken Lautsprecher am Gehäuseunterteil befestigt.

    • Hebe den linken Lautsprecher aus seiner Fassung heraus und lege ihn zur Seite.

  15. AKvZaAPVvVmWXLho
    • Entferne folgende drei Schrauben:

    • Zwei 7,5 mm lange Kreuzschlitzschrauben an beiden Seiten des linken Rahmens für die Ausgänge.

    • Eine 9 mm lange Kreuzschlitzschraube in der Mitte des linken Rahmens für die Ausgänge.

    • Bei manchen Modellen sind die Schrauben 7,5 mm lang.

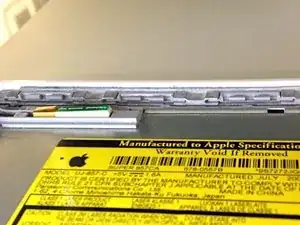
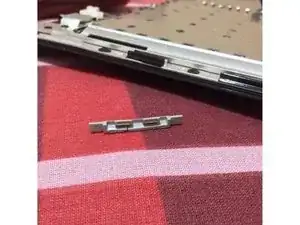
    • Entferne den kleinen schwarzen Abstandshalter aus Kunststoff unten am linken Rahmen für die Ausgänge.

    • Bei manchen Modellen, z.B. Frühjahr 2008 ist an dieser Stelle kein entfernbarer Abstandshalter.

    The screw at the lower end of the I/O frame may be longer than the one at the top. Use the longer screw at the bottom (with the black plastic spacer).

    axel -

    Effectivly, the 7.5 mm is near the speaker and the two 9.5mm next.

    Andre Sterpin -

    On my late 2007 A1181 2.2 G Santa Rosa machine all three screws are 7.5 mm PH00. There is no black plastic spacer as mentioned in the first comment.

    Patrick Langvardt -

    On my early 2009 Macbook white A1185, all three screws in this step are of same length…

    Alec -

  16. knN1ZtMi4WrVHREa
    • Hebe den linken Rahmen für die Ausgänge nach oben aus dem Computer heraus. Achte auf die dünnen Metallfinger, sie können dabei hängen bleiben.

    • Es kann sein, dass das Lautsprecherkabel am Rahmen für die Ausgang festgehakt ist. Hebe es aus dem Haken heraus. Hänge es beim Zusammenbau auch dort wieder ein.

    • Die Abschirmung ist an dem Teil, den du entfernen möchtest mit kleinen Haken an anderen Teilen befestigt, die kaum zu sehen sind, bis du sie auseinander hast. Sie befinden sich über der Kopfhörerbuchse und dem Firewire-Anschluss.

  17. aFpMyZjuDKwXkAvW
    • Löse das Metallklebeband zwischen dem Lüfter und dem optischen Laufwerk ab.

  18. fOY6HUngwobtmQcr
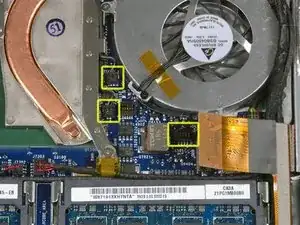
    • Biege das graue Displaydatenkabel und die schwarzen Lautsprecherkabel nach rechts. Dadurch wird eine silberne Schraube sichtbar, mit der das Lüftergehäuse am Gehäuseunterteil befestigt ist.

  19. BhCipqF43ieVxasa
    • Trenne das orangene Flachbandkabel zum optischen Laufwerk vom Logic Board ab.

  20. TV2CnuayYRGVSqvb
    • Löse die kleine schwarze Gummiabdeckungen von der rechten Seite des Kühlkörpers ab.

    My late 2007 A1181 2.2 ghz Santa Rosa machine has only one heat sensor as shown in step 21 and the rubber spacer was attached on top of that connector closer to the fan.

    Patrick Langvardt -

  21. eWdZaJigCUCb26CV
    eWdZaJigCUCb26CV
    hlqePIN4VkQNXkbZ
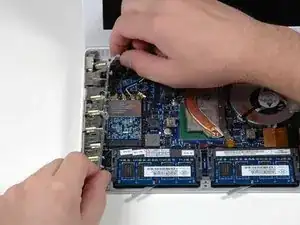
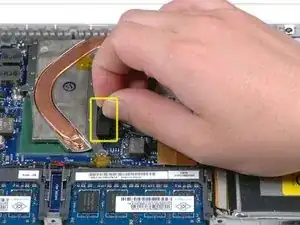
    • Heble/ziehe den schwarzen Lüfterstecker und die zwei Stecker der Thermosensoren nach oben und trenne sie vom Logic Board ab.

    • Bewege die Stecker nicht parallel zur Oberfläche des Logic Boards, dadurch können sie kaputt gehen.

    • Wenn du Macbook Core 2 Duo Santa Rosa/Penryn Anfang 2009 hast, gibt es nur einen Thermosensor.

    • Der Kühlkörper in MacBooks von 2009 kann leicht unterschiedlich aussehen.

    I have come across different types of temperature sensor connectors! Please help!!

    onechrisjones -

    Zitat von onechrisjones:

    I have come across different types of temperature sensor connectors! Please help!!

    help i was trying to desconect the heat sensor and i accidently pull the whole thing off. Can i solder it back or would i need a whole new logic board? Someone please help me with this! thanks

    pmora -

    How do the fan connectors on Step 21 work? It appears that the connector has to come up away from the board but the base of the connector isn't attached well to the board so it is very easy to destroy this connector. I've found its not required to disconnect the fans if all you are doing is removing the system board.

    tim7866 -

    To disconnect the temp sensors, apply a small amount of pressure between the board and the wires being very careful not to apply pressure under the plastic housing that is mounted to the board.

    tim7866 -

    I'm removing the logic board from a MacBook (13-inch, mid-2009) i.e. Penryn, and at this step there does not seem to be a temperature sensor at all as the photo on this page show for Alternate Layout: Santa Rosa and Penryn. The connector is there on the logic board but there is no cable and not sensor to speak of between the heat sink and the fan, as in other models.

    hdh607 -

    The illustration shows what is referred to as a 3 wall logic board model 820-1889-A with flat temperature connectors. Be aware that there are 4 wall square block connectors on other models and the two types are not interchangeable even though they both come from model 1181A's. This model (shown) accepts 3 boards. A 1.86 GHZ , a 2.0 GHZ , and a 2.16 GHZ one. The early 2006 model can be different from the late 2006 , early 2007 model so check your board part number and actual image of your replacement if you don't have the serial number.

    Dave -

    I am confirming from experience and also a discussion in the ifixit answers section (MacBook 5.1 temperature sensor missing?) that not all (few in my experience) 2009 macbook 5.2s have anything connected to the TEMP J5550 connector at the seven oclock position in relation to the fan. It is simply empty.

    stevesontheroad -

  22. XVlaoRS4bJsHMIi1
    XVlaoRS4bJsHMIi1
    RhOnMdFyyrZNYUF2
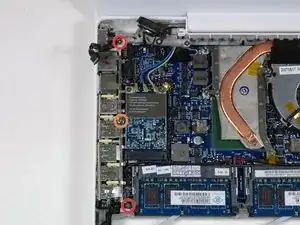
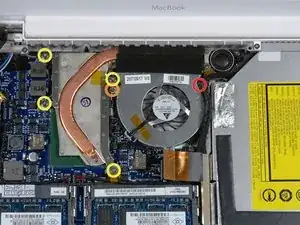
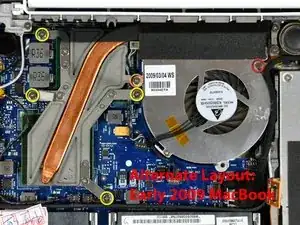
    • Entferne folgende sechs Kreuzschlitzschrauben:

    • Eine 3 mm lange Schraube rechts am Lüfter

    • Eine 6 mm lange Schraube links am Lüfter

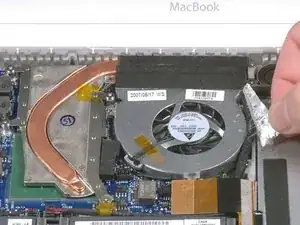
    • Vier 9 mm lange Schrauben, mit denen der Kühlkörper am Gehäuseunterteil befestigt ist

  23. VFACkhnoYZUXfPA6
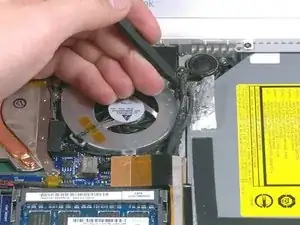
    • Halte den Kühlkörper mit einer Hand und den Lüfter mit der anderen Hand. Hebe die Kühlkörper-/Lüftereinheit aus dem Computer heraus. Der Lüfter ist nur mit einem Stück in schwarzem Filzklebeband am Kühlkörper befestigt, du musst beide Teile gemeinsam entfernen.

    • Beim Wiedereinbau des Kühlkörpers in den Laptop kann dir unsere Anleitung für Wärmeleitpaste die Arbeit erleichtern.

  24. NleG4QKdnystIWBX
    NleG4QKdnystIWBX
    nXyMeVVPwL16BnSH
    DXhAZSfRHbMgJIya
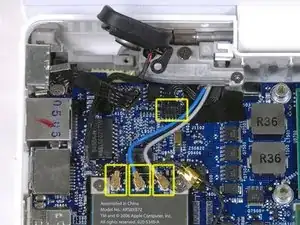
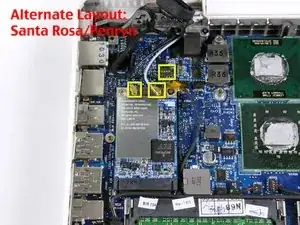
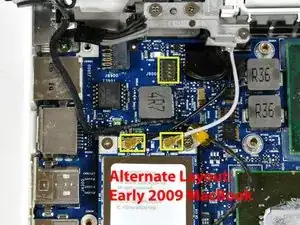
    • Trenne die drei Antennenkabel von der AirPort-Karte und das schwarze Inverterkabel vom Logic Board ab.

    • Wenn du einen MacBook Core 2 Duo Santa Rosa/Penryn/Frühjahr 2009 gibt es nur zwei Antennenkabel und das Inverterkabel befindet sich näher am oberen Ende der AirPort-Karte.

    In case anyone is wondering, you pull the cable straight up, GENTLY! :-)

    Alec -

  25. PS5aW6DHMWJULqF2
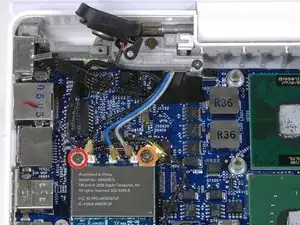
    • Entferne die folgenden zwei Schrauben von der AirPort-Karte:

    • Eine 3 mm lange Kreuzschlitzschraube von der linken Seite

    • Eine 8 mm lange Kreuzschlitzschraube (mit 2 mm großem Kopf) von der rechten Seite

  26. j2yHLC3JEnTuvy3v
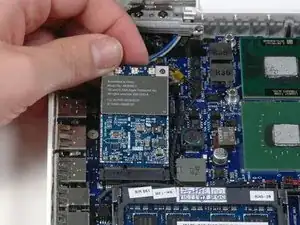
    • Fasse die AirPort-Karte am oberen Rand und schiebe sie zum Display hin aus dem Computer heraus.

  27. rG4xYenNckPx1ZQ5
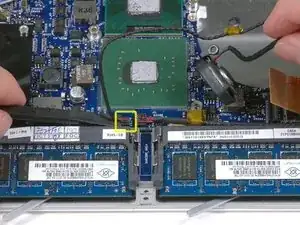
    • Trenne den Stecker des linken Lautsprechers mit einem Spudger vom Logic Board ab.

    • Hebe den linken Lautsprecher aus dem Computer heraus.

    Even with a spudger I had a hard time getting this little connector loose. I ended up popping the red wire out of the connector. I hope I can repair it

    Patrick Langvardt -

    Update. after accidentally pulling the red wire out of the left speaker connector I repaired it by reinserting it into the connector and repairing the back of the connector with a very tiny amount of JB Weld adhesive.

    Patrick Langvardt -

  28. Mq2BJOUUVtaMBNEf
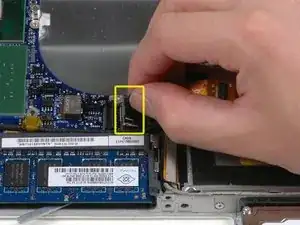
    • Ziehe die schwarze Zuglasche am Displaydatenkabel nach oben und trenne es ab. Wenn keine Zuglasche oben am Stecker vorhanden ist, kannst du einen Spudger zu Hilfe nehmen.

    I can't seem to pull this I have the tab on a grip but I pull up and nothing tried the spudger and still attached. help I don't want to break anything

    LORENA C -

    I am having trouble lifting this cable. I pulled in the black tab but nothing tried the spudger and still help me because I don't want to break anything thanks!

    LORENA C -

    This was a tough one. I was able to catch the edge on the side nearest the RAM with a pointed spudger, popping that side up.

    Patrick Langvardt -

  29. ITn3cIsPZHGWFUcG
    • Trenne das jetzt freiliegende Festplattenkabel vom Logic Board ab.

  30. MctIFRwFbS62mCcP
    MctIFRwFbS62mCcP
    sfnYXQLeBKkRUsSI
    quvtRGCQPglXQtSY
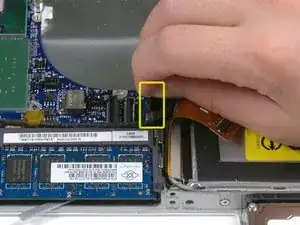
    • Trenne die Stecker vom Lautsprecher und Bluetooth-Anschluss mit einem Spudger vom Logic Board ab.

    • Wenn du ein MacBook Core 2 Duo Santa Rosa/Penryn hast, trenne den Stecker am Kabel der PRAM-Batterie ab.

  31. 4kxtsMo3CnqTZdLZ
    • Trenne das Mikrofonkabel vorsichtig mit einem Spudger vom Logic Board ab. Arbeite abwechselnd an den beiden Seiten des Steckers und wackle den Stecker allmählich heraus.

  32. 2fSyxngwpXIW3Nrh
    • Hole das Mikrofonkabel aus dem Metallclip direkt über dem RAM-Einschub heraus.

    • Bei einigen Santa Rosa/Penryn Modellen gibt es diesen Clip nicht.

  33. uVCBh1toOVbeEkFL
    • Heble den Akkustecker sorgfältig mit einem Spudger vom Logic Board nach oben und trenne ihn ab.

    The picture shows prying from the end, which is OK to loosen it, but the connector pulls straight up.

    Patrick Langvardt -

  34. r6lsyjRLbmpVkwCk
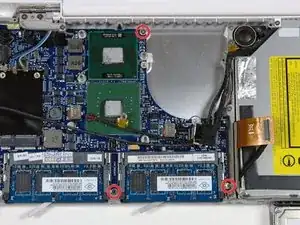
    • Entferne die drei 3 mm langen Kreuzschlitzschrauben, mit denen das Logic Board am Gehäuseunterteil befestigt ist.

    which mm is the screws?

    greets

    webmaster -

  35. OKMZsJUrBYWiSm1P
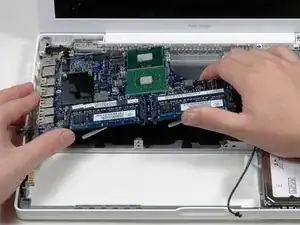
    • Hebe das Logic Board am der rechten Seite hoch und schiebe es nach oben aus dem Computer heraus.

    • Wenn du die Abschirmung von den Anschlüssen entfernt hast, musst du sie erst wieder einbauen, bevor du das Logic Board einsetzen kannst. Die Abschirmung der Anschlüsse kann nicht mehr eingebaut werden, wenn das Logic Board im Gehäuseunterteil installiert ist.

    On this step beware of the way the three antena cables are when you remove the board. I had a minor problem after having reinstalled my new logic board : the black cable was too short to be pluged back. I assumed that the original order had to be respected but that the antena could work with only two cables out of three. It worked properly.

    Ambroise -

    If you find yourself having to bend the logic board to get it out (or back in under the Airport antenna cables), consider loosening the left display hinge to allow more room. Loosen each of the 3 screws on the bracket where the antenna cables come out and you'll have a lot more play.

    axel -

    thanks axel..your instructions helped...

    ALAN KETIN -

Abschluss

Um dein Gerät wieder zusammenzubauen, folge den Schritten in umgekehrter Reihenfolge.

iRobot

Mitglied seit: 25/09/09

0 Reputation

0 Kommentare