Einleitung

Diese Anleitung zeigt, wie ein defektes linkes Displayscharnier ausgetauscht wird.

  1. dLF6KygThyYNdyCS
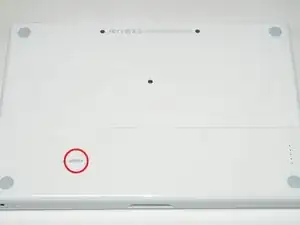
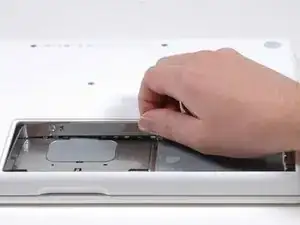
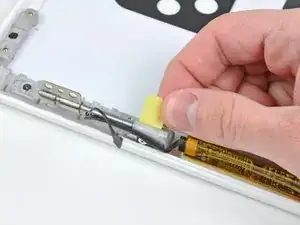
    • Nimm eine Münze oder einen Spudger (Spatel), um die Akku-Verriegelungsschraube um 90 Grad im Uhrzeigersinn zu drehen.

    I used this guide plus the Thermal Paste guide to resolve my MacBook RRS (Random Restart Syndrome) issue. My MacBook would randomly restart after the fan kicked into high speed. When I removed the heatsink I discovered an an irregular patch completely free of thermal compound of about 15-20% of the area on one of the processors. I removed and re-applied the thermal paste. I ran a memory test utility overnight that previously caused a restart after a couple of hours, and the probelm seems to be solved. TIme will tell.

    ServiceDocs -

    This guide was seriously helpful, so thanks for putting this together. I found a thick ribbon of dust/muck whatever between the fan outlet and the exhaust port that was almost as dense as felt. My fan must have been fighting like crazy trying to pass air through that blockage, which explains the high temps and excessive fan noise. Wish I'd done this sooner...

    Thanks again!

    skraggle -

    Just R&R'ed the fan in my black MacBook Core 2 Duo tonight. Took me 30 minutes tops and I was taking my time. These instructions are SPOT ON! Great job ifixit.com! Two thumbs up!

    Follow the instructions exactly as you see and have a piece of paper taped to the table next to you that you can outline all the screws you took out so you know where they go back in. I expected this to be a LOT harder, but it was one of the simplest repairs I've ever done to ANY computer!

    mikeutter -

    Piece of cake--or should I say gum. If you don't have a magnetized screwdriver, load up a stick of gum and chomp on it until it's needed then use a bit to retain screw on the driver. And if you should tear the black tape, or if the silver tape won't stick any more, just bubblegum it together. The instructions were clear and correct, which made for a very simple repair.

    Mike Woodruff -

    My battery does not pop out when after step 1. Any idea why, and how do fix it?

    Calvin -

    Zitat von Calvin:

    My battery does not pop out when after step 1. Any idea why, and how do fix it?

    Will not drop out even if you turn it upside down?

    skraggle -

    Somehow, now my isight camera doesn't work and the light is always on. Cannot figure out what I did wrong.

    josefsalyer -

    Somehow the plastic disc with the slot for a coin got dislodged from the case, and I can't seem to get it open now. Any tips/links on how to open this without the aid of the plastic disc?

    Peter Wood -

    i broke my disc off as well. I used two toothpicks to rotate the thing. hi tech.

    howard bederman -

    Outstanding guide - thank you!

    owen bullock -

    My computer will not charge when plugged in. It will stay on as ling as the plug is in the wall however if the power source gets disconnected it will shut down immediately. I removed the battery and put it back in that did not help. It worked and charged fine 2 days ago. I have a backpack with a laptop storage area. I went to hang the backpack up and it fell and ever since the battery is not functioning. Is there some fix I can try or is my only solution to replace it? I would have thought that dropping it would affect more than the battery?

    Beth Tomasek -

    Better leave the back pack where it cannot fall. Hindsight is so much better than foresight . I learned the hard way too!

    Loy Lum -

    Many of the tiny screws in this project were quite sticky. I found some blue Loctite residue that must have been when the Apple repair shop worked on the laptop years ago. I have found that it is important to hold the correct driver firmly down in the screw and then just tweak the driver in short bursts to loosen it before unscrewing it with a smooth turn.

    Patrick Langvardt -

    Be really careful while doing this to not use too much force while doing this step, because the plastic disc can break off and it can be a cosmetic issue along with functionality issue. This happened to me first hand so please take my word for it…

    [deleted] -

    Probably worth mentioning at this stage that the caddy you propose to use should not have lugs on the front corners, like those used in unibody 1278 and onwards.

    harwood -

    Hehe, still my mac os running! After, already bit more than 10 years of use!

    I put new heat paste now for the second time. Maybe this helped for staying young so long.

    Thanx for all the repair guides!!!

    Fabien -

  2. FN4ThHdXJENYggv1
    • Hebe den Akku aus dem Computer.

    I just replaced the battery as indicated (with a iFixit part), but the computer says there is no battery connected, even after letting the power plug in for more than one hour.

    Jean Wallemacq -

    I think I found the way to have the new battery to charge!!!!!

    See: https://www.youtube.com/watch?v=jRYIMDQx....

    Essentially, you have to follow a very precise order: 1/shut down the computer, 2/take off the magsafe connector, 3/remove the old battery, 4/put back the magsafe connector, 5/put the new battery, 6/power on, each time leaving a few seconds in between.

    Jean Wallemacq -

  3. wxI2pQDYMxYyon6w
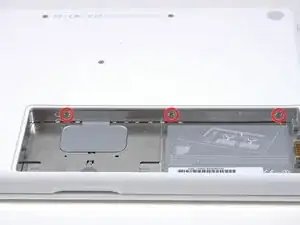
    • Entferne die drei im gleichen Abstand an der Rückwand des Akkufachs verteilten Kreuzschlitzschrauben #000.

    • Die Schrauben bleiben in der Metallabdeckung für den Speicher hängen, du kannst sie deswegen nicht verlieren.

    • Die flexible Verlängerung von iFixit ist bei diesem Schritt sehr hilfreich.

    please pay attention that screws are native to metal pieces otherwise you are going to be a stupid like me trying to unscrew unsuccessfully until I reread the guide

    manochu -

    Lay the screws out in a ”timeline” like a circle, Then when you reassemble just start from the end of the “timeline”

    decristoforo -

    The screws have to unscrewing positions, first they unscrew from the whole body BUT if you move the lid without entirely removing the screws, they will remain attached to the lid. This I find much more recomendable!

    Wytchkraft -

    I found when putting this back in that I had to use a spudger to work the mesh/foam into the slot where the memory cards are so the bracket would lay flat again when screwed back in.

    slwatts2 -

    What size screwdriver

    edward greene -

    Edward: Philips 000

    johnsawyercjs -

  4. PGJSBlvccBHSXVPO
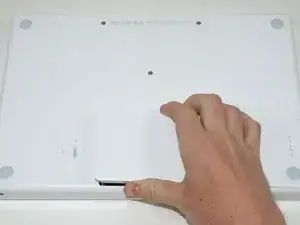
    • Fasse die L-förmige Speicherabdeckung am rechten Ende an und ziehe sie zu dir hin, so dass die Öffnung des Akkufachs frei liegt.

    • Hebe sie dann nach oben aus dem Computer heraus.

    That looks so easy!

    caiden rutledge -

  5. 6blEAXc4lLXCJ2Bh
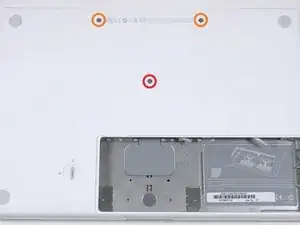
    • Entferne die folgenden drei Schrauben:

    • Eine 11 mm Kreuzschlitzschraube #00 in der Mitte des unteren Gehäuses. (Kopf: 5 mm Diameter, Dicke: 0,75 mm)

    • Zwei 14,5 mm Kreuzschlitzschrauben #00 (Kopf: 5 mm Diameter, Dicke: 0,75 mm)

    • Wenn die Schrauben im Gehäuse festsitzen, kannst du einen magnetisierten Schraubendreher verwenden, um sie herauszuholen.

    • Die kürzere der drei Schrauben kommt in die Mitte des unteren Gehäuses.

    I couldn't get the top two 11mm screws to come out, even with a magnetized driver. When I tried to keep unscrewing them, they clicked like they were spring mounted, and I didn't have any trouble leaving them in and continuing on.

    ryan64 -

    Zitat von ryan64:

    I couldn't get the top two 11mm screws to come out, even with a magnetized driver. When I tried to keep unscrewing them, they clicked like they were spring mounted, and I didn't have any trouble leaving them in and continuing on.

    I use a strong magnet to pull the screws out of their socket.

    Alaerus -

    The top two screws didn't seem to want to come out, and I saw no reason they had to, so I left them there, put a little piece of tape over each so they wouldn't fall out.

    HandyMac -

    You need to replace the shorter middle screw first, otherwise it won't tighten later since it won't quite reach the bottom.

    colmcostelloe -

    for me this was the hardest part especially the two 14.5mm that dint want to come out. keep turning the screw and slightly pressing the case down, once the screw is a little use try using finger, screw and a non metallic point to try to push them out. they arent tight but they are very hard to unscrew i almost gave up, but believe me they come out with patience

    manochu -

    I also did not find that I needed to remove the two 14.5 mm screws. I unscrewed them but they seemed designed to stay with the case and I found it did not seem to affect anything to just let them stay there.

    Alice -

  6. DtjVZJA2CTUA3iOJ
    • Sei beim Herauslösen dieser Schrauben ganz besonders vorsichtig, die Schraubenköpfe gehen leicht kaputt.

    • Um Schäden zu minimieren, kannst du die flexible Wellenverlängerung benutzen.

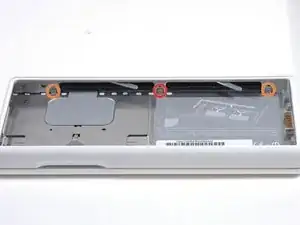
    • Entferne die folgenden drei Schrauben von der Rückwand des Akku-Gehäuses:

    • Eine 3 mm Kreuzschlitzschraube #0. (Kopf: 2,75 mm Diameter)

    • Zwei 4 mm Kreuzschlitzschrauben #0 auf jeder Seite. (Kopf: 2,75 mm Diameter)

    On this step, I encountered a problem. The middle screw was screwed in very very tightly. As a result, I ended up stripping the screw despite being very careful. I tried to use a wire cutter to remove the screw, but that did not work. I actually ended up using the wirecutter to cut the bracket off, leaving the screw screwed in. This did not affect anything. I am typing off of my replace macbook top case right now.

    The point is, BE CAREFUL! but if something does go wrong, don't fret. There are solutions.

    LaNoobieFixer -

    On a Macbook I just tore down, I found that in this step, the 4mm screw was on the left, not the right. I thought maybe someone else had it apart before and accidentally switched them so in staying true to these instructions I tried to reassemble with the 4mm screw on the right. I found it would not go all the way in. I ended up putting it back together with the 2-3mm screws on the right and the 1-4mm screw on the left.

    scottgriz -

    I didn't look closely at these screws when I took it apart, but when I went to put it back together (two weeks later) I found I had two longer (4mm?) screws, and one short one. So I put the longer ones in the two end spots, the short one in the middle; they all seemed to go in okay. (Maybe the screws got changed around the last time the cracked top case was replaced, when the MB was in the Apple shop under warranty last year.)

    HandyMac -

    Me too. I had two longer 4mm screws here, and one 3mm screw. And I didn't pay attention to what holes each screw came out of. I put them back in a random order and it seems fine.

    Thomas -

    My early 2008 MacBook was the same. 2 x 4mm in the outer and 1 x 3mm in the centre.

    Ernie K -

    You need to replace the shorter middle screw first, otherwise it won't tighten later.

    colmcostelloe -

    I needed a tweezers here. These screws are tiny!

    If you lose one you may have to remove the RAM (by pulling the appropriate lever) and gently slide out the screw.

    colmcostelloe -

    oh thanks I thought the screw was lost forever

    Ike Broflovski -

    I couldn't pull over the two 3 mm Phillips on the step 6, how could you've done it?

    Eliotus -

    To confirm what HandyMac and colmcostelloe found, some MacBooks have one 3mm and two 4mm screws in the rear wall of the battery compartment. On the one I worked on, the shorter 3mm screw came from the middle hole.

    BeatJunkie -

    please note the position of the screws because when you are reinstalling them you might get confuse. this ones go below or under (sorry English inst my first language). There are two screw holes this steps are for the ones below.

    manochu -

    Zitat von BeatJunkie:

    To confirm what HandyMac and colmcostelloe found, some MacBooks have one 3mm and two 4mm screws in the rear wall of the battery compartment. On the one I worked on, the shorter 3mm screw came from the middle hole.

    Thanks Beat Junkie, this was the situation with my Mac 2.13ghz Mid 2009 that I was putting back together. Thanks for the confirmation! (For the 6th step)

    Cong Trieu -

    For me (A1181), there were two shorter screws and one longer. The longer went on the left (a shorter screw wouldn't catch). (Not the middle that is currently in the instruction. But that could be model difference.) The middle screw started to strip the head but using a slightly larger phillips allowed me to get it out.

    Paul Collins -

    I have two MacBooks, one white and one black and both had two 3mm screws and one 4mm screw, opposite of what was in the main document

    doublel -

    In my late 2006 macbook the central screw was longer than the side screws..

    Julien Lesage -

    Mine was A1181 model, Core 2 Duo 2.16 GHz. Of course I did not keep track of the screws and ended up with two shorter ones and one longer. Replaced them with the longer one to the right of the three. Got it done with a Wiha PH00 screwdriver. Had better hold than the bit from the precision screwdriver kit.

    quentinlow -

    me too. Got it done with a iFixIt PH00 screwdriver.

    Johhnie Doe -

    Yeah, same for me, #00 worked; #0 suggested in the guide was too big. I didn’t even try #000. For 2.2GHz A1181. My screw config matched the guide, 3mm in middle, 4mm on the sides.

    Les Kitchen -

    Stripped a head on my left screw (A1181 model, Core 2 Duo 2.0 GHz). Used a precision 1.5 slotted screwdriver to get enough bite to screw it out and back in.

    Daniel -

    I couldn't get the suggested Phillips #0 tip to grab. PH#00 worked, but I found the PH#000 to work the best.

    steveeb33 -

    I found this step to be the hardest to put back because of the angle - even with iFixIt's driver Flex Extension.

    steveeb33 -

    I had two 3mm screws and one 4mm screw…. So I put the 4mm screw in the middle hole, and the 3mm screws in the outer holes.

    FixWiki -

  7. 4MqPJgssmP6AGvOt
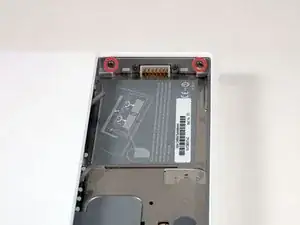
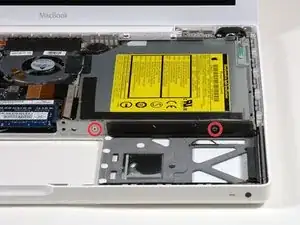
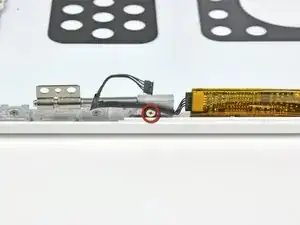
    • Entferne die beiden Kreuzschlitzschrauben auf beiden Seiten der rechten Wand des Akkufachs (nicht die, die sich direkt neben dem Akkuanschluss befinden).

    • Zwei 6,25 mm Kreuzschlitzschrauben #000. (Kopf: 4 mm Diameter, Dicke: 0,5 mm)

    The steps do not tell you what length screw that is needed to be here. What I can tell you that is the screw needs to be 5mm or 6mm, NOT 7.5 or 8mm or 9mm.

    Cong Trieu -

    Screwdriver PH0

    Projectors Band -

    For black 2.2GHz A1181, I used PH #000 as suggested by guide. My screws are both 6mm.

    Les Kitchen -

  8. xdDA5eHuaNInWRlA
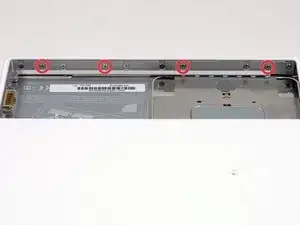
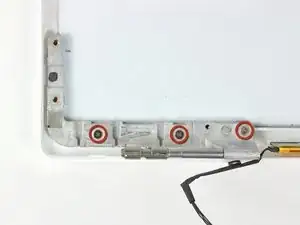
    • Entferne die vier gekennzeichneten Kreuzschlitzschrauben an der Vorderwand des Akkufachs. Wenn du von links aus arbeitest, entferne die 2., 4., 7. und 9. Schraube.

    • Vier 3,25 mm Kreuzschlitzschrauben #000. (Kopf: 4 mm Diameter, Dicke: 0,4 mm)

    It's recommended to use a PH00 screwdriver instead of the PH000.

    The PH000 is too small and you can damage the screwheads.

    Martin Born -

    Yeah, I found PH #00 better too. (For black 2.2Ghz A1181.)

    Les Kitchen -

    I used PH0 for this

    Projectors Band -

    Is there a way I can cut the bracket off? I completely stripped one of the screws?

    Austin Martin -

    I’ve done this often enough that I marked the screws to remove with red marker.

    Peter Wood -

  9. EBC44ZGj1Dj1QTlD
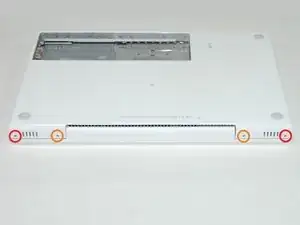
    • Entferne die folgenden vier Schrauben auf der Rückseite des Computers:

    • Zwei 11 mm Kreuzschlitzschrauben #00, mit Schaft (2,2 mm Diameter x 2 mm Länge) (Kopf: 3,2 mm Diameter , Dicke: 0,5 mm)

    • Zwei 7,25 mm Kreuzschlitzschrauben #00, mit Schaft (2 mm Diameter, 3,75 mm Länge) (Kopf: 3,2 mm Diameter, Dicke 0,5mm)

    • Beim Wiederzusammenbau kommen die beiden längeren Schrauben nach innen und die beiden kürzeren nach außen.

    Outer screws (red) are shorter (7mm long), while inner screws (orange) are 11mm.

    ptb -

    I found these screws quite loose; upon reassembly, I wanted to torque them but found the case would distort towards the center, so I had to leave them fairly loose

    David A -

    I cannot get the two outer screws out for the life of me- and afraid of stripping them. Already see I'm doing some damage. Help? What can I do?

    Olivia -

    Are you sure you have a proper screwdriver? From my experience you really need to use the correct size and not just something that seems to fit.

    Jakub Clapa -

    Olivia, you can screw back the longer screws that go on the inside. In the photo marked with orange. Then open and close the lid of the MacBook a few times. This will fit the 4 screws more properly in the steel inner-frame and they can come a little bit loose.

    Close the lid again. Leave the inner screws untouched and begin with the outer screws (marked with red) with indeed a perfect matching screwdriver head (with a big and long grip for your hand). This worked for me perfectly without damage. Success!

    S van Dam -

    When reassembling, do not fully tighten the two 11 mm (orange) screws. When the plastic starts to flex, back it off until the strain on the plastic housing is released and leave it at that. The two 7.25 mm (red) can be snug.

    steveeb33 -

    Same experience as David. Case warped and left screws a little loose.

    spadu79 -

  10. jesHGFcWjJWckGS1
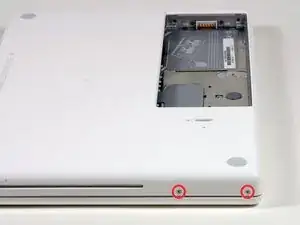
    • Entferne die beiden Kreuzschlitzschrauben von der rechten Seite des Computers. Das ist die Seite mit dem optischen Laufwerk.

    • Zwei 5,2 mm Kreuzschlitzschrauben #00 mit Schaft (Diameter: 2,3 mm,Länge: 3,25 mm) (Kopf: 3,2 mm Diameter, 0,5 mm Dicke)

    • Es ist nicht notwendig, die entsprechenden Schrauben auf der rechten Seite des Computers zu entfernen, wo sich die Anschlüsse befinden.

    The screw farthest from the optical drive would not come out, all other screws came out fine with my screw driver and the screw looks ok, any tips on how to get the screw out?

    Aidan Morey -

    With some of the screws that can happen. I had it too. This did it for the MacBook I was repairing: 1. Open the MacBook. Then press firm but gentle on the upper case with your hand or fingers while trying to loosen the screw with your screwdriver. 2. I used a different screwdriver from the same size diameter but with a much larger hand-grip. Success!

    S van Dam -

  11. rU3wVbbA1jsJBNJW
    • Ein Flachbandkabel für Trackpad und Tastatur verbindet das obere Gehäuse mit dem Logic Board, daher darfst du das obere Gehäuse noch nicht ganz abnehmen.

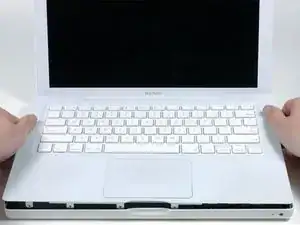
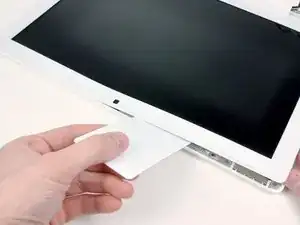
    • Verwende ein Öffnungswerkzeug aus Plastik, eine abgelaufene Kreditkarte oder eine ähnlich dicke Karte, um das obere Gehäuse aufzuhebeln, indem du in der linken oberen Ecke beginnst und dich zur Vorderseite des Computers vorarbeitest.

    • Das obere Gehäuse wird wahrscheinlich an seiner Verbindung über der Vorderkante des optischen Laufwerks hängen bleiben. Löse daher zunächst alle anderen Seiten und ziehst dann das obere Gehäuse von beiden Seiten der Öffnung des optischen Laufwerks nach oben. Auch hier kann das Einführen einer Kunststoffkarte, eines Plektrums o. Ä. hilfreich sein.

    • Wenn du das MacBook auf eine Seite stellst, um besser sehen zu können, können sich die vier grauen Kunststoffclips verschieben, die die rechte Seite des oberen Gehäuses an ihrem Platz halten. Aber keine Panik. Sie gleiten in die Schlitze an der oberen rechten Kante des unteren Rahmens, oberhalb der Vorderkante des optischen Laufwerks.

    • Achte beim Zusammenbau darauf, dass die Clips auf der rechten Seite, über dem optischen Laufwerk, fest einrasten. Sie unterscheiden sich von den Clips auf der linken Seite und benötigen daher normalerweise einen etwas festeren Druck, um einzurasten.

    There will be 4 grey plastic clips just right of the DVD drive. Note their position as they will fall out in the next steps.

    tim7866 -

    No such clips found on my early 2008 version.

    Ernie K -

    Thank you ifixit, it was huge help for me, I did it and everything just works great.....THANK YOU!

    Dako -

    As is reported above, there a 4 friction tabs that connect to the keyboard. If they do not stay in place and stick to the keyboard, the keyboard will not go back on. Just remove them and put them in the clips, with the solid clip wall to the outside of the unit, and put the keyboard back on. Do this before reconnecting the keyboard.

    David Higgins -

    I had no problem at all in this step, the left side was already unlocked when I open the MacBook, the right side was a little tricky but i was able to pull it out in less than a minute

    manochu -

    The front left had an annoying little metal strip between the outside of the case and the tab. It's very easily bent, so the tab was caught on it. I spent a good deal of time trying to push and pull various things (and even just yank the @$!^ thing off), but eventually I found that if you undo the two screws you are told not to in step 7, the battery connector can be pulled up and out, leaving enough horizontal room to pull out the metal strip (with a little bit of coercion). I left it out when I put everything back together.

    James Pearson Hughes -

    Thanks for the tip. Saved me!

    Joe -

    Because this step requires some force, make sure to double check that you got all your screws out. I finally got my gumption up to apply the necessary force required to pull up the upper case, and after 5 minutes of pulling, I look and see that the reason it wasn't coming up because I missed one screw. Ugh.

    Also, before you just shove your hands under the upper case, prying about, think twice: I cut my finger pretty bad on a sharp piece of metal.

    Thomas -

    When reassembling, take some care to align the tabs on the right hand side next to the optical drive. Rock and slide these tabs into position. Then work from right to left, as the rest of the case is quite easy to put back together.

    Andrew Dent -

    I took my mac apart yesterday to clean out the trackpad properly and after getting some 'help' from my grandfather (he lost 2 screws and snapped off a bit of the uppercase but i didn't have the heart to ask him to leave it alone) i tried putting the uppercase back on. it fits perfectly but the middle section closest to the screen appears slightly raised and when i go to screw in the four screws on the exterior of the laptop i can't because the hole is not at all aligned (and two of those four screws are very long). anyone know why this might be? can it be fixed/is it a common problem?

    Eliza -

    If the upper case sticks above the optical drive, don't pull straight up, but up and to the left at the same time.

    frood -

    Wow, pulling both up and to the left made all the difference for me, to unstick the keyboard around the optical drive.

    Neil Steiner -

    I think it is a mistake to separate the keyboard from the clips at the right side (above the optical drive) at all! Instead, after freeing the other three sides, just slide the keyboard slightly to the left, and leave the clips attached to the keyboard. For reassembly, just put the keyboard in its approximate place and slide it to the right to get those clips into position. Be sure the keyboard is really snug against the machine’s case. Then press the other three edges of the keyboard down.

    jeh -

    The plastic around the edge is very thin and cracks easily, so be gentle while using the opening tool.

    Henry S -

    On the right side above the optical drive there are little plastic braces that latch the upper case to the main body. This is the reason why the upper case might stick here. If the above step is not working, also try to gently push the upper case sideways away from the optical drive after freeing all other sides. When reassembling make sure the braces are in their slots of the main body and not attached to the upper case. If you cannot fit the upper case evenly over the optical drive, that's probably why. In this case carefully remove them and slide them back into their slots before lowering the upper case.

    Hendryk1982 -

    this guide was awesome. this step was easy for the broken macbook i salvaged and noticed because i got a factory replacement keyboard quite recently on my macbook in use, the 4 clips above the optical drive were TIGHT - it took quite a bit of pulling up before it came loose!

    Chinarut Ruangchotvit -

  12. 1NGrYHwrUGqEvy6d
    1NGrYHwrUGqEvy6d
    mneJaV6RthqCDgqo
    odIfPIcXuEgHGlCi
    • Halte das obere Gehäuse hoch und ziehe die schwarze Lasche am Steckerende des silbernen Flachbandkabels von seinem Anschluss auf dem Logic Board weg.

    • Wenn keine schwarze Lasche vorhanden ist, kannst du auch einen Spudger verwenden, um den Stecker vorsichtig aus seinem Anschluss auf dem Logic Board zu heben. Dieser Stecker ist hoch, heble ihn also gerade nach oben.

    • Wenn das Kabel des oberen Gehäuses beim Entfernen des oberen Gehäuses abbricht, bieten wir das Kabel einzeln an, und wir haben eine Anleitung, die den Austausch erleichtert.

    • Wenn du das obere Gehäuse entfernt hast, ist es ein guter Zeitpunkt, um Staub, Haare usw. zu entfernen. Am besten verwendest du eine Dose mit Druckluft. Wenn du einen Pinsel verwendest, achte darauf, dass die Borsten aus einem Material bestehen (normalerweise Tierhaare), das keine statische Elektrizität erzeugt, die die Elektronik zerstören kann.

    • Nach dem Wiederzusammenbau befinden sich 4 graue Kunststoffclips in den Schlitzen an der Oberseite des Rahmens vor dem optischen Laufwerk (siehe zweites und drittes Bild). Diese Clips müssen in ihren Schlitzen eingesetzt werden, damit die entsprechenden Laschen an der Unterseite der rechten Seite des oberen Gehäuses einrasten können.

    When changing the topcase remember to change the sticker with the serial also! This might be important when further service or bigger repairs by apples service are needed. The serial also helps you with identifying your macbook!

    spi -

    The entire connector broke off the logic board when I was disconnecting the keyboard just now. Be extremely careful!

    Chris -

    I tried to remove the blacktab from the logic board, however, the black tab tore apart. The logic board is okay but the keyboard connector is torn. It has some silver wires passing through a whit plastic housing. It is the first generation of MacBook Core Duo. Do you think it can be repaired?

    Roger -

    I could not get the keyboard off my the body... (black macbook I don't know if that makes any difference). It was stuck bottom left hand corner, so I had to bend whatever was stuck to get access to the logicboard etc... any reason why this is the case??

    Takuma -

    not sure if this is the place to ask but my mac. doesn't start properly now it turns on and the little light on the right side turns on but keyboard leds don't and display doesn't either any ideas please?

    carlos -

    Great repair guide! Changing the top case was pretty easy and it saved me a lot of money.

    Harry -

    it was really easy, i had no experience whatsoever installing or unistalling mac parts (or pc either). it just took me less than 25 minutes, and i just finish and Im typing from my new upper case keyboard.

    manochu -

    After a sucessful install of the keyboard, the select (mouse buttun equivalent) was found to not operate consistently. I called support and they are shipping a new one out to me. THIS is why I buy from ifixit - sure I can get a part for less elsewhere - but I would not get the service I get with ifixit - THANKS guys!!!

    jgreengold -

    Note - I agree, this was VERY easy - great pictures, perfect explanations...

    jgreengold -

    Zitat von carlos:

    not sure if this is the place to ask but my mac. doesn't start properly now it turns on and the little light on the right side turns on but keyboard leds don't and display doesn't either any ideas please?

    Did you ever find an answer for this question? My computer is doing the same thing. Thanks.

    E Chambliss -

    Zitat von E Chambliss:

    Did you ever find an answer for this question? My computer is doing the same thing. Thanks.

    no i never did couldn't get help it blows to hear someone else had the same problem...im using a windows(yuk) but im getting a new mac next paycheck. if you figure it out let me know so i can fix my other one and maybe give it to my parents

    carlos -

    Zitat von carlos:

    no i never did couldn't get help it blows to hear someone else had the same problem...im using a windows(yuk) but im getting a new mac next paycheck. if you figure it out let me know so i can fix my other one and maybe give it to my parents

    Hello, I'm following this procedure because my MacBook isn't turning on due to a failure in the MagSafe DC In board, it was not charging the battery and therefore no power going in. The case was broken duirng warranty and also the MagSafe power adapter was replaced. Now it is failing again. This is an old late 2006 MacBook. Does your Mac powers on, do you hear the chime sound? or you are stuck with a hardware failure?

    Repair232323 -

    Zitat von Francisco:

    Hello, I'm following this procedure because my MacBook isn't turning on due to a failure in the MagSafe DC In board, it was not charging the battery and therefore no power going in. The case was broken duirng warranty and also the MagSafe power adapter was replaced. Now it is failing again. This is an old late 2006 MacBook. Does your Mac powers on, do you hear the chime sound? or you are stuck with a hardware failure?

    my MacBook charges the battery and powers on i dont hear a chime and it turns on but never starts

    carlos -

    Zitat von spi:

    When changing the topcase remember to change the sticker with the serial also! This might be important when further service or bigger repairs by apples service are needed. The serial also helps you with identifying your MacBook!

    How do you do it? I can't get it out

    Superb guide thank you guys

    eli -

    This takes some nerves if there is no tab, but be confident and just prise the connector straight up.

    Andrew Dent -

    Be very careful while you pulling the black tab! It's better to use spudger to pry the connector from it's housing while you gently pulling the black tab.

    eaksut -

    Clips removal: its hard with finger to pull. It's better and easy off with a pry tool (I used a flat twiser) to pry from the bottom gently for each clips. It was so smooth and easy.

    Johhnie Doe -

    After I clean everything nice… put the cable back and DO NOT TURN ON. What the !&&* happens!? Ideias my friends? :(

    Sorry my bad english!

    glecyo medeiros -

    Getting the upper-case/keyboard off was a bit nerve-wracking. Just work away at it carefully, bit by bit.

    A small torch (flashlight for our American friends) was handy to see what was happening underneath the upper-case. Otherwise too dark.

    I used a photographic lens-cleaning blower (with the rubber squeeze bulb, just the blower, no brush) to get away the dust. Probably not as effective as canned air, but it worked well enough. I’d recommend avoiding touching anything with the tip of the blower. Keep it a few mm away.

    Les Kitchen -

    After removing the keyboard I noticed that the side clips were not attached to the body but rather to the keyboard still. Easily removed but something to note.

    Philip Lynes -

  13. R3bRTHrLZTdAjmgn
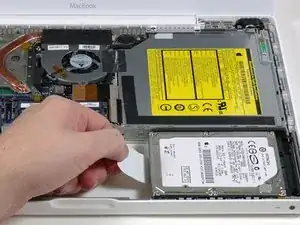
    • Greife die weiße Kunststofflasche an der Festplatte und ziehe sie nach links, um die Festplatte aus dem Computer zu entfernen.

    Note, if you’ve already installed an optical/SATA adapter, and you’re doing this just to replace the SATA drive, then you might be able to skip almost all of the following steps. It seems that for the sort of adapter described in this guide (with the drive secured by a plastic positioner), you should be able to leave pretty much everything in place, and swap out the SATA drive (though you might need to move the Bluetooth antenna holder out of the way).

    Unfortunately for me, mine is a different kind of adapter, with the drive secured by screws from the underside, so I still had to go through almost all the steps to get the adapter out. I can’t even remember where I got the adapter. I think it was probably from iFixit, but it might have been a different, earlier version.

    Les Kitchen -

    Backstory is that I put an SSD in the adapter a few years back to replace a dead optical drive. And it worked with the extra drive, but it seemed to function slowly, at optical-drive rather than SSD speed. Recently, the machine stopped detecting the extra hard-drive. I don’t know why. My guess is that in an upgrade something changed in how the kernel detects devices, and it got confused by an SSD being where it expected an optical drive. (I’m running Debian GNU/Linux, it being the only way I can run up-to-date software on a machine no longer supported by Apple, and I’m a Free Software enthusiast anyway.) Your mileage may vary… Because the SATA drive wasn’t being detected, and I needed access to the data on it, I had no choice for the time being but to take out the SSD and go back to a single-drive machine. The main drive is SSD, and I’ve upgrade to the max 6GB RAM, so it’s still a pretty useful machine.

    I’m planning to put the adapter back in, just in case the void would be bad for cooling air-flow.

    Les Kitchen -

  14. J2MuDpjv6jiRPZk5
    • Entferne die beiden Kreuzschlitzschrauben an der Seite des optischen Laufwerks.

    • Zwei 3,25 mm Kreuzschlitzschrauben #000 (Kopf: 4 mm Diameter, 0,3 mm Dicke)

    After installing the caddy successfully, I could not make the screw on the right fit in again. The distance between the hole and the caddy seemed to be too big.

    ThomasKS -

    !! I can't remove the left screw, and ended up "screwing" it.. it's a round hole now. What should I do?

    wkurosawa -

    wkurosawa: The optical drive will stay put properly if the screw on the left isn't installed.

    johnsawyercjs -

  15. WHr6AyDb5pPvC4vN
    • Trenne den orangefarbenen Flachbandkabelstecker des optischen Laufwerks vom Logic Board, indem du ihn entweder mit einem Finger oder einem Spudger gerade nach oben hebelst.

    Pull straight up from the left

    tjkredo -

  16. WleeVoTtZUOLtSMp
    • Ziehe den Stecker des neu freigelegten Display-Datenkabels vom Logic Board ab, indem du ihn mit Hilfe seiner schwarzen Zuglasche nach oben ziehst.

    • Wenn sich oben auf dem Stecker keine Zuglasche befindet, kann es hilfreich sein, diesen Stecker mit einem Spudger zu lösen.

    The display cable was difficult to disconnect for me. I had to pull firmly and use the spudger at the same time to finally pop it off.

    supershibbydude1 -

    I pulled firmly on the tab, while rocking back and forth slightly.

    Les Kitchen -

    Pull the connector firmly straight up.

    Eric -

    I have found over the years that a connector puller is invaluable in these situations. I believe that I bought mine from iFixit. In steps 16 and 17 you'll have to partially de-route two cables at the base of the connectors in order to get a good grip with the connector puller.

    randy3833 -

  17. 26qTC1KSb3Egu5rW
    • Ziehe den Stecker des neu freigelegten Festplattenkabels vom Logic Board ab, indem du ihn an der schwarzen Lasche nach oben ziehst.

    • Wenn du den Stecker des Festplattenkabels wieder mit dem Logic Board verbindest, achte darauf, dass der Stecker unter den Kabeln für den rechten Lautsprecher und das Mikrofon verlegt wird, da er sonst nicht bündig mit dem Logic Board abschließt, was dazu führt, dass der Stecker nicht vollständig in seinen Anschluss am Logic Board einrastet.

    This step is not necessary

    nycstb -

    Left Off Here

    velopro -

    When reconnecting the Hard Drive Cable to the logic board (Step 17) I ran the HD cable on top of the microphone wire, and the other wire that runs parallel to it, when I should have run the HD cable underneath those two wires. This resulted in the hard drive not being connected on startup, and a lengthy troubleshooting session to figure this out. So save some time and install this underneath the two wires, just like you found it when taking it apart!

    mrphiliprichard -

    I've found it very useful to take photos of wire routing on disassembly for later reference.

    randy3833 -

  18. nSOV1TwJff11djwO
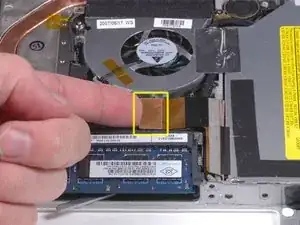
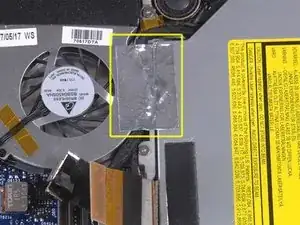
    • Ziehe das Folienband zwischen dem Lüfter und dem optischen Laufwerk ab. Hebe das Folienband von der Seite des Lüfters ab, wobei es am optischen Laufwerk befestigt bleibt.

    • Achte beim Wiederzusammenbau darauf, die Kabel unter dem Klebeband zu verlegen, bevor du es wieder anbringst.

    • Wenn der Kleber auf diesem Folienband nicht mehr haftet, kannst du es mit einem normalen Stück Klebeband befestigen, wobei der Lüftereingang nicht blockiert werden darf.

    I was gently pulling up the tape with a spudger, but the tape snapped clean in half right at the edge of the optical drive. I'm really pretty surprised because I see no reason why it would have done that.

    Neil Steiner -

    Leave the foil on the fan side cause you’ll be taking it off the optical drive anyway

    Luke -

    How crucial is it to have tape here (foil or otherwise)?

    Peter Wood -

  19. tZJyKQ1VODthwfF6
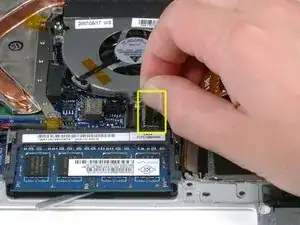
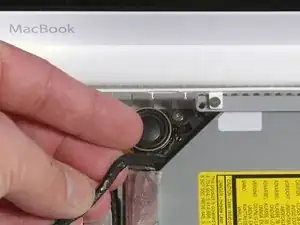
    • Ziehe das Display-Datenkabel an der Kante des optischen Laufwerks nach oben, um eine silberfarbene Kreuzschlitzschraube freizulegen.

    I had to unscrew a screw securing flat ribbons keeping cables in position between beeper and fan to reach for the dvd screw

    t0m -

  20. 5KYOQK2dC3OKJPun
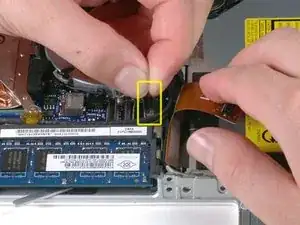
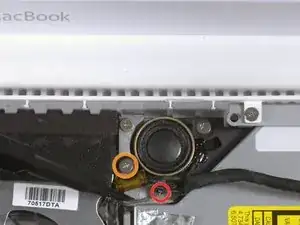
    • Entferne die 2 mm Kreuzschlitzschraube #00, mit der die hintere Ecke des optischen Laufwerks befestigt ist.

    • Achte beim Wiedereinbau dieser Schraube darauf, dass sich keines der Kabel in der Nähe unter dem Schraubenkopf verfängt.

    • Möglicherweise verdeckt das Bluetooth-Kabel mit der silbernen Ummantelung die Schraube. Wenn dies der Fall ist, schiebe es vorsichtig zur Seite. Möglicherweise musst du die Schraube entfernen, die die Erdungslaschen für die beiden benachbarten Kabel hält, bevor du das Bluetooth-Kabel ausreichend zur Seite schieben kannst.

    • Diese Schraube hat bei früheren Modellen einen Durchmesser von 7 mm, bei Santa Rosa/Penryn und 2009er-Modellen beträgt er möglicherweise 4,2 mm.

    STEP 20 - IMPORTANT= This screw secures a mounting bracket on the optical drive. This bracket's eyelets are slotted. The right side of the bracket has a tab inserted in the bottom case. After removing the screw, use the spudger to slide the bracket to the left. This disengages the tab from the right side of the case, thus allowing the optical drive to be lifted out in step 23.

    xtian -

    As an addition to xtian's note, the bracket that you need to slide right (and a spudger is very useful here) it may be because the rear right (as in the picture) of the optical drive needs to be GENTLY pushed down as the bracket end needs to slot into a hole on the right hand side of the case.

    Ernie K -

    After removing the screw gently push the metal tong (which the screw was holding) towards the fan. This will unlock the drive mount.

    Tom Roinisto -

    Please add this notes to the actual step. I missed the comments and bent the bracket.

    huso -

    I used a #000 Phillips.

    Eric -

    I found it helpful to remove the screw sitting to the lower left of the speaker.

    patjmccarthy -

    There is only one screw holding the optical drive down, the one circled in red. the one in orange is for the ground loop for the microphone and right speaker cable. Also, a spudger makes quick work of moving the cables out of the way to get to the screw for easy removal/replacement.

    Leo LeBron -

    As I tried to refit the optical drive, the plastic mount for the brass threaded socket that receives the screw crumbled like an old tooth. Only thing for it was to ditch the plastic and superglue the brass socket into place on the case - seems to have worked. (People who design parts/fixings that involve strong materials held in place by weaker ones should be imprisoned). I also had to remove the sliding bracket on the drive and cut 2/3mm off the right hand end to get the screw hole to align with the brass socket, also seems not to have caused any harm. Never thought I would find myself lashing out with the superglue and wielding a hacksaw inside a laptop...empowered!

    muir mackean -

  21. 1GTViDXGttrIW6Qy
    • Hebe die Bluetooth-Antennenkarte von der Vorderkante des optischen Laufwerks ab.

  22. Ct3moTbsiW6FyN44
    • Führe das Festplattenkabel unter den Clips auf der Seite des optischen Laufwerks heraus.

    • Führe das Kabel beim Zusammenbau wieder unter diesen Clips hindurch.

  23. FGY5WuRWQ5Kei1S3
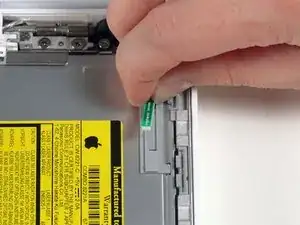
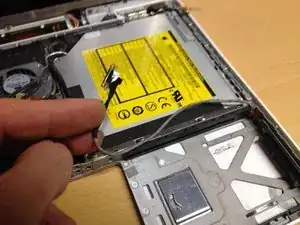
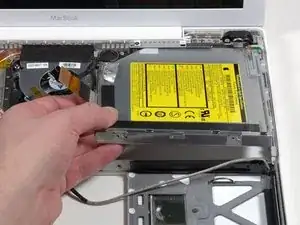
    • Hebe die Seite des optischen Laufwerks an, die dir am nächsten ist, und schiebe dann das Laufwerk zu dir hin und nach oben aus dem Computer heraus.

    • Gehe folgendermaßen vor, um das optische Laufwerk neu einzubauen:

    • Schiebe zunächst die Seite, die der Rückseite des Macbook am nächsten ist, unter die Kante des hinteren Rahmens links vom Scharnier und schiebe gleichzeitig die Befestigungslasche des optischen Laufwerks in der oberen linken Ecke unter die Kabel an dieser Stelle.

    • Senke das Laufwerk teilweise in das untere Gehäuse ab. Halte das Festplattenkabel vom Einschub des optischen Laufwerks fern.

    • Bevor du das Laufwerk vollständig einsetzt, drücke mit einem Spudger nach vorne (zur Vorderseite des Laufwerks hin) auf das Schraubloch in der Befestigungslasche des Laufwerks.

    • Drücke den Schieber, der an der anderen Seite des Laufwerks verläuft, nach vorne, um das Ende dieses Schiebers in einen kleinen Kanal im unteren Gehäuserahmen einzusetzen. Dadurch wird das Laufwerk in seiner Position gehalten.

    • Wenn das Schraubloch in der Befestigungslasche des Laufwerks nicht mit dem Messinggewindeeinsatz im unteren Gehäuse übereinstimmt, ist das vordere Ende des Schiebers nicht vollständig in seinen Kanal im Rahmen. Wenn sich der Schieber nicht weiter nach rechts bewegen lässt, entferne das Laufwerk, um zu sehen, ob das Ende des Schiebers verbogen ist.

    • Wenn das vordere Ende des Schiebers nicht verbogen ist, ist er möglicherweise etwas zu lang. Schneide mit einer feinen Schere den schmaleren Teil des Schieberendes ab. Das optische Laufwerk bleibt trotzdem fest an seinem Platz.

    On the the optical drive there is a sliding-bar (secured by two screws, which fixes the drive in the right edge of the Alu-frame) that has to be shifted to the left when taking the drive off. Especially, before putting the optical drive back to the computer, make sure that the the sliding bar is in its leftward position in order not to block the insertion of the drive. Then shift the bar gently to the right thereby fixing the drive's position.

    armin -

    Thanks! Even so, I had to get the drive aligned just right, so that the sliding bar could mate with the matching slot in the case.

    Les Kitchen -

  24. UUZQjStq13B55TrY
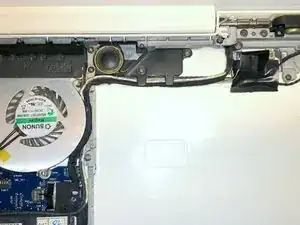
    • Entferne beim Macbook Core Duo und Core 2 Duo Modelln folgende drei Schrauben:

    • Zwei 3 mm lange Kreuzschlitzschrauben nahe beim rechten Lautsprecher

    • Eine 6 mm lange Kreuzschlitzschraube, die in ein Loch in einem Kunststofffinger über dem Tieftöner eingeschraubt ist

    • Überdrehe diese Schraube über dem Tieftöner beim Zusammenbau nicht, der Kunststoff am Lautsprecher könnte reißen.

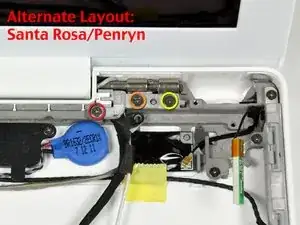
    • Bei Santa Rosa/Penryn und 2009er Modellen gibt es keinen C-Kanal:

    • Entferne nur die einzelne 3 mm lange Kreuzschlitzschraube rechts am Lautsprecher und überspringe Schritt 26.

    If you don’t have the c-channel it seems you can skip steps 24, 25, and 26.

    mike s -

    Santa Rosa and Penryn use a #000 phillips for the speaker screw.

    Eric -

  25. ppxPnjixNvsjVXXn
    • Hebe den rechten Lautsprecher aus seiner Fassung und lege ihn beiseite.

  26. CJYc1SfXO1GjMLmY
    • Wenn du ein Santa Rosa/Penryn oder 2009er Modell hast, überspringe diesen Schritt.

    • Heble mit einem Spudger den weißen Kunststoffschlitz behutsam nach oben und schiebe den metallenen C-Kanal nach rechts vom Display weg.

  27. AsNQSmeeSSxLXoU3
    • Trenne das Mikrofonkabel vorsichtig mit einem Spudger vom Logic Board ab. Arbeite von Seite zu Seite und wackle den Stecker allmählich zurück und aus dem Anschluss heraus.

    • Wenn du den Stecker senkrecht nach oben ziehst, bricht der Anschluss vom Logic Board ab. Der Stecker kann nur gelöst werden, indem das Mikrofonkabel waagrecht zum Display hin gezogen wird und gleichzeitig mit einem Spudger zwischen Anschluss und Stecker nachgeholfen wird.

  28. h6E3HOUShTZZVBlm
    • Hebe das schwarze rechte Lautsprecherkabel mit einer Hand hoch und hole das Mikrofonkabel unter dem silbernen Metallclip direkt über dem RAM-Einschub heraus.

    • Dieser Metallclip ist nicht bei allen Modellen vorhanden. Kontrolliere, ob das Kabel in diesem Bereich durch nichts weiter festgehalten wird, bevor du weiterarbeitest.

    I find it very strange that it’s omitted, but to deroute the microphone cable, you will have to unscrew the cable right next to (above) it. At least, I had to. It’s not hard, but you can’t deroute the microphone cable without derouting the other cable.

    Make sure to remember that this screw is removed when reassembling!

    FixWiki -

  29. wrofZMWsCJiip2EA
    • Wenn du die Befestigungsschraube der Erdungsklemme in Schritt 20 nicht entfernt hast, entferne sie jetzt. Es ist eine 7 mm (eventuell 4 mm oder 3 mm in Santa Rosa/Penryn und 2009er Modellen) lange Kreuzschlitzschraube mit der die Erdungsklemmen am rechten Lautsprecherkabel und Mikrofonkabel am Metallrahmen befestigt sind.

    Put close attention to how the cables are laid out to get the same staking order, when reassembling I did not care about the order and as a result they were not as "Flat" as before and made the DVD drive insertion a bit more hard as it did not sit as deep as it should, so I had to re arrange the cables and once they were right the DVD drive sat perfectly. I would suggest taking a photo before re-routing them.

    Daniel -

    For the second time that I changed an inverter I skipped to disconnect the microphone cable (steps 27 to 30) because it's really hard to wiggle the connector out of its socket and it looks very fragile.

    By doing this you can not move the display assembly far from the case BUT it's not a problem for the next steps (front bezel and clutch cover).

    I won time and did not have to replace display and microphone cables what is not easy because of the lack of place and if the SuperDrive is compressed it can block CDs.

    Not sure if that will help...

    Charlocom -

  30. b3EYkGxCy16YKnfp
    b3EYkGxCy16YKnfp
    gKEGEGQFqtflG3wB
    • Löse das Mikrofonkabel und das schwarze Displaydatenkabel aus den Laschen unten am Tieftöner.

    • Es scheint mehrere Möglichkeiten zu geben, die Kabel beim Zusammenbau wieder zu verlegen, die beste wird in Bild 2 gezeigt. Klicke zum Vergrößern auf das Foto.

    Is the silver wire really the microphone? I noticed wear right down to the wire on mine, and the macbook often has yellow/goofy looking screen, then adjusting the angle helps.

    Luke -

    On my Penryn model, it helped to deroute the data display cable and the microphone cable from under the tabs of the subwoofer by loosening the two Phillips screws to the right of the speaker.

    randy3833 -

  31. eZWZWW13LP2ssUWO
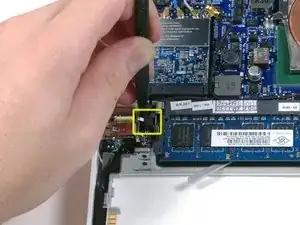
    • Entferne die einzelne 3 mm lange Kreuzschlitzschraube, mit der die Erdungsklemme im Displaydatenkabel direkt über der Bluetooth-Platine befestigt ist. Diese Schraube befestigt eventuell auch eine Erdungsklemme im Lautsprecherkabel.

    The ground screw also holds down a ground loop that is part of the speaker cable. The two loops may be stuck together so you need to carefully separate them.

    kyoungdale -

  32. yAvWHOG4kOr4PX5m
    yAvWHOG4kOr4PX5m
    gKZWThqJpEZGVjbC
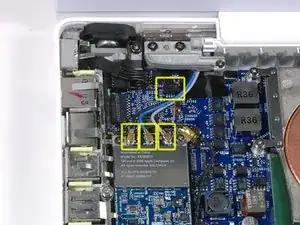
    • Trenne die Antennenkabel von der AirPort-Karte ab:

    • Wenn du das original MacBook Core Duo oder Core 2 Duo Modell hast, siehst du im ersten Bild, dass drei Antennenkabel vorhanden sind.

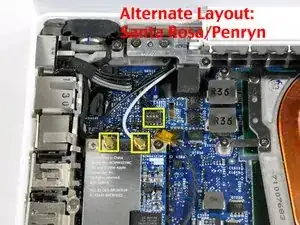
    • Wenn du ein MacBook Core 2 Duo Santa Rosa/Penryn oder 2009er Modell hast, gibt es nur zwei Antennenkabel und der Stecker/Anschluss für das schwarze Inverterkabel ist an einer anderen Stelle. Eventuell befindet sich ein quadratisches Stück Schaumstoff über dem Stecker/Anschluss der Inverter-Platine.

    • Setze einen Spudger unter das rechte oder linke Ende am Stecker des Inverterkabels und heble vorsichtig senkrecht nach oben. Heble nicht am Anschluss, nur der Stecker darf senkrecht nach oben gezogen werden. Ziehe nicht in Richtung des Kabels, du könntest den Anschluss aus dem Logic Board reißen.

    Don't pry the plastic connector from the board, but rather, the plastic connector is two pieces. Separate them.

    Joscon5 -

    For the MacBook Core 2 Duo Santa Rosa/Penryn: the inverter cable is a bit tricky. I was fooled into thinking that there were pins which went INTO the inverter cable. Because of this, I was afraid of lifting up on the cable (off the board), but this is what you actually must do to separate them.

    For clarification, here's a pic (low-res, sorry) of the inverter cable disconnected from it's on-board plug: http://lh4.ggpht.com/_l0f6yKkaxDU/S0FOHS...

    jetrost -

    The inverter connector comes off vertically from the motherboard.

    James -

    Can I get a replacement connecter that the inverter cable connects to and solder it on? I broke mine taking to of how it says in the guide

    edward -

    i also broke mine off the motherboard on accident. it appears to be a fairly clean break. is there anyone who has had luck soldering them back on?

    michael -

    Antenna connectors pull up.

    Eric -

    About disconnecting the inverter cable. I had more luck wedging the pointed end of spludger between the PCB near the cables and the shoulder of the connector nearest the display. I then pushed the pointed end of the spludger away from the display and the connector popped up off the socket. when trying to use the spludger on the sides of the socket, i deformed the plastic edges of the socket.

    Linda Vanasupa -

    This worked well for me too.

    Jeremiah Banks -

    Pull vertical for santa rose models as well, be delicate with this part, very tricky.

    Abraham Q -

    The inverter cable was fine if a little fiddly, but I can't get the antenna cables back on at all - anyone got any ideas? Even with bright lights and magnifiers I can't see why they won't go back in. (And I don't know why ifixit thinks I'm called facebook -- Sam)

    facebook -

    ... and of course as soon as I ask for help I find the answer. Don't try to push the plug vertically into the socket on the Airport board, start it at an angle with the cable running up and away from you towards the screen, then rock it back horizontal and it just clicks into place. -- Sam

    facebook -

    A method to remove the inverter cable connector that just worked great for me: I hooked a dental pick underneath the connector at the cable side (display side) and picked in right up out of the socket. I wiggled it a little first to make sure that I only had the connector hooked.

    randy3833 -

    After destroying a similar connector on a fan replacement with a dental pick, I've decided to withdraw my recommendation to use one. Best to use the flat end of the smaller spudger and pry the connector out from under the wire (screen) side, very slowly, working from side to side.

    randy3833 -

  33. TUKTGruiOUO1rByM
    TUKTGruiOUO1rByM
    ST4P1Z4XaI5tlyfN
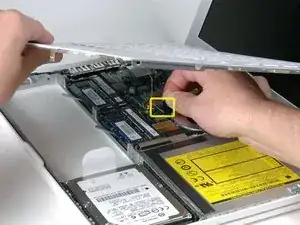
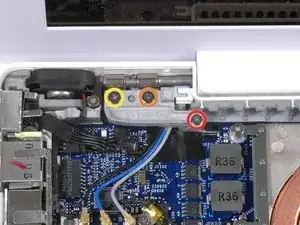
    • Wenn du ein original Macbook Core Duo oder Core 2 Duo Modell hast, siehst du in Bild 1 folgende zwei Schrauben, die von der rechten Scharnierhalterung entfernt werden müssen:

    • Eine 6 mm lange Kreuzschlitzschraube links an der Scharnierhalterung

    • Eine 10 mm lange Kreuzschlitzschraube rechts an der Scharnierhalterung

    • Wenn du ein Santa Rosa/Penryn oder 2009er Modell hast, siehst du in Bild 2 folgende drei Schrauben, die von der rechten Scharnierhalterung entfernt werden müssen:

    • Ganz links eine 3 mm Kreuzschlitzschraube mit kleinerem Durchmesser

    • Eine 5,2 mm Kreuzschlitzschraube mit größerem Durchmesser und 4,2 mm Kopf in der Mitte.

    • Eine 10 mm Kreuzschlitzschraube mit größerem Durchmesser und 4,2 mm Kopf ganz rechts.

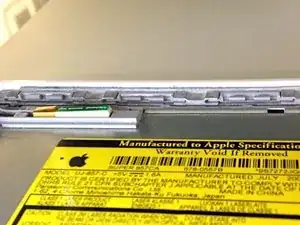
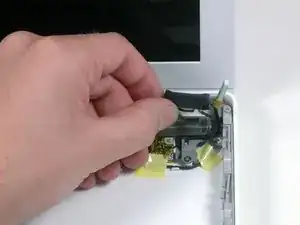
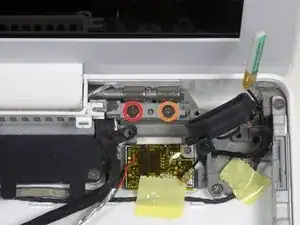
    • Bevor du die rechte Scharnierhalterung entfernst, merke dir genau, wie die Teile zusammenpassen, inklusive dem kleinen weißen Kunststoffteil. Du brauchst das für den Zusammenbau. Hebe dann die rechte Scharnierhalterung mit dem kleinen weißen Kunststoffteil aus dem Computer.

    I have the regular (not Santa Rosa/Penryn) model, and instead of a 6mm Phillips screw on the left, it was a 5mm Phillips screw. It didn’t make a difference, however.

    FixWiki -

  34. EGFejascv4OkIyFB
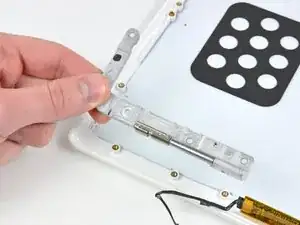
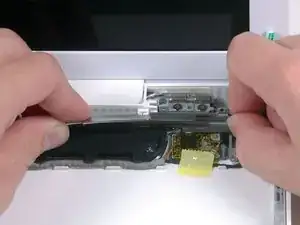
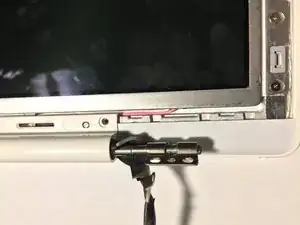
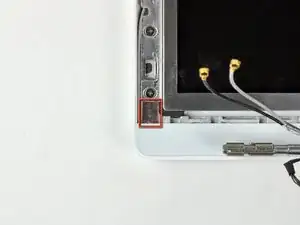
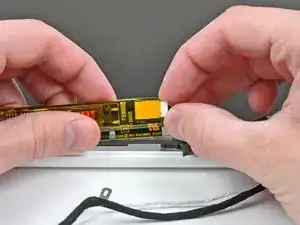
    • Halte das Display mit einer Hand fest, während du folgende drei von der linken Scharnierhalterung entfernst:Schrauben

    • Eine 7,2 mm Kreuzschlitzschraube mit kleinerem Durchmesser an der rechten Seite

    • Eine 5,2 mm Kreuzschlitzschraube mit größerem Durchmesser in der Mitte

    • Eine 10 mm Kreuzschlitzschraube mit größerem Durchmesser an der linken Seite

    • Bevor du die linke Scharnierhalterung entfernst, merke dir genau, wie die Teile zusammenpassen, inklusive dem kleinen weißen Kunststoffteil. Du brauchst das für den Zusammenbau.

    • Bei 2009er Modellen kann die linke Scharnierhalterung etwas anders aussehen als im Bild gezeigt. Die Schrauben sind aber gleich und an der gleichen Stelle.

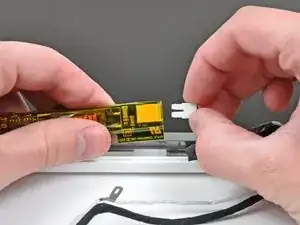
    • Hebe die linke Scharnierhalterung zusammen mit dem weißen Kunststoffteil aus dem Computer heraus.

    • Achte darauf, dass die Kabel, die aus dem rechten Ende der linken Scharnierhalterung herauskommen nicht unter anderen Kabeln eingeklemmt sind.

    I tried this last night and the screen fell backward, cracking the components of the hinge. Be careful and support the screen here once you unscrew the hinges!

    TheLordSmurf -

    What is that plastic hinge thingie called in step 34. The piece broke and I'd like to replace that.

    shawniemichael8 -

    Can anyone else confirm what I’ve written below?…

    In my macbook, which is the regular (not Santa Rosa/Penryn) model, the longest 10mm screw is the same, but the middle screw and the right screw are both approximately 5mm. However, the middle screw is fatter/wider and the right screw is thinner.

    Also, when reassembling, make sure all three screws are easily screwed in before tightening each one. The hinge mount that you’re fastening down will wiggle a bit before being fully tightened down, possibly causing the screw holes to not line up!

    FixWiki -

  35. mKbLmS3oQDNqc2RY
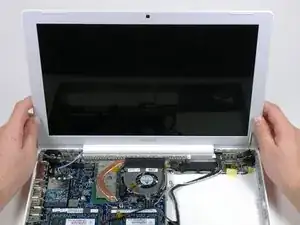
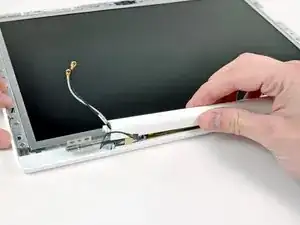
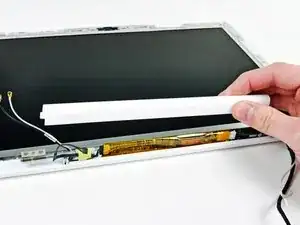
    • Fasse die Displayeinheit an beiden Seiten und hebe sie nach oben aus dem Computer heraus. Achte darauf, dass keines der am Display angebrachten Kabel an Teilen im Gehäuseunterteil hängen bleibt.

    For those wishing to go further into the LCD, the steps are identical to the MB CD, see this repair guide for more:

    MacBook Core Duo Inverter tauschen

    MC25 -

  36. VR4TmNeJQv3CyZmo
    • Die folgenden Schritte sind für weiße und schwarze MacBooks identisch.

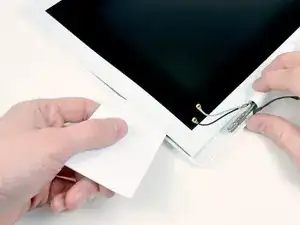
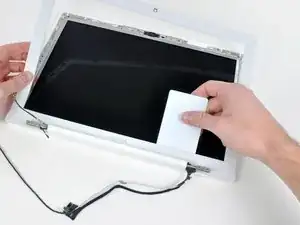
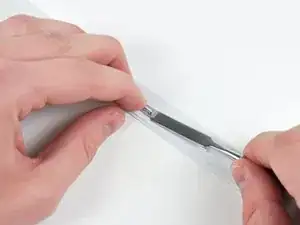
    • Benutze eine dünne Kunststoffkarte um die Clips, welche die vordere Displayabdeckung festhalten, zu lösen. Es gibt insgesamt fünf Clips auf der linken Seite der Displayabdeckung.

    • Es kann einfacher sein die Displayabdeckung von den inneren Kanten, die direkt angrenzend an das LCD Display sind, her zu lösen.

    • Benutze keine Kunststoffkarte, die nicht ersetzt werden kann! Die Clips sind schwierig zu lösen und es ist möglich, dass die Karte verbogen wird und bricht.

    When you go to replace the bezel, look at the back side and disconnect any of the little snap-on tabs that may not have stayed in the metal bracket around the LCD. On a white MacBook they were grey, about 4mm x 8mm. They work best if you put them into the metal frame separate from the bezel and then snap the bezel into them.

    The best way to remove them seemed to be by placing my thumb over one edge (so they didn’t fly off) and prying with a thin, flat screwdriver flat against the bezel tab.

    mike s -

    Hello I've seen a video on Youtube where the guy skipped all the previous steps and got to the inverter without taking the screen off. Seems like it saves a lot of time and potential problems, since I have never done anything like this. Does anyone recommend doing it? I see it's more accessible to just try to get to the inverter without taking the screen off first.

    Miquel -

  37. PaEuIDa3UWYGnudo
    • Fahre mit dem Lösen der Clips am oberen Rand der Displayabdeckung fort.

    • Besonders vorsichtig solltest du im Umfeld der iSight Kamera sein.

  38. n5U6pXWPBRgXS3Vs
    • Löse nun die fünf Clips, mit denen die rechte Seite des Display-Rahmens befestigt ist.

  39. tRMmTTVXLRcBYhrN
    tRMmTTVXLRcBYhrN
    nY5lYqJWXrDZsWDf
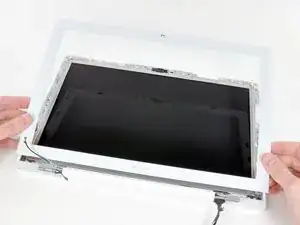
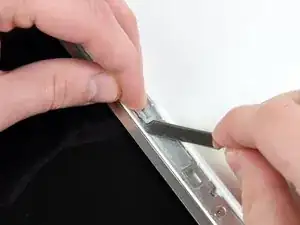
    • Hebe den vorderen Displayrahmen von der Oberseite und benutze deine Plastikkarte um die Clips entlang der Unterseite des Rahmens zu lösen.

    • Achte darauf, dass sich deine Karte zwischen dem Metallrahmen um das LCD-Panel und dem Displayrahmen befindet und nicht das LCD-Panel selbst berührt.

    • Nachdem du alle Clips gelöst hast, hebe den vorderen Display-Rahmen von der Display-Baugruppe ab.

    • Wenn du den vorderen Display-Rahmen wieder auf dem Display-Gehäuse platzierst, kann es einfacher sein, die Clips wieder zu befestigen, wenn du in dieser Reihenfolge auf die vier Kanten drückst: oben, unten und dann die Seiten (links oder rechts). Auf der Unterseite musst du möglicherweise fester drücken, damit die Clips wieder richtig einrasten.

    A note for anyone panicking because they can't get their front bezel back on:

    It is common for the grey clips holding the bezel to the display to come up along with the bezel. If you have ANY grey clips attached to the back of your bezel, in order to replace the bezel you need to first remove the clips from the bezel and reinsert them into the holes in the display panel manually first! Once all of these clips are back in place, the bezel can be reattached.

    These clips are very fragile and if you are having this problem odds are you have already severely bent some of them. Check the tiny plastic clasps and if they are squashed down, gently pry them back up with your fingernail. Again these grey clips are very fragile, so use care in reattaching them.

    WillyDavidK -

    This was a very helpful tip. I made the mistake at first when reading your note, thinking that the gray clips were supposed to be on the bezel, not the display, but quickly corrected that.

    For anyone confused, the bezel is the thin plastic part surrounded the display, and the display of course houses the LCD.

    Another note:

    The easiest way to remove the clips from the bezel is from the side and pry up. To reattach them to the display, put one end of the clip in first, and then use tweezers to poke in the other end of the clip.

    Zitat von WillyDavidK:

    A note for anyone panicking because they can't get their front bezel back on:

    It is common for the grey clips holding the bezel to the display to come up along with the bezel. If you have ANY grey clips attached to the back of your bezel, in order to replace the bezel you need to first remove the clips from the bezel and reinsert them into the holes in the display panel manually first! Once all of these clips are back in place, the bezel can be reattached.

    These clips are very fragile and if you are having this problem odds are you have already severely bent some of them. Check the tiny plastic clasps and if they are squashed down, gently pry them back up with your fingernail. Again these grey clips are very fragile, so use care in reattaching them.

    MC25 -

  40. akdKXV1mnjVZsijV
    akdKXV1mnjVZsijV
    eRSujaKnUOcm5lRA
    • Es kann sein, dass manche Clips die eigentlich am LCD-Panel befestigt bleiben sollten, an der vorderen Displayabdeckung hängen bleiben. Die folgenden Schritte erklären, wie man diese Clips wieder an das LCD-Panel anbringen kann.

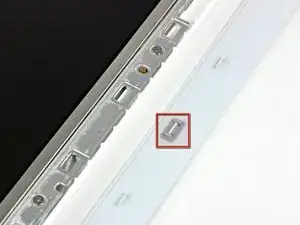
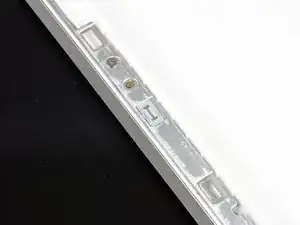
    • Benutze einen Spudger aus Metall oder ein anderes dünnes Werkzeug um die Clips vorsichtig aus den Mulden des Frontdisplays zu Hebeln. Ein 0,8mm flacher Schraubendreher sollte hier als Werkzeug auch funktionieren. Es kann ebenfalls sein, dass die Clips besser abzuhebeln sind, wenn du das Werkzeug auf der länglichen Seite der Clips ansetzt.

    • Bei diesem Schritt ist Vorsicht geboten, da die Clips aus dünnem Kunststoff hergestellt und somit zerbrechlich sind.

    I found that an easy way to remove the clips from the bezel is to use a plastic knife (knife as in the utensil). Sliding the knife under one of the clip's long sides and prying upwards worked well for me. Thanks MC25 and WillyDavidK for the tips, they worked great!

    Iron Kettle -

    The plastic clips deform easily, making it difficult to reuse them. The tabs on the back of the bezel that fit into the clips also break off easily.

    If any of the tabs or clips are omitted, the bezel will not lie flush nor will it hold the cables that run beneath it in place.

    Wear gloves while wrangling with the white bezel—like the white topcase, the matte-finish plastic is very porous and quickly gets grubby.

    CG Hughes -

  41. GPI6jonYrRQEdXaw
    GPI6jonYrRQEdXaw
    Lv6LEnqn5OKSK2oO
    • Führe ein Ende des Halteclips unter der Kante seiner Vertiefung ein, die sich in der LCD-Halterung befindet.

    • Verwende das flache Ende eines Spudgers, um den kleinen Haken auf der Unterseite des anderen Endes des Halteclips in die Vertiefung in der LCD-Halterung zu schieben.

    • Das zweite Bild zeigt einen richtig eingebauten Rückhalteclip.

    • Es kann einfacher sein, die kleinen Haken auf der Unterseite der Clip-Enden in ihre Vertiefung in der LCD-Halterung zu schieben, wenn du die beiden Enden des Clips zunächst ein kleines bisschen nach unten biegst. Sei aber vorsichtig, dass du die Clips nicht zu stark verbiegst - wenn du auch nur ein wenig zu viel Kraft aufwendest, brechen sie.

  42. GGUCFIaXfZRNuJk3
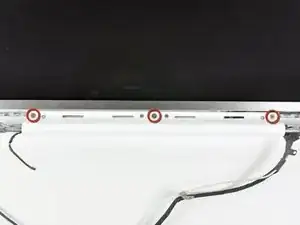
    • Entferne die drei 4,2 mm langen Kreuzschlitzschrauben, mit denen die Scharnierabdeckung befestigt ist.

    In this picture you can see that it is a Nikon camera that was used for this guide. :)

    ForumHermit -

  43. DXTa5GYqhRUfEMyK
    • Halte das Display mit einer Hand nach unten und hebe gleichzeitig mit der anderen Hand das Ende der Scharnierabdeckung vom Scharnier. Führe dabei die Kabel zum Inverter und zum Airport durch den Ausschnitt in der Scharnierabdeckung. Wenn sich die Kabel an den beiden Haken auf der Innenseite verfangen, dann löse sie vorsichtig ab.

    • Es hilft, wenn du die Scharnierabdeckung etwas hin und her wackelst.

    • Achte beim Zusammenbau darauf, dass das schwarze Inverterkabel oder die Airportkabel nicht beschädigt werden, wenn das linke Ende der Scharnierabdeckung wieder einschnappt. Es hilft, wenn du diese Kabel anhebst und oben an das Scharnier hältst, das ist besser als das Kabel seitlich am Scharnier entlang laufen zu lassen.

    There are little clips at each end of the clutch cover, and I found it helpful first to lift the clutch cover off the metal rod first, and after that squeeze the cables at each end between the clips, so you can lift the cover off.

    Iron Kettle -

  44. CTbolbHMq2ZhQA15
    CTbolbHMq2ZhQA15
    WfhwjtoSrZIiaZsJ
    • Hebe das rechte Ende der Scharnierabdeckung hoch. Führe dabei das Displaykabel und das iSight-Kabel durch den Ausschnitt und die beiden Haken am rechten Ende der Scharnierabdeckung. Wenn sich die Kabel an den beiden Haken verfangen, dann löse sie vorsichtig ab.

    • Hebe die Scharnierabdeckung von der Displayeinheit ab.

    • Achte beim Zusammenbau darauf, das Displaykabel oder das iSight-Kabel nicht zu beschädigen. Schiebe das rechte Ende der Scharnierabdeckung an seinen Platz, aber bevor du es einschnappen lässt, führe diese Kabel zwischen den beiden Haken innen am rechten Ende der Scharnierabdeckung entlang nach oben in den gekrümmten Bereich über dem Scharnier.

    • Vermeide es auch, die Kabel der Hintergrundbeleuchtung zu beschädigen. (Die Kabel mit dem weißen Stecker am Ende rechts am Inverter). Sie müssen unter der oberen rechten Kante der Scharnierabdeckung verlaufen. Sie sind entweder grau und weiß, oder weiß und pink. Sie führen durch eine Öffnung in der unteren rechten Kante des LCDs zur Beleuchtung.

    Pay attention here. I missed the part about pinching the cable and that's exactly what I did. It helps to pull the video and mic cables tight to fit the clutch cover on. I also had to make sure the pink/white cables were up and out of the way. When I did it correctly, it slid in pretty easily. It would help to really look at how things are arranged when you are taking it apart, too. There's some tabs that interconnect with the plastic sliding things you removed in steps 46-47.

    maccentric -

  45. wLdGXojtlTEXXu6S
    wLdGXojtlTEXXu6S
    FVZ1fJ3tFfvCPAUb
    • Entferne das kleine Stück Schaumstoff, welches unter jede der Blendenabdeckungen an der unteren linken und rechten Ecke geklebt ist.

  46. XyRlveFnFLBra2GK
    XyRlveFnFLBra2GK
    APwlGlX1yFqSLBEY
    • Schiebe die linke Blendenabdeckung mit einem Spudger zum LCD hin.

    • Hebe die Abdeckung nicht senkrecht ab! Anders als die große Displayblende wird diese mit waagrechten Haken festgehalten, die leicht abbrechen können.

    • Hebe die linke Blendenabdeckung von der Displayeinheit weg.

  47. lSmFRCNaRpvWbGpr
    lSmFRCNaRpvWbGpr
    TdndxBoksIEfK2bB
    • Schiebe die rechte Blendenabdeckung mit einem Spudger zum LCD hin.

    • Hebe die rechte Blendenabdeckung von der Displayeinheit weg.

  48. gIwF3Qer6yODuD3g
    gIwF3Qer6yODuD3g
    KL5Oh5naPXhTHTIT
    • Hebe den Inverter ein wenig aus dem Display heraus und trenne das Kabel zur Hintergrundbeleuchtung von seiner rechten Seite ab.

    • Lege den Inverter wieder in seine Vertiefung zurück.

  49. MhITvtFHVMZiw6xn
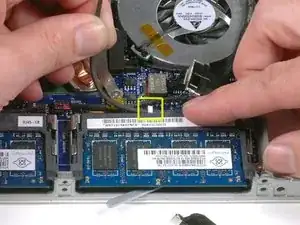
    • Entferne die einzelne 3,2 mm lange Kreuzschlitzschraube, mit der das Displaydatenkabel am rechten Scharnier befestigt ist.

  50. upNcpVgeZUPiJ1sV
    • Hole das Displaydatenkabel unter dem Befestigungsarm des rechten Scharniers heraus.

  51. xSXX4j1WDLOYoJDS
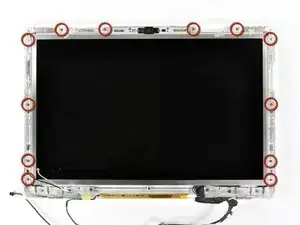
    • Entferne die zwölf 4,2 mm langen Kreuzschlitzschrauben, mit denen die Displayeinheit an der rückseitigen Displayblende befestigt ist.

    • Achte darauf, wie das Mikrofonkabel (und bei einigen Modellen das Antennenkabel) außen um die beiden Schrauben in der unteren rechten und linken Ecke des Displays verlaufen. Wenn sie beim Eindrehen der Schrauben nicht genau so geführt werden, können sie leicht beschädigt werden. Um den Verlauf genau zu sehen, klicke auf das Foto und vergrößere es.

    For the re-install, the cables that run along the sides of the LCD display do not follow the entire length of the display on either side. Both the iSight cable and the Airport antenna cables come away from the sides of the display about 3" from the corner where the hinges are. They move to the outside around the aluminum hinge supports. This is important so the cables do not get pinched and the bezel can snap into place.

    kyoungdale -

    Finding the correct route for these cables took some head scratching but the end result worked fine. In hindsight some more detailed pictures of the cable positioning when re-installing would be helpful. I also found that previous Apple authorised repairers had lost screws and removed tape, and charged me £400 for the priviledge.

    Keir -

    What size are these screws? 4.2x? Is there a link to these that would help please?

    Thanks

    Kasim Mohammed -

    To answer Keir's request for more detailed photos of the routing for the cables near the lower left and right corners of the display: click on the photo of the display in this step, which will open a higher-resolution version of the photo in a new tab, where you can click on this photo to magnify it so you can see the cable routing in the corners in larger detail.

    johnsawyercjs -

  52. 4N2ZbUNbplHXLUIK
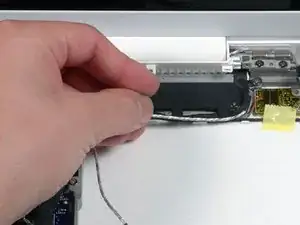
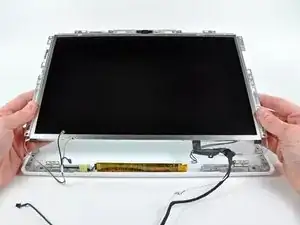
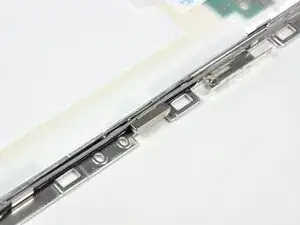
    • Hebe die Unterkante der LCD-Einheit leicht an, schiebe sie dann etwas nach unten, so dass die Oberkante unter einer kleinen Leiste in der rückseitigen Displayblende herauskommt.

    • Hebe sie aus der rückseitigen Displayblende heraus, achte dabei darauf, dass sich keine Kabel verfangen.

    • Bevor du die Schrauben beim Einbau der LCD-Einheit in die rückseitige Blende wieder festziehst, musst du erst die kleinen Messingpfosten - eine links und eine rechts auf der Blende - in die entsprechenden Löcher in der LCD-Einheit einsetzen.

  53. Aen4jfqbG1d3vopA
    Aen4jfqbG1d3vopA
    nO5s6Go53qyS33gn
    • Achte auf den kleinen Magnet an der linken Displayseite. Er bleibt eventuell am Rahmen des LCDs oder der rückseitigen Displayblende hängen.

    • Wenn das Display zugeklappt wird, kommt dieser Magnet in die Nähe eines Sensors auf einer kleinen Platine am Ende der I/O-Platine. So merkt das MacBook, dass das Display geschlossen ist und in den Ruhemodus gehen kann.

    • Um diesen Magnet wieder einzubauen, musst du ihn in seine Vertiefungin der rückseitigen Displayblende mit der kurzen Seite nach oben (Bild 2) eindrücken. Lege dann das LCD zurück in die rückseitige Displayblende und schraube es fest, so dass der Magnet nicht herausfallen und verlorengehen kann.

    “Make sure to replace the sleep magnet with the shorter edge facing up.”

    Hi, could you please explain to me how and where exactly should be placed this small magnet? I didn’t noticed it when I dismounted and now, from the image, I do not understand where it should be. If you can also explain to me what is it for I’ll double thank you …

    mdirenzo -

    This is quite an important step, as misplacing the magnet will mean that the display will not sleep at all when the cover is closed (which is what happened when I had my broken screen replaced).

    udorotheo -

  54. mAEsEAffwPjxRYKM
    • Auf dem linken Scharnier ist ein Stück Klebeband befestigt. Ziehe es ab.

    What is that disconnected cable in the photo?

    Chal Miller -

  55. lHJGjURORy5DhJDq
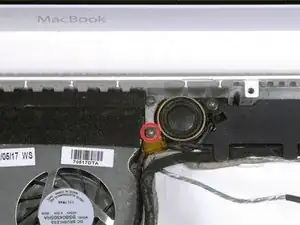
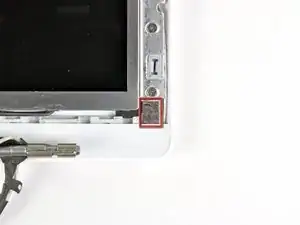
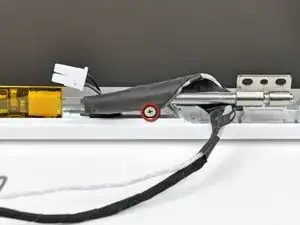
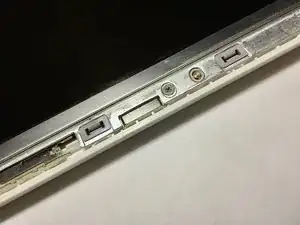
    • Entferne die einzelne 3,2 mm lange Kreuzschlitzschraube, mit der das Inverterkabel am linken Displayscharnier befestigt ist.

  56. uYuAELQZ1BDsvhYG
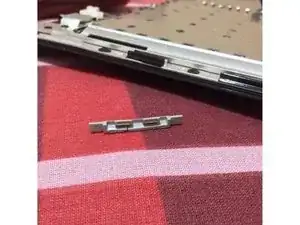
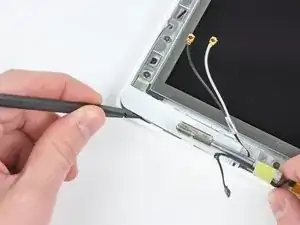
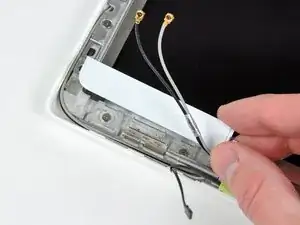
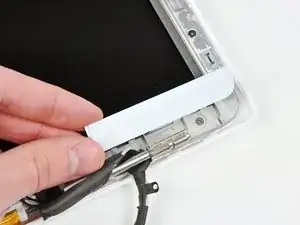
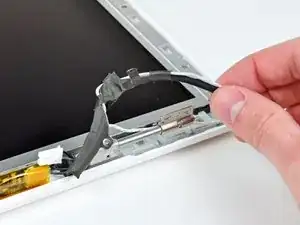
    • Entferne die drei 3,2 mm langen Kreuzschlitzschrauben, mit denen das linke Displayscharnier an der hinteren Displayblende befestigt ist.

  57. XeXfGObkRFnt5sk4
    • Entferne das linke Displayscharnier von der hinteren Displayblende.

Abschluss

Um dein Gerät wieder zusammenzubauen, folge den Schritten in umgekehrter Reihenfolge.

Andrew Bookholt

598569 Reputation

Ein Kommentar

I am not sure if there is need for removing the right side cables when all you want is to remove the left hinge

Joe macrehnza -