Einleitung

Hier wird der Austausch einer defekten Displayeinheit am MacBook Unibody gezeigt.

  1. qPsGdXwUZZBT6RJa
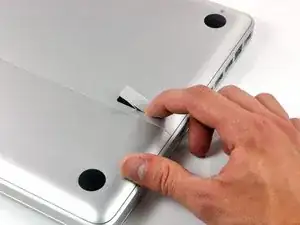
    • Lege die Oberseite des Gehäuses mit geschlossener Klappe auf eine glatte Oberfläche.

    • Drücke den Verschlusshebel auf der geriffelten Seite der Klappe in das Gehäuse des MacBooks, bis du den Verschlusshebel auf der anderen Seite greifen kannst.

    • Öffne den Verschlusshebel so weit, dass er senkrecht steht.

    This is not a a1278 unibody MacBook Pro. A1278 MacBooks backs are one solid metal piece not two separate pieces. This guide is for a different MacBook Pro.

    Brad Burgeson -

    This guide isn’t for a pro; it’s a MacBook unibody.

    Nicholas -

    So, it turns out that Apple used the model code A1278 for quite a few different Mac models, including both Pro and non-Pro versions! This guide is for the non-Pro Macbooks. There’s also one for the Pro models with the same A1278 identifier.

    tempelmann -

  2. Pf4wGUpXWyJ3tAfH
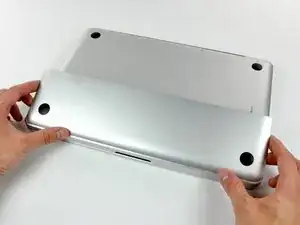
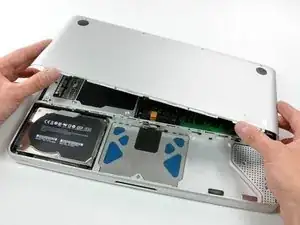
    • Die Bodenklappe sollte nun ein kleines Stück offen stehen.

    • Die Klappe kann nun nach oben aus dem Gehäuse des MacBooks genommen werden.

  3. WkwQip2DfR1iJLMX
    • Versichere dich, dass sich die Entriegelung der Klappe in senkrechter Position befindet, bevor du weitermachst.

    • Ziehe an der weißen Plastiklasche und damit den Akku gerade nach oben und aus dem Laptop.

    Great tutorial ! great step !

    Leo Etcheverry -

    Even though it’s specifically stated, you have to make sure the access door latch is vertical or the battery won’t be removable.

    Henry Kim -

  4. mgYUuNTR1BjI1A6i
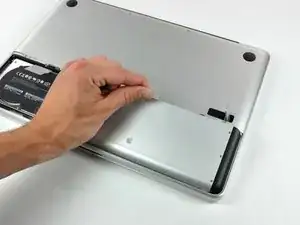
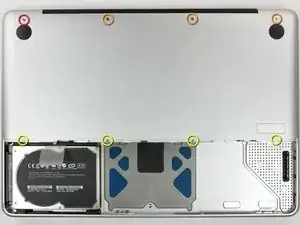
    • Entferne die im Bild gezeigten acht Schrauben, die die Bodenplatte mit dem Rest des Gehäuses verbinden:

    • Eine 3 mm Kreuzschlitzschraube.

    • Drei 13,5 mm Kreuzschlitzschrauben.

    • Vier 3,5 mm Kreuzschlitzschrauben.

    On my model, it seemed the top-left was 3.5mm and the bottom 4 were 3 mm.

    Jim -

    Make sure you have a good quality Phillips screwdriver. Mine had removable tips and had a small play at the connection. As a result I didn't have a good feel and damaged my screws (those securing the fan and the top left in step 23). Game over for me installing new thermal paste...

    Be very carefull with your screws! Especially those on the inside.

    Nickolas Michelinakis -

    You can get away with a Phillips #00 for many of the screws involved but the 4 at the bottom case split are likely to strip if you don’t use a JIS #00 or, in a pinch, a Phillips #000.

    Bill Cole -

    I used the Phillips #00 tip from my Pro Tech Toolkit, and it worked well enough. But yes, maybe #000 might have been better on the lower row of screws. Note to myself: Always read the comments first.

    Les Kitchen -

    When replacing these screws, the order to replace them in is as follows:

    1, Top left

    2. Top right

    3. Top center-left

    4. Top center-right

    5. Bottom center-right

    6. Bottom center-left

    7. Bottom right

    8. Bottom left

    I hope this information is helpful.

    facebook -

    I followed my usual process of putting in all the screws loosely, then tightening them gradually in distributed pattern, to help ensure that the panel settles in place evenly. But maybe some orders are better.

    Les Kitchen -

  5. EZrPgfOVIaaIsXLR
    • Hebe die Bodenplatte mit beiden Händen an und entferne sie vom oberen Gehäuse.

    Thanks for the guide!

    It's implicit in the two photos, but worth mentioning because it blocked my progress in this step for a bit: You have to put the release latch back into its horizontal, closed position before you can lift off the lower-case panel.

    Les Kitchen -

  6. UnfTVKa4kGgLhmpS
    • Ziehe den Stecker am Kamerakabel gerade aus seinem Anschluss heraus und trenne ihn ab.

    • Ziehe beim Ablösen des Steckers nicht am Kabel.

    Be EXTREMELY careful when removing and re-inserting the 'camera' cable. The contacts can be easily bent beyond repair if you try to force it back in. Damaging this cable at this connection or near the display may disable your ability to use your iSight camera, AND both your Bluetooth and WiFi. I had to pay apple $300 to replace the entire display assembly because one prong was faulty, causing my WiFi card to not be recognized.

    seanheff17 -

  7. xORcdpjYmZYWrNAc
    xORcdpjYmZYWrNAc
    Dm5qBsfLdS1OVoer
    • Hole das Kamera-Datenkabel aus seinem Kanal am optischen Laufwerk heraus.

    Although I ordered the screen for an A1278 MacBook Unibody Aluminum, the screen glass was marked as a MacBook Pro. The iSight/WiFi /BT cable was about an inch longer than the Macbook one and took a bit of creative re-routing, but everything works fine.

    tjod -

    has it got the airport and bluetooth modules built in separately in the display assembly as in the macbook late 2008 and mbp mid 2009?

    fericcio -

  8. 6FQppPtEshmRXyuq
    6FQppPtEshmRXyuq
    HLtfrIbButKCKkVh
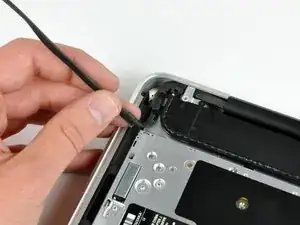
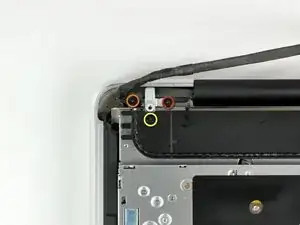
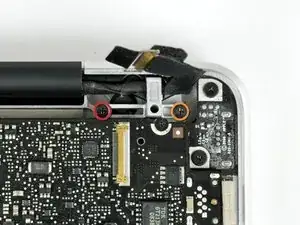
    • Entferne folgende Schrauben, mit denen das Kamera-Datenkabel und der rechte Lautsprecher am Gehäuseoberteil befestigt sind:

    • Eine 9,9 mm lange Kreuzschlitzschraube, nur teilweise mit Gewinde

    • Eine 9,6 mm lange Kreuzschlitzschraube mit vollständigem Gewinde

    • Eine 4 mm lange Kreuzschlitzschraube

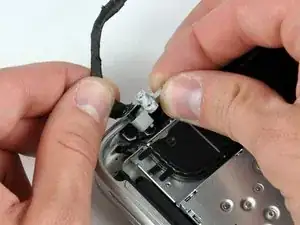
    • Schiebe die Halterung des Kamerakabels unter dem Tieftöner heraus und entferne es vom Computer.

    • Im iSight-Kabel befindet sich eine Öse, durch die die Schraube ganz links in den Bildern geht.

    "orange" is the short one, that goes in the middle ;)

    Riesling -

    My model has different bracket, you need to remove the subwoofer first

    Andrea Ghensi -

    1. With my Laptop, the left screw was partially threaded, not the right one. 2. Before removing the camera cable bracket, I needed to unscrew the subwoofer.

    Edgar Fuß -

  9. dUR61OdDgcqO6ZhU
    dUR61OdDgcqO6ZhU
    CVDUNKbRkXIbkxIB
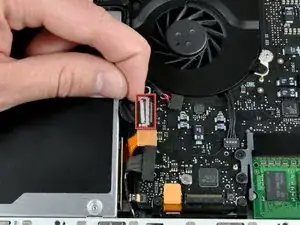
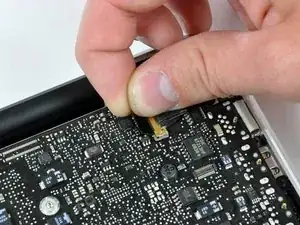
    • Fasse die am Sicherungsbügel des Displaydatenkabels befestigte Zuglasche und klappe ihn zur Seite mit der Stromversorgung des Computers hin auf.

    • Ziehe den Stecker des Displaydatenkabels gerade aus seinem Anschluss heraus.

    • Ziehe den Stecker nur gerade vom Stecker weg, aber nicht nach oben.

    i can't understand what I need to do in this step, I'm afraid with this step, i think i can "hurt" my mac and i don't want to do that, anyone knows what i need to do?

    Thanks

    Lucas Borges -

    There is a steel 'latch' that flips over from the left side of the connector, to the right side. After you flip this latch over, the cable will easily slide out.

    madmaxmedia -

    as I pulled the monitor cable out of the bracket after flipping the lock over one side of the bracket broke loose. Now the monitor will not turn on. Can anyone help?

    boldtu -

  10. KX4fAOE6kkiQnPIE
    KX4fAOE6kkiQnPIE
    ocp6hFJoAXBGxWtU
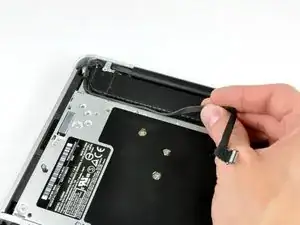
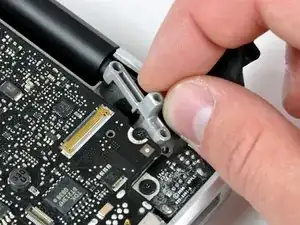
    • Entferne folgende zwei Schrauben von der Halterung des Displaydatenkabels:

    • Eine 7 mm lange Kreuzschlitzschraube

    • Eine 5 mm lange Kreuzschlitzschraube

    • Hebe die Halterung des Displaydatenkabels aus dem Gehäuseoberteil heraus.

    Note for Step 10 during reassembly: Be careful when replacing the screw for the display cable bracket closest to the magnetic power cord receptacle. The interior magnet might attract the screw causing the screw to get pulled under the DC power circuit board which might then require that you disassemble things again to retrieve the screw.

    wintermute -

  11. JZwrRypptntvcRW6
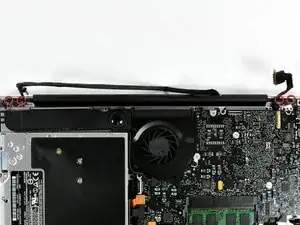
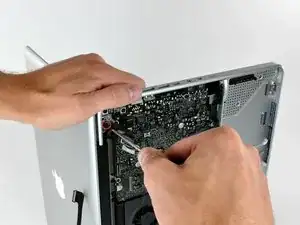
    • Entferne die beiden äußeren 6 mm langen Torx Schrauben, mit denen das Display an jeder Seite am Gehäuseoberteil befestigt ist (also insgesamt vier Schrauben).

    Hey guys, with these older models Do Not interchange different colored LVDS cables. Note the connector here is gold, do not use a silver connector on a gold one or vice versa. I fried a logic board this way on an A1278. Note that the core i7 lvds connector is different than the core i5.

    rjpoirier_nb -

    I never thought that I’d be required to use PB Blaster to remove computer screws. Had to use two tiny drops for each screw, letting it soak in for 20 minutes or so. The display screws, coated with blue thread lock, did not want to budge. I was so fearful that I would strip them using a T-6 driver. Ended up using a 1/4” drive ratchet with a T-6 bit, pressing down firmly and blocking the MacBook from turning with my elbows. I’ve had a lot of experience doing this kind of work, but wow!

    randy3833 -

  12. 3hMFv5xctPAx6bqU
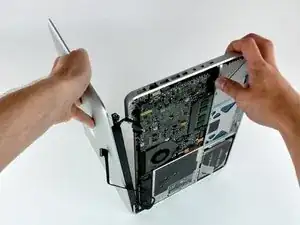
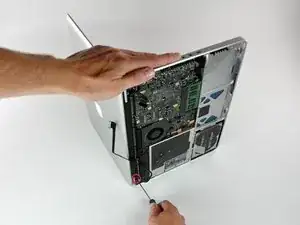
    • Öffne das MacBook, so dass das MacBook rechtwinklig zum Gehäuseoberteil steht.

    • Stelle das geöffnete MacBook wie gezeigt auf die Arbeitsfläche.

    • Halte das Display und das Gehäuseoberteil mit der linken Hand zusammen und entferne die 6 mm lange Torx Schraube von der unteren Displayhalterung.

  13. UENnAHrYGcqTUVrT
    • Halte das Display und das Gehäuseoberteil weiterhin mit der linken Hand zusammen. Wenn du hier einen Fehler machst, kann das lose Display oder Gehäuseoberteil hinfallen, so dass Bauteile beschädigt werden können.

    • Entferne die letzte 6 mm Torx Schraube, mit der das Display am Gehäuseoberteil befestigt ist.

  14. X6xvVBK6giPdMK5I
    X6xvVBK6giPdMK5I
    YZXiaPDuWVTfRJvE
    qOX2lhZEtxKWCLNr
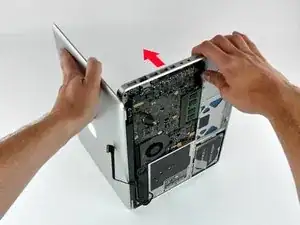
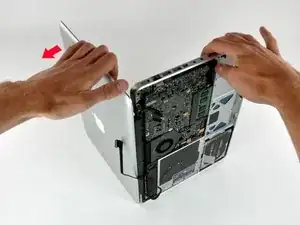
    • Greife das Gehäuseoberteil mit der rechten Hand und drehe es leicht zur Oberkante des Displays hin, so dass die obere Displayhalterung aus der Kante des Gehäuseoberteils herauskommt.

    • Drehe das das Display leicht vom Gehäuseoberteil weg.

    • Hebe das Display vom oberen Gehäuseteil weg, achte dabei darauf, dass sich keine Halterungen oder Kabel verfangen.

Abschluss

Um dein Gerät wieder zusammenzusetzen, folge den Schritten in umgekehrter Reihenfolge.

Walter Galan

708447 Reputation

4 Kommentare

This worked perfectly. My brother had an old MacBook laying around that he had fried when he spilled a drink on it. As a result it sat for a few years after he bought a new computer. His top case was ruined and after some pestering gave me his "broken" mac. I just finished swapping the displays, my computer was 6 years old and my display had dead pixels and a broken isight(for the last three years!) Swapping the display assembly fixed everything. Total time: 2 hrs.

NOTE: Be very careful when removing the cables, always use less force then you think you need, you should be good to go!

Melanie B -

My display has a huge stripe down the middle that is inverse contrast. When I have the display in a certain position, like if I bend the screen ALL the way back, it'll be fine but mostly the stripe will pop back. This leads me to think the display cable is loose or not seated properly. I got to about step 9 in this guide, cleaned the connectors and re-seated but it's still there. Any ideas? I think the cable might be messed up when it goes into the black plastic hinge part. Seems pinched?

antiboyo -

Curious if you made any progress here -- my brother has exactly the same issue. I'm planning on replacing the assembly outright, but going to open it up first just to see if I can "un-pinch" it. If it's just the cable, I was thinking of replacing it, but it looks like I'd have to take the display apart more which I'm not up to doing (heat gun etc.).

Mark Ahrens -

Hey, just so you guys know, reassembling the display is a little tricky. The display might not go on straight, so don't tighten down all of the screws until you are sure the display is straight. You might not even have that problem, but I did with my MacBook.

lyonmissions -