Einleitung

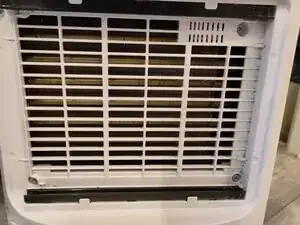
Ein häufiges Problem mit dem Acrete One ist, dass das Display aufhört zu funktionieren, sondern Unsinn oder in manchen Fällen sogar Garnichts anzuzeigen aber trotzdem mit einem Piepen auf das drücken von Tasten zu reagieren. Dies scheint an der zweistelligen Anzeige zu liegen, welche sehr günstig ist.

Dieses Problem kann dadurch diagnostiziert werden, dass das Gerät keine der normalen Funktionen der Luftreinigung oder Entfeuchtung ausführt und die Knöpfe piepen zu verursachen scheinen und das Display zu verändern, aber die Normalen Modi scheinen sich nicht durch das drücken von Knöpfen zu verändern.

In meinem Fall hat das Gerät gepiept, wenn es mit Strom versorgt wurde, mit einem leeren Display. Wenn ich den Einschalter drückte, würde es solange "L!" anzeigen, bis ich ihn losließ.

Ich denke dies war ein Fehler, da es diesen Fehlercode in der Anleitung nicht gab.

Wenn man sich diesen Reddit Post ansieht, gibt es viele Personen, die ein Problem mit dem Display haben.

Hier sind meine Quellen, um herauszufinden wie man dieses Problem löst. Danke an diese Personen.

https://www.badcaps.net/forum/troublesho...

https://www.reddit.com/r/Appliances/comm...

  1. budJltvjnUXcG2bq
    budJltvjnUXcG2bq
    sMXBl1FXZhTyrDAr
    PUWB3wvFwOhKlGSy
    • 4x in der Entlüftung

    • 4x nach dem Entfernen des Wassertanks (2 oben und 2 unten(nicht auf den Bildern))

  2. sS1ieBQZMKrEACZF
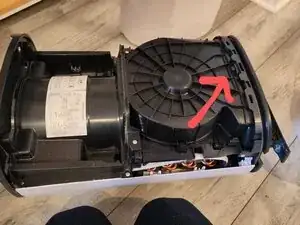
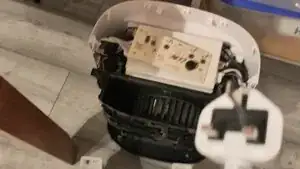
    • Es ist schwierig, sie zu entfernen, aber man muss einfach ziehen. Dieses Video ist praktisch, den ganzen Demontageprozess zu sehen: https://youtu.be/Oc8chhGgatQ [EN]

    Sadly, that video linked on YT IS now set to "private," so can't be viewed :(

    Damaja Xtra -

  3. uBQCVLE6mfMVLM6H
    • Etwa 6-8 Schrauben zu lösen. Das Ziel ist es, die weiße Abdeckung auf der anderen Seite teilweise abziehen und die Displayabdeckung von oben abheben zu können.

    • Gerade genug, um sie von der Abdeckung des Displays oben zu lösen.

  4. jecLhcZAbTWrUVw6
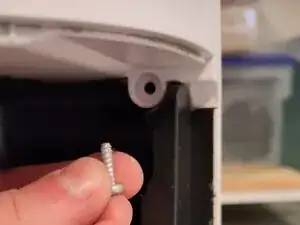
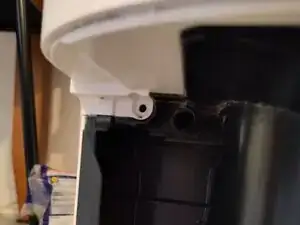
    • Je nachdem wie groß die Einheit ist, befindet sich dort ein Plastik Clip oder eine Schraube. Der Clip ist eventuell etwas schwerer zu lösen, aber ein Schlitz Schraubendreher kann dort stark mit einer Hand hereingedrückt werden, während man die Display-Abdeckung mit der anderen herauszieht.

  5. SxdwX3f1p1Ry4XZC
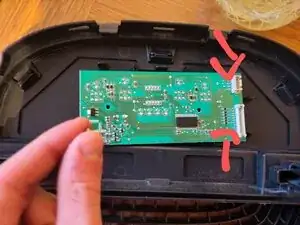
    • Löse die zwei Verbinder, indem du sie zusammendrückst und sie dann herausziehst.

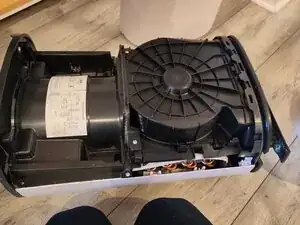
    • Die gesamte Oberseite der Einheit sollte nun vollständig entfernt sein.

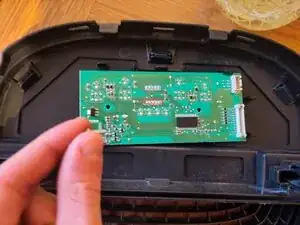
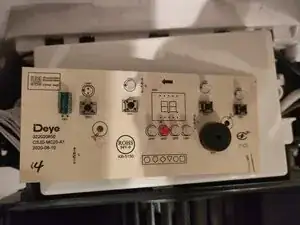
    • Löse die zwei Kreuzschlitz Schrauben, die die Platine befestigen.

    • Löse sie Vorsichtig heraus.

  6. P221OCFyDrcVHfSG
    P221OCFyDrcVHfSG
    vKLyEb5FPFJaMHBD
    QieRVSKgKOcrGecF
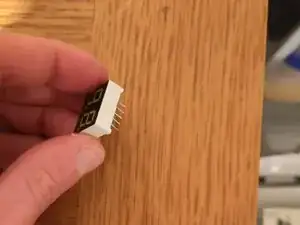
    • Die 10 markierten Pins halten das Display

    • Wenn die Stifte abgelötet sind, greife die 2-stellige Anzeige mit einer Zange und ziehe Sie sie von der Platine ab.

  7. Schließe die Platine vorsichtig an und versuchen, nur den Einschaltknopf zu berühren, kann man sehen, ob das Gerät funktioniert – es sollte ohne Bildschirm funktionieren.
    • Schließe die Platine vorsichtig an und versuchen, nur den Einschaltknopf zu berühren, kann man sehen, ob das Gerät funktioniert – es sollte ohne Bildschirm funktionieren.

    • Es gibt viele Ersatzbildschirme. Man benötigt ein zweistelliges (manchmal auch Zwei-Bit-) 7-Segment-Display mit 0,4 Zoll und gemeinsamer Kathode und weißen LEDs (die LED-Farbe ist wahrscheinlich nicht wichtig).

    • 0,4 Zoll meint die kurze Seite des Displays

    • Ich habe diesen gefunden: https://www.aliexpress.com/item/10050085...

    • Sie sind ~ 1-5€.

    • Stelle Sicher, dass er 10 Pins hat (5 auf jeder Seite)

    You. Are an actual legend for this. Thank you for your clear and precise instructions

    Grumps -

    i have the exact same issue display is giving nonsense symbol but i do get a beep?

    vincent consenheim -

    did you fix yours ?

    vincent consenheim -

    Da ich im Besitz zweier Meaco MeacoDry Arete® 20L bin von denen eines der Geräte statt der realen Luftfeuchte im Display 20 anzeigt, ansonsten aber geht und beim 2. Gerät der Kompressor unrund läuft, habe ich mit großem Interesse gelesen, wie man das Gerät zerlegt.

    Da das Video des Demontageprozess zu sehen: https://youtu.be/Oc8chhGgatQ nicht mehr verfügbar ist hätte ich gerne gewusst, ob mir jemand diesbezüglich weiterhelfen kann? Dafür wäre ich wirklich dankbar.

    getit2210 -

    Ah, that's annoying. All I can suggest is to undo all the screws you see and pull quite hard, but not too hard until it comes apart!

    Alex Sadler -

    Thank you so much. It works now. They asked for £120 to fix this, and now my device is working. I'm waiting to receive my part from Aliexpress to replace it. You are a legend.

    Sina Mahroughi -

    Bei meinem Meaco Luftentfeuchter musste man nur insgesamt 6 Schrauben lösen

    Die beiden oberen nach Abnahme des Filters und jeweils die 2 oben nebeneinanderliegenden Schraube an der Schmalseite.

    Das weisse Befestigungsteil entfernt man am besten wenn man mit einem Schraubenzieher zwischen die Trennfuge der beiden weissen Teile die inneren Clips nach innen drückt

    Genauso verfährt man oben wenn man die Abdeckung für das Display entfernt.

    Nachdem man den Clip gedrückt hat und die Abdeckung dort angehoben hat,drückt man mit einem Schraubenzieher in die vordere Trennfuge undtrennt so die weissen Clips.

    Beides hat bei mir sehr gut funktioniert.

    Viel Erfolg

    Ralph Föhn

    Ralph Foehn -

    Thank you iFixIt! A clear guide has enabled me to repair my Dehumidifier screen.. Bravo!!

    I love repairing stuff!

    Paul Archer -

    Hello.

    did anyone try to program this display controler?

    TM1638 its programable display controler???

    Georgi Bayramski -

    I have a meacodry ABC 12l dehumidifier, it had the same problem as described for the arete one and to repair it the guide is practically identical, but, crucially the display in the ABC is a common anode display and not a common cathode display.

    Adam Bower -

    oh, that's interesting. How do you tell the difference?

    Alex Sadler -

Abschluss

Um dein Gerät wieder zusammenzubauen, folge der Anleitung in umgekehrter Reihenfolge.

Alex Sadler

Mitglied seit: 30/03/25

369 Reputation

12 Kommentare

Thank you for putting this together! Followed the steps exactly and rescued one of these from it's journey to landfill. Works perfectly :)

Gabriel G -

Great walk-through! Step 2 is the tricky part, the pulling force that is needed to remove the cover feels like things are going to break but all stayed in one piece. I managed to fix my Meaco Arete One which failed with exactly the same symptoms as described above. Only 1 year old and still under warranty but I decided to give it a try anyway (since the summer moist is arriving I didn't want to go through all the trouble of returning it and waiting for an unknown amount of time). It's running without display for the moment, waiting for the replacement part to arrive. Thanks again, great job!

GertE -

Thank you for this guide! I managed to fix my unit myself

Jamie -

jamie i got the same problem was going to ask if you could set me straight how to do this. please

vincent consenheim -

my display arrived today and ive taken the circuit board out from the top with allot of pulling , my friend will give me his solder iron tomorrow and then ill update you all

vincent consenheim -

Great guide, fixed my dehumidifier and it's all working now!

Laur -

Thanks for the detailed guide. Followed it exactly, including the recommended part, and it's worked a treat.

Ed K -

Thank you for this excellent guide! My unit died with the exact symptoms described, and this got me back up and running.

I wanted to add a last-resort tip for anyone without soldering tools: My unit packed up while my only bedsheets were drying, so I was desperate. I was able to snip all 10 pins of the display using a small pair of nail scissors (wire cutters would be better!). There's a tiny gap between the black display component and the circuit board. (Again, last resort and unadvisable but may help someone in a pinch like myself)

Once the display was physically cut off, the dehumidifier started up perfectly, just as the guide says. I'll deal with soldering the stumps out if I ever get a replacement, but honestly, I don't miss the display at all. Amazing that such a tiny part can bring the whole machine down!

Alfie C -

Thanks for this detailed guide, my dehumidifier works again, highly appreciated!

Hilbrand Hoogerwerf -

Very helpful - thanks. I’d recommend a set of plastic trim removal tools to assist with the case removal. I found these helped apply pressure to the securing tabs without damaging the case edges. The casing comes away a little easier if it is tilted a little (just a couple of inches) forward away from the machine at the bottom edge but as mentioned by others it does need some force.

Rob D -

Great guide works a treat. I had woked my way to the fault being the controller board and was just about to drop £80 on a new board but thankfully I found this post. 7seg display removed and unit it now working properly

Samf -

Huge thanks for these instructions! Saved me £100+ and something from landfill. Got the display off (my first ever go at soldering) and my 2 year old Meaco Dry abc 10l seems to be working again. Haven’t ordered a replacement display yet… seems to work without anlright and maybe not essential?

Helen G -