Einleitung

Hier wird gezeigt, wie du die obere Baugruppe am Mittelrahmen austauschen kannst. Sie enthält die Kopfhörerbuchse, den Lautsprecher und die oberen Antennen.

  1. M4DtsLm3nLlhMOEQ
    M4DtsLm3nLlhMOEQ
    PcWNyp6ZaonbAF3w
    NFxoZQgD1XrXeqhJ
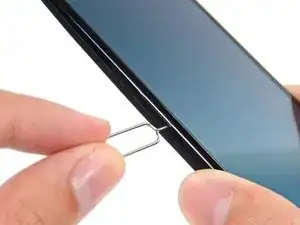
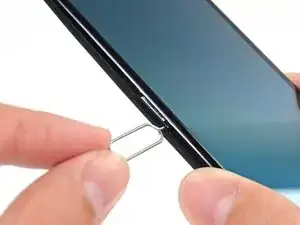
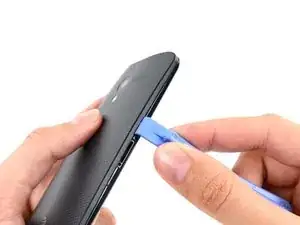
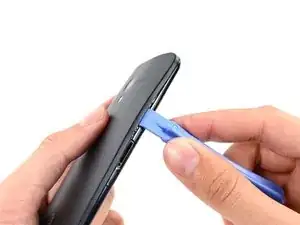
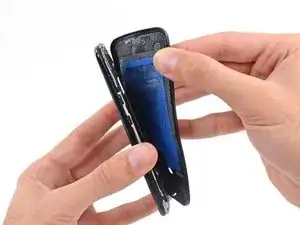
    • Setze das Auswurfwerkzeug für SIM Karten in die Öffnung neben dem SIM Karten Einschub ein und drücke es hinein, um den Einschub herausspringen zu lassen.

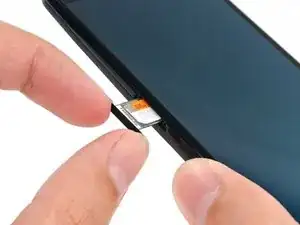
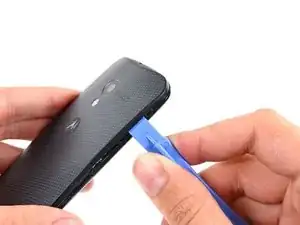
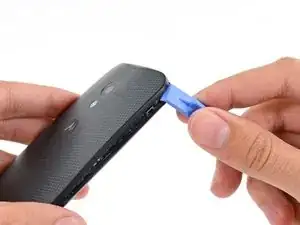
    • Entferne den SIM Karten Einschub.

    • Wenn sich die SIM Karte nicht von selbst aus dem Einschub löst, dann kannst du sie leicht mit den Fingern entfernen.

    Sim not work

    Radhey Kashyap -

  2. D1i1VabQtetp4Nrn
    D1i1VabQtetp4Nrn
    aqftVJvC4pURU4GJ
    FuTyiKcxBqPRSqTS
    • In den folgenden Schritten wirst du die Klammern lösen, welche die Gehäuseteile zusammenhalten. Zusätzlich ist das Gehäuserückteil mit einem Klebepad gesichert. Wenn die Klammern gelöst sind, musst du zuerst einen iOpener verwenden um das Gehäuse ganz zu öffnen. Versuche nicht das Gehäuse ganz zu öffnen, bevor du den Klebstoff gelöst hast.

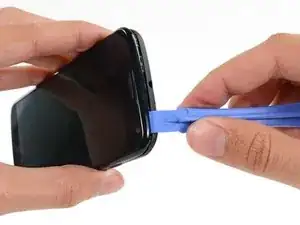
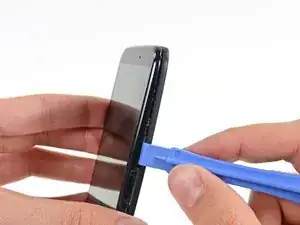
    • Setze ein Plastiköffnungswerkzeug in die Naht zwischen Gehäusevorderteil und Rückteil in der Nähe des SIM Karten Einschubs ein.

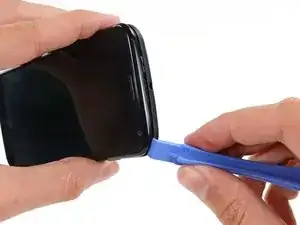
    • Schiebe das Werkzeug die Naht entlang in Richtung der oberen Ecke.

  3. qZuq4G1ZYxZ6pSNR
    qZuq4G1ZYxZ6pSNR
    YGKEMQvLSidRJ1uG
    • Schiebe das Werkzeug vorsichtig um die Ecke und löse so die Klammern.

  4. DVrMhrudpvlHM4UX
    DVrMhrudpvlHM4UX
    mDLThJNJVijY4cLI
    • Hebele zwischen den Gehäuseteilen um die obere rechte Ecke .

  5. 4mAJQfoNXorsDm6u
    4mAJQfoNXorsDm6u
    mcHWWM2oGPaB6ywo
    PLWBZWW2aTBRvve2
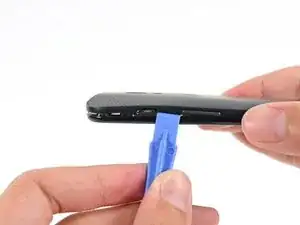
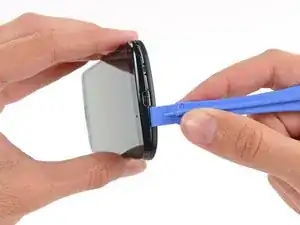
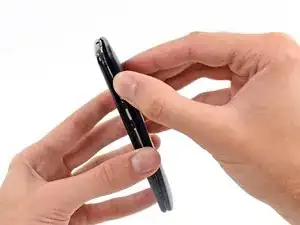
    • Schiebe das Werkzeug vorsichtig an allen vier Seiten des Smartphones entlang, um die verbleibenden Klammern des Gehäuses zu trennen.

    • Der Kunststoff der vorderen Abdeckung ist um die Knöpfe herum dünner und die Tasten können sich bewegen; arbeite langsam, um Schäden an den Tasten oder der Frontabdeckung zu vermeiden.

    • Schiebe das Öffnungswerkzeug nicht zu tief in das Smartphone, um Schäden an den internen Komponenten zu vermeiden.

    Be *very* careful not to push the opening tool too deep when you go around the buttons! I accidentally broke the volume rocker ribbon by doing so, and didn't even realize it until I had completely removed the cover.

    Simeon Simeonides -

    When i removed the volume rocker i cant get it back in correctly seems to be in right but the volume up is not clicking and only works if i push it really hard any ideas?

    Alf stevens -

  6. DCfIdvEQijZXjNlc
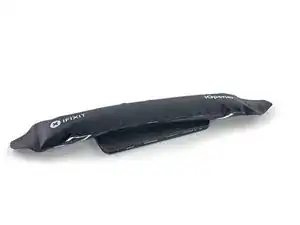
    • Erhitze den iOpener und lege ihn für ca. 90 Sekunden auf das Smartphone um den Kleber zu lösen, der die Rückabdeckung befestigt.

    There is NO GLUE holding on the back of a Moto X with a wood back! That little fact just made the extra $50 I spent on the phone totally worthwhile.

    Doug Larrick -

    Lucky for you, I have the bamboo, and plenty of adhesive.

    Kelly F -

  7. JyHJeX5irn52KvVa
    JyHJeX5irn52KvVa
    MbRokUhhbyMhOoem
    AHSgWa5fIGUmjiox
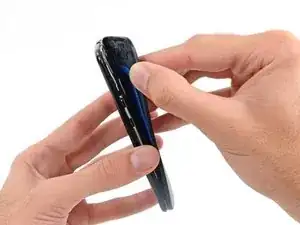
    • Beginne an der Seite mit dem SIM Karten Einschub vorsichtig die Rückabdeckung vom Gerät abzulösen.

    • Die Rückabdeckung ist sehr biegsam, du willst aber sicher keine der inneren Bauteile durch zu große Ungeduld beschädigen.

    • Es besteht die Möglichkeit, dass die NFC Spule weiterhin an der Rückabdeckung kleben bleibt. Stoppe in dem Fall das Ablösen und lege nochmal den aufgewärmten iOpener auf die Abdeckung.

    • Löse die Rückabdeckung noch nicht ganz ab, sie ist immer noch mit dem Smartphone durch das Kabel zum Kamerablitz verbunden.

    • Das Kabel ist an der Seite des Smartphones mit der Einschalttaste/Lautstärkeregelung befestigt.

    Step 15 seemed to be the hardest part for me. (step 25, the battery was also difficult). I am now not a fan of sticky stuff, "Mild adhesive" is definitely an understatement, IMHO, just saying I don't like sticky stuff, maybe I didn't do it right. The iOpener seemed to help a little, but not much.

    CAUTION

    BE CAREFUL with the NFC antenna, it says "X8 Mobile Computing System" on it. The adhesive seemed stick to the the blue stuff on the back cover more and loosen up on the bottom of the antenna, the part that sticks to the battery. So in the process of peeling the back cover the antenna started to come up and was torn at the connector strip before I realized what was happening, step 19 has a good picture of the connector strip that I'm talking about. I like using NFC once in awhile, so now my next FIX will be the antenna.

    Overall instructions were GREAT, I now have a camera again. Thank you.

    Patrick -

    So you are saying that there is no problem if I don't connect the NFC antenna? I'm asking this because I bought a replacement battery that don't include the NFC antenna. I would really appreciate your help with this :)

    jspsaucedo -

    The adhesive was crazy hard on mine as well and I ended up with two small cracks on the edges of my back cover. The blue rubber piece actually separated from the back and removed it from the battery after it was open. The battery itself was also very difficult to remove (pull tab did nothing) and bent/pried the old battery out. I see no reason for all that adhesive! Other than getting the dang thing open the rest was easy. Great guide!

    Darrell Jividen -

    The adhesive holding the back very strong! In the process of removing the back, I cracked the edges of the back cover and ripped part of the NFC connector. Luckily the friend I was doing the repair for did not even know what NFC was, so she was ok with this. Take your time removing the back cover! Also, the adhesive holding the battery in place was not what I would call mild. The black tab was next to useless in removing the battery

    Danny Smandych -

    So you are saying that there is no problem if I don't connect the NFC antenna? I'm asking this because I bought a replacement battery that don't include the NFC antenna.

    jspsaucedo -

    Thank you for the guide !!! comments were really useful too. Read them.

    fabajaja -

  8. oYAKXRnhuplViXo2
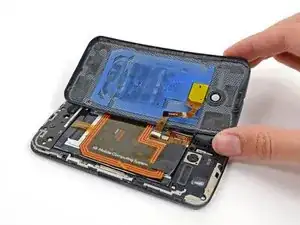
    • Lege die Rückabdeckung sanft ab. Dabei soll der Verbinder am Flachbandkabel zum Blitz offen liegen, das Kabel aber nicht angespannt werden.

    As I had seen in another video, my Moto X with a custom back did not have the blue sticky pad. But the back was still well-adhered in the top corners and with a strip of adhesive along the bottom. In the photo in this step you can see the only adhesive I had to deal with, which was on either side of the lens (two dark areas on the phone back) and along the bottom of the phone (dark area at the bottom of the phone back).

    pdisc1 -

  9. cyT44shIJBAVM4iD
    cyT44shIJBAVM4iD
    fVFqf4BJcdJpJbfj
    XCrjSZJQy6sBcGib
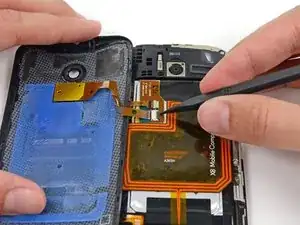
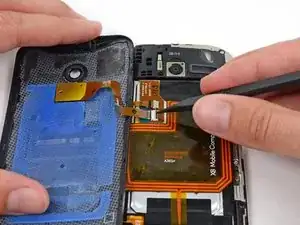
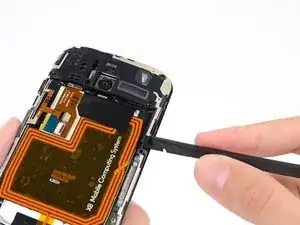
    • Klappe den Sicherungsbügel am ZIF Verbinder des Blitzkabels mit der Spudgerspitze hoch.

    • Achte darauf, nur an der Klappe selbst, nicht am Verbinder zu hebeln.

    • Ziehe das Blitzkabel gerade aus dem Sockel.

  10. YvIqiOHVawfWEcOU
    • Trenne die Rückabdeckung vom Smartphone.

  11. bQGrAwfJw2w3bbKW
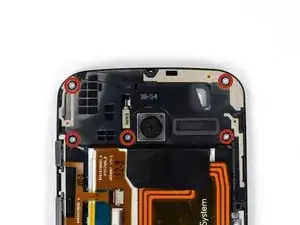
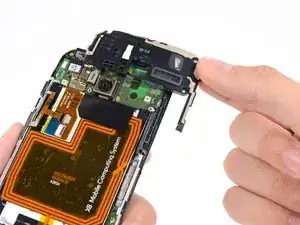
    • Entferne die fünf 3 mm T3 Torx Schrauben von der Einheit aus Kopfhörerbuchse/Lautsprecher

  12. 2jOUhGCF1Ok15Jt6
    2jOUhGCF1Ok15Jt6
    TQTmVNOZfE3ZYALv
    eIlEqvBHTmJNVaWt
    • Setze einen Spudger unter das Anhängsel der Einheit aus Kopfhörerbuchse/Lautsprecher und hebele sie aus ihrem Sitz.

    • Entferne die Einheit aus Kopfhörerbuchse/ Lautsprecher.

Abschluss

Um dein Gerät wieder zusammenzubauen, folge den Schritten in umgekehrter Reihenfolge.

Sam Goldheart

Mitglied seit: 19/10/12

476408 Reputation

Ein Kommentar

Is this the signal antenna?

I have one that says Searching for service and no matter what it won’t detect any network.

Not sure if this or the lower antenna are responsible for cellular signal.

Rafael B -