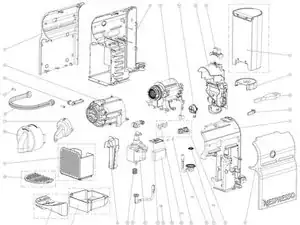
Einleitung

Hier wird das Öffnen einer Nespresso-Maschine von Magimix gezeigt. Die Krups-Version ist sehr ähnlich.

Bevor du das Gerät öffnest, solltest du erst prüfen, ob die Garantie noch gültig ist. Nach (teilweiser) Demontage hast du keinen Anspruch mehr auf Garantie.

Ziehe den Netzstecker und suche dir einen Arbeitsplatz, der die Maschinen nicht zerkratzt.

  1. MPoY4MakXdYmHp3Y
    MPoY4MakXdYmHp3Y
    TnPFMYS25JBsVatQ
    • Entferne alles Wasser aus dem System (siehe Handbuch).

    • Bild 2: Explosionszeichnung.

    cuando pulso los botones,se encienden los dos haciendo pausas cada tres encendidos ,y no paran que puede ser el motivo ??, gracias

    moy5099 -

    Prueba esto: Apague la máquina, mantenga pulsado el botón derecho (vaso grande) hasta que el botón izquierdo parpadee 3 veces, listo. Si esto no funciona: Apague, desenchufe, espere 1min, enchufe y continúe como arriba.

    Si tienes mala suerte, esta es la causa: Nespresso CitiZ Kondensatoren tauschen

    VauWeh -

    Nello spaccato manca la parte che sta a contatto con le capsule e la leggenda con i numeri di riferimento dei pezzi.

    Riccardo Ricci -

  2. xSGehAuE54B6THDp
    xSGehAuE54B6THDp
    XffRFATeqFWY3BId
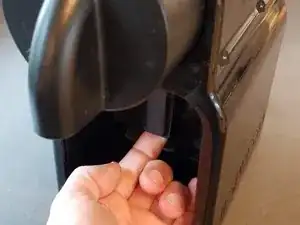
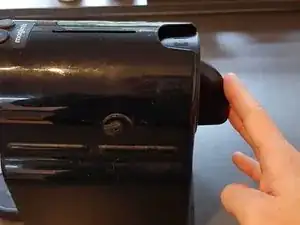
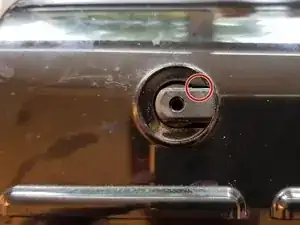
    • Ziehe das Teil mit ziemlich viel Kraft heraus.

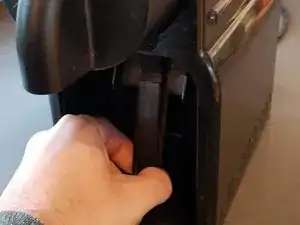
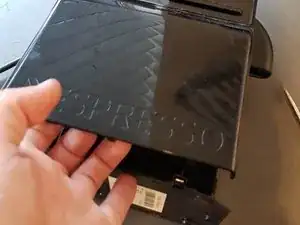
    • Nachdem ein Klicken zu hören war, kannst du das Teil direkt nach unten ziehen. Es sollte sich leicht lösen.

    What is the name and part number of this part? Where can I buy a new one?

    VERONICA THUESEN -

    NN-300134 1-1-J made of ABS

    Markus -

    Lo siento no lo se, hay piezas que no estan a la venta sencillamente porque la demanda de piezas es muy pequeña o inexistente.

    Carlos López (España - Spain) -

    Bonjour

    Je ne parviens pas à remettre cette pièce en place. Une technique particulière ?

    Merci d'avance

    Nicolas -

    Ninguna, tecnica en especial, tan solo va encajada, si que es verdad que me costo un poco encontrar la posicion correcta, te aconse uses una linterna para ayudarte.

    Carlos López (España - Spain) -

  3. gKjEcPEJfHgGmfYk
    gKjEcPEJfHgGmfYk
    D5nxNseXTu2ZUySu
    • Benutze einen Torx T20 Schraubendreher.

  4. oFiDeeWfaTnSRw3A
    oFiDeeWfaTnSRw3A
    teMNuUuYChdwhDil
    np5Lq5jyUwWVbBlI
    • Schließe den Kapselhalter fest.

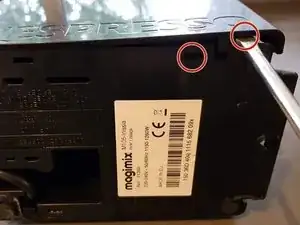
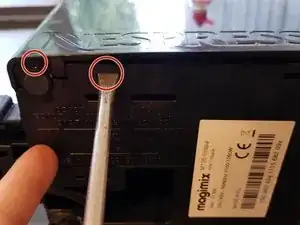
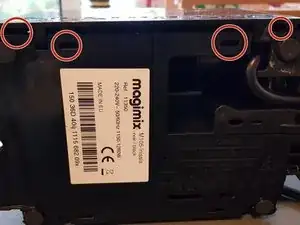
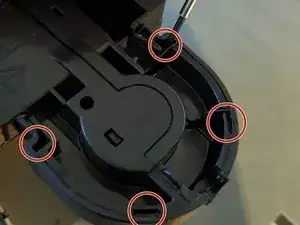
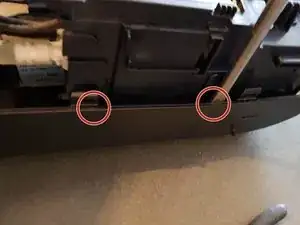
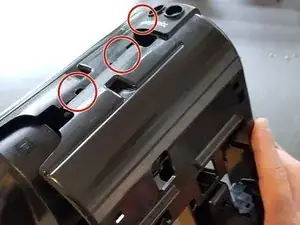
    • Drücke den Schraubendreher hinein und wackle ein wenig hin und her, um die Rasten zu lösen (siehe Bild 2 und 3). Es sind insgesamt vier Rasten.

    Il serait bien de préciser de quel couvercle latéral on parle : le droit ou le gauche ? Merci.

    Gilles Guérin -

  5. uCWTVZJAPMAdi5Hm
    uCWTVZJAPMAdi5Hm
    LQTZCZPb4uZGWSf5
    WCWUNhbpsijXum3R
    • Achte darauf, dass die Aussparung passt.

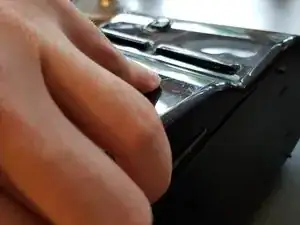
    • Ziehe die Abdeckung ab. Wenn ein kleiner Spalt entstanden ist, kannst du die Finger ein wenig nach oben setzen und an die Abdeckung seitlich wegziehen.

    This is quite delicate, scary and slow! There are more clips and the side can get stuck on the metal lugs that stick out the side. You may have to ease the plastic cover over them.

    Terry Cunnane -

    Use the handle, not pliers to align.

    Bob -

    met een tangetje lanzaamdraaien. best wel veel kracht voor nodig

    Gerrit -

    Thank you very mucha.

    Traducci´pon:

    Girar lentamente con unas tenazas. Se necesita bastante fuerza.

    Carlos López (España - Spain) -

  6. 42dRvDvCYuAi2DX1
    42dRvDvCYuAi2DX1
    SyFEudYYWT51AKiF
    • Wiederhole das Ganze für die andere Seite.

    La photo avec la main me semble trop zoomée. Un plan plus large serait plus explicite. Merci.

    Gilles Guérin -

    There are way more clips to disengage.

    Bob -

  7. 22UMgkfKZIgNLJJn
    • Entferne die weiße Klammer.

  8. PQpP2gMYkTKHcw3l
    PQpP2gMYkTKHcw3l
    NAOLuKhtHRsiBOtI
    R5Unq6RYgZEPTj1X
    • Ist der Netzstecker wirklich gezogen?

    • Trenne die drei Anschlussleiter (Null, Phase und Schutzleiter) ab.

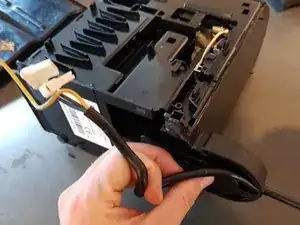
    • Entferne das ganze Anschlusskabel.

    Stroom nooit laten zitten bij uit elkaar halen, dus dit had vóór stap 1 al gemoeten.

    paul -

    De witte plastiekjes zijn afdekkapjes. Het is beter om telkens het kleine dekseltje van het witte plastiekje te openen, om vervolgens de onderliggende klem los te trekken.

    P-308 -

  9. xYFheR1GW5KtSKUs
    • Löse die Rasten mit einem dünnen Schraubendreher.

    Le but ici est de désenchâsser les 2 pièces plastiques qui forment le réceptacle du réservoir d'eau. Pour cela il faut insérer le tournevis comme indiqué sur la photo tout en poussant vers le bas.

    JéroniMo -

  10. Xht6hgG2OgbyJZ2h
    Xht6hgG2OgbyJZ2h
    CXrAjb5hQAYZBmrI
    2jn4ZL1rNfTmcGey
    • Lösen die Abdeckung an diesen vier Stellen und entferne sie.

    When your machine is leaking, this is the right moment to diagnose it once this step is done. I suspect most pressure is on the parts when using a new cup. Screw back the lever to insert a new cup. Reconnect the power cord and put the water tank seat back on so the water container can be used.

    When putting the machine back together this point is obviously also the right time to test if everything is working (again) as expected.

    Ferry de Boer -

  11. AvDYi1x3uJkwVDtC
    AvDYi1x3uJkwVDtC
    mWnlYjSYHpiAmvyr
    glUMUH6VmFHIIXL1
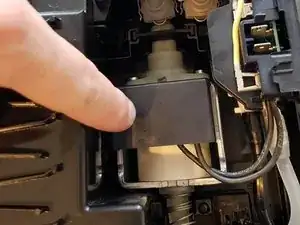
    • Bild 1: Heble hoch und ziehe nach oben.

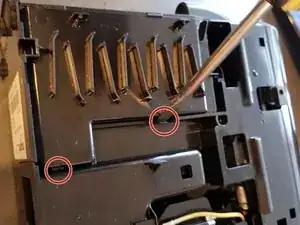
    • Bild 2: Löse die beiden Rasten innen an der Abdeckung.

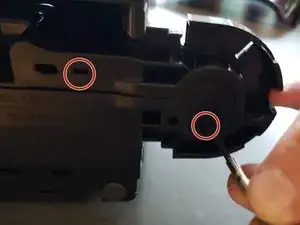
    • Bild 3: Drehe alles herum und hebe die Abdeckung ab.

    L'étape 11 est délicate à réaliser. Je n'y suis pas arrivé, j'ai cassé une pièce => Poubelle

    Alpes Tour -

    Hola Alpes, Por desgracia este paso no es sencillo , es el mas complicado de todo el desmontaje, y alguna vez se rompe algun anclaje, lo he podido constatar en varias que he desmontado similares

    Carlos López (España - Spain) -

    De plus, au remontage, il faut veiller à ce que "le tout" s'emboîte bien au niveau de la zone située près de la lame du tournevis. Sinon, "le tout" est trop haut et va empêcher le positionnement correct du "premier côté". La manœuvre de (ré)emboîtement demande assez bien d'effort.

    JPKuypers -

    ... et on s'en aperçoit quand on n'arive pas à remettre le second côté intérieur en place...

    Laurent B -

    Traduccion de JPKuypers: Además, al volver a montarlo, asegúrese de que el "todo" encaje en la zona próxima a la hoja del destornillador. De lo contrario, el "todo" queda demasiado alto e impedirá la correcta colocación del "primer lado". La maniobra de (re)montaje requiere bastante esfuerzo.

    Carlos López (España - Spain) -

    Je ne comprend pas quelle pièce vous cherchez à retirer? Si on procède de la manière décrite, il n'est pas possible de ne pas casser du plastique.

    Ahah -

    Traduccion

    ¿No entiendo qué parte está intentando eliminar? Si procedes como se describe, es imposible no romper el plástico.

    Carlos López (España - Spain) -

    Je ne comprend pas quelle pièce vous cherchez à retirer? Si on procède de la manière décrite, il n'est pas possible de ne pas casser du plastique. En effet des pièces supplementaires sont à enlever avant, notamment à l'intérieur de la structure sur le haut de la figure 1. Le tournevis photo1, tel qu'il est positionné fait pression sur la même pièce plastique d'où casse certaine si vous forcez!

    Ahah -

    Traduccion

    ¿No entiendo qué parte estás intentando quitar? Si se procede como se describe, no es posible evitar romper el plástico. Primero hay que quitar otras piezas, sobre todo dentro de la estructura de la parte superior de la figura 1. El destornillador de la foto 1, tal como está colocado, ejerce presión sobre la misma pieza de plástico, ¡que se romperá si lo fuerzas!

    Carlos López (España - Spain) -

    No te queda mas remedio que realizar palanca para poderdesmontar esta parte de la maquina.

    Carlos López (España - Spain) -

    I agree, this step is not clear and not easy. I'll try to rephrase it.
    The video helps understand what we are trying to separate.
    https://youtu.be/JPI5JGeD83U?t=660

    Serge-Henri Bijou -

    Ok, es un paso complicado si no lo ves en directo.

    Carlos López (España - Spain) -

  12. SVoYZDNPDYBKMOvL
    SVoYZDNPDYBKMOvL
    jFwhXKTftjmgVdUf
    • Drücke auf die Einheit, damit sich die Lager des Hebels lösen. Ziehe sie dann heraus.

    Hola y para volver a ponerlas? Yo desarme hoy la mia y no consigo ponerlas como estaban

    Cristian J -

    Has de empujar hacia abajo para que te permita que se inserten https://www.youtube.com/watch?v=qUiKj5Ks...

    Carlos López (España - Spain) -

  13. HT2YpYgfXASTCje1
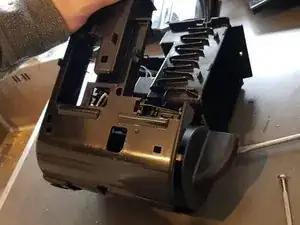
    • Entferne das Oberteil, indem du die Metallstifte entlang den L-förmigen Schlitzen gleiten lässt.

    Il porta capsula può essere rimosso sganciando le due linguette;

    sotto c'è un O-ring che più perdere acqua in pressione che poi fuoriesce sotto la macchina in funzione!

    Qualcuno sa dove posso trovare l'O-ring di ricambio???

    Grazie!

    Devis Mariotti -

  14. VlwPngrHej25WIMx
    VlwPngrHej25WIMx
    kJU5RnWU6pe1wvOV
    GguXGHa3Eq3N2tnN
    • Löse die beiden Rasten auf einer Seite des Kaffeeauslaufs, dann auf der anderen.

  15. ybqYwWyv2EJSbIsI
    ybqYwWyv2EJSbIsI
    jwsvB4kDlXCcD2ba
    UOEnuG6EEappfVhG
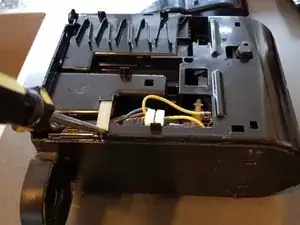
    • Markiere eine der beiden schwarzen Leitungen, damit du sie später wieder richtig anschließen kannst.

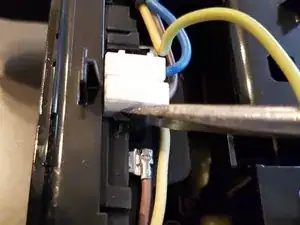
    • Löse die gelbe und die braune Leitung ab.

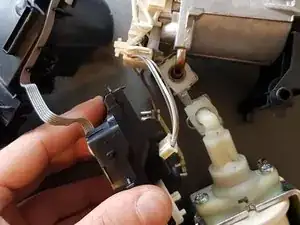
    • Ziehe den weißen Stecker ab.

    When putting the machine back together make sure the spring on the bottom of the pump is propely back in the seating. If not the machine will resonate like crazy.

    Ferry de Boer -

    Waarom de kabel markeren. Er is toch geen polariteit?

    Ron -

  16. WZTR5KHvdgSwCfkD
    WZTR5KHvdgSwCfkD
    pxtJeFCdwwWHE2XN
    kJ6SFLxZnLAcvmLN
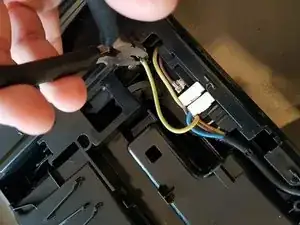
    • Wackle an dem letzten schwarzen Plastikteil und löse es ab.

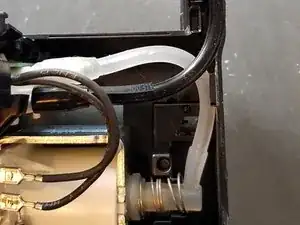
    • Heble den schwarzen und den weißen Schlauch ab.

  17. qRiQIRmwSjnsIihx
    qRiQIRmwSjnsIihx
    I3EBpvPxiFuXaEQG
    LUo5FWHCDYBvVoTF
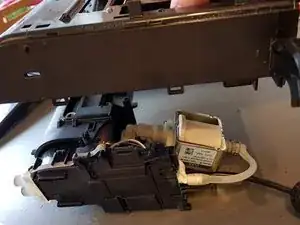
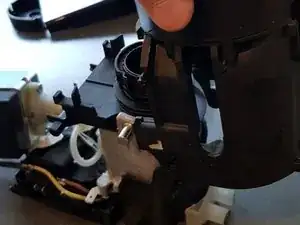
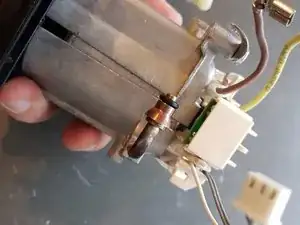
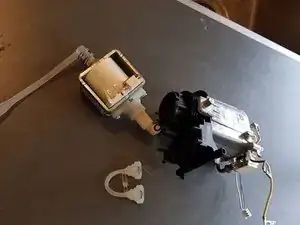
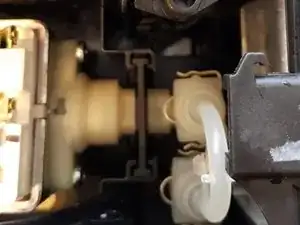
    • Es ist etwas knifflig diese beiden Klammern zu lösen: Die rechteckige Fassung aus Kunststoff für die Metallklammern ist Bestandteil des U-Rohrs. Denke daran, wenn du dieses U-Rohr von den anderen beiden (Pumpe und Erhitzer) abtrennen willst. Ihre Enden sind konisch, das U-Rohr lässt sich leicht aufschieben, aber schwer lösen.

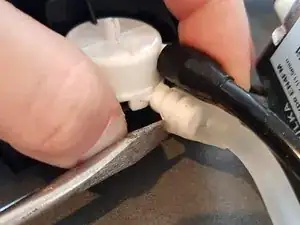
    • Schaue das Foto 1 an, der Hintergrund zeigt nach unten. Sorge dafür, dass das Metallrohr direkt oder am Erhitzer an einer rutschfesten Oberfläche (z.B. einer Gummimatte) abgesichert ist. Wenn du am Pumpenende beginnst, musst du dort gleichartig verfahren.

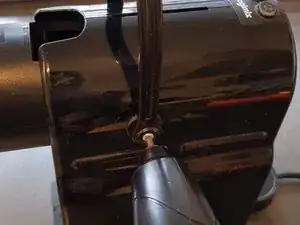
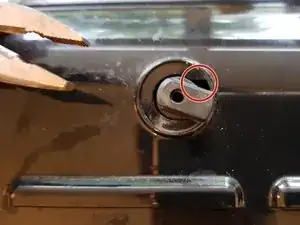
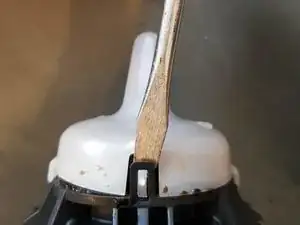
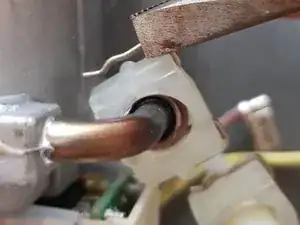
    • Drücke ein 2,5 mm dickes spitzes Werkzeug (rund oder flach) in die Drahtschleife, die aus der Mitte der Kunststofffassung herausragt. Die Schleife muss nicht weiter herauskommen, mit einem passenden Schraubendreher kannst du sie aber etwa 1 mm aufweiten.

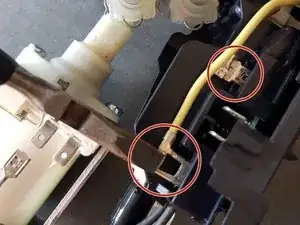
    • Ziehe die linke und die rechte Schulter der Metallklammer soweit wie möglich aus der Kunststofffassung auseinander. Setze ein gleichartiges 2,5 - 3,5 mm dickes spitzes Werkzeug zwischen die Außenkante der Fassung und den offenen Drahtenden der Klammer ein. Setze nahe bei den Schultern ein.

    • Nun wird die Drahtklammer an drei Stellen auseinander gezogen. Überprüfe, ob der Draht in der Mitte der Fassung nicht mehr am Rohr anliegt, sondern gerade noch über den Rand des konusförmigen Flansches herausragt.

    • Schaue wieder wie auf Foto 1 (oder gleichartig von der Pumpenseite her). Drücke die Kunststofffassung mit den Fingern auf jeder Seite des Rohrs vom Erhitzer (oder der Pumpe) weg nach unten. Eventuell musst du ein wenig ruckeln, um die Metallklammer über die letzten Millimeter des Flansches zu bekommen.

    • Nun sollte sich die Verbindung lösen. Wenn nicht, dann schaue dir nochmals genau an, wie die Metallklammer in der Mitte der Fassung um das Rohr herum liegt. Korregiere eventuell die Lage der drei Werkzeuge, mit denen die Klammer auseinander gehalten wird.

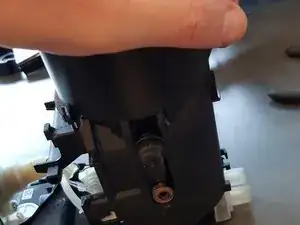
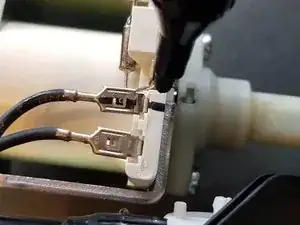
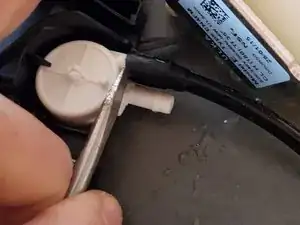
    • Wenn sich die Verbindung gelöst hat, ist der O-Ring leicht zugänglich. Der innere Durchmesser ist etwa 3 mm, der äußere etwa 5 mm, er ist etwa 1 mm dick.

  18. HeEQRYTpLtPiAQBw
    HeEQRYTpLtPiAQBw
    w1SJNcq2leXw5GaC
    cePOOy3RKRVWXWtV
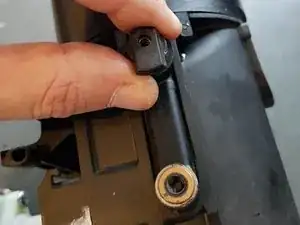
    • Bild 1 und 2 zeigen die sich verjüngenden Kanten, diese halten die Drahtklammer an Ort und Stelle. Die Neuinstallation ist einfach. Drücke sie einfach hinein.

    • Soweit bin ich gekommen. In meinem Fall leckte das rechts auf Bild 3 gezeigte Teil zwischen Metall und Kunststoff. Leider konnte es nicht weiter zerlegt werden.

    Van you mark the spot where it was leaking?

    Marcel Veldhuizen -

    I noticed the water in between the plastic and metal part. Only later I was able to take the heater apart with force, the leak was inside, in de middle.

    The black part twists a bit to one side that way you can get it off. Needs quite some force, though!

    Léon Witteman -

    I have a leak at exactly the same spot. How do you fix this? I first thought it was the small o-ring, but I think it's where the heating pipe exits the heater…

    Steven Verbrugge -

    I had the same issue and by rotating the plastic part this can be removed from the boiler housing. Inside there is a small o-ring which in my case was worn. Now need to find replacement ring…

    Jeroen van Ruitenbeek -

    Hey Jeroen, I had the same leakage problem, and want to replace the o ring! did you manage to find out which o ring you need? I suspect it is this one, but not sure: https://www.partsnl.nl/ms-0019105-krups-...

    arno_holtrop -

    Hello, I did not test yet but I replaced the Oring by a nitrile P5 (4.8x1.9) Oring from a Oring kit I have. It fits well and need a little push that feel secured. I recommend nitrile Oring given the temperature and not rubber.

    [deleted] -

    Also got it off, using a screw driver on on side to rotate to the side where there is visibly space to move to. Inside tough, I couldn't find anything, also not that o - ring! Tomorrow I'll take another look I guess. I was wondering if any of you managed to fix the leakage problem in the end, as it seems I have the same problem (magimix m105)

    arno_holtrop -

    Hi, I had the same problem and arrived to the same step, but I couldn't remove the plastic part from the metal part. In fact I broke a bit the plastic part when forcing it.

    I would also like to know if anyone finally fixed it.

    Thanks!

    Javier Cebollada -

    Hi, I am close, just ordered a new o ring and will try to assemble tonight or tomorrow, I could show you a little video how to do it if you give me your email, I don't know how to post it here.

    arno_holtrop -

    I managed to separate the heater from black inner. Held in a vice, gentle tap to turn clockwise and it opens.

    There is a little o-ring inside the end of the black plastic. I pulled it out cleaned and reversed it back in.

    re-assembled it does not appear to leak, for now at least.

    Chris Miller -

    Do you happen to have pictures of the process? I have the same issue and can’t split the heater from the front plastic panel

    Avner Israel -

    Can you please show some photos of how to split the black plastic from the heater? Thank you very much in advance

    Boomer Liu -

    Anyone find the right o-ring to fix the leakage. I tried 2 different one, it all seems to thinner than the original one

    Richard Siao -

    Hi everyone. I seem to have the same exact leak as you all do but haven’t managed to separate the heater from the plastic part yet. I wasn’t planning to as I wanted to fully replace the part. And well, I didn’t think it would be so complicated to find that spare part. You can easily get it from european websites but it’s 230V… For some reason, I cannot find the heater element in 120V through North-American sellers… does anyone know where I could buy one? Thanks a lot :)

    Emilie Desrue -

    Hello Sir. May I ask except for the heater, is there any other part only work in 120V? I have a broken 120v machine ( CPU board broken ) and another broken 220V machine (black plastic part in the heater broken). I want to put the 220v CPU board and heater into the 120V machine. I am wondering if the pump is working on 120V? or it works on a fixed Voltage output by the CPU board? Thank you in advance.

    Boomer Liu -

    Yep mine has the same problem. Trying to find the right replacement o-ring now.

    Matt T -

    Hoi, Ik wil de Inissia aanpassen voor camping gebruik. Hiervoor zou ik een diode vb P2000M in lijn moeten zetten met de verwarmingsweerstand. Ik heb geprobeerd om de diode in de gele draad te zetten die naar het drukblok loopt (de gele draad die in stap 11 is te zien). Maar dat werkt niet. Het resultaat is een toestel waarvan de lampjes 3 keer kort flitsen, pauze en weer 3 keer kort flitsen. De diode zit dus mogelijk op de verkeerde plaats. Kunnen jullie me verder helpen?

    Frits Bonte -

    I used a large crowbar as a lever to open the brew unit's bayonet assembly. As mentioned elsewhere, the size of the o-ring (in the cavity of the large black plastic part into which the small black plastic sleeve and metal pipe slide) is 4.8x1.9 mm. In my case, replacing this o-ring did not stop the leakage. A lot of work with no favourable end result. The brew unit does not seem to be made for repair. Regarding the two metal springs and the tiny pipe in the middle of them (behind the cup holder), the following video is useful: https://www.youtube.com/watch?v=TY_B_Ytz...

    P-308 -

    La parte in plastica nera, collegata alla caldaietta, può essere rimossa. È sufficiente tenere ferma la caldaietta e ruotare la parte in plastica in senso orario. Spesso la perdita segnalata anche nella guida è associata ad un danneggiamento della parte in plastica in corrispondenza dell’innesto con la caldaietta. In altri casi, più fortunati, è sufficiente sostituire l’o-ring che si trova in corrispondenza di questo innesto, per evitare la perdita. La parte in plastica difficilmente si trova come ricambio singolo, solitamente è associato alla caldaietta, tuttavia se disponete di un’altra macchinetta da cui recuperare parti di ricambio, è possibile mantenere la caldaietta e sostituire solo la parte in plastica.

    Andrea Golisano -

    Muchas gracias Andrea, copio la traducción:

    La pieza de plástico negra, que está unida al caldero, se puede retirar. Basta con mantener quieta la caldera y girar la pieza de plástico en el sentido de las agujas del reloj. A menudo, las fugas que también se indican en la guía están asociadas a daños en la pieza de plástico del acoplamiento con la caldera. En otros casos más afortunados, basta con sustituir la junta tórica de este acoplamiento para evitar la fuga. La pieza de plástico raramente se encuentra como pieza de recambio individual, suele estar asociada al caldero, sin embargo, si dispone de otra máquina de la que pueda recuperar piezas de recambio, puede conservar el caldero y sustituir sólo la pieza de plástico.

    Carlos López (España - Spain) -

    Après plusieurs manipulations en tout genre j’en ai conclu ceci :

    Le joint est celui vendu pour la XN250 de référence MS 623318 qui est un joint torique

    Cela n’a pas arrêté la fuite et donc c’est le corps de chaudière qui est responsable quand celui-ci monte en pression de micro fissures laissent passer l’eau.

    À vide sans capsule il n’y a pas de fuite c’est uniquement quand on met la capsule donc plus de pression !!

    Donc changer le joint ne suffit pas dans la plupart des cas et on a que la solution de changer la chaudière

    THIERRY BRENAGET -

    Aussi j’ai eu l’expérience d’avoir la tête en plastique qui fuit alors qu’aucune fissure n’est visible à l’œil nu et je pense que c’est la tête qui est la cause des fuites et donc on ne peut l’acheter pour la remplacer cette pièce n’est pas vendue

    THIERRY BRENAGET -

    Hartelijk bedankt, prachtige foto's en duidelijke uitleg.

    Mijn toestel, Krups XN 100, is inderdaad zo goed als gelijk aan de Magimix.

    In onderdeel nummer 18 in het driedimensionaal beeld van alle onderdelen in de machine, zit ook het perforatie element dat je er ook kan uithalen.

    Daar bevinden zich een korte zware veer die de speelruimte van dit element bepaald, een jumpertje met een klein veertje die het nadruppelen beperkt,

    en heel belangrijk een O-ring die de perforatie kamer moet afsluiten om zo veel mogelijk drukverlies te voorkomen.

    Maar daar zit een groot probleem, deze O-ring zit niet in een fitting, niet in een gleuf en kan zo maar zijn eigen weg gaan bij spanningsverlies door ouderdom.

    Dit is geen fabrieksfout, geen constructiefout maar een ontwerpfout.

    Indien die O-ring niet op zijn bedoelde plaats blijft, krijgt men bij het maken van koffie eerste gewoon water en dan koffie met water.

    Resultaat, geen mooie schuimvorming meer en weg is die speciale smaak.

    Komt ook voor bij nieuwe toestellen.

    Filips -

  19. ULETDkRVgiJMrYKQ
    ULETDkRVgiJMrYKQ
    5mQW33tw4kunM2m5
    EerGLcRaoQgj2E3f
    • Der Zusammenbau geschieht in umgekehrter Reihenfolge. Die nächsten beiden Schritte zeigen, worauf du besonders achten solltest.

    • Bild 1: Umkehrung von Schritt 11: es geht am einfachsten, wenn du die Seite flach hinlegst und in das innere Gehäuse auf sie herablässt.

    • Bild 2: Umkehrung von Schritt 12: Achte darauf, dass der schwarze Schlauch über dem weißen verläuft.

    • Schiebe den Gummianschluss über die Pumpe.

    Also photo 2: make sure the spring is pushing against the plastic flange, and not going through it as pictured. The machine will be very noisy otherwise.

    Andrea A -

    Please clarify do you mean the tube should not be within the spring?

    anony Ab -

    I think he means that in my photo, on the right side of the spring it went through the cutout in the plastic housing. The tube does need to go through the spring, but the spring needs to be a bit more compressed to seat in the plastic rim. Imagine the spring in my photo to be compressed to about half its current length and it's still touching the left white plastic part.

    Léon Witteman -

  20. SYGCX1hVUwGGVnfg
    SYGCX1hVUwGGVnfg
    TQDYGkhvQZ2WJ6rA
    • Bild 1: Vergiss diese Abdeckung nicht.

    • Bild 2: Umkehrung von Schritt 10: Achte darauf, dass die Rasten in die Aussparungen passen.

    This machine seems to be identical to the Krupps model XN1001. Your instructions were very helpful with the reassembly.

    Repair Café Venlo-Zuid -

    Hey, my nespresso inissia’s cup holder fell off when I was emptying the used pods. I can’t seem to re-attach it. I didn’t find any broken or missing parts either. Please can you contact me on my email: sheza.umar@yahoo.com if you can help me out with it? Thank you!

    Sheza Umar -

    My clips don't secure the tube to the water heater, leading to leakage. How do you secure the clips? I ended up buying some new clips thinking it would make a difference but they are still very loose and don't hold the tube in

    william chou -

    Would you know the size of the o ring in the chamber?

    kristopher -

    Thank you, this description helped me a lot to repair my DeLongi Type EN 80 B (same). My problem was a o-ring in the pump (inner diameter 4,1 x 2). It was getting hard and the pump did not work any more. I replaced it with a diameter 3,5 x 2 and the machine make good coffee now again.

    Matthias -

    Traducido a Español el comentario de Matthias:

    Gracias, esta descripción me ayudó mucho a reparar mi DeLongi Tipo EN 80 B (igual). Mi problema era una junta tórica en la bomba (diámetro interior 4,1 x 2). Se estaba endureciendo y la bomba ya no funcionaba. La cambié por una de diámetro 3,5 x 2 y la máquina vuelve a hacer buen café.

    Carlos López (España - Spain) -

    Me ha venido perfecto tu manual, la férrea me pierde Justo por la unión que comentas y he desmontado la pieza! Para sacarla es necesario girarla el sentido horario con fuerza pero con tiento, y ahí se aloja un sello que se deforma con el tiempo.

    Jero Calvo -

Abschluss

Um dein Gerät wieder zusammenbauen, folge den Schritten in umgekehrter Reihenfolge, beachte insbesondere die Schritte 19 und 20.

Léon Witteman

Mitglied seit: 29/09/19

2393 Reputation

44 Kommentare

I wanted to diagnose a leak so I took it apart to about step 10, set the water tank in place, plugged it in, and started a cycle. The heater got hot (the large metal assembly at the top) and when the pump came water gushed out of the joint with the tricky spring clip, the rear one that connects to the metal pipe leading into the heater.

I disassembled the clip (unplugged first and let it cool off) and found that the O-ring inside the joint was split. Now to find a replacement.

Darin Fitzpatrick -

Hi Leon, thanks for taking the time to make this guide.

I followed to step 11. Then I noticed the boiler had lots of white limescale streaks on it, indicating a leak. I think this is the part you diagnosed as leaking for you. I’ve decided to give up unfortunately.

Cheers John

John Moule -

There's another stage you can go! The plastic moulding the pod fits into can be removed from the boiler casting. You need to rotate the moulding about 15° clockwise on the boiler using a bit of leverage between the trunions and the moulding both sides. It's rather stiff but once turned it releases a sort of bayonet fitting retaining the moulding to the boiler.

Inside there's another ‘O' ring, that can be suspect for a leak, and a plastic sleeve behind it.

Steven Wilkes -

Thank you! Great addition.

Léon Witteman -

do you know the size of the o-ring?

Alex Diepeveen -

Alex, I haven't measured or taken pictures. The ring is approx 8 mm in diameter (from memory!). Don't know is this is of much use for you, though.

Good luck!

Léon Witteman -

the seal is 4.8x1.9mm

Will Stirling -

Well done Steven Wilkes

k.raymond -

This is a nice guide for a machine that I found to be a nightmare to work on - mainly due to the (all too common) practice of using snap-together plastic components, rather than screws. After the plastic has aged for a few years it inevitably becomes brittle and the clips often break during disassembly. My machine was a Krups Nissia XN100 model what was just on five years old. While there were some differences in the design, your guide was very useful - particularly so because your photos are clear and detailed. I found a leak at the “front” of the heater at the join to the black plastic moulding that forms part of the heater assembly. In an earlier comment, I saw that it’s possible to separate the plastic moulding from the heater so that the O-ring seal can be replaced. Despite applying quite a lot of force, I couldn’t get mine apart :-( I’ve since found that I can buy a new machine for less than three times the cost of a new heater assembly, so I decided to abandon the repair.

midahed -

Can someone tell me if there is a small circuit-board battery in there that one can remove/replace to reset the machine?

Andrew van der Merwe -

Thanks for this excellent guide. I am nearly there, a utube video suggests it is an o ring. Just need to get the second inner side off now and I should be there! I suspect I will need glue/gaffer tape to re-assemble, I heard a lot of clips breaking to get to this stage…..

Geoff Hayday -

Great helpful guide! My heater assembly was leaking. Ordered a new one on partmaster.co.uk which was half the price of one on a Dutch website. For certainty I also replaced the high pressure connector and o-rings.

Ferry de Boer -

I also had a leak between the metal and plastic part of the heater assembly. This was due to a worn o-ring. I could get the plastic part removed by rotating and applying a bit of force. I replaced the o-ring with a new MS-0071881 but still it was leaking. I assumed due to little pressure reamaining. I added a second o-ring on the other side of the small plastic pipe inside the boiler, this added just some extra pressure on the new sealing ring to make it seal.

Jeroen van Ruitenbeek -

Same issue here,, tried to add o ring as you did but leak is still here.

Have you durably solved this issue ?

I often repair Nespresso Coffee Machine and i never found how to solve the issue durably for customers...

Need each time to replace the whole part : boiler and plastic (which include the o ring)

More over i continue to think that there is a sort of glue between boiler and plastic on the new part... when i dismantle....inevitably there is no glue anymore...

Would like to repair the 3 or 4 boilers i have with me....all with the same issue...

Many thanks to you for your help

Kind Rgds

Gerald -

Est-ce que la fuite a disparu en ajoutant un 2ème joint

Thierry -

Buongiorno, la mia inissia si surriscalda troppo, dopo un solo caffè diventa bollente nella parte superiore, il caffè è ustionante, prima di berlo devono passare almeno 7/8 minuti. Cosa può essere?

gianmarcotrisciuzzi -

Mrci bcp vip

Ouramtane Maouche -

Brilliant guide thank you. One problem now I have disassembled it is I have 3springs which I do not know where they belong. The must have sprung off at various points and I couldnt tell where from. I can't see them referred to in the guide

Any ideas please?

anony Ab -

De casualidad no tendrán un tutorial como este pero para la Nespresso prodigio?

bob.pl -

For the Magimix the O-ring in the chamber has OD 32mm with a ringwidth of 3mm, so ID(32-6=)26 Look for FDA/ Foodgrade O-rings, with compound ‘70’. They are availlable online (in the Netherlands at least, prices range from eur 8,50 (10-pack) to eur 6,50 a piece.)

Type info: O-ring 32x3 - VMQ - MVQ - Silicone - 70 Shore A - Red - FDA - ORS9901

Repair Cafe Hilversum (NLD) -

Excelente informe de despiece, muchas gracias por compartirlo

Cesar Stefanuto -

can someone tell me why there isnt any water coming out of my machine, yes the pump does still turn onn but there isnt any water coming out.

Verpaele Delsin -

Es-ce que je peux démonter la pièce en plastique sur la résistance Krups Inissia sn1001

Make kilo -

hi ,

can i buy spare parts from ifixit ? for example the white plastic pin inside the thin spring at step 13

thanks

Ahmed Abbas -

Hola Ahmed Abbas Ifixit no dispone de piezas de repuesto de Nespresso, piezas tan concretas generalmente no se venden ni por otros distribuodores has de comprar un conjunto.

Carlos López (España - Spain) -

Hola Carlos López ,

muchas gracias

Ahmed Abbas -

Hi.

Issue with boiler o ring,, tried to add o ring as did above but leak is still here.

Have you durably solved this issue ?

I often repair Nespresso Coffee Machine and i never found how to solve the issue durably for customers...

Need each time to replace the whole part : boiler and plastic (which include the o ring)

More over i continue to think that there is a sort of glue between boiler and plastic on the new part... when i dismantle....inevitably there is no glue anymore...

Would like to repair the 3 or 4 boilers i have with me....all with the same issue...

Many thanks to you for your help

Kind Rgds

Gerald - il y a 3 jours

Gerald -

Did you solve this problem? I have the same problem and have tried several times with O rings of different sizes and can’t stop the leak inside the heater !

Jeremy Parker -

Hi Leon. Thank you for this guide. I need to replace the part on your "Step 2" (the part removed). Would you know it's name and part number? Thanks for any advice. Verona

VERONICA THUESEN -

@veronicathuesen Can you give us the part # in the exploded view, step 1, Pic 2?

VauWeh -

This page may help you.

VauWeh -

VERONICA THUESEN -

Thank you for the link to electrodo.de, what a great website. I managed to remove the part and the problem now seems to be somewhere else. Allow me to explain what happens when I do a coffee: very little water comes through the coffee pod, and lot of water comes from behind the pod sliding down from the part on the minute 0:49-0:52 on the video I sent earlier. I can see now that there is nothing wrong with that part in particular. Any further advice? Thank you very much for your time!

VERONICA THUESEN -

(I miss your video ;-))

The issue could be a clogged "pyramide"plate. This is a round plate with many little "pyramides", which peak little holes in the capsules, so the water/coffee can flow freely. We have a guide for a similar model, you can see the plate and how it is cleaned following from step 13. Think of replacing it with a new one, its cheap.

VauWeh -

VauWeh, THANK YOU!!!!!!!!!!!!!! Your words lead my husband to clean the inside of the machine with the dental water jet and lots of "debries" came out. As you said, it was clogged. Thank you VERY much for your advice. You saved us from buying a new machine!

VERONICA THUESEN -

@veronicathuesen Great! Repair is war on entropy!

VauWeh -

Felicitacioones y muchas gracias por tu comentario Veronica.

Carlos López (España - Spain) -

This machine is identical to the DeLonghi EN80b.

My machine was leaking, took it apart with this manual.

Martin Hilvers -

During disassembly an o-ring 8x2mm fall down. Can someone support me to find from where? I didn'd dismount the pump so cannot be o-ring inside connection to upper white tube

Alessandro Vignati -

Hi there, i repaired a delonghi en 80b with your advice on opening today.

My Maschine was leaking because IT was Standing in the cold for too Long.

The Problem we're Not the o Rings but the Connection underneath we're the White plastic parts are are clicked together one Side was broken so while running the pressure seperated them... I fixed IT with a thin wire which i slung around so IT was stable again...

Thank you very much for the Tutorial

Greets Dominik

Dominik Welle -

Please note that in the Type D40 version of this machine, it is not possible to remove the lever arm seats.

Fulton Fortner -

Thanks a lot for preparing this guide + the clear pictures. I would not have been able to fix my daughters Magimix without this guide. Another device saved from the scrapyard!

DannyK -

Merci pour ce tuto ! Genial !

Pour démonter uniquement la pompe sans avoir à enlever les clips métallique en 'M' (ou en U) il est possible de déclipser la partie en plastique qui vient se loger dans le tuyau qui fait pont avec la résistance et maintenu par ces clips metalique 'M' (mais je sais pas si c'est recommandé.

Hey Hey -