Einleitung

In dieser Anleitung erfährst du, wie du den Touchscreen deines DSi austauschen kannst.

  1. xvUu2VHXnLOaoxyD
    xvUu2VHXnLOaoxyD
    GJgBKkUY2j6UrTTr
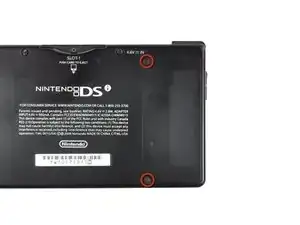
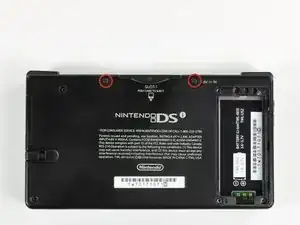
    • Entferne die beiden Kreuzschlitzschrauben, mit denen die Abdeckung des Akkus am Gehäuseunterteil befestigt ist.

    • Die Schrauben sind fest an der Abdeckung angebracht und fallen nicht heraus.

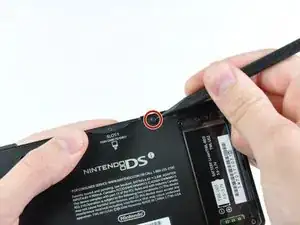
    • Hebe die Abdeckung an und entferne sie vom Gehäuseunterteil.

    • Wenn du sie nicht gut fassen kannst, dann klopfe leicht auf die gegenüberliegende Seite.

  2. TMGAeGDWRXJKjqkf
    TMGAeGDWRXJKjqkf
    pXTJP3k1hRhVckSv
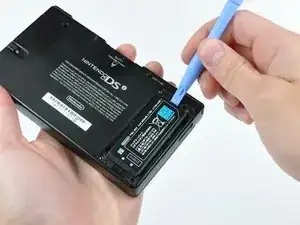
    • Nimm einen Spudger (oder deinen Fingernagel) und hebe den Akku oben an.

    • An der Oberkante des Akkus ist eine kleine Leiste, damit du dein Werkzeug besser ansetzen kannst.

    • Unter dem Akku befindet sich ein Indikator für Feuchtigkeit. Heble vorsichtig, damit der Indikator nicht beschädigt wird.

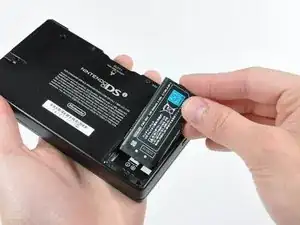
    • Fasse den Akku und hebe ihn aus dem DSi heraus.

    This is also where the water damage indicator is located, if that's important

    Vaulto -

  3. ZElvjs4G5DRnVKEX
    ZElvjs4G5DRnVKEX
    NNd3fYSswNeKCoBU
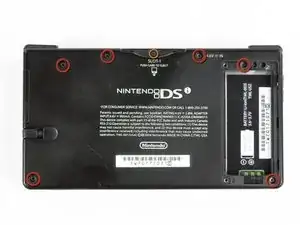
    • Zwei Schrauben befinden sich unter den beiden Gummifüßen (rot markiert).

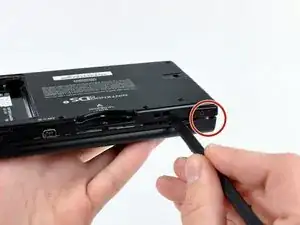
    • Benutze die Spitze eines Spudger, um die Gummifüße aus dem Gehäuse zu lösen.

    • Wenn dein Gerät schon älter ist, zerbröseln die Gummifüße vielleicht, wenn du versuchst, sie auszubauen. Nimm in diesem Fall ein geeignetes Werkzeug und beseitige alle Reste vom Gummi.

    One of the feet did break on me, tweezers came in handy for picking it out

    Willie Narvaez -

    I unfolded and sharpened a paperclip. You can use that to stab and hook the rubber without tearing it, as the rubber is thick enough to reseal when reinserted.

    Keegan Andersen -

    Nasty, broke my spudger and the feet in this step.

    TimedIn -

  4. MPpnnO22qoYDH1YH
    • Entferne die Schrauben, mit denen das untere Gehäuse am DSi befestigt ist:

    • Sechs 5,2 mm Kreuzschlitzschrauben #00

    • Eine 2,7 mm Kreuzschlitzschraube #00

    Impossible d'enlever les vises… trop serré! comment faire?

    evrobert03 -

    i can't get the screw by the gamecard slot out, PH#00 is too small and PH#0 is too big

    Iblowup -

    same problem here. maybe try a JIS?

    darth mango -

  5. MqTKErbDcomH6eMJ
    MqTKErbDcomH6eMJ
    HuePUMK6TciCQZEj
    OkwvvvtBbd53ugBG
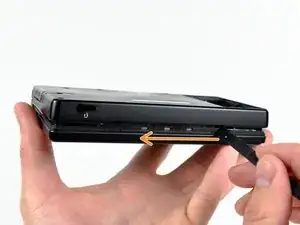
    • Setze den Spudger nahe der oberen rechten Ecke des DSi zwischen dem unteren Gehäuseteil und dem Bildschirm ein.

    • Führe den Spudger vorsichtig an der Kante des Außengehäuses entlang, damit eine Öffnung zwischen dem Hauptteil und dem Gehäuse entsteht.

    • Führe den Spudger weiter um das Gehäuse des DSi herum, bis der größte Teil des unteren Gehäuses entfernt wurde.

  6. ZsX1F2YxXpOFEtuH
    ZsX1F2YxXpOFEtuH
    BS25HSFVrSclu2X1
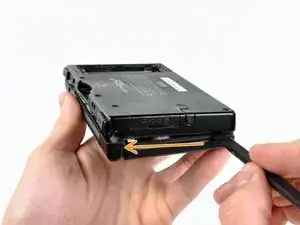
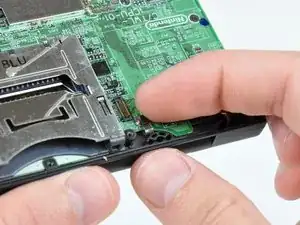
    • Hebe das untere Gehäuse vorsichtig an der Unterkante an.

    • Das Gehäuseunterteil ist immer noch mit dem rot markierten Lautstärke- und SD-Kartenkabel an der Hauptplatine befestigt. Versuche also nicht, das untere Gehäuse des DSi vollständig zu entfernen.

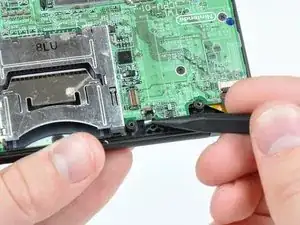
    • Löse das Kabel der Lautstärkeregelung und der SD-Karte mit einem Spudger aus dem Anschluss auf der Hauptplatine.

    • Sobald das Kabel vollständig entfernt ist, lässt sich das gesamte Außengehäuse abnehmen.

    Any help removing the ribbon cable, I have absolutely no clue how to remove this.

    John Brodie -

    Beginner here, removing it went fine. However, I had some trouble reattaching it. Eventually it worked but the way I tried putting it back in was very messy and probably could've broken the connector. Does anyone have any tips how to align the connectors, firmly reattach it, etc.?

    D. Doornboom -

  7. kmVh26fubSE4TiMD
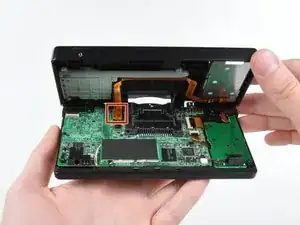
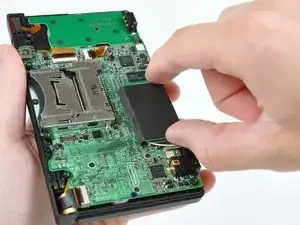
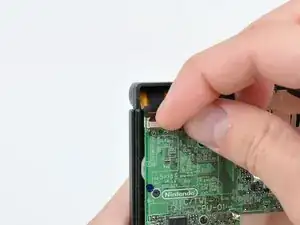
    • Ziehe das WLAN-Modul an der Kante, die sich am nächsten zur Kopfhörerbuchse befindet, von der Hauptplatine ab.

  8. QDhsgwruDwxGZhwa
    • Entferne den WLAN-Antennenstecker gerade aus seinem Anschluss auf der WLAN-Platine.

    After reassembling it, I switched my Nintendo DSi xl On and only the blue power light, is on after that it doesn't respond any more, except while charging it blinks

    Phillips -

  9. rOrYJByq3ETfmbdk
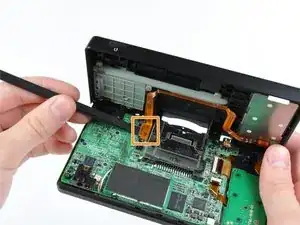
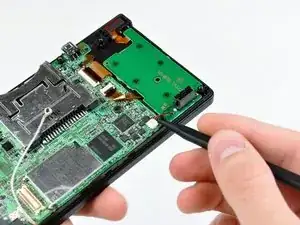
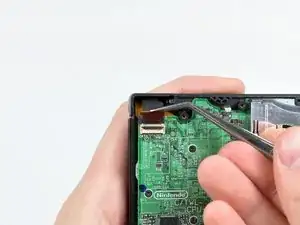
    • Heble den Stecker der Stromversorgung mit der Spudgerspitze aus seinem Anschluss auf der Hauptplatine heraus.

    do not pry up! pull to one side so you don't disconnect the clip from the motherboard!

    Lisa -

    Actually Lisa, you are incorrect. If you pull to one side you WILL end up pulling the connector off the motherboard. It is designed so that you ARE MEANT TO pry it upwards out of the connector. All you need to do is use the point or corner of the flat edge of a spudger (or a small flat-headed screwdriver), push it ever so slightly under the middle of the small white plug where there is a small recess in the connector for just this purpose. Prying the plug up in this fashion you should clear the connector with the spudger by prying it up through the recess rather than catching the connector and pulling it off the board.

    James Gravestock -

    how to fix if the clip comes off of the motherboard?? please help!

    jaime -

    Push it back in straight if it is still in one piece.

    Tman Tech -

    If the socket comes off the motherboard along with the connector, what’s the best way to fix it?

    Kimberly Meyer -

    it has to be soldered back on, so if you can't do it yourself, find someone who can (maybe a local repair shop).

    just some mango -

    I already pull it off from board new i have to learn how to weld it back

    Mussa Ding -

  10. GkLxSBWqXUZvEWfO
    GkLxSBWqXUZvEWfO
    wH65BTmxHuvJEaw3
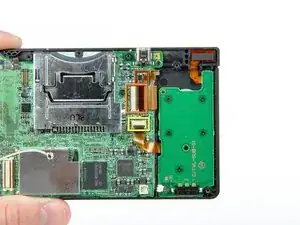
    • Klappe die Sicherungsbügel an folgenden drei ZIF-Anschlüssen mit dem Fingernagel oder der Kante eines Öffnungswerkzeugs hoch:

    • Unteres Touchscreenkabel

    • Unteres LCD-Kabel

    • Kabel der Stromversorgung

    • Achte darauf, dass du nur an den scharnierartigen Sicherungsbügeln hebelst, nicht an den Anschlüssen.

    • Wenn alle drei Sicherungsbügel geöffnet sind, ziehe die Kabel vorsichtig mit deinen Fingern oder einer Pinzette gerade aus ihren Anschlüssen heraus.

    I accidentally broke the retaining flap off of the lower touchscreen’s socket. Is it possible to reattach it?

    Thewolfpack23x -

    Mine broke off too. At first I thought it would just pop back in, but when I looked at it under magnification, I can see that a tiny piece of plastic actually snapped off the flap. I think we're farked. Looks like the only way to fix would be to solder on a new cable connector.

    trevorsklar -

    i love and hate flex cables.

    they are flat and awesome, but every single flap for the connectors has broken for me (past experience vent lmao)

    Vaulto -

  11. QQ53GOjQUAjipiLR
    QQ53GOjQUAjipiLR
    RnDBPQTsLn1a4m5E
    • Klappe vorsichtig den Sicherungsbügel am Flachbandkabel zum Touchscreen mit dem Fingernagel oder der Kante eines Öffnungswerkzeugs nach oben.

    • Achte darauf, dass du nur am Sicherungsbügel hebelst, nicht am Anschluss.

    • Ziehe das Flachbandkabel zum Touchscreen mit der Spudgerspitze gerade aus seinem Anschluss heraus.

    When I was putting mine back together, the flap popped off and when I tried to put it on with a tweezers, it snapped. Any suggestions other than scrap it or use it without the touchscreen? Pictures at https://sites.google.com/site/memesbyluc...

    Lucas Hoekstra (Lucas9810) -

    This little flap is a pain in the butt to get back in! If there is any way to bypass the removal of this, my advise is to do it!

    Tamara Girodie -

    Adding on: The cable actually ended up breaking as the tweezers I used to put it back in scraped part of the gold ribbon off. Be extremely careful!!!

    Tamara Girodie -

  12. mafsk2s4efjqS2NP
    mafsk2s4efjqS2NP
    A6utw32KgXdGX3hn
    • Klappe den Sicherungsbügel am Kabel der Doppelkamera mit dem Fingernagel oder der Kante eines Öffnungswerkzeugs vorsichtig hoch.

    • Achte darauf, dass du den Sicherungsbügel hochklappst, nicht den Anschluss selbst.

    • Ziehe das Flachbandkabel der Doppelkamera mit der Spudgerspitze gerade aus seinem Anschluss heraus.

    This one's super annoying to get back in

    FarmYard Gaming -

  13. 4JjISgpwCH2gWOm4
    • Heble die Mikrofonantenne mit der Spudgerspitze nach oben aus ihrem Anschluss auf der Hauptplatine heraus.

  14. n3Z4aW2J3yJGnHfM
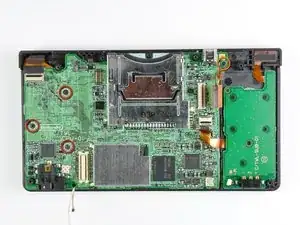
    • Entferne folgende vier Kreuzschlitzschrauben, mit denen die Hauptplatine am Rahmen des DSI befestigt ist:

    • Drei längere Schrauben

    • Eine kurze Schraube

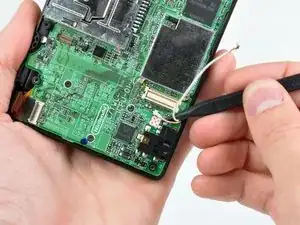
    • Ziehe die Kabel des Mikrofons und der WiFi-Antenne aus den Einkerbungen in der Hauptplatine nahe an der Kopfhörerbuchse heraus.

  15. B2aHLlOTl2dIdMJP
    B2aHLlOTl2dIdMJP
    tQHEhIuY2yBQBFvm
    oexSRl3VTauw5BVp
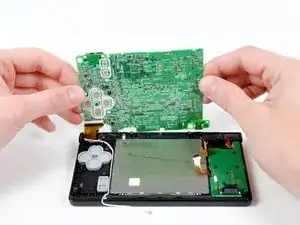
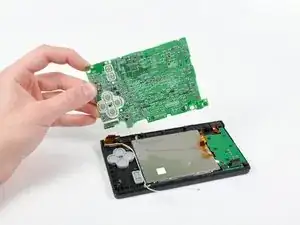
    • Hebe die Hauptplatine leicht nach oben, um das Flachbandkabel zum oberen LCD über den ABXY-Tasten freizulegen.

    • Klappe den Sicherungsbügel am Flachbandkabel des oberen LCDs mit dem Fingernagel oder der Kante eines Öffnungswerkzeugs vorsichtig hoch.

    • Achte darauf, dass du den Sicherungsbügel hochklappst, nicht den Anschluss selbst.

    • Entferne die Hauptplatine vom DSi.

    I actually chose to leave this ribbon cable connected, and had no issues completing the rest of the steps around this. Just be careful not to pull the cable!

    Tamara Girodie -

  16. OrGPD1EqHlD4RNKS
    OrGPD1EqHlD4RNKS
    i2kPqfain3lsgpdh
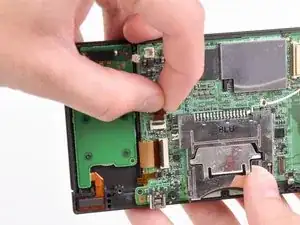
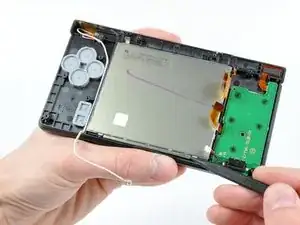
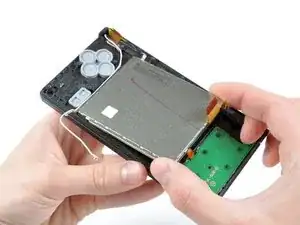
    • Heble die Metallabschirmung des unteren LCDs mit der Spudgerspitze vom Rahmen des DSi hoch.

    • Hebe die untere LCD -Einheit aus dem DSi heraus.

    It’s not mentioned here, but I found it easiest to just remove the buttons and rubber backings here as well - they will likely just fall out anyway when moving the case around and you may lose them.

    Tplan -

  17. MQAJ54JEdXxs44Bd
    MQAJ54JEdXxs44Bd
    pMMvxSF6nRJlIYA1
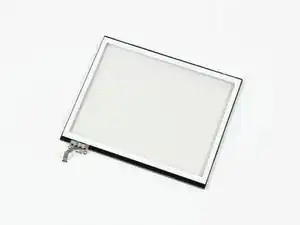
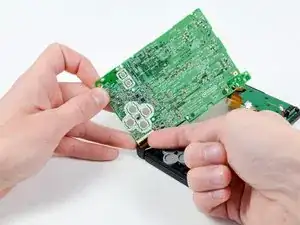
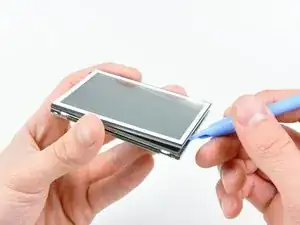
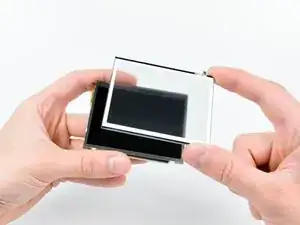
    • Setze ein Öffnungswerkzeug aus Kunststoff mit der Kante zwischen den unteren Touchscreen und das untere LCD ein.

    • Lasse das Öffnungswerkzeug mit der Kante um den Rand des Touchscreens herum laufen, um ihn vom unteren LCD zu lösen.

    • Entferne den Touchscreen vom unteren LCD.

  18. JNtnFLSUro5HaSgV
    • Der Touchscreen bleibt übrig.

Abschluss

Um das Gerät wieder zusammenzubauen, folge dieser Anleitung in umgekehrter Reihenfolge.

Walter Galan

708450 Reputation

5 Kommentare

As always an excellent well documented and easily explained guide. My DSi touch screen now calibrates and works perfectly. Thank you so much for your excellent site.

Chris Mifsud -

I followed every step. Once I was done assembling it, I turned it on and the bottom screen flashed. Don't understand why and I'm really frustrated. Please help.

Gabbi M -

Donde puedo comprarla?

rghi_28 -

Much easier than the instructions made it seem, I'm not too experienced in this sort of thing at all and frankly I'm just glad the thing turned on once I got it all back together. Great instructions, simple repair

Luciano -

I have replaced the digitalizer but still the touch screen is not working, I've already make sure that all the ribbon cables are correctly connected, what could be the problem? The motherboard? I'm running out of options, any help will be really appreciated

pablo paiva -