Einleitung

Hinweis: Wenn das Gerät zerlegt wird, kann die Garantie für das Gerät erlöschen. Sei vorsichtig, wenn noch die Möglichkeit besteht, dann schicke es lieber an den Hersteller ein.

  • Diese Anleitung hilft dir, die Probleme mit dem Joystick zu beheben. Ob nur Reinigen, oder ein komplettes Austauschen der Joysticks, beides ist einfach selbst zu beheben. Nimm dir genug Zeit und gehe sorgfältig mit der PS Vita Slim um.
  1. MWUymU6oT1rGeD6u
    • Überprüfe, dass das System vollständig heruntergefahren und alle SD-Karten entfernt sind, bevor du dieser Anleitung folgst

    • Alle 6.35mm Schrauben wurden mit einem J00-Bit des iFixit pro Toolkit entfernt.

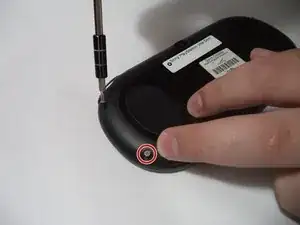
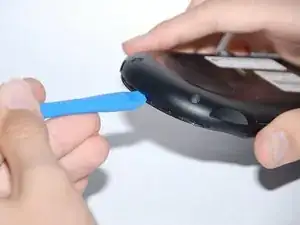
    • Du findest vier Schrauben auf der Rückseite, entferne diese wie auf den Bildern gezeigt,

    I actually broke a 32GB storage card because I didn’t remove it first before I open the chasis. Beware of this!!! REMOVE YOUR CARD FIRST!!!

    Daniel Wang -

  2. dNixpdkvqXrEXvRX
    dNixpdkvqXrEXvRX
    6FOyLDiaHJn3JbMJ
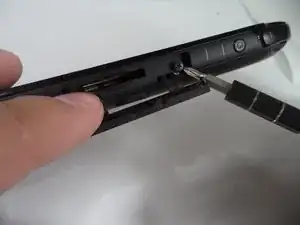
    • Es sind zwei Schrauben auf der Unterseite, neben der Ladebuchse. Entferne diese mit dem J00-Bit des iFixit Toolkit.

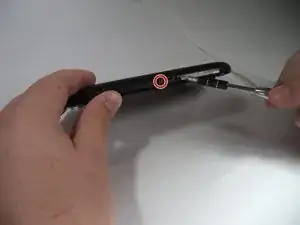
    • Zuletzt entferne die obere Schraube unter dem Staubschutz mit dem J00-Bit des iFixit Toolkit.

  3. oB5eopNayEQgQNdm
    oB5eopNayEQgQNdm
    AFU4gg4k5bwrPruG
    JjhdMGePJxTZe1sZ
    • Für den nächsten Schritt benötigst du das Öffnungswerkzeug.

    • Trenne die Rückwand vorsichtig komplett von der Vorderseite ab. Du musst das kleine Flachbandkabel auf der Innenseite entfernen musst, bevor du die Rückwand komplett abnimmst. Ansonsten läufst du Gefahr dieses zu beschädigen.

    • Während du die Rückwand abhebst, öffne diese vorsichtig rundherum. Du wirst klackende Geräusche hören während du dies tust.

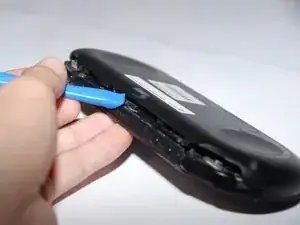
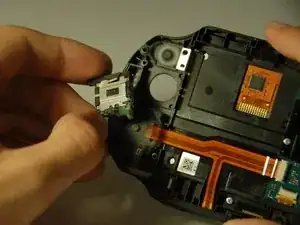
    • Während du dies tust musst du vorsichtig die Flachbandkabel lösen, welche mit der Hardware verbunden sind.

  4. nQrlvZtdJYWOSKtU
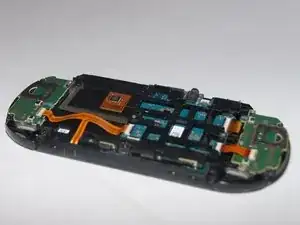
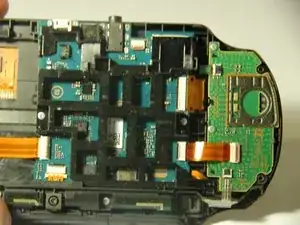
    • Nachdem die Flachbandkabel entfernt sind und die Rückwand komplett abgenommen ist, kommst du an die Hardware heran.

    Don’t forget to remove the battery at this point. The little corners of the connector that poke out a bit are there for you to pry the connector up. Be careful pulling the battery connector out by the wire, you could damage the wire where it is attached to the connector.

    Landon Burnette -

  5. QSNJrxCmCyFXIeh2
    QSNJrxCmCyFXIeh2
    Lb1G1YFEPEekblMA
    lLtXeglFALgVTgKA
    • Beginne mit dem linken Joystick

    • Die grüne Platine hält den Joystick fest. Diese muss entfernt werden.

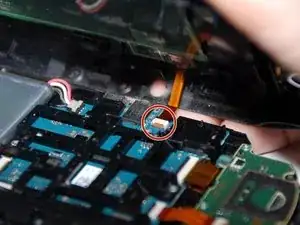
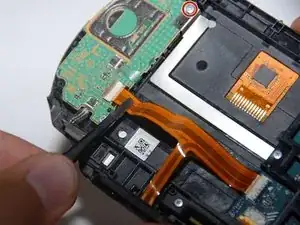
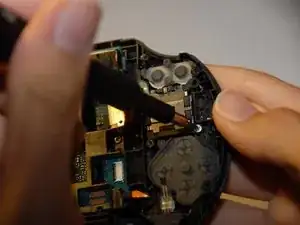
    • Löse vorsichtig die drei Flachbandkabel aus den Anschlüssen.

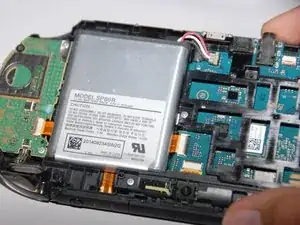
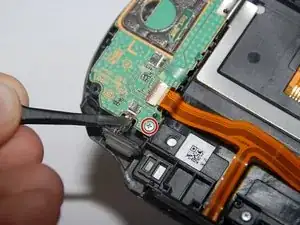
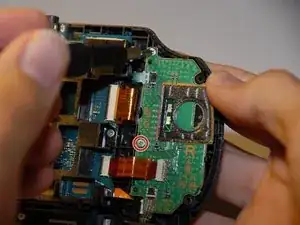
    • Löse nun die beiden Schrauben, die das Gehäuse festhalten. Es handelt sich um 6,35 mm Schrauben, die mit einem J00-Bit aus dem iFixit Pro Werkzeugsatz entfernt werden können.

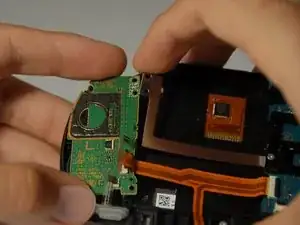
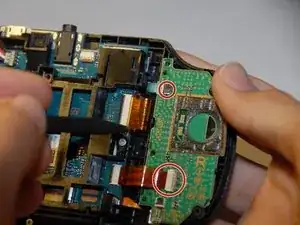
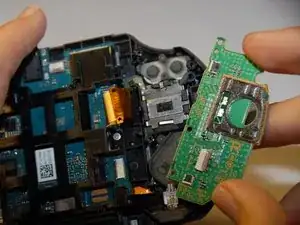
    • Hebe vorsichtig das Metallstück an, das die grüne Platine noch festhält. Nimm dann vorsichtig die grüne Platine heraus.

    Pull brown tab up to remove ribbon cable (black tab for the smaller ribbons)

    Zay -

  6. AIXCtAZLwmegXc5L
    AIXCtAZLwmegXc5L
    6eEPWHupvPhMx3VZ
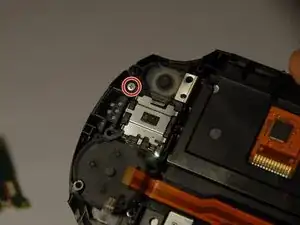
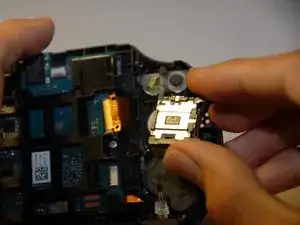
    • Eine weitere Schraube wird sichtbar. Drehe die 6,35 mm lange JIS-Schraube #00 heraus.

    • Hebe sorgfältig den Joystick heraus.

    • Nun kannst du den Joystick reparieren oder ersetzen.

  7. F4K26GsPPCjfbXH3
    F4K26GsPPCjfbXH3
    os2A4OSK3RQenxpI
    qGWVIB6hCjEnF6cC
    • Weiter geht's zum rechten Joystick.

    • Auch hier ist eine grüne Platine, die zuerst entfernt werden muss.

    • Löse vorsichtig die Flachbandkabel ab.

    • Entferne die beiden 6,35 mm JIS-Schrauben #00, mit denen die Platine befestigt ist.

  8. ry3DolYPKYEPOP5Y
    ry3DolYPKYEPOP5Y
    kB4YyjX2YvAiNkEN
    eL6DwNUywrfYdDCY
    • Entferne die darunter liegende 6,35 mm lange JIS-Schraube #00.

    • Hebe vorsichtig den Joystick heraus.

    • Nun kannst du den Joystick reparieren oder ersetzen.

Abschluss

Um das Gerät wieder zusammenzubauen, befolge diese Anleitung in umgekehrter Reihenfolge.

Daniel Woodard

Mitglied seit: 23/08/17

3184 Reputation

18 Kommentare

Would I have a problem if I used 2 screws for the right analog stick , it solved my ghost movement

Art Front -

I have changed the analog stick, but it is still not working

akash shah -

Can you switch left with right analog stick?

Pyro Haze -

yes you can switch them. but its recommended to get a pair of new analog sticks so you dont have to open it again when the other side fails

Darian Perisic -

Fixed, very easy! Thanks a lot

Julien Lemoine -

did it with a philips 00. Just be extra careful and push down hard so the driver does not skip and strip the screws. I would recommend getting a prying tool and plastic tweezers. I removed the casing by hand and removed and installed the ribbon cables by hand which took a while and was a big pain in the rear end.

Darian Perisic -

Gran ayuda por parte del autor: super fácil saludos desde Puebla México

Gustavo Cadena -

It should be noted, the battery is not secured to the case in any way and has a tendency to fly about if you’re not careful with it. I learnt this the hard way when it came loose and snapped one of its cables.

Sam Cain -

Thanks man. I was just going to repair my vita. I'll be careful

BATTLEGROUNDS MOBILE INDIA -

Just a note: the small green ribbons have little clips on-top that you can pop open to take them out and put them back in. If you’re experiencing some wonky connectivity you may need to go back in and re-secure them.

Stevie Dow -

Hey! Thanks for this. Was trying to figure out why removing the ribbons were so difficult. Appreciate you!

chris garcia -

Hey! Many thanks! This guide was very helpful and I finally got my PS Vita fixed after I had a broken joystick for about 2 years (which was the reason I stopped playing). One thing that was not mentioned in your guide was how to put the ribbon cables back into the connectors, which was my only problem. Eventually I figured out I had to pull out a small black plate on the connector so I can put in the cable (which wasn’t possible before). Anyway, thanks! =)

--- -

Very useful guide, found that mine had blue PCBs for the L/ R sides, however could be due to mine being a Japanese unit. I do recommend disconnecting the battery while doing this to keep from inadvertently powering the unit up.

I did have difficulty getting the ribbon cable for the rear touch pad re-seated properly. Found that I had to GENTLY bend the cable to make it easier to line up with its port on the mainboard.

Spencer Peat -

Anyone have recommendations as to who makes/sells reliable, good quality replacement joysticks for the 2000/slim series?

Having issues with mine drifting as soon as I boot it up, I'm gonna hit it with the contact cleaner (once I find where it's hiding), hopefully it helps, but since this was preowned, have to factor in wear and tear, so it might be easier to just replace them both.

Strings Cat -

Update:

Found a OEM styled part on amazon by a "Deal4GO", drift gone. Now I can experiment with the old stick at my leisure.

Strings Cat -

My PS Vita is no longer turning on after doing this, the orange light also does not come on when the charger is plugged in.

long_justifier -

Probably the battery connecter is not fitted properly or you might have damaged a ribbon cable. (Ribbon cables are a pain in the ass to take care of)

BATTLEGROUNDS MOBILE INDIA -

Hola necesito ayuda porque vi en el canal de mundo yakara como hacerle un mod

A una psvita fat pero la mía es slim y consiste en ponerle joycons magnéticos de switch entonces

Necesito un diagrama o alguna idea de los voltajes para llevar a cabo esta modificación si alguien pudiera ayudarme estaría eternamente agradecido 👍👍

Bryan -