Einleitung

Diese Anleitung ist für Selbermacher die eine Wartung der Rancilia Silvia durchführen wollen. Hier werden die Schritte zum Austausch der Gruppendichtung und des Siebs sowie eine gründliche Reinigung gezeigt.

Arbeite sorgfältig und nicht überhastet. Du musst dir vor Reparaturbeginn die richtigen Teile besorgen, das kann einige Zeit dauern.

Das Gerät ist ziemlich teuer, wenn du unsicher bist, lasse die Wartung lieber von einer Fachwerkstatt durchführen.

Andererseits kann dies auch die letzte Möglichkeit sein, ein altes Gerät wieder in Ordnung zu bringen, anstatt ein neues zu kaufen. Versuche es, so kannst du viel Geld sparen.

  1. jgTVxUu3GXTQFaD2
    jgTVxUu3GXTQFaD2
    unngLruBvR1FICb6
    qEPE3VwPImZOUVPq
    • In diesem Schritt sollst du den genauen Typ deiner Maschine identifizieren. Das ist wichtig, da sich die Reparatur je nach Version leicht unterscheiden kann.

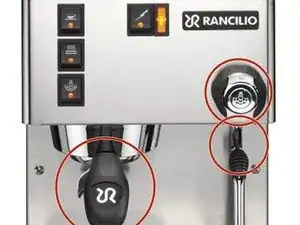
    • Hier wird Version 3 gezeigt, zu erkennen am ergonomischen Griff, dem längeren Dampfhebel mit silberner Kappe und einer Dampfdüse mit Kugelverbindung.

    • Die Version M ist mit der gleichen Gruppe ausgestattet wie Version 3. Äußerlich unterscheidet sie sich durch zwei Leuchten auf der Vorderseite und keine Leuchte an der Einschalttaste. Typ M ist die neueste Version.

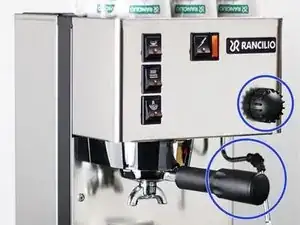
    • Hier wird Version 2 gezeigt, zu erkennen am abgerundeten Griff, dem Dampfknopf mit Rillen und dem Rancilio Logo aus Kunststoff.

    • Hier wird Version 1 gezeigt. Der Griff ist geriffelt. Das Logo ist im Siebdruckverfahren auf die Maschine gedruckt.

    The yellow dot indicating version 1 does not correspond to any photo.

    John Tracz -

  2. F2Vn3oCJh5DJxDEg
    F2Vn3oCJh5DJxDEg
    e32bZPHCCpR6uQYh
    FiYUkNAMWAWVHIgY
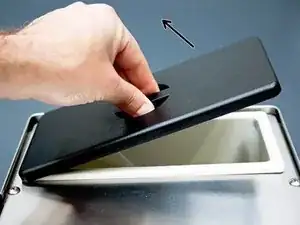
    • Hebe den Wassertankdeckel ab und entferne ihn.

    • Hole die Schläuche aus dem Wassertank heraus und ziehe sie zur Seite.

    • Hebe den Wassertank gerade aus der Maschine heraus.

    • Achte darauf, dass die Schläuche in das Gerät eingeschoben sind.

  3. MHB3UjXOw3gCoVKt
    MHB3UjXOw3gCoVKt
    EIqBDnNBEXaQLJhs
    3yXPnGmPR2FbU1fv
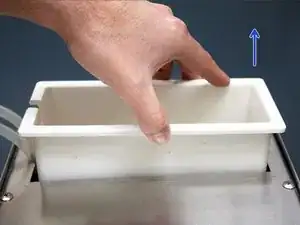
    • Entferne die Abtropfschale.

    • Lege die Maschine mit dem Boden nach oben auf die Arbeitsfläche.

    • Achte darauf, dass die Schläuche in der Maschine stecken. Sie könnten vom Gerät beschädigt werden, wenn es auf ihnz liegt.

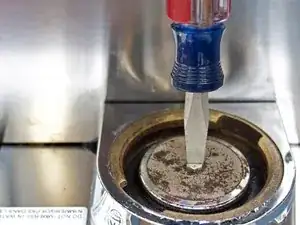
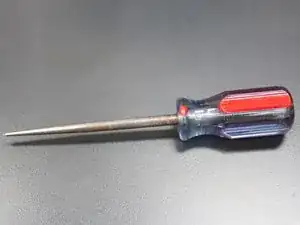
    • Nimm einen Flachschraubendreher und entferne die Schraube.

    • Im Ersatzteilkit ist eine 8 mm Sechskantschraube enthalten.

  4. kGDqoONqrnIalJ3G
    kGDqoONqrnIalJ3G
    1slVjWVRsES1XYhW
    Nj6GOdYvTjsGonGV
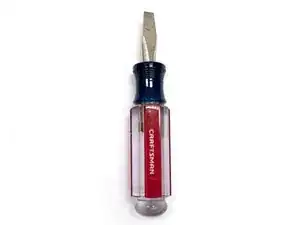
    • Das ist ein sehr guter Schraubendreher, (ein Craftsman 5/16" x 1 3/4" Schlitzschraubendreher) um sehr festsitzende Schrauben zu entfernen. Er darf nicht zu lang sein, damit er zwischen Abtropfschale und Sieb passt.

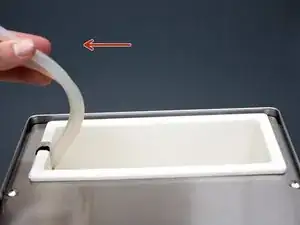
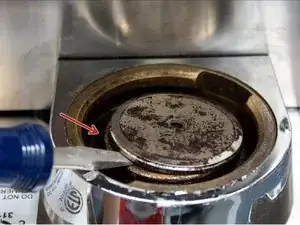
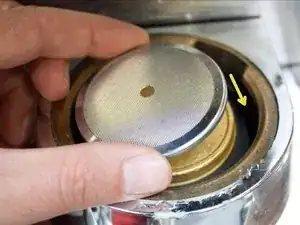
    • Entferne das Sieb. Wahrscheinlich musst du etwas hebeln. Wenn es ganz fest sitzt, kannst du eine geeignete Zange (Wasserpumpenzange) benutzen.

    • Es ist nicht schlimm, wenn das alte Sieb beschädigt wird. Achte nur darauf, dass die Messingeinfassung nicht beschädigt wird.

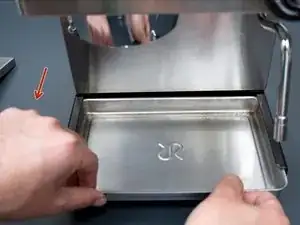
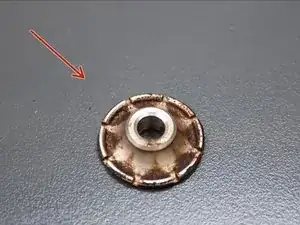
    • Entferne die kleine Verteilerplatte aus Edelstahl.

  5. vIruT1mMrwNlUIb1
    vIruT1mMrwNlUIb1
    hBJB5OFZPXdhQIBu
    Qu41oM1CHr6E6aRx
    • Weiche die schmutzige Verteilerplatte mit heißem Wasser und Kaffeefettlöser ein. Bürste sie anschließend gut ab.

    • Achte insbesondere darauf, dass die Kanäle auf der Rückseite sauber sind.

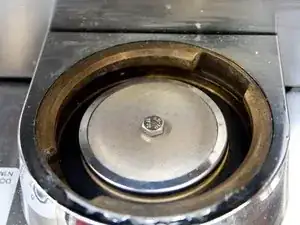
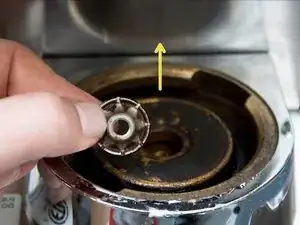
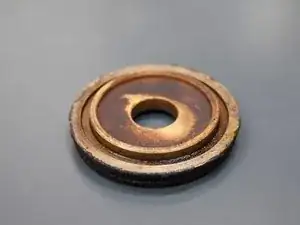
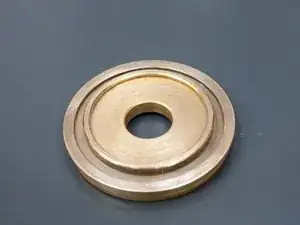
    • Bei Version 3 musst du auch die Messingscheibe entfernen. Hebe sie einfach heraus. Wenn sie klemmt, löse sie sehr behutsam mit einer geeigneten Zange. Das Messing darf nicht beschädigt werden. Bei Version 1 und 2 kann die Scheibe nicht enfernt werden.

    • In Bild 3 ist die Messingscheibe nach dem Ausbau zu sehen. Weiche sie in heißem Wasser und Kaffeefettlöser ein. Bürste sie dann mit einer Stahlbürste ab. Beseitige alle Spuren von Kaffeefett.

    All parts on Step 5 are easily cleaned with liquid based lemon cleaner, or lemon juice!

    Same for Step 7 and Step 8.

    Little to no brushing afterwards ;)

    Ric Vieira -

  6. Ps2FxZkLJ1dqyPNM
    Ps2FxZkLJ1dqyPNM
    JSDtmvUjw3ublYDd
    3Q11QrVI1ddUhBVX
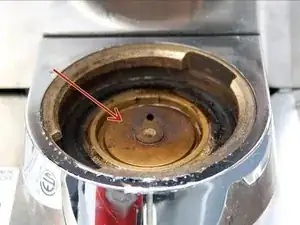
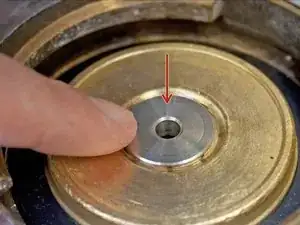
    • Bild 1 zeigt die Gruppe von Version 3 mit ausgebauter Messingscheibe.

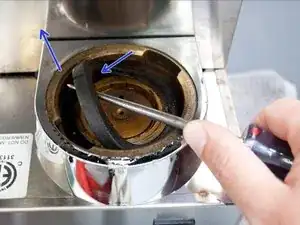
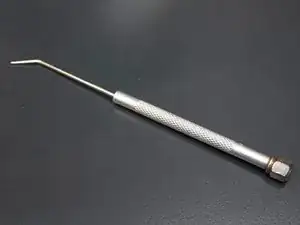
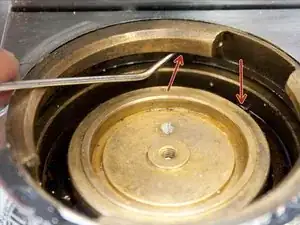
    • Zum Entfernen der Dichtung an der Gruppe eignet sich ein spitzes Werkzeug, z.B. eine Ahle gut.

    • Heble damit die Dichtung der Gruppe hoch.

    • Sei geduldig und verletzte dich nicht an der Spitze.

  7. 6aTynf1Pmq1NFZp1
    6aTynf1Pmq1NFZp1
    YEWPvkolflqSb1EI
    h1QTON6s2AVTQiut
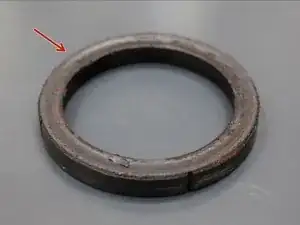
    • Wenn du Glück hast, ist die Dichtung nach dem Ausbau noch in Ordnung. Sie kann aber auch steinhart und schwer zu entfernen sein.

    • Eventuell musst du die Dichtung sogar mit einem Hammer und der Ahle in kleine Stücke zerteilen, bevor du sie heraus bekommst.

    • Sei vorsichtig und beschädige dabei nicht den Messingbrühkopf.

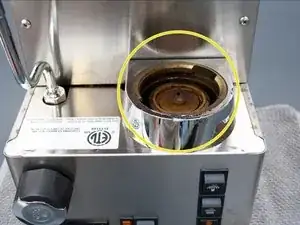
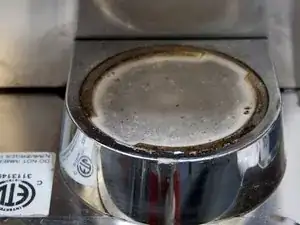
    • Reinige anschließend den Boden des Brühkopfes.

    • Es ist gut, etwas Kaffeefettlöser auf den Boden des Brühkopfes zu geben.

  8. InECseAjVjLEdet5
    InECseAjVjLEdet5
    UpE6Ya2BFTZr2kgm
    txLgXfJJgnLIVJhI
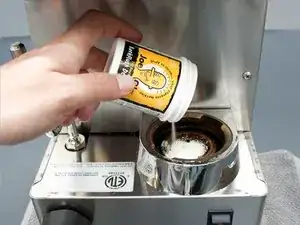
    • Gieße etwas heißes Wasser auf den Brühkopf und lasse ihn zehn Minuten lang einweichen.

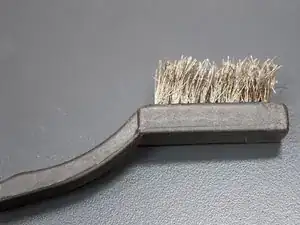
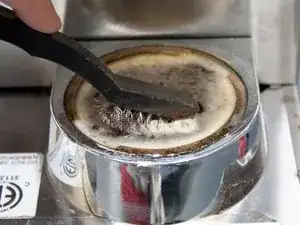
    • Nimm eine Bürste mit Messingborsten. Bürste die Oberfläche des Brühkopfes damit ab.

    • Trockne den Brühkopf mit Küchenpapier ab. Er kann ruhig noch etwas feucht sein.

    Grouphead on Step 8 is easily cleaned with liquid based lemon cleaner, or lemon juice!

    Same for Step 5 and Step 7.

    Little to no brushing afterwards ;)

    Ric Vieira -

  9. KMCkDAlH1OHgfWAW
    KMCkDAlH1OHgfWAW
    5YSGyHmVM6MbbYR6
    EY4P6NRX2bxGYGCg
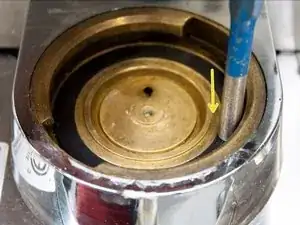
    • Nimm ein spitzes Werkzeug, wie in Bild 1 gezeigt. Reinige damit die Fugen im Inneren des Brühkopfes.

    • Reinige alle Oberflächen. Achte zuerst auf die Rille oben, die mit dem Siebtträger in Kontakt kommt, damit er wieder gut abdichtet.

    • Reinige dann die Oberfläche am Boden des Brühkopfes. Wenn sie sauber ist, sitzt die Dichtung gut.

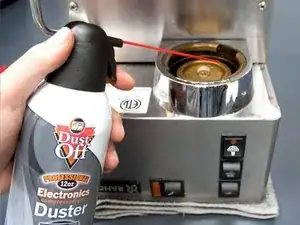
    • Entferne die Schmutzreste mit Druckluft.

    • Wenn du Version 3 hast, dann baue die Messingscheibe erst ein, nachdem du die Dichtung montiert hast.

    Many thanks for this. On my Rancilio Silvia the porta filter no longer turns all the way in the grouphead (that is perpendicular to the machine). I’ve checked the grouphead and it’s clean.

    Robert -

  10. YWYDrDBTNaFxGxIC
    YWYDrDBTNaFxGxIC
    2pqMUmSQ13mrVVYi
    UoQWKPC5e4Edn4As
    • Besorge dir die Ersatzdichtung.

    • Achte darauf, dass es eine Originaldichtung von Rancilio ist, andere passen eventuell nicht. Dadurch können viele Probleme entstehen.

    • Setze die Dichtung mit dem Aufdruck nach unten in den Brühkopf ein. Drücke sie mit einem geeigneten Werkzeug, z.B. einem 5 mm Durchschlag vorsichtig hinein. Achte darauf, dass die Dichtung an der gesamten Oberfläche bündig abschließt.

    • Wenn sie trotzdem nicht richtig bündig passt, ist wahrscheinlich noch etwas Schmutz im Brühkopf und du musst noch besser reinigen.

    • Wenn du die Version 3 hast, setze die Messingplatte wieder ein.

    Thank you for a very nice guide.

    I inserted the gasket with the lettering . Should that be an issue?

    cw.stenberg -

    A bit confusing here… on Step 10, it says gasket "lettering down”, but the machine is up side down, so which way is down??

    And on Step 6, the gasket is opposite from what you mention on Step 10!?

    Ric Vieira -

  11. SdULCgucElX6Xyi5
    SdULCgucElX6Xyi5
    4DujAmnoVCOZMMKy
    wRDLQGRJkN31HnGf
    • Setze anschließend die Verteilerplatte aus Edelstahl wieder ein.

    • Die Seite mit den Kanälen für das Wasser muss nach unten zeigen. Wenn die Platte richtig eingebaut ist, siehst du die Kanäle deswegen nicht mehr.

    • Baue das neue Sieb ein.

    • Es wird dringend empfohlen, ein neues Sieb zu verwenden. Das Sieb ist zweilagig und kann deswegen nicht perfekt gereinigt werden.

    • Drehe die neue Schraube mit einem 8 mm Schlüssel ein, bis sie gut sitzt. Das Sieb sollte sich ein wenig zum Brühkopf hin biegen, wenn du die Schraube festziehst.

    • Glückwunsch, du hast die Reparatur geschafft.

Abschluss

Nun bist du fast fertig. Drehe die Maschine um. Ziehe die Schläuche heraus. Setze den Wassertank mit der Öffnung für die Schläuche an der linken Seite ein. Führe die Schläuche in den Tank ein. Fülle Wasser ein und lege den Deckel auf. Installiere die Abtropfschale und die Tassenablage.

Nun kannst du deinen ersten Espresso zubereiten.

Samuel Kanenwisher

Mitglied seit: 12/08/12

1260 Reputation

19 Kommentare

Thanks Sam for your very thorough instructions. My machine has been spraying coffee all over creation for a couple years now and I just recently figured out the reason why. I ordered the parts from Amazon and Seattle Coffeegear and could not wait to install. I've got to let it sit overnight so the new rubber feet I put on it take hold but, first thing tomorrow, I'll be firing it up and praying for "no spray."

You have really done a great public service by posting this blog and I thank you for that.

I don't know what the 30 points are all about but I give you all that and more.

thanks

Ranny

ranny -

Hello Ranny, thank you for your comments. I am happy to give other people the tools to repair their machines and enjoy great cups of espresso again :) -Sam

Samuel Kanenwisher -

Just wanted to say thanks and that a great job was done with these instructions. If you're handy at all these instructions will give you great confidence before starting the project.

Doug

revdougl -

This was so helpful! I had a hard time removing the old screen from the brass disc but I persevered. The old gasket came out easily- I screwed a small wood screw into it and used the screw as a handle to pull it out which worked great.

I did a thorough cleaning and made sure the writing side of the gasket was pointing downward, and replaced the screen, but now there's a bit of leaking. I took it all apart again and double checked everything, used the portafilter to help wedge in the gasket (again), tightened the screw on the screen, but it's still leaking a little bit.

Help?!

buffywiskers -

Often the issues related to wear on the ears of the portafilter. If the chrome is worn away and you can see brass. Then the portafilter has developed a wear pattern. Can you send pictures showing the bottom ears on the portafilter?

Samuel Kanenwisher -

Hi, thanks but I sorted it out. For some reason I now need to turn the handle to 5 o'clock with this new gasket. With the old gasket I only needed to turn it to 6 or 7. (FYI chrome is intact)

buffywiskers -

Very good instruction. Especially the hint from buffywiker on how to pull out the gasket by skrewing a screw as a handle in the old gasket, was very much appreciated.

By the way the angle to which you can turn the handle is mostly depending on the thickness of the gasket. There it seems, that you can buy a lot gaskets with some deviation. This is depending on whether it is an original Ranchilio part or a me-too part.

Oliver Kortmann -

Thanks Sam!

Good instruction.

Denes Attila -

Hi Sam. Great instructions. Thanks!

After I replaced the gasket I began to have water flow problems. It is coming out so slowly creating a terrible shot.

Erin

Erin -

I am not sure why you would have water flow problems after replacing the gasket. I have to start with some questions that might seem a little silly. Yet, many people have resolved their slow water flow issues with these steps:

A. No water flow problems before replacing the gasket?

B. Did you replace the screen too?

C. Have you tried backflushing the machine with coffee cleaning detergent?

D. Did you change the grind setting?

Samuel Kanenwisher -

Hello,

I am noticing one problem regarding Rancilio Silvia steam pipe.

It is somehow stuck, and water doesn’t come to steaming point, it starts leaking from steam pipe,

I bought a whole new set of steam pipe, but it doesn’t help,

can someone know a solution?

would be great help.

bharati581 -

Hi there.. thanks for posting this, I learned a lot.

A friend just gave me an old Silvia Rancilio but the milk frother, and the steamer aren't working. Is there a fix-it instruction somewhere?

Juli Dyulia -

We don’t have one for a steamer not working. Did you take the steam tip off and see if it works? Does hot water come out of the steam wand?

Samuel Kanenwisher -

Regarding the lettering on the gasket. You say lettering down. Is that you say lettering against the group Head so it is down when the machine is upside down or facing down when the machine is right side up. I'm sure you mean down as in technically facing up when the machine is right side up but want to make sure. It would make sense that you want a fully smooth surface aka no writing when inserting the portafilter.

Clayton Erickson -

Hello, the lettering should „touch“ the group head so you are not able to read if its placed into it.

My old gasket was mounted with invisible lettering too.

Anagapi -

this was a brilliant guide. i had to reuse the old screw as for some reason the new one was slightly too short. thanks

Daniel Wolman -

I have these 3 parts stuck together, i was wondering what could be done to those things apart? I have tried soaking them in hot water, cafiza but the shower screen is literally molded into the group diffuser spacer.

BREW GROUP DIFFUSER SPACER

BREW GROUP HEAD JET BREAKER 25-139-001

SHOWER SCREEN - RA40200005

the last thing i want to do is buy the parts unless it’s damaged and needs to be replaced. I was wondering can you use acid like citric acid instead of vinegar as i hate the smell.

Samuel Kim -

The last resort is to burn them with a blow torch.

Samuel Kanenwisher -

Hello, I was wondering if anybody could tell me how to take apart the black handle from my friend Rancilio silva espresso machine. The metal part has come Unscrewed, and will easily slid off.

thanks

thomas munro Sr. -