Einleitung
Diese Anleitung zeigt dir, wie du die Trackpad Einheit austauschen kannst. Die Einheit besteht aus dem Trackpad und dem Haptikmotor (haptic engine).
-
-
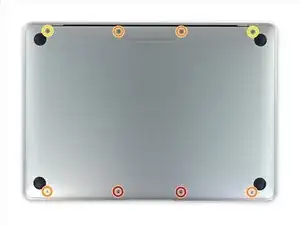
Entferne folgende acht Schrauben, mit denen das untere Gehäuse befestigt ist:
-
Zwei 1,8 mm Pentalobe P5 Schrauben
-
Vier 2,9 mm Pentalobe P5 Schrauben
-
Zwei 6,1 mm Pentalobe P5 Schrauben
-
-
-
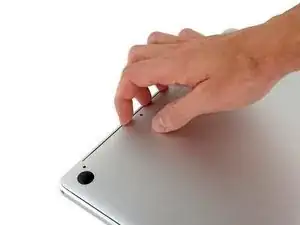
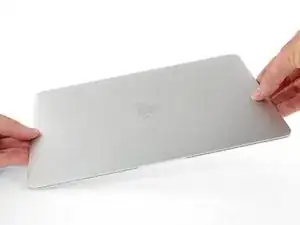
Zwänge deine Finger in den Spalt zwischen dem oberen und dem unteren Gehäuse. Beginne an der Rückseite des MacBooks zwischen den Scharnieren.
-
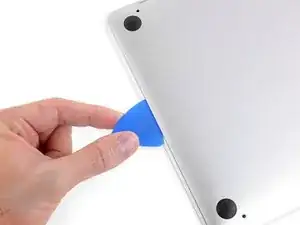
Fasse das untere Gehäuse fest an und hebe es gleichmäßig hoch, bis es sich vom oberen Gehäuse löst.
-
-
-
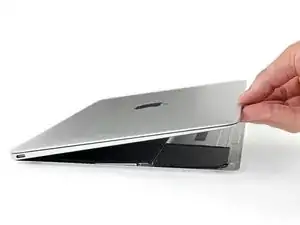
Halte das untere Gehäuse gut fest und drehe das MacBook vorsichtig um, sodass das Apple Logo nach oben zeigt.
-
-
-
Hebe das obere Gehäuse und das Display zusammen von der Vorderkante her nach oben an, bis es mit einem Winkel von etwa 45° steht.
-
-
-
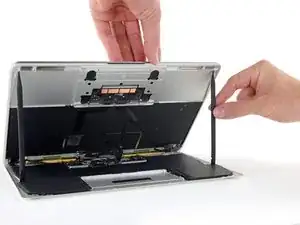
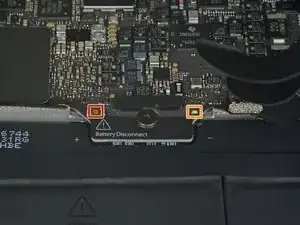
Drücke mit dem flachen Ende des Spudgers die goldfarbene "battery disconnect" Taste und halte sie fest.
-
Wenn die Einschalt-LED aufleuchtet, dann halte die Taste weiterhin gedrückt, bis die LED erlöscht. Das kann bis zu 10 Sekunden lang dauern.
-
Wenn die LED nicht aufleuchtet, dann lasse die Taste nach 5-10 Sekunden los. Drücke und halte sie für weitere 5-10 Sekunden und lasse los. Drücke und halte sie zum Abschluss erneut für 5-10 Sekunden und lasse los.
-
-
-
Hebe die Vorderkante hoch, bis das untere Gehäuse mit einem Winkel von etwa 45° geöffnet ist.
-
-
-
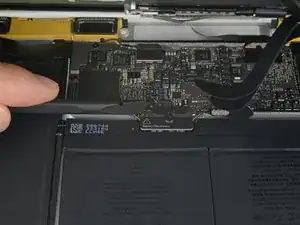
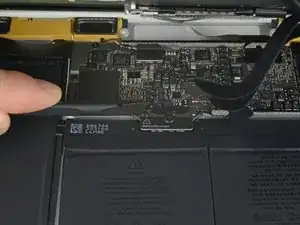
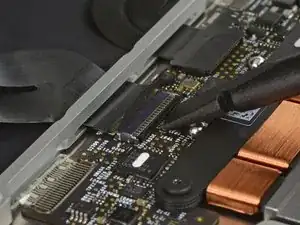
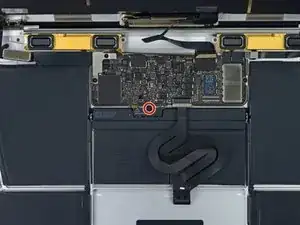
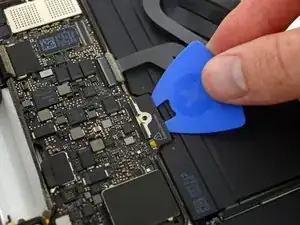
Klappe vorsichtig den Sicherungsbügel am ZIF Verbinder des Trackpadkabels mit einem Spudger hoch.
-
-
-
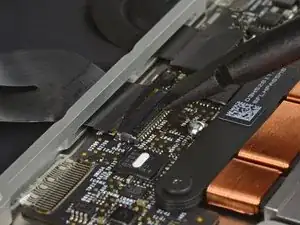
Ziehe das Flachbandkabel des Trackpads vorsichtig durch den Schlitz im Rahmen vom Trackpad ab.
-
-
-
Schließe das MacBook sorgfältig und drehe es wieder um, so dass das Apple Logo nach oben zeigt.
-
Klappe das obere Gehäuse/Display Einheit etwa rechtwinklig auf und stütze es an einem stabilen Gegenstand, so dass du es nicht festhalten brauchst.
-
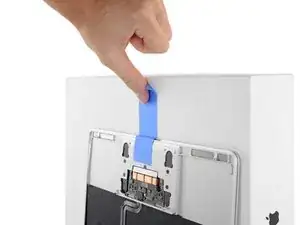
Klebe das obere Gehäuse mit einem Klebeband in der Nähe des Trackpads fest, so dass es sich nicht versehentlich bewegen kann.
-
-
-
Entferne die einzelne 2,9 mm Torx T5 Schraube, mit der der Akkuanschluss am Logic Board befestigt ist.
-
-
-
Als zusätzliche Sicherheitsmaßnahme kannst du den Akku physisch trennen, indem du ein Akkuisolierstück zwischen Logic Board und Akkuanschluss einsetzt.
-
-
-
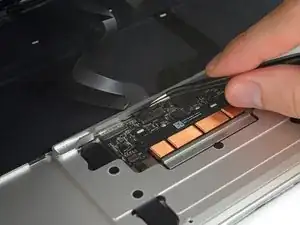
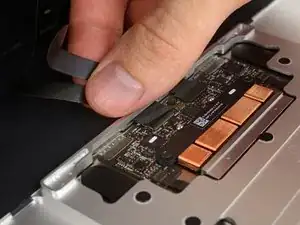
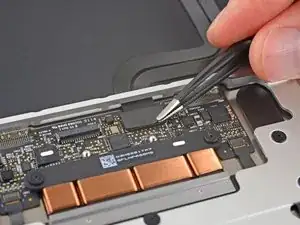
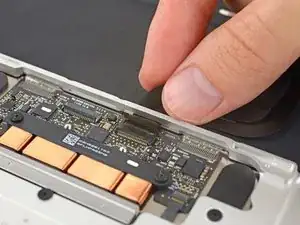
Entferne mit einer Pinzette das Klebeband vom Stecker des Flachbandkabels zur Tastatur auf dem Trackpad.
-
-
-
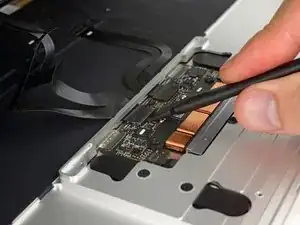
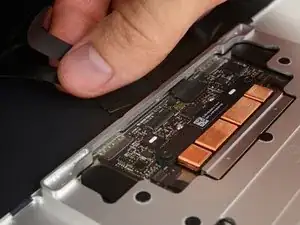
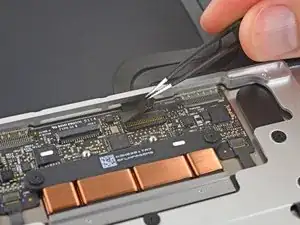
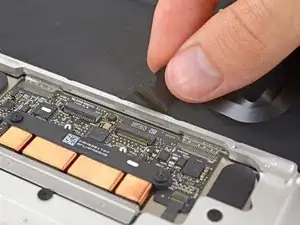
Klappe mit dem Spudger den Sicherungsbügel am ZIF Verbinder des Flachbandkabels zur Tastatur hoch.
-
-
-
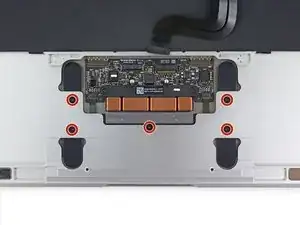
Entferne die fünf 2,5 mm Torx T3 Schrauben, mit denen das Trackpad am Gehäuse befestigt ist.
-
-
-
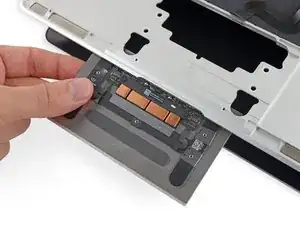
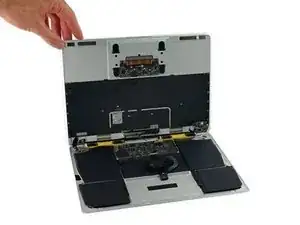
Klappe das Display ein wenig auf, so dass die Trackpad Einheit vom oberen Gehäuse frei kommt und entferne die Trackpad Einheit.
-


Um dein Gerät wieder zusammenzusetzen, folge den Schritten in umgekehrter Reihenfolge.

IMPORTANT. You’re not removing the bottom, yet. This step is solely to separate the panel from its clips, permitting inside access.
Chris Leeds -
The screws go in tangent to the curve of the case. If you aren’t used to handling small hardware try turning the screw counterclockwise while you feel for the hole until you feel it drop, that means the threads have aligned. It takes only light finger torque when they are threaded correctly
abscate -
Can you please show a picture of all the screws, and where they go? My table got bumped and all the screws stuck to the lid magnet on the MacBook. Gaaaah! Thank you!
TwiddledUp -
A few comments before you start, from me just after I finished.
1. The "adhesive remover" is acetone. Handle it as you would acetone. I'm somewhat annoyed at iFixit that they treat us like kids. Tell us what things are and why they are dangerous.
2. There are two ways to do this removal. One where you remove the logic board, and one where you don't. The instructions here are for removing the board. If you don't remove it, I think the danger is that you damage it while removing the battery, either because of force involved, or that you platter some of the acetone on it. The danger if you do remove it is that it involves removing many very fragile cables. You will surely damage some, the question is only if you damage something important. So take a choice, neither is very good.
(i'll continue below)
Michael Lachmann Tamarlin -
3. When you get to the battery removal step, you are supposed to just put "a few drops of ACETONE", and let them act for 2-3 minutes. That did nothing in my case. I can't give you very good advice on how to do it well, since I didn't. But I drowned it in acetone, and let it act for much longer, and it still was very hard to remove. I think I damaged a battery. Lucky that it was totally empty. I would also prepare another pair of gloves -- they get covered in disolved glue, which the becomes sticky again.
4. When inserting the battery, take especially care to align the hole in the board of the battery with the round screw hole. If these don't align, you won't be able to close the computer.
5. I wish they did more explicit reverse instructions, especially on some of the steps, since some don't reverse very cleanly. Check this video for some of those: https://www.youtube.com/watch?v=FKbb_el6....
6. You don't need to reverse the step of pressing the gold button! After installing the battery, it should work.
Michael Lachmann Tamarlin -
Is it necessary to REMOVE the battery if I’m just replacing the screen?
Jeff Rutkowski -