Einleitung

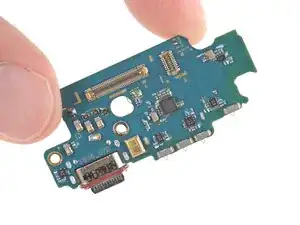
Follow this guide to replace the USB-C board (aka daughterboard or sub board) in your Samsung Galaxy S25 smartphone.

Before starting this repair, try cleaning the port and see if it fixes your problem.

Note: You'll need replacement back cover adhesive to complete this repair.

Note: The USB-C port and SIM reader are soldered to the daughterboard, so replacing either of these parts requires replacing the entire board.

If your device isn't charging properly, disconnects unexpectedly, or your USB-C cable feels loose when plugged in, you may need to replace the USB-C board.

Some photos in this guide are from a different model and may contain slight visual discrepancies, but they won't affect the procedure.

  1. AowUXbwWpTFAARTa
    AowUXbwWpTFAARTa
    RuC3Ueg4LHvJ4nEN
    • Let your Galaxy's battery drain below 25% before starting this repair—a charged lithium‑ion battery may catch fire if damaged.

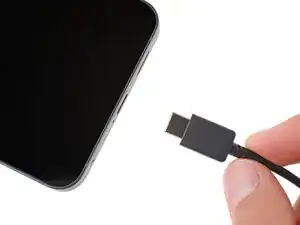
    • Unplug all cables from your phone.

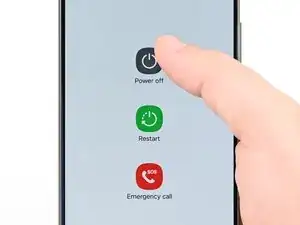
    • Completely power off your phone by holding the side key and volume down button and selecting Power off.

  2. g5DtXE6ncrCBOjjC
    g5DtXE6ncrCBOjjC
    GQPdAelUdnUj6ydV
    NLnLlhVj6dUlU1V1
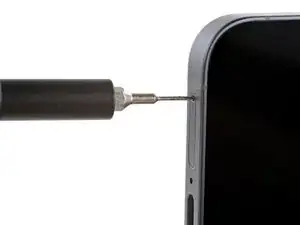
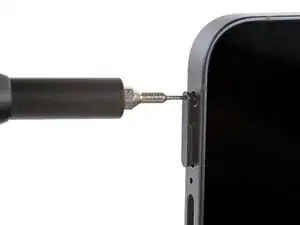
    • Firmly press a SIM eject tool, bit, or straightened paper clip into the SIM card tray hole on the bottom edge of your phone until the tray ejects.

    • A small mic hole is next to the SIM tray—don't confuse the two!

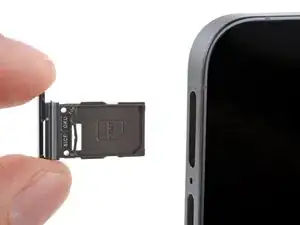
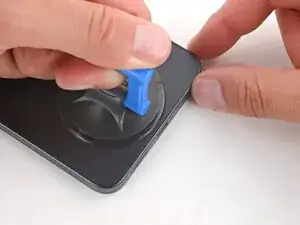
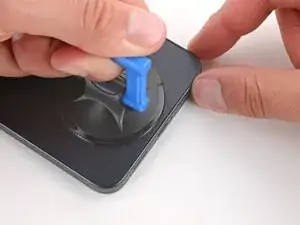
    • Remove the SIM card tray.

  3. iNTFtoTsbCSJTVB6
    iNTFtoTsbCSJTVB6
    1yAOTBpMEUpwOMD5
    tVA2Due3Eee4PFrY
    • Glass shards can complicate disassembly—or worse, cause injury. If your phone's back glass is cracked, follow this step.

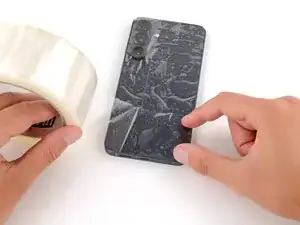
    • Apply strips of packing tape to the cracked glass until it's completely covered—this will help keep the glass contained and allow the suction cup to stick.

    • Make sure there's a single strip (not overlapping) of tape across the bottom edge, big enough for a suction cup to fit on.

    • Only cover the glass itself—don't stick any tape to the frame.

    • Consider wearing safety glasses to protect your eyes from any glass shaken free during the repair.

  4. Jr1MCjRhkmRHOfB6
    • Adhesive secures the back cover to the frame. Heating the cover softens the adhesive, making it easier to separate.

    • Heat an iOpener and lay it on the bottom edge of the back cover for two minutes.

    • Alternatively, you can use a hair dryer or heat gun to heat the cover.

    • Improper use of a heat gun can destroy the display and/or battery—follow the linked instructions carefully.

  5. WvdWsU1ZhQcwp1cK
    WvdWsU1ZhQcwp1cK
    L3UBAsluWwbwN6MC
    5WdFgNQywkJqrNZh
    • While the back cover heats, note the following about its adhesive:

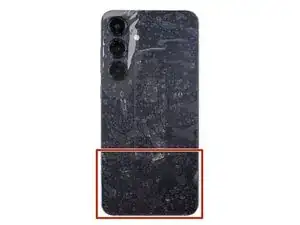
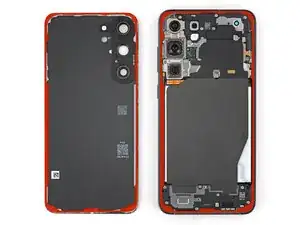
    • The cover is secured with adhesive around the perimeter of the frame. Use this picture as a reference while you separate the adhesive.

    • Only insert your tool slightly under the cover near the cameras to avoid damaging them.

  6. 4TyqHGkgmScNdvkG
    4TyqHGkgmScNdvkG
    SLqyq1MBWANBRHt5
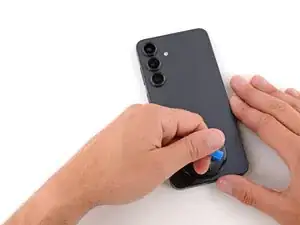
    • Apply a suction handle to the center of the back cover's bottom edge, as close to the edge as possible.

  7. iYLXZFZZijU5wtAh
    iYLXZFZZijU5wtAh
    HEZFCVnn2NlhL4In
    1vsHNrq2xfLnf1ML
    • Pull up on the suction handle with strong, steady force until a gap forms between the back cover and frame.

    • Use the fingers of your lifting hand to hold the phone down, or steady the frame with your free hand—be careful, your phone may be hot.

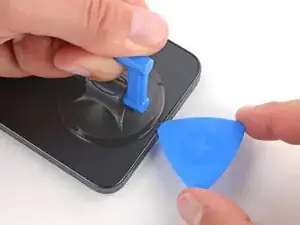
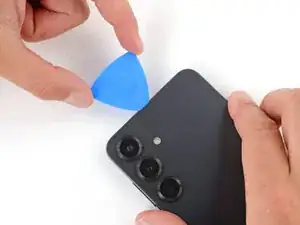
    • Insert the tip of an opening pick into the gap.

  8. POptgfLmW2vSvb3w
    POptgfLmW2vSvb3w
    wRCuVZQTyEYnxGB2
    UDfTJJtLEoi6DDhB
    • If the back cover feels stuck at any point when separating the adhesive, apply heat to the area and try again.

    • Slide the opening pick along the bottom edge to separate the adhesive.

  9. GqG5S4AWmWwkZOQN
    GqG5S4AWmWwkZOQN
    DknrCcb4i1fGJBen
    v2roKFOukWMWTuAT
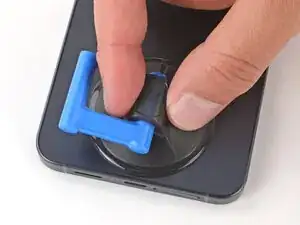
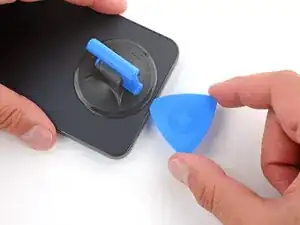
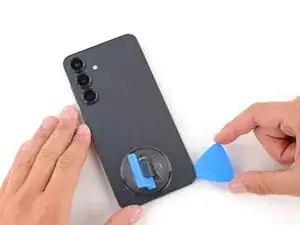
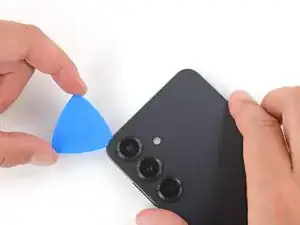
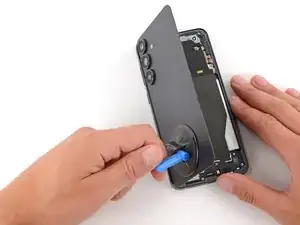
    • Slide the opening pick around the bottom right corner and up the right edge to separate the adhesive.

  10. LB4h6MU1XjDiXTd4
    LB4h6MU1XjDiXTd4
    LJYtSgb1tSbXEDQG
    uhZxN1INTaZuQWuf
    • In the next two steps, only insert the pick slightly (a few millimeters) near the cameras to avoid damaging them.

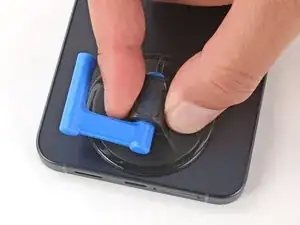
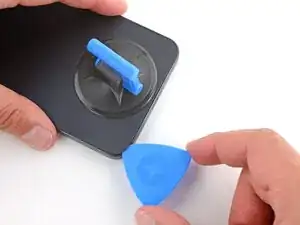
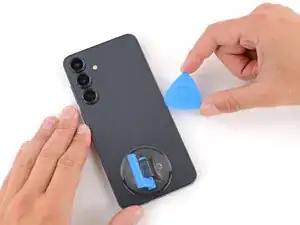
    • Slide the opening pick around the top right corner and along the top edge to separate the adhesive.

  11. 5OMDESAMT6fYkQpD
    5OMDESAMT6fYkQpD
    vmvlRnZkQg1UoJmN
    Idcf2tmfj3CVja6U
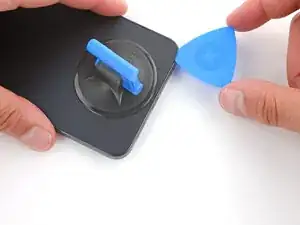
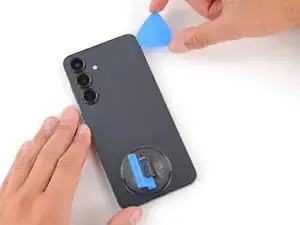
    • Slide the opening pick around the top left corner and down the left edge to separate the adhesive.

  12. VEGq6WerQFEAniOr
    VEGq6WerQFEAniOr
    6RHfFo31MwVp2JOc
    OHqUpWuXOoN4cNeD
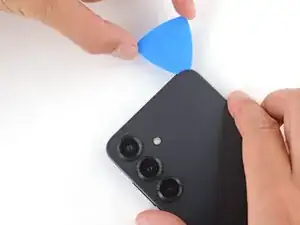
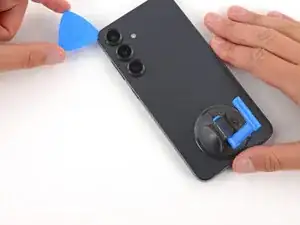
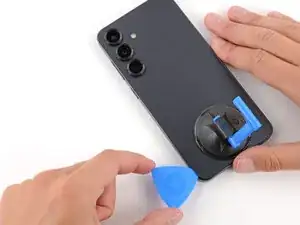
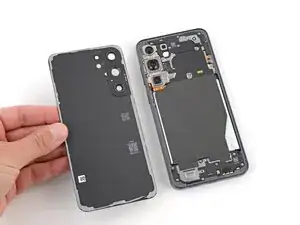
    • Use the suction handle to lift and remove the back cover.

    • If the cover still feels stuck, go back around the perimeter with an opening pick and separate any remaining adhesive.

    • During reassembly:

    • This is a good point to power on your phone and test all functions before sealing it up. Be sure to power your phone back down completely before you continue working.

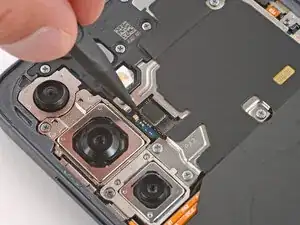
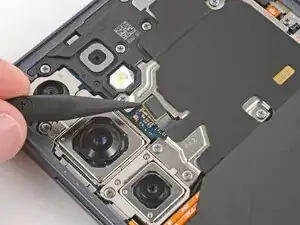
    • Check your rear cameras for any smudges and gently wipe them with a clean, lint–free cloth if necessary.

    • Your replacement back cover adhesive will be applied to either the frame or the back cover. Use cutouts and contours to see where it lines up best. If it matches the back cover, follow this guide. If it matches the frame, use this guide.

  13. ydFFkHTrijoPoVJZ
    ydFFkHTrijoPoVJZ
    poXxO23Dw2WDcyle
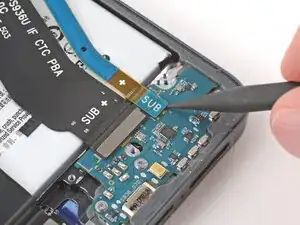
    • Use the point of a spudger to pry up and disconnect the wireless charging coil press connector.

  14. PfSte2Q4MNLDwEnu
    PfSte2Q4MNLDwEnu
    aQ6EsNVTyMF6FQBm
    1UOGE33KlFVDgFPH
    • Throughout this repair, keep track of each screw and make sure it goes back exactly where it came from to avoid damaging your phone.

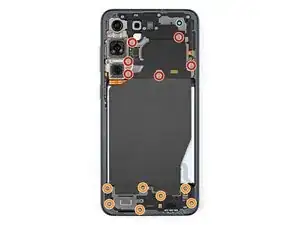
    • Use a Phillips screwdriver to remove the thirteen screws securing the wireless charging and loudspeaker assembly:

    • Six 3.5 mm‑long screws securing the wireless charging coil

    • Seven 3.5 mm‑long screws securing the loudspeaker

  15. ZdQ4pdmpwaX2KE2n
    ZdQ4pdmpwaX2KE2n
    IvKJu4jQymyhMePT
    wBdXDgifaAfR5eqF
    • Use the point of a spudger to pry up and lift the left side of the loudspeaker until it unclips.

    • During reassembly, press firmly around the perimeter of the loudspeaker to engage its clips.

  16. fZOZxU1heGInoGPK
    fZOZxU1heGInoGPK
    E2RnFmd6yQetLCcT
    • Use two hands to remove the wireless charging and loudspeaker assembly.

  17. fyBHiQUOjH65hVpO
    fyBHiQUOjH65hVpO
    gwCdP5VkpfkMBibH
    • Every press connector has a corresponding gold arrow on the board that shows the proper location to pry—nifty! Prying at the wrong location risks damaging the fragile surface‑mounted components on the board.

    • Use the point of a spudger to pry up and disconnect the battery press connector.

  18. RAtNYfmPAUQACRse
    RAtNYfmPAUQACRse
    JBsx4RhWBfjuDkhI
    oJARYDndONF4BHXS
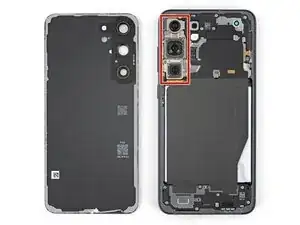
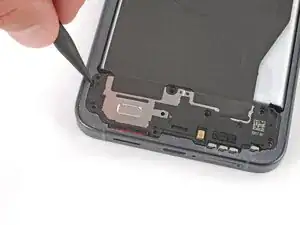
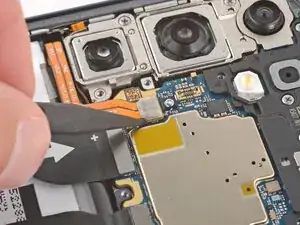
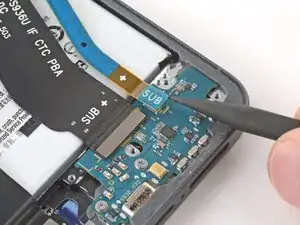
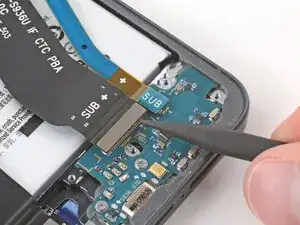
    • Use the point of a spudger to pry up and disconnect the two press connectors on the USB‑C board's top edge.

    • Optionally, you can disconnect the other ends of the cables from the motherboard and remove them for better access.

    • During reassembly, remember to reconnect the both ends of the cables if you removed them.

  19. mADp6OT226JlJwPy
    mADp6OT226JlJwPy
    LYBZF1TwFr36JGBm
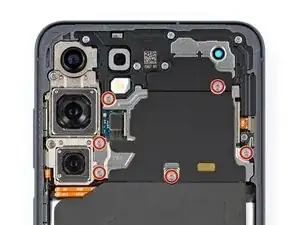
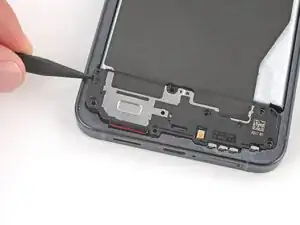
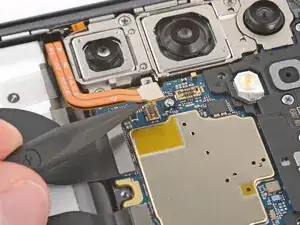
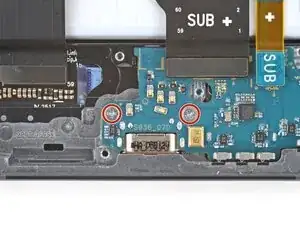
    • Use a Phillips screwdriver to remove the two 3.2 mm‑long screws securing the USB-C board.

  20. YZJTaEFt6WsaGbcH
    YZJTaEFt6WsaGbcH
    GuWlmhTvdgIagB65
    xAuYqLeO2EoO4TDb
    • Before trying to remove the board, make sure you've removed the SIM card tray.

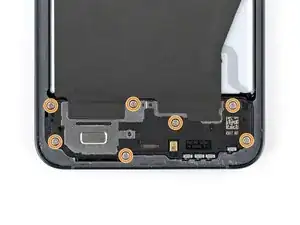
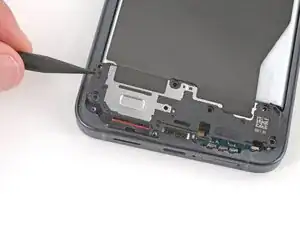
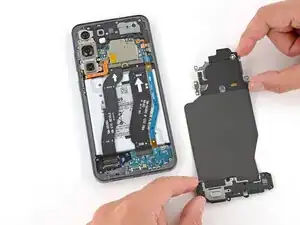
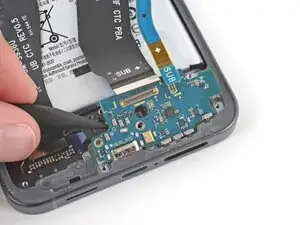
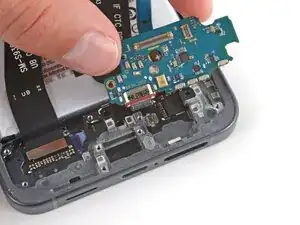
    • Insert the point of a spudger under the center of the USB-C board's left edge and gently lift until it unclips.

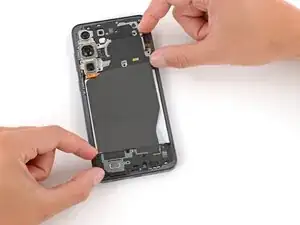
    • Remove the board, making sure the cables don't get snagged.

    • During reassembly:

    • Make sure both cables that connect to the USB‑C board are out of the way—you may need to hold them up as you insert the board.

    • Insert the USB‑C board at a slight downward angle, guiding the port into its recess. Make sure the push connectors on the bottom edge are properly seated against the frame.

    • With the board in place, press down firmly on the center of the top edge to clip the board in place.

    • Be careful not to press on any small, surface‑mounted components.

Abschluss

Compare your new replacement part to the original part—you may need to transfer remaining components or remove adhesive backings from the new part before you install it.

To reassemble your device, follow these instructions in reverse order.

Take your e-waste to an R2 or e-Stewards certified recycler.

Repair didn’t go as planned? Try some basic troubleshooting, or ask our Answers community for help.

Spencer Day

Mitglied seit: 14/09/22

170336 Reputation

0 Kommentare