Einleitung

Folge dieser Anleitung, um das Gehäuseunterteil des Dual Sense Controllers für die PlayStation 5 zu öffnen oder zu ersetzen.

  1. GTfsKVIR12U1WTFu
    GTfsKVIR12U1WTFu
    ePrmMhAFKkXiSkSe
    • Ziehe das Ladekabel ab und schalte deinen Controller aus, bevor du beginnst.

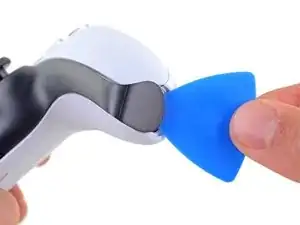
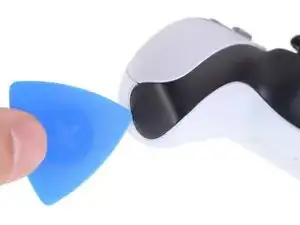
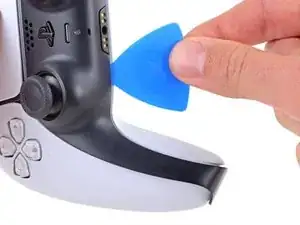
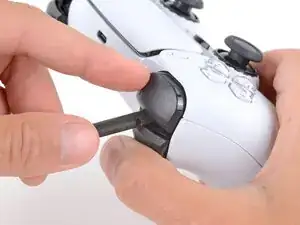
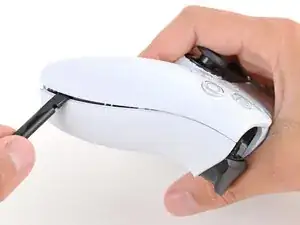
    • Stecke ein Plektrum unter die untere rechte Ecke der Abdeckung, um die Clips zu lösen, mit denen sie befestigt ist.

    What if i accidentally press the playstation button during the repair

    Elias -

    @elias30038 I just hit the circle button and that powered it back off. I think you mostly just need to be careful about it not turning on once you get the electronics exposed at the end.

    Alex B -

  2. Rjcu3KDZixCT6wVc
    Rjcu3KDZixCT6wVc
    PTiPbZOkfusF5DVG
    TciAM3EXVAG6wM3E
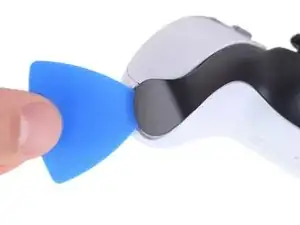
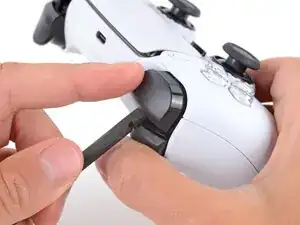
    • Schiebe das Plektrum an der unteren rechten Kante entlang, um die Clips zu lösen, die die Abdeckung festhalten.

  3. d5bIXVWhYD6NuHtO
    d5bIXVWhYD6NuHtO
    VnUyqAC2gatYKPwY
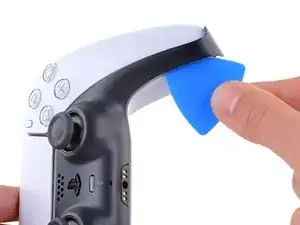
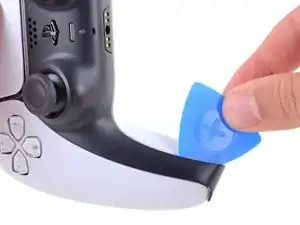
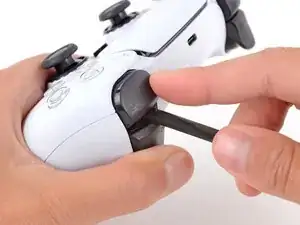
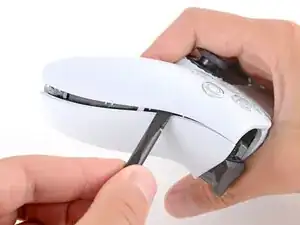
    • Stecke ein Plektrum unter die untere linke Ecke der Abdeckung, um die Clips zu lösen, mit denen sie befestigt ist.

  4. e5VLpDCSJZrCTHZr
    e5VLpDCSJZrCTHZr
    Vmn4XCtKxVVpYw1i
    uGRXgEGmKq2IKNvT
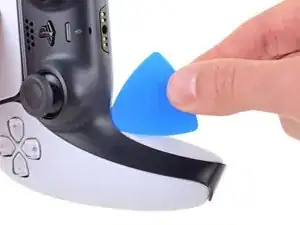
    • Schiebe das Plektrum an der unteren linken Kante entlang, um die Clips zu lösen, die die Abdeckung festhalten.

  5. bQYOnlI5CkoEepwG
    bQYOnlI5CkoEepwG
    FnfBCacKEAvKripH
    MIN3JWiK5kicsBCd
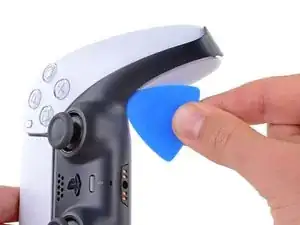
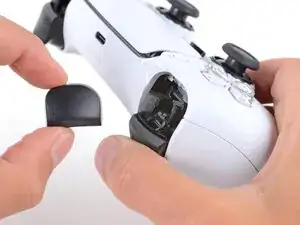
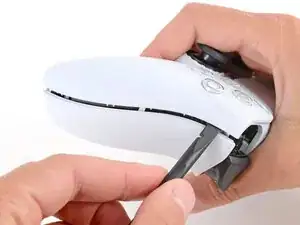
    • Hebe die Abdeckung mit deinen Fingern an der unteren Kante an, um die restlichen Clips zu lösen.

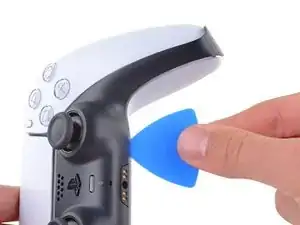
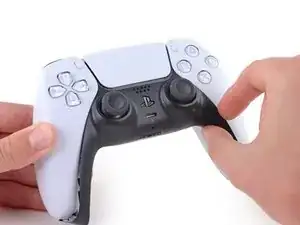
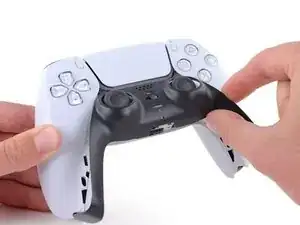
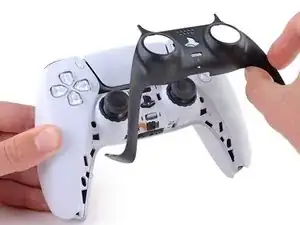
    • Hebe die Abdeckung über die Joysticks, um sie zu entfernen.

  6. bkMg2Eo6RVJBRwJE
    bkMg2Eo6RVJBRwJE
    FkNGiCeBPPV6tcfk
    Bsl3YMbrH2Q5nOTU
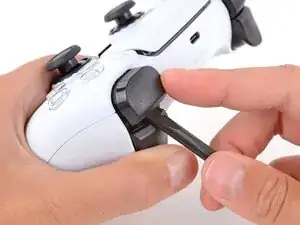
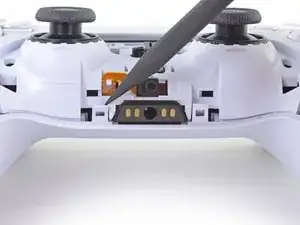
    • Fasse den Kontroller mit einer Hand und halte den linken Auslöser mit dem Daumen gedrückt.

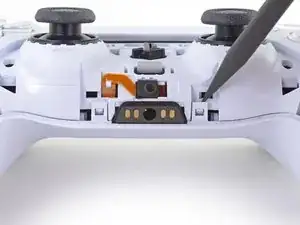
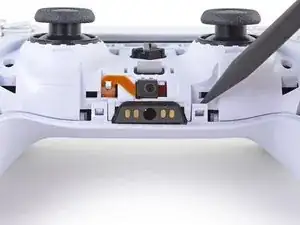
    • Setze das flache Ende des Spudgers mit der anderen Hand zwischen die L1 und L2 Tasten ein.

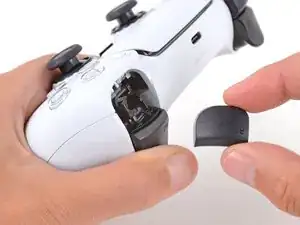
    • Heble die L1 Taste mit dem Spudger behutsam vom Kontroller weg, halte dabei den Finger darüber, damit die Taste nicht davonspringen kann.

    Tried prying from the front of the buttons as pictured and my spudger broke off in the gap. A video I watched showed them being pried off from the back (between the R1/R2 and L1/L2 buttons) which seemed much easier.

    Lora Singleton -

    Agree with Lora's comment above. I was able to use an old credit card to take L1/R1 out this way. I pressed down the L2/R2 button to create space to work in, then came in from between L1/L2 and R1/R2. It's easy to pop one of the outer corners first then you can work the credit card around the top and the rest falls out.

    darkstar448 -

    Man, if I'd just read the thumb part...

    caldugen -

    erst überlegen, und dann....

    Oliver -

  7. mNyBpuCPfU2EZivG
    mNyBpuCPfU2EZivG
    JR4mA33SaJbxJtnh
    mluWrqHlwtNLXBHV
    • Wiederhole den vorherigen Schritt für die R1 Taste.

    to save a few bucks, the L1 and R1 buttons can be removed without the use of the spudger tool by using any thin prying tool and just pry the buttons from the bottom instead of the top

    Alan Peng -

    What I didn't see addressed anywhere (here or in other similar articles) is that replacement R1 / L1 buttons can be differ enough to be un-usable depending on which model your ps5 controller is. The ones I ordered don't fit and now I can't find a way to be sure I get the right ones because few know there's even a difference.

    Walt Mather -

    Did you already figured it out? The version the we need yo use?, We are in the same situation here.

    Gerald Ross Rodriguez -

    Tried prying from the front of the buttons as pictured and my spudger broke off in the gap. A video I watched showed them being pried off from the back (between the R1/R2 and L1/L2 buttons) which seemed much easier.

    Lora Singleton -

  8. RTMdTIsvXlDMMLCE
    RTMdTIsvXlDMMLCE
    3xBGQ3AXp52YbXKM
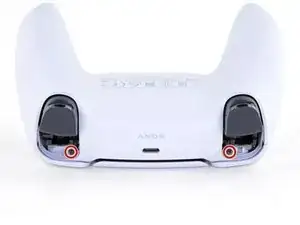
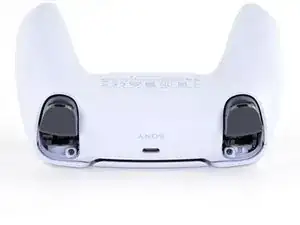
    • Entferne die beiden 6,4 mm Kreuzschlitzschrauben, die die unteren Enden des Gehäuseunterteils fixieren.

  9. rkti2BnvDAh1TREh
    rkti2BnvDAh1TREh
    YyonYJBpMSo32LBL
    • Entferne die beiden 6,4 mm Kreuzschlitzschrauben hinter den L1 und R1 Tasten.

  10. Xc1l4aJ6u6BGp5RP
    Xc1l4aJ6u6BGp5RP
    LjguKaIMMeWPUAgo
    dItxRHYBJkALcAlp
    • Sei sehr vorsichtig beim Ablösen der Clips an der Gehäuserückseite - sie sind sehr empfindlich und gehen leicht kaputt.

    • Löse die beiden Clips links und rechts von der Kopfhörerbuchse mit der Spitze des Spudgers.

  11. PlREPIyu3XjYsEEV
    PlREPIyu3XjYsEEV
    T3E2bKLKMWY3pBhh
    yS3JuXYoXheuDeji
    • Die Gehäuserückseite ist an der linken und rechten Seitenkante mit fest sitzenden Kunststoffclips befestigt.

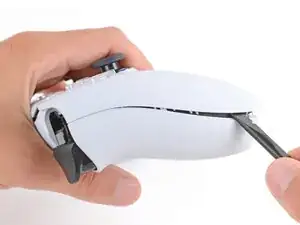
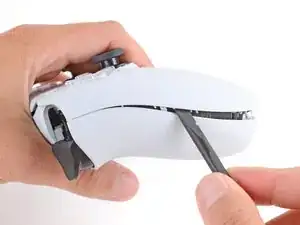
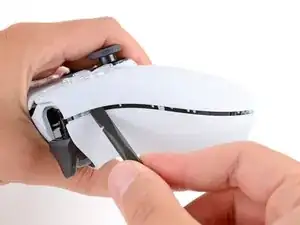
    • Setze einen Spudger mit dem flachen Ende zwischen das vordere und hintere Gehäuseteil ziemlich unten an der linken Kante.

    • Schiebe den Spudger an der linken Kante entlang und drücke die Gehäuseteile auseinander, um die Clips zu lösen.

    Be careful when prying into the shell because i damaged mine prying it open too forcefully

    Elias -

    there is two screws if its too hard to open it up at the end of it

    samaka -

  12. pBh4N2vrrxvn5CrT
    pBh4N2vrrxvn5CrT
    DxPhIgUVCJrqPf3d
    urUJIpGpfAOnvYlh
    • Löse auf gleiche Weise die Clips an der rechten Kante.

  13. 1oJ2lGLAwEZABd4K
    1oJ2lGLAwEZABd4K
    XcdcRmPl2iBBD1Y3
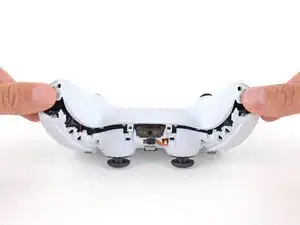
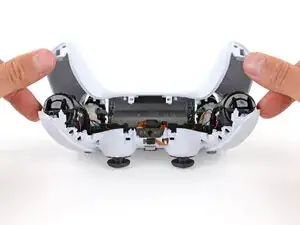
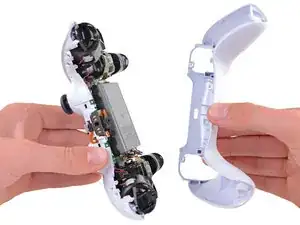
    • Lege den Kontroller mit der Rückseite nach oben, so dass die Joysticks auf der Arbeitsfläche liegen.

    • Halte den Kontroller mit den Fingern nach unten und hebe die Gehäuserückseite mit den Daumen nach oben ab.

  14. eRemnBXLmRUfuESX
    • Entferne das Gehäuseunterteil.

    There are four more clips/hooks hidden in the seams along the outer sides of the handles. If you pull open the controller as shown in this step, then you will shear off the two tiny clips which are right next to the R1 and L1 buttons.

    Therefore, you should first release those clips by prying the seams open sideways.

    I noticed this with the updated design of the controller, not sure whether the hooks are present on the first version.

    The hooks are not critical for the integrity of the controller as the two halves are held together by the screws hidden under the buttons. The damage does show that the controller has been taken apart.

    Nick -

    Thought I'd clarify: The clips next to the L1 and R1 are on the outer side from the L1 and R1 buttons, I'd suggest zooming in on the picture to see them. They're quite easy to break, but also easy to remove using the plastic spudger along the seam, bending the bottom cover outwards

    Franz Rolfsvaag -

    I am still strugling to find the clips. Could someone point them out in the image with a screen shot or something like that.

    aGingerThing -

    I keep getting stuck at this step too with the new DualSense CFI-ZCT1WA revision. The top and bottom shells seem like they are fused together next to L1/R1 but I can't seem to be able to find where these hidden clips are located. My controller is still in warranty so I don't want to break them in case I can't fix my issue.

    but also easy to remove using the plastic spudger along the seam, bending the bottom cover outwards

    I tried this but it seems that the you need a lot of force and I ended up bending the tip of my spudger. Are you sure it's not the top cover that you need to pry away? The bottom cover has a ridge to make sure it's under the top cover so it's not easy to bend outwards.

    @samomio I think there needs to be a step added for these new clips.

    robplease -

    Ok, not seeing a lot of motion on this request, so I've uploaded photos of the hooks to imgur.

    Here ya go: https://imgur.io/a/7NWmQi5

    Sean Murphy -

    Life save Sean. Appreciate the image.

    Vili -

    This guide really needs an update on this. I had a really hard time getting the forward clips to release even after referring to the comments above. Pretty sure I broke them in the end. No big deal but would be great if the iFixit experts could work out a good method for releasing them.

    Marcus Harvey -

    I finally figure it out!!

    The hidden clip is very tricky but once you understand how it works it is easy to remove.

    Use Sean's picture: https://imgur.io/a/7NWmQi5

    What sean is showing, is actually the bottom shell of the seam.

    To disassemble

    1. Use the flat side of the spudger, pry the bottom seam OUTWARDS near the R1/L1 button hole.

    2. (most important) While prying the bottom shell seam outwards, push your thumb on the upper shell and push outward as well (you can do this by applying pressure from the removed R1/L1 button hole towards the seam. And then it will disassemble automatically

    And that's it!

    Penn -

    updated instruction:

    I finally figure it out!!

    The hidden clip is very tricky but once you understand how it works it is easy to remove.

    Use Sean's picture: https://imgur.io/a/7NWmQi5

    What sean is showing, is actually the bottom shell of the seam.

    To disassemble

    1. Use the flat side of the spudger, pry the bottom seam OUTWARDS near the R1/L1 button hole.

    2. (most important) While prying the bottom shell seam outwards, hold your thumb on the upper shell as anchor and then use your other finger to pry the bottom edge of the controller up away from the shell. If you are doing the first step, then don't worry about breaking the clip, just force it open. And then it will disassemble automatically

    And that's it!

    Penn -

    Yes! Thanks a bunch Penn. That did the trick! Much appreciated

    Sean -

    I managed to do it just by pulling harder than what I was already doing. And I don't think I broke anything. So, for me at least, the technique described in this guide worked.

    Riedweg Guillaume -

    The video linked below clearly shows how to open the controllers with the extra clips near the L1/R1 areas.

    See a video here by How To X on YouTube... https://youtu.be/djIvRoclr_E?si=dKFpQCZe...

    Jason Z -

    I really struggled with releasing the rest of the back panel (close to the shoulder buttons.) What finally seemed to do the trick for me, was doing both sides at once with upward turning motion of the back panel with the shoulder buttons approximately at the axis. Trying to release just one side and then the other felt impossible without potentially breaking the case.

    dborba -

    This was what did it for me

    Matthew Williamson -

    这里没有写

    注意拆后盖的时候的用力方向

    l1 和 r1 附近有卡扣,用力方向不对会破坏这两个卡扣,我的已经破掉了。

    e而且这个卡扣附近有螺丝锁定,我怀疑是不是故意被设计来检测手柄有没有被拆开过。

    Mussa Ding -

Abschluss

Um dein Gerät wieder zusammenzubauen, folge den Schritten dieser Anleitung in umgekehrter Reihenfolge.

Entsorge deinen Elektromüll fachgerecht.

Lief die Reparatur nicht wie geplant? Probiere zunächst einige grundsätzliche Lösungen oder frage in unserem Forum nach Hilfe bei der Fehlersuche.

Sam Omiotek

Mitglied seit: 25/02/19

96268 Reputation

Ein Kommentar

Where do i get fitting rear cases?

Zoonk Dng -