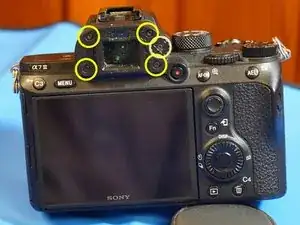
Einleitung

Diese Demontageanleitung ist umfassend genug, um den Verschlussmechanismus bei Bedarf auszutauschen.

Ich begann mit der Demontage, weil ich dachte, der Verschluss sei kaputt, aber als ich den Verschluss erreichte, fand ich eine lockere Schraube an der Sensorhalterung, die das Problem verursachte, indem sie den Verschluss einklemmte. Ich habe die Sensorhalterung repariert, die Kamera wieder zusammengebaut, und sie funktioniert. So habe ich $2000 gespart. Auf keinen Fall hätte ich eine so teure Kamera zerlegt, wenn sie funktioniert hätte.

Ich würde die Reparaturfähigkeit dieser Kamera als ziemlich hoch einstufen. Sehr wenig Klebstoff. Es werden einfache Kreuzschlitzschrauben verwendet. Ich habe eine Menge meiner vorhandenen iFixIt-Werkzeuge für die Anschlüsse usw. verwendet.

Ich habe die Demontage als schwierig empfunden, weil die Entfernung der Hauptplatine besonders viel Kabelsalat mit sich bringt.

  1. mCBGJ4gS2wnROuBE
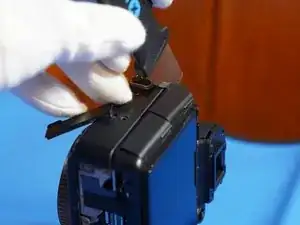
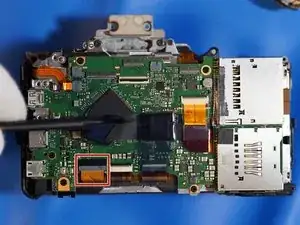
    • Entferne die SD-Karten und den Akku.

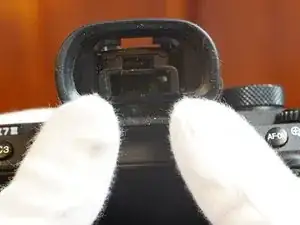
    • Die EVF-Abdeckung (die Abdeckung vom Elektronischen Sucher) lässt sich durch Aufklappen abnehmen, es gibt keine Schrauben.

  2. hhiWBtG1LR11DJan
    hhiWBtG1LR11DJan
    eTkYhDeKfvoIWmZN
    LUsZtFojmDpBwcit
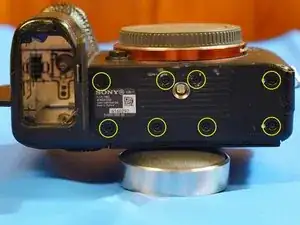
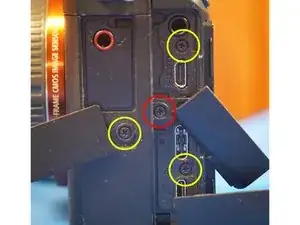
    • Drehe acht Schrauben an den Bodenplatten heraus und entferne sie. Die Metallabdeckungen werden beide von den gleichen Schrauben gehalten.

  3. ACYTliKLyianeMSD
    • Entferne die Schrauben des elektronischen Suchers, einschließlich der Schraube, mit der der Fokusknopf befestigt ist.

    • Nimm einen Spudger und halte damit den Fokusknopf fest, so dass er sich nicht drehen kann, während du die Schraube löst.

  4. nbJICFPCCuckAsrV
    nbJICFPCCuckAsrV
    mCTANWqFuLqoJ2aM
    AvWEaWESkgXDYxyY
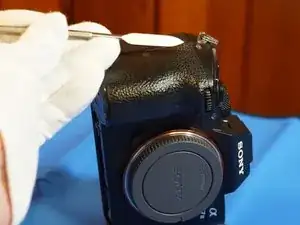
    • Um an die darunter liegenden Schrauben zu gelangen, muss der Gummigriff der Kamera entfernt werden. Gehe mit einem Spatel unter eine Ecke und ziehe ihn langsam ab.

  5. WQcMqFOSJLGVw2b2
    • Die Schraube mit dem roten Kreis ist kürzer. Beachte dies für den Wiedereinbau.

  6. YIAGYbEWGqGLHoBl
    YIAGYbEWGqGLHoBl
    nm4G2VPcRPVhQQiN
    • Du musst sind Schrauben entfernen, um die Kamerarückseite in einem Stück zu entfernen.

    • Beachte die silbernen Schrauben hinter dem Gummigriff.

  7. sVAJGOBFJedxN6Fh
    • Denke an die einzelne Schraube hinter dem Display. Diese wird benötigt, um die Kamerarückseite zu entfernen.

  8. k5U6VXD4KFBRN2gN
    k5U6VXD4KFBRN2gN
    v6EqZCUTDsGoiwjr
    • Die hintere Abdeckung lässt sich leicht aufhebeln. Wenn es schwer geht, überprüfe, ob noch Schrauben vergessen worden sind..

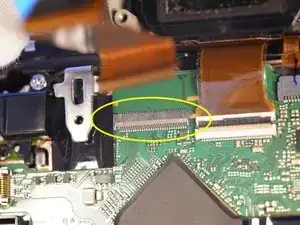
    • Es gibt nur ein Flachbandkabel, das die gesamte Rückseite verbindet und entfernt werden muss, wenn die Rückseite lose ist. Es handelt sich um einen ZIF-Anschluss. Zum Lösen musst du den Sicherungsbügel zur Oberkante der Kamera hin klappen.

  9. WxtHRFgLLM2LSO1Q
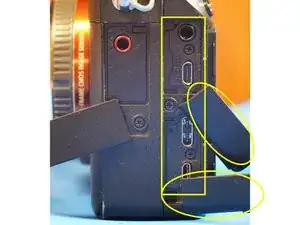
    • Beachte, dass an dieser Stelle die Anschlussabdeckungen (HDMI/Kopfhörer und USB-C/Multi) mit der Rückabdeckung abfallen. Beim Zusammenbau musst du zuerst die Abdeckungen einsetzen, bevor du die Rückseite wieder einbaust.

  10. qDZMeQOwPNZHvnTu
    qDZMeQOwPNZHvnTu
    LCXQSJJV5PXANVcj
    tuZJXnyBbdlbNXha
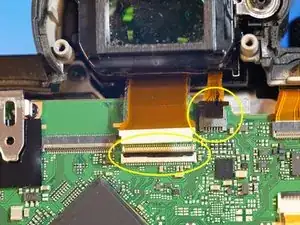
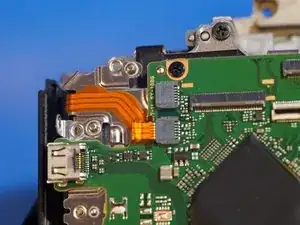
    • Es gibt 2 Anschlüsse für den EVF (Elektronischer Sucher).

    • Ein ZIF-Anschluss. Der Sicherheitsbügel muss nach unten geklappt werden.

    • Die andere hält einfach durch Reibung.

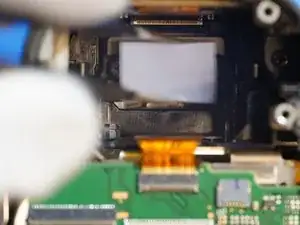
    • Der EVF (Elektronischer Sucher) kann vorsichtig herausgedrückt werden.

    • Entferne auch vorsichtig die Polsterung hinter dem EVF. Sei vorsichtig, denn sie kann brüchig sein.

  11. a5V33i1mUhYhZAa5
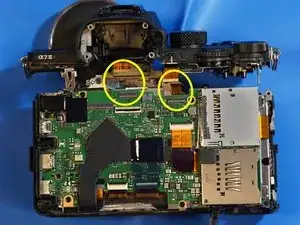
    • Klappe die Sicherungsbügel an den beiden ZIF-Anschlüssen nach oben und trenne die Kabel ab.

    The flip part of the zif connectors are very delicate and can only be operated a certain amount of times approximately around 20 actuations

    Airon Williams -

  12. HHgsR46yH2X1hsXH
    HHgsR46yH2X1hsXH
    S1UTaCSkCsZAcyue
    bieFWvtVHlMat3Ev
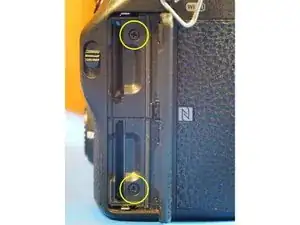
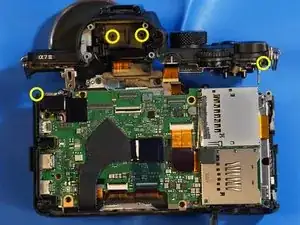
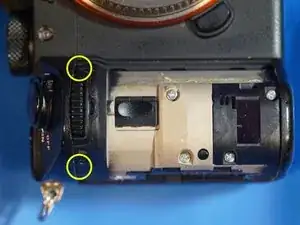
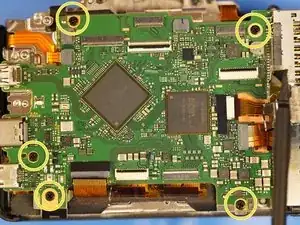
    • Die Oberseite ist mit insgesamt sieben Schrauben befestigt.

    • Eine Schraube befindet sich unter der Stelle, an der die Kamera mit a7iii beschriftet ist. Es ist die silberne Schraube auf der rechten Seite im Gegensatz zu der schwarzen Schraube auf der linken Seite in einer ähnlichen Position.

    • Zwei Schrauben sind hinter der Stelle, wo der EVF war, teilweise durch das Pad versteckt. Sie sind silbern, obwohl sie auf den Fotos schwarz aussehen.

    • Eine silberne Schraube befindet sich oben rechts auf der Rückseite, wo sich der Belichtungseinstellknopf befindet.

    • Eine schwarze Schraube befindet sich im Akkufach.

    • Zwei Schrauben befinden sich unter der Stelle, wo der Gummihandgriff war.

    Hallo zusammen, kann mir jemand sagen ob man den Micro USB Terminal tauschen kann?

    Dalmatino Crowebs -

  13. SGrePOeCRl3UjxrC
    • Wenn alle Schrauben entfernt und die Kabel abgetrennt sind, lässt sich die Oberseite der Kamera leicht abheben.

  14. sxw4YiIpiPIcHPMT
    sxw4YiIpiPIcHPMT
    y36mHCDslGGCF5Tl
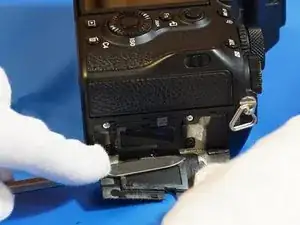
    • Halte eine kleine Tüte für die Teile der Kopfhörerbuchse bereit.

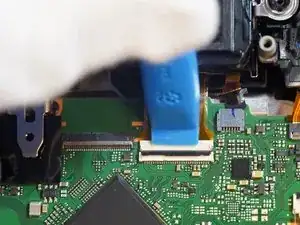
    • Ziehe das Isolierband von der Kopfhörerbuchse ab. Achte darauf, dass du dabei nicht das darunterliegende Flachbandkabel beschädigst.

    • Trenne den Stecker ab. Es gibt nur einen.

    • Entferne die beiden Schrauben, mit denen die Kopfhörerbuchse befestigt ist.

  15. wDPUUmaGPpxbIHuA
    wDPUUmaGPpxbIHuA
    qgDA2rvbfq1TYEAf
    xPYbfywyRZoVaylK
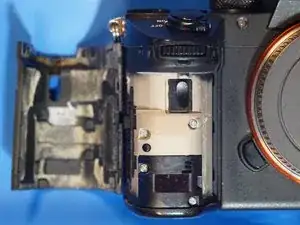
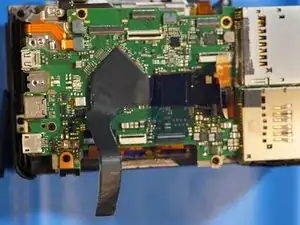
    • Um an einige Bauteile heranzukommen, muss das Antistatikband vorsichtig nach oben abgezogen werden. Wenn etwas im Weg steht, dann schneide es nicht ab, sondern biege es aus dem Weg.

  16. riSDMeP4gOXoitJM
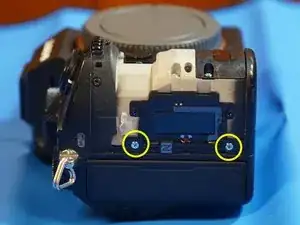
    • Den Akkuanschluss kannst du daran identifizieren, dass er nur zwei ziemlich breite Leitungen hat. Es handelt sich um einen ZIF-Anschluss, klappe den Sicherheitsbügel zur Unterseite der Kamera.

  17. jv1IJluAAcEqqJyi
    • Der Stecker des Bildstabilisators unter dem Antistatikband des Prozessors hält durch Reibung.

  18. WuWLOvwJTfIdJqcM
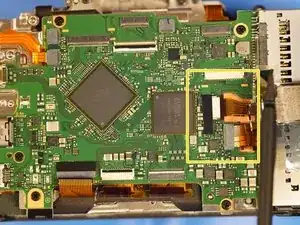
    • Weiter geht´s mit zwei ZIF-Anschlüssen der Bildverarbeitung. Klappe die Sicherungsbügel zur Unterseite der Kamera hin.

  19. A2jmoGdapGuLlZEK
    • Unter dem Akkustecker sind zwei weitere durch Reibung befestigte Stecker. Der obere gehört zum Verschluss, der untere zum E-mount.

  20. ekrtrSUu3PTaXuaM
    • Der Stecker für das Mikrofon oben links hält durch Reibung.

  21. VOxwl4PDUMTuALWl
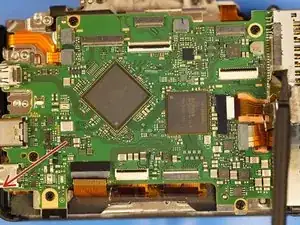
    • Ein Stecker (unter den vielen Anschlüssen) auf der gegenüberliegenden Seite. Er hält durch Reibung.

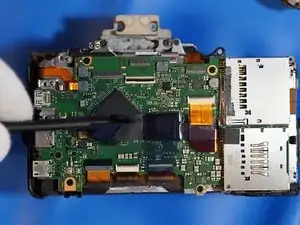
    • Ziehe beim Zusammenbau eine der Schrauben gegenüber den Anschlüssen leicht an. Fixiere dann die Hauptplatine mit einer der längeren Schrauben mit soviel Abstand so, dass du den Stecker für den Vielfachanschluss einschieben kannst.

    • Auf diese Weise gelingt es. Der Stecker ist eigentlich so konstruiert, dass er eingesetzt werden soll, wenn die Hauptplatine eingebaut ist. In der Hauptplatine gibt es einen Ausschnitt, der es erlaubt, das Kabel einzuschieben. Es handelt sich um den Stecker für den Lademotor.

  22. yCRipiEhCVMDfVPC
    • Entferne die fünf Schrauben, mit denen die Hauptplatine befestigt ist.

    • Führe den Akkustecker durch die Öffnung, damit du die Hauptplatine zur Oberseite der Kamera hin klappen kannst.

    • Zwei Stecker vorne an der Hauptplatine werden durch Reibung gehalten.

    • Die beiden Kabel lassen sich beim Zusammenbau leichter wieder anschließen, wenn du die Kabel mit hochgeklappter Hauptplatine ansteckst, dann herunterklappst und erst dann das Akkukabel wieder durch die Öffnung führst.

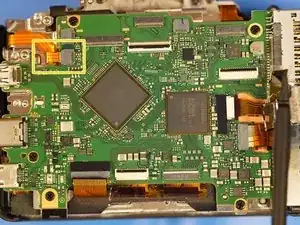
    • Das WiFi-Antennenkabel hat nur eine Leitung und hält durch Reibung. Schließe es beim Zusammenbau bei hochgeklappter Hauptplatine an, klappe erst dann die Hauptplatine herunter.

  23. LgFJw6iAQTNVBUeh
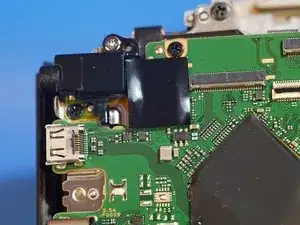
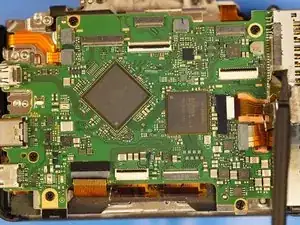
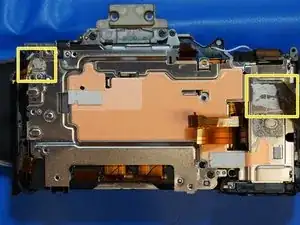
    • Dieser Block wird zusätzlich zu den Schrauben mit zwei Kabeln festgeklebt. Löse die Kabel vorsichtig ab.

  24. qgTfweMInBqvvEDy
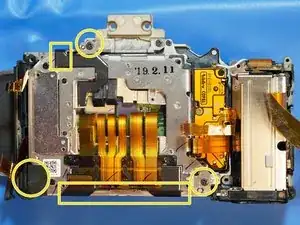
    • Diese Einheit ist mit vier Schrauben befestigt. Die Schraube im Kreis oben rechts befindet sich unter dem Klebeband.

    • Entferne die Abdeckung. Der Bildstabilisator/Verwacklungsschutz wird freigelegt.

  25. 4LeRbRaRfQQ4QPeW
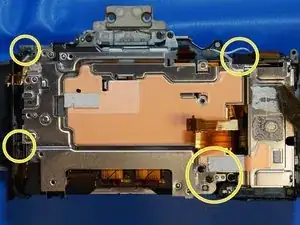
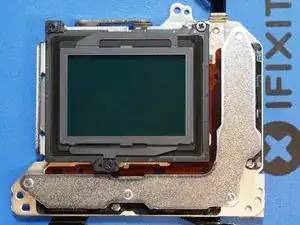
    • Bei diesem Bild ist der Verwcklungsschutz abgenommen.

    • Merke dir vor dem Ausbau des Verwacklungsschutzes unbedingt die aufgedruckten Nummern und Positionen der Unterlegscheiben. Sie können an drei Stellen mit je bis zu zwei Scheiben sein. Bei mir waren es insgesamt vier Scheiben. Die Markierungen geben die Dicke in 0,01 mm an. Beim Zusammenbau muss es wieder genauso eingestellt werden.

    • Mit diesen Scheiben wird die Lage des Sensors gegenüber dem Objektiv justiert.

  26. XL5K5w2v3lrq1xOA
    XL5K5w2v3lrq1xOA
    FFBXc2iZL6CJH2Gt
    • Der Verwacklungsschutz ist mit drei Schrauben und Klebeband befestigt.

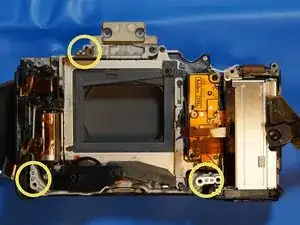
    • Merke dir die Position der Unterlegscheiben und entferne dieses Teil sehr vorsichtig, da der Sensor daran befestigt ist und freigelegt wird. Die Befestigung des Sensors ist biegsam und zerbrechlich.

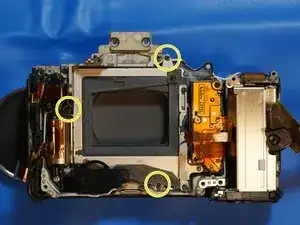
    • Hier siehst du meine Reparatur: die untere Schraube ist herausgekommen und die oberen Befestigungen sind deswegen ausgebrochen. Die lose untere Schraube hat meinen Verschluss verklemmt, so dass ich dachte, dass der Verschluss kaputt wäre.

  27. vFkRCRplxXmhWMgT
    • Entferne die vier Schrauben, mit denen die Verschlusseinheit befestigt ist. Die Kabel sind bereits abgetrennt.

Abschluss

Um dein Gerät wieder zusammenzubauen, befolge diese Anweisungen in umgekehrter Reihenfolge.

Nathan Ruffing

Mitglied seit: 24/05/21

802 Reputation

29 Kommentare

Thanks for this, I just need to replace my USB port cover that is broken and I wondered how they are held in.

Nice to know they drop off when the back is removed.

Paul Rogers -

I'm glad it helped! Thanks for letting me know.

Nathan Ruffing -

Thanks for putting the guide together! I went through this up to Step 10 to diagnose and order a replacement for a slit EVF proximity sensor cable. The cable is pinched against the top of the case, so I think my unit was just out of tolerance enough that over time repeated minor impacts cumulatively led to cutting through the cable. Other people report the same problem on reddit.

Rachel -

Great to hear you used the guide! Thanks for sharing.

Nathan Ruffing -

Thank you so much for this!

It was quite clear to me, even though I had never taken a camera apart before.

A few small things that might help others:

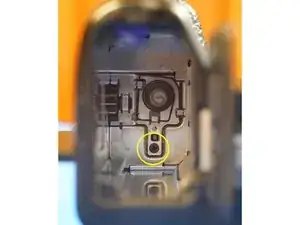
- The missing screw in step 25 is underneath the little black tape at the top-right (right under the WiFi antenna)

- you don’t have to take the grip all the way off, you don’t need the 4 screws at the middle, so you only need to pull away the edges at the sd card side and at the top next to the dial.

Also, when I took it apart a second time (I wanted to remove the shims for the sensor), my camera didn’t want to boot anymore and just rebooted again and again by itself. This appears to be a software bug and you might have to disassemble again until step 23. There is a small battery on the other side of the copper plate which remembers the date and time settings, but that needs to be disconnected from the motherboard to fix the issue.

Hope this helps,

And thanks again!

Dennis Van Der Mast -

- I was able to see where that screw is and I circled the fourth screw in the picture in step 25. Thank you for the input.

- Why did you want to remove the shims? They seem really important and if you remove them I would think the sensor could be too close to the camera housing and possibly interfere, right? I would think removing the shims could break the camera (maybe, maybe not, but I wouldn't remove them).

Nathan Ruffing -

Thank you so much for posting this content,

I have a question about shims ?

If i want to astro modify the sensor and remove IR/UV filter from the sensor , do i need ignore those shims in reassembly for having infinity focus ? And is it possible to remove shims for solving infinty focus problem cause to remove some glass in front of the sensor?

Brad V -

Sounds interesting and risky to remove a filter from the sensor. I don't know much about that specifically. I can say as it says in step 26 that the shim markings are 1/100mm, so the total thickness of any of them is around half mm. I would NOT think you would want to remove the shims because they aren't just for space, they are to make the sensor flat with the camera case / lens mount. If you remove them or put them back in a different location, you undo the factory calibration of having the sensor FLAT with the image the lens is projecting. I wouldn't think you would want that at all. Also, without the shims you might have the issue of the sensor interfering with the camera case.

I would think you would just remove the filter. Although I don't really know how you would do that either because it might be glued on. I didn't see an extra filter piece you could remove easily.

Nathan Ruffing -

hi,

my lcd display all the sudden started to show colorful strips. I assume it´s something with the ribbon cable either being corrupted or discounted. Sometimes it works sometimes it doesn't. how can i check that?

Leon -

I would say maybe take it apart until you remove the ribbon cable that goes to the LCD and re-install it. If the strips aren't too bad though it might not be worth the risk.

Nathan Ruffing -

My camera won't turn off when I switch it to OFF. Some time ago It worked 50/50 and sometimes camera turned off immediately after going to low power mode.

Not it never turns off. I tried disconnecting the power switch connector from the main board, but the camera it still turned ON. Does it mean some kind of serious issue with main board or maybe power switch is just inverted?

Eugene Miko -

Sounds to me like the switch gradually went bad, but I don't know. Sounds like the camera is still usable right? Maybe take the battery out when you are done. You could try physically toggling the switch somehow but I'm not even sure it's really a "power on power off" switch or something that tells the motherboard to turn on or off.

Nathan Ruffing -

Thank you so much for this guide! I thought I had to replace the shutter, but when opening the camera I found that only the frame around the sensor visible in picture 3 of step 27 (lighter grey just around the sensor) was loose because the screw at the bottom had completely fallen out. As I already had the new shutter I put it in anyway, as it might have been damaged by the loose frame.

If anyone knows how that frame is called or where it could be ordered as a replacement part, I would be very glad to know! For now, I just removed it and everything seems to work perfectly.

Lio -

Hi Lio, glad you liked it and were able to follow! This is really fun for me to see people use the guide.

I don't know how to order that gray frame specifically. I would imagine the best way to obtain one would be to buy a broken a7iii and assume that part isn't broken since it isn't a moving part.

Notice the third bullet point in step 27. The loose screw was EXACTLY the problem I had with my camera:

"You can see the repaired mounts on my sensor block. The bottom screw had come out and the top mounts broke as a result. The loose bottom screw was also jamming in my shutter unit and made me think the shutter unit was broken."

I didn't even replace the shutter because I hadn't bought one yet so I gambled that mine was okay and put it back together and it's is still working.

Happy to hear you fixed yours!

Nathan Ruffing -

Your guide really was the reason I would even attempt to open it!

Weird that it was the exact same screw, and good idea to look for a broken A7 III. I think I will just use mine for now (and hope the sensor does not fall apart), and if I see any problems I might try that.

Lio -

Thanks so much for this guide. I have a broken card slot (slot 2, the upper one). Is it complicated to replace it? Must I disassemble the motherboard entirely?

Thanx from Norway

Bjørn Kamfjord

Bjørn Kamfjord -

I imagine you could get a replacement card slot, but I think the hardest part about that would be to de-solder the old one off and solder the new one on. I don't know how many points it's soldered on by. You get access to the card slot pretty early in this guide and then you could look and know. I wasn't paying much attention to the card slots honestly.

Nathan Ruffing -

Wound up using your guide in conjunction with "HansomsRepairs" on YouTube. Very helpful, unfortunately the camera remains unfixed. When I booted it up I still get the same message so I took it all apart again and checked all the connections , still the camera error message. When I turn on the camera you can hear the MB charge unit actuating but the shutter itself doesn't move , I'm thinking of replacing that part as hopefully my last resort unless you have any ideas. Again, thank you.

Michael M -

I don't have any other ideas. The reassembly is difficult I thought, so I would just make sure it's put together correctly.

Nathan Ruffing -

I had the same problem. The plastic lever connecting the MB charge unit with the shutter was broken. It looked completely fine, so i missed it the first three times and only discovered it when i manually turned the MB motor and the lever just bent out of the way instead of moving the shutter.

Georg Baumann -

Hey, is there an easy way to chance the mic cover lid/flap? Mine is broken and I have the replacement part but it seems to be hold in with some kind of pin. Do I need a whole disassembly or is there an easier solution?

Felix -

Notice step 9 talks about the plastic ports covers. It's in step 9 that those covers come off when you remove the back of the camera.

Nathan Ruffing -

Thank you for the quick response Nathan! But I meant the one flap that’s fixed by the front part of the camera, covering the mic port. I hope I don’t have to disassemble the whole camera for that.

Felix -

Bonjour mon A7iii est tombé, depuis l'evf ne fonctionne plus et comme, je n'utilisai que ce mode de visé je n'ai plus aucun moyen d'accéder aux réglages

Y a t'il une solution pour réactiver l'écran ou faire un reset qui me permettrait de retrouver les réglages usine et pouvoir utiliser l'écran ?

Dan Gazzano -

I understand that you used only the EVF and had the screen deactivated, so now with the EVF failed you cannot do anything because you cannot access the settings to activate the scree. I do not know if you can reactivate the screen without access to the settings, but I imagine there is a way to hard reset the camera. I found a factory reset option on YouTube that might work. You have to be able to see the settings, but maybe you can do it blind by counting the button presses to get to that spot on the menu. If you have a friend who has an a7iii, that might help by mimicking the button presses on a working camera to do it without the screen.

Nathan Ruffing -

You can buy a micro hdmi adapter and use an external monitor (anything with an hdmi input, but not 4K!!!). Unless you changed it in the settings (or the external display is 4K), the camera just uses the external display instead of the internal ones.

Georg Baumann -

my sd card door is broken and i was wondering how to fix it. ideally with the least amount of screws removed. any idea until which step of the disassembly i should get to to be able to replace the door ?

(the hooks and the unlocking mechanism works properly , just chipped off a tiny plastic piece of the corner of the door , easier suggestions are welcome , something more robust than tape pls)

Aamir Zabil -

I have never done the disassembly to just get the SD card doors off, but I think you do have to get through step 8 because they are "built-in" to the housing and only come off once the entire back of the camera is removed. If I were you, I would just let the door be broken. If you want to remove those doors, you definitely have to remove the back of the camera.

Nathan Ruffing -

Hi I replaced a shutter in the A7III and when I put it back together the menu button AF On etc aren’t working the shutter speed control dial will work for one use then go off

I have visually checked all the ribbon cables and can’t see any damage / loose connections do you know which ribbon cable is responsible for these buttons

Jeds123 -