Einleitung

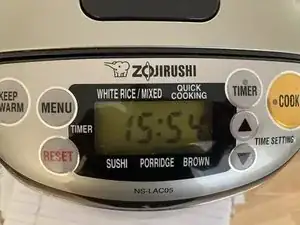
Der Zojirushi Reiskocher ging nach fünf Jahren kaputt, die Uhrzeit wurde nicht mehr angezeigt. Das wäre eigentlich nicht so schlimm, der Reiskocher an sich funktioniert noch, aber der Timer nicht mehr. Außerdem sieht es unschön aus und sollte einfach funktionieren.

Wenn du die Batterie austauschen willst, wirst du frustriert feststellen, dass sie verlötet ist. Diese Konstruktion lässt keinen leichten Austausch zu. Man stellt sich die Frage, wieso Zojirushi so eine offensichtliche Unannehmlichkeit (geplante Obsolenz?)produziert. Dies sollte bei einem Neukauf beachtet werden.

Diese Anleitung zeigt, wie du dieses Problem lösen kannst.
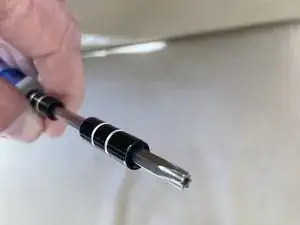
  1. Cdj3eBlDBdlRa6vg
    Cdj3eBlDBdlRa6vg
    SJHsW6X3FnSGR1NH
    • Ziehe den Netzstecker.

    • Drehe ihn um und lege ihn mit der Oberseite nach unten auf ein Tuch.

  2. ZrO6ndBEvHjJpWKM
    ZrO6ndBEvHjJpWKM
    yWTVLSFbSel4WSQP
    tmluJLwta1lyIVYu
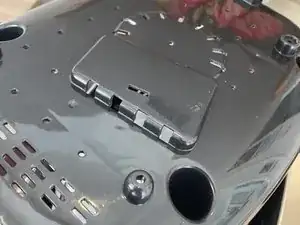
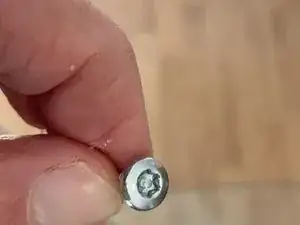
    • Entferne die vier Schrauben, mit denen die Bodenplatte befestigt ist. Drei davon sind Kreuzschlitzschrauben #2, eine Torx TR20 Sicherheitsschraube.

    • Heble mit einem geeigneten Werkzeug rund um die Bodenplatte, bis alle Clips gelöst sind. Es gibt insgesamt sieben, einen in jeder Ecke, einer vorne und zwei hinten. Die lassen sich ziemlich leicht öffnen.

    • Hebe die Bodenplatte ab und lege sie beiseite.

    Good guide for an important project.

    Please indicate spacing of solder holes for battery tabs. There are several tabbed battery offerings with different geometry.

    Also, if there is room, I’d install a battery holder instead of a soldered battery. But still need pin spacing.

    And Is there vertical space for a slightly thicker element? (To accept a holder, not just a raw battery. )

    John B -

    @John B, see @Ed Chou recent comments on adding a battery holder.

    Jimjar -

  3. Cs2ymbg2lHWQovwj
    Cs2ymbg2lHWQovwj
    LDTNiLONWK6pEts1
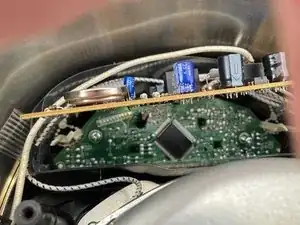
    • Die Platine mit der Batterie wird sichtbar.

    • Es sind insgesamt zwei übereinander liegende Platinen. Die untenliegende mit dem Display und den Tasten kann für diese Reparatur an Ort und Stelle bleiben.

    • Ziehe sechs Stecker von der oberen Platine gerade nach oben ab, sie sind nicht weiter gesichert. Die Farben von links nach rechts sind Schwarz, Gelb, Blau, Blau(Basis) und Schwarz (Basis). Die Farben sind ordentlich auf der Platine markiert.

    • Das Flachbandkabel hat keinen Stecker, lasse es einfach angeschlossen.

    • Drücke auf die Kunstoffnasen, von denen die obere Platine festgehalten wird. Löse die Platine ab und Klappe sie über das Flachbandkabel hoch, um an die Unterseite der Uhrbatterie heranzukommen.

    • Entferne nicht die untere Platine, es ist sehr mühsam, sie wieder einzusetzen.

  4. 5WUH3GTlJPspFvTK
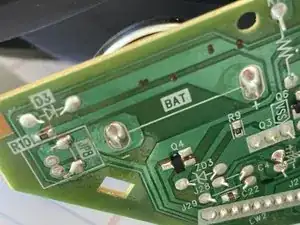
    • Die Lötstellen für die Batterie sind auf der Rückseite markiert. Entlöte zunächst eine davon.

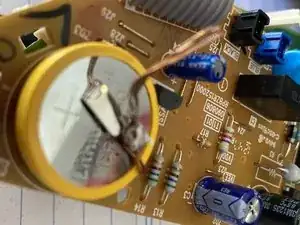
    • Heble die Batterie auf der anderen Seite mit einem Spudger hoch.

    • Entlöte auch die zweite Lötstelle. Entferne die Batterie und entsorge sie fachgerecht.

    • Vorsicht! Wenn du die Batterie mit einer Zange herausheben willst, dann achte darauf, dass kein Kurzschluss entsteht. Nimm lieber ein nicht leitendes Werkzeug oder deine Finger.

    Would be great with a measurement of the distance between the pins

    Patrik Sandin -

  5. HZoAhyDgZRrsNmf6
    HZoAhyDgZRrsNmf6
    TUUaxTSPOYjkBEmC
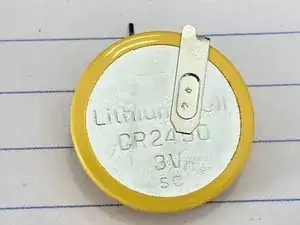
    • Du benötigst eine CR2450 Batterie mit Lötfahnen.

    • Eventuell passen die Lötfahnen nicht richtig, dann musst du sie entsprechend anpassen. Du kannst einen Kontakt anlöten und den zweiten durch ein Kabelstück verbinden.

    • Lies die Kommentare, es gibt gute Hinweise auf Batteriehalter, mit denen die Montage einfacher wird.

  6. BNGNeWMmk4MoNtVI
    • Baue die obere Platine wieder ein. Die schwarzen Laschen an der Seite sind die Führungen für die Platine.

    • Schließe die sechs Stecker wieder an. Achte genau auf die angegebenen Farben.

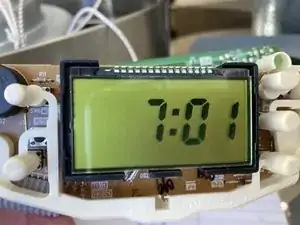
    • Drehe das Gerät um. Die Uhr sollte wieder funktionieren.

    • Schraube die Bodenplatte wieder fest.

Abschluss

Um dein Gerät wieder zusammenzubauen, folge den Schritten in umgekehrter Reihenfolge.

Jimjar

584 Reputation

22 Kommentare

If you have a Ring doorbell, try the included orange-handled screwdriver for opening the case and removing the circuit board. The security screw head along with Phillips head fit all the screws inside and out. Not sure about all rice cooker versions, but this worked perfectly for mine.

Ed Chao -

This battery holder fit my rice cooker perfectly.

CR2450 Coin Cell Battery Holder - PC Pin https://a.co/d/71iBrrP

Ed Chao -

@Ed Chao - good comments on the security screw and the battery holder. That’s probably an easier fix then soldering in a battery with tabs. Jim J

Jimjar -

Thanks for the article. I fixed mine by removing the battery and adding wire leads to a 2032 battery holder. I covered the connections on the back of the holder with epoxy to insulate the leads. I then hot glued the holder to the inside front of the case. I still have to remove bottom to replace battery, but 2032 batteries are cheaper and easier to find. I replaced the security screw with a standard one.

G V -

@Ed Chao did you need to solder in the battery holder or is that not required?

Henry -

I did this, with the battery holder. Worked great, until I plugged it into power. The display went blank like I had shorted something! Any clue?

Dave Sandusky -

@davesandusky I am not sure what is wrong but I would start by making sure that you reconnected all of the wires properly, they are easy to mis-connect if you are not careful.

Jimjar -

@Jimjar I never disconnected the wires - didn’t need to.

Dave Sandusky -

I 3D printed a CR2450 Battery Holder and used the existing tabs from the old (dead) battery as connectors.

My battery holder 3D Model can be found here. Read the description there for details. This is in place of Steps 4 and 5 of this tutorial.

XRaVeNX -

@xravenx the 3D-printed battery holder is very cool. Jimjar

Jimjar -

From an Amazon review tip, https://www.digikey.com/en/products/deta... is a replacement battery with the correct lead style the right distance apart. The plastic bottom snapped off easily without a prying tool after removing the screws. Instead of disconnecting the wires I just removed them from the retainers at each side. The hardest part of this repair was freeing the board from its plastic clips.

Paul Streitman -

All of this. Battery perfect replacement. Didn't disconnect the wires. Replaced with an extra set of hands. Before putting back together, double check all connections in case anything was bumped or knocked of and plug in and make sure it doesn't display any error message.

Wagoneer85 -

Hey, thanks for doing this. I was beyond annoyed when zojurushi told me I had to ship it to them to have the battery replaced. That's a lot of wasted time and energy by a lot of people. Anyway, I replaced the battery successfully, thank you.

adrian vasquez -

@adrianvasq65716 Fantastic that you were able to replace the battery youself!

Jimjar -

What a low down racket all these rice cooker companies are running. They just want people to buy a new rice cooker every few years. They could perfectly easily make them with a pop open battery door and a pop in battery, like every dinky battery-operated gadget has!

werewolf -

I feel your rage.

adrian vasquez -

Yeah, I do too! @werewolf, comment back if you are able to fix yours.

Jimjar -

I followed this guide for a NS-ZCC10, some things to note:

1. The battery in the NS-ZCC10 is a CR-2354 so if you want to solder a direct replacement you'll need to buy that size.

As @edchao noted, a CR2450 Coin Cell Battery Holder does fit. The best I could find online they're both 3V just different dimensions. I had to slight tilt a transistor (I think that's what it was) to make enough room for the battery holder, but gently doing this seemed ok.

2. On the NS-ZCC10 the LCD is mounted differently and is in the way of the battery. I removed the support cage to desolder the battery to easily lift it off, if I were to do it again I'd leave the support cage in place and work around it. The LCD is attached via very long pins soldered to the board so I was in danger of damaging this connection.

3. The wire clips were latched, so be very careful removing the wires as you don't want to break the connector or pull the part off the board.

tebriel -

My Zojirushi NP-GBC05 induction rice cooker has a vertical tab-mount CR2450 installed, Panasonic CR-2450/VAN. I was able to find stock at Mouser.

cohese -

Thanks for the tip cohese.

Jimjar -

Thanks! I have a NS-KCC05 that I picked up used and now I can have oatmeal waiting in the morning. As suggested by another user, I installed a battery holder rather than a solder-in battery as I tend to keep my appliances for a long time. This model uses JIS head screws rather than Torx so I didn't have to dig out my tamper-proof set.

Justin Haber -

I soldered on the battery holder linked below, spacing is 20.5 mm (0.807”). It works well! Only trick is that you have to remove some of the material where the perimeter of the new battery holder will prevent the clip that holds the circuit board from being able to pass through its mounting hole. I used a belt sander to flatten down that side and it did the trick, you could also easily remove the material with hand sanding. The battery holder in the second link also will work with a very slight bend of the mounting tabs.

One I used—

CR2450 battery holder

This one will also work—

https://www.digikey.com/en/products/deta...

Big fixes for small problems -