Einleitung

Tausche dein optisches Laufwerk gegen eine zweite Festplatte ein.

  1. sLBEp1SWeQaGvAGF
    sLBEp1SWeQaGvAGF
    qiWAxhbPbXwslECg
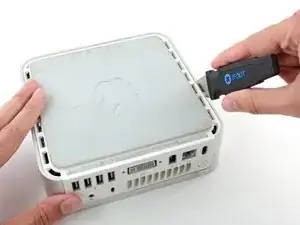
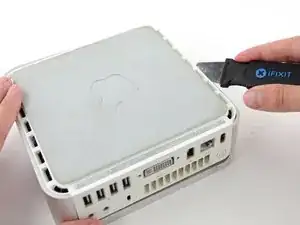
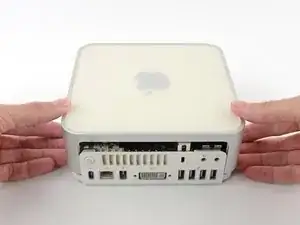
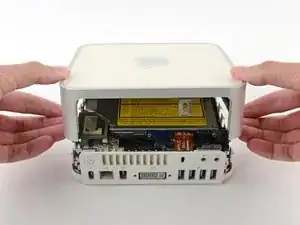
    • Schalte deinen Mac Mini aus, trenne alle Kabel und drehe ihn um.

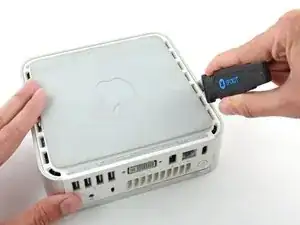
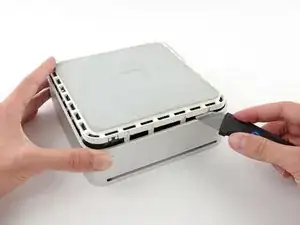
    • Führe den Jimmy in den Spalt zwischen dem oberen Aluminiumgehäuse und dem unteren Kunststoffgehäuse ein.

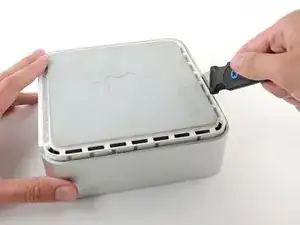
    • Der Jimmy sollte nach ungefähr 9,5 mm stoppen.

    A spackle knife makes these steps go much faster.

    jouniseppanen -

    A double sided letter opener or a thin non-serrated butter knife will suffice.

    To prenent cosmetic blemishes, place a matchbook cover or similar thin cardboard on the outer perimeter under the “jimmy”.

    Mike -

    Despite mentioning recommended tools at the top I think it’s really worthwhile making a point about narrow Philips screwdrivers at this point before people start putting the case apart.

    Matt D -

  2. kah5J3ZqepQRAYLs
    kah5J3ZqepQRAYLs
    TjNLADvgUc3u65EC
    E1GivJlcjLIm1AjR
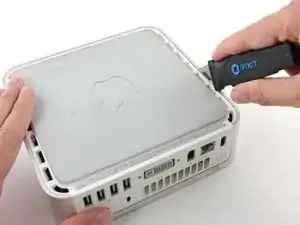
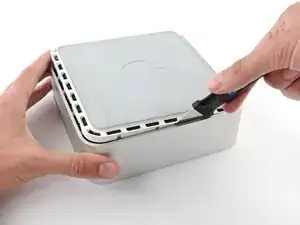
    • Biege den Jimmy vorsichtig nach außen, um den Spalt ein wenig weiterzu öffnen, und hebe das untere Gehäuse ein wenig an.

    • Am unteren Gehäuse befinden sich mehrere Kunststoffclips, die in eine Nut am oberen Aluminiumgehäuse passen. Dein Ziel ist es, sie mit dem Jimmy so weit nach innen zu drücken, dass sie sich aus der Nut lösen, während du vorsichtig das untere Gehäuse abziehst.

    Patience is your best friend.

    Do not insert “jimmy in too far. Marking a line from tip upwards on the tool will prevent too far insertion, possibly breaking tabs or damaging internal components.

    To prevent the cover closing back up, small strips of matchbook cover (os equivalent) can be inserted about half inch hold prevent closure.

    Mike -

    I think it needs to be made more clear that what you want to be doing is applying upward pressure on the back I/O panel with your HAND while pressing the clips with the jimmy, sort of like tensioning a lock and then setting individual tumblers. (Yeah, I watch LockPickingLawyer.)

    The pictures appear to show trying to lift the lower housing using the jimmy, similar to how I've seen people doing things like prying with a putty knife or screwdriver... and that plastic is only going to get more brittle over time.

    If you apply the upward pressure with your hand via the back panel and then work your way around the outside edge clip-by-clip, then it's much easier to be gentle with the jimmy because your only goal is to press on each clip enough to release it. All the rest of the force comes from, say, a finger hooked into the edge of the Ethernet port and a thumb pressing on the edge of the top cover.

    ssokolow -

  3. IkyV51XbYAOx1scN
    IkyV51XbYAOx1scN
    yEIBOXiZXylOkfa3
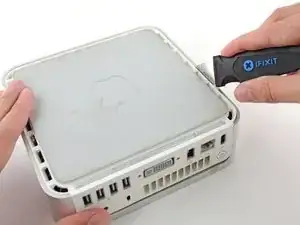
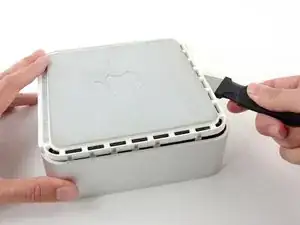
    • Wenn du die erste Seite gelöst hast, drehe den Mac Mini und beginne, an der Vorderkante zu hebeln.

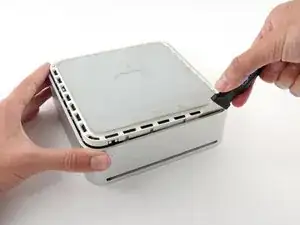
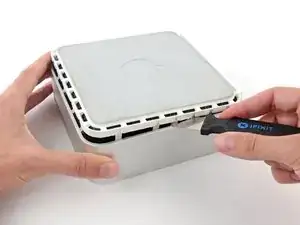
    • Biege mit der gleichen Hebelbewegung die Clips nach innen und hebe das untere Gehäuse aus dem oberen Gehäuse heraus.

  4. ALLVbaEmIiRDx3ye
    ALLVbaEmIiRDx3ye
    tIQp3aqsF2IIZtPb
    • Möglicherweise musst du den Jimmy an der Kante entlang bewegen, um alle Clips zu lPosen. Sei geduldig und arbeite dich schrittweise vor.

  5. Tjq4XQhQltwaf41J
    Tjq4XQhQltwaf41J
    cN1LgUGSLjcbAtOp
    • Arbeite dich um das Gerät herum, um die Clips an der letzten Seite zu lösen.

  6. mkOHVknKjJGtqOlZ
    mkOHVknKjJGtqOlZ
    aHVZOjTkBWLtHRns
    • Drehe den Mac Mini wieder auf die Vorderseite und hebe das obere Gehäuse vom unterem Gehäuse ab.

    Before reassembly, make sure no wires are sticking out.

    Line up top cover carefully. Gently press down on top cover until top and bottom fully seated.

    CAUTION! DO NOT PRESS TOO HARD ON THE COVER TO PREVENT CRACKING THE PLASTIC TOP.

    GO EASY.

    Mike -

    Re: reassembly, I found it gentler to use the jimmy to lightly press the plastic clips in a little bit to get them past catching on the frame with minimal force.

    ssokolow -

  7. tesVkqtkctF41qmD
    tesVkqtkctF41qmD
    YbBty6YuxcleAX6r
    TsrDTWhgReCx4LaK
    • Später in dieser Anleitung wirst du mehrere Kreuzschlitzschrauben entfernen, welche sehr tief liegen. Normale Schraubendreher sind meist zu breit um zu den vertieften Schrauben zu gelangen, achte daher darauf, einen dünnen Schraubendreher zu haben.

    • Entferne zuerst die AirPort-Antenne (die größere von den beiden), welche nah bei dem Power-Button liegt.

    • Drücke die beiden Stifte zusammen, und hebe die AirPort-Antenne von ihrem Befestigungsstift ab.

    • Sei vorsichtig und drücke die Stifte nicht zu weit zusammen, sonst brechen diese ab.

    • Beim Zusammenbau musst du die beiden Stifte leicht zusammendrücken, sodass sie in die Öffnungen auf der AirPort-Antennenkarte passen.

    How serious is it if W1 loses the spring? Mine pinged off and I cannot find it. I spent about half an hour looking with no success.

    Matt D -

  8. Ne1HrDQvVHbckCOi
    Ne1HrDQvVHbckCOi
    RwZGARKpYRYjrbQO
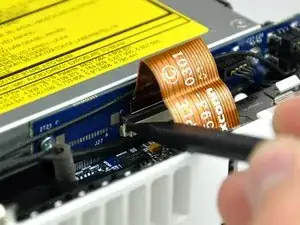
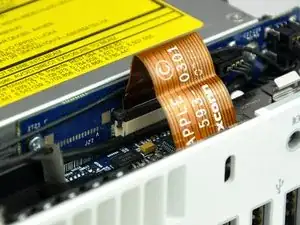
    • Hebe den Sicherungsbügel am ZIF-Anschluss auf der linken Seite mit der Spudgerspitze ein wenig hoch.

    • Der Bügel lässt sich etwa 1 mm weit anheben. Versuche nicht, den Bügel ganz zu entfernen.

    Now also lift the right side of the ZIF cable lock up from its socket.

    chriZ -

    Good catch of the incomplete unlocking instructions. ;P

    lamarhavard -

    Hmmm... what if I didn't read this before and I removed the cable and the lock sort of broke?... what would happen... would I experience problems? I can still put the cable back in place and push the lock back down with the spudger.

    Dan O -

    Same. I totally removed the lock , the edges are busted and won't stay in place, How can I get the cable to stay? what's the fix?

    Suzanne -

    Dan O & Suzanne, hold the cable in the socket and put a dab of hot glue on both sides, It's non-conductive and should hold...worked for me.

    lamarhavard -

    does any one know, where to get the connector from zhe ZIF Cable?

    someone, that preowned my mac broke the holder!

    julian gmeiner -

    Julian, did you ever find where to get a replacement lock for the Zip Cable. Mine is also broken..

    Suzanne -

    This is not my first memory replacement in a Mini and I got over-confident and stupidly fully removed the audio cable ZIF lock and assumed I had broken something. But, now that I have read this guide more carefully, I am not sure. I sure would love to hear some detailed instructions for putting a ZIF lock back on.

    Is it possible that I have removed it without having broken it? If I have broken it, do I have to buy a new cable? Just a new ZIF lock? A new audio board? This is a 2.0 GHz A1176.

    Thanks!

    GalvanicMacPro -

    Michael, Mine seems to be broken. I bought & tried the Kapton Tape that was suggested & still no sound.

    Suzanne -

    C’est la première que je doit déverrouiller un câble ZIF. Je précise qu’il faut lever à gauche et à droite, ça force un peu, prendre appui sur le boitier du Mac, comme e montre la photo.

    La partie noire reste dans la partie blanche (+1 mm), et la nappe flexible sort par le haut.

    Ludovic -

  9. EKFU6gDpNXCSQnLx
    • Hebe das Audio-Flachbandkabel nach oben aus seinem Anschluss heraus.

    • Wenn sich das Audiokabel noch nicht herausholen lässt, dann ist der Sicherungsbügel noch nicht ganz offen. Überprüfe nochmals, ob er überall 1 mm weit von seinem Anschluss auf der Verbindungsplatine angehoben ist.

    As an option to avoid potential damage when disconnecting the cable from the ZIF socket and clip, it is possible to unscrew the audio board and remove it along with the internal frame.

    Nick Baldwin -

  10. 61qvOIM5yqSBSjGd
    61qvOIM5yqSBSjGd
    MEBJfeYqFJgGhfDT
    • Drehe den mini so, dass der Einschub des SuperDrive zu dir zeigt.

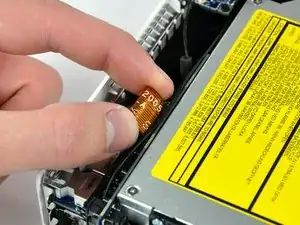
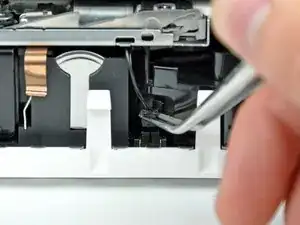
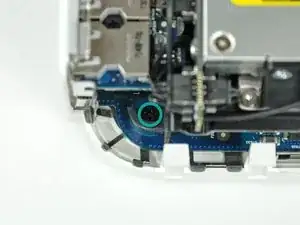
    • Hebe den Stecker am Kabel des Thermosensors der Festplatte mit einer Pinzette aus seinem Anschluss auf dem Logic Board heraus.

    • Fasse nur den Stecker mit der Pinzette an, nicht die Kabel.

    • Der Stecker befindet sich unter der Öffnung für das optische Laufwerk, nahe an der PRAM-Batterie.

    Managed to leave this connected by flopping back the drive rather than totally removing

    pglock -

    WATCH OUT!!

    separated one of the wires from the connector very easily. i would have preferred to use a spudger at this step. the tweezers in effect snipped the wire!!

    mklsvg -

    As my experience you should definitely use angeled tweezers as shown in several pictures. To avoid stripped cable deflash sharp edges of the tweezers a little bit. I never experienced problems when using that kind of tool carefully.

    Timpetou -

    I've had to remove a few of these connectors on iBooks and other small Apple devices ... I've found that, with careful and gentle pressure (working first one side and then the other) using a small flat-headed jeweller's screwdriver is best.

    Mike Haines -

    Note where the airport antennae connecting wire comes out from the interior along the top. When reassembling, it has to be routed the same way, or it won't reach its install position.

    robert -

    If your fan runs at high speed after you complete this project, you have forgotten to reconnect the thermal sensor.

    Curt -

  11. NcmfB3WBQrMtDS5h
    NcmfB3WBQrMtDS5h
    NBuQxBTA6wSbupxI
    • In den nächsten fünf Schritten werden die vier Kreuzschlitzschrauben, mit denen der innere Rahmen am Gehäuseunterteil befestigt ist, entfernt. Bei jedem Schritt wird zunächst eine Übersicht gezeigt, dann eine Nahaufnahme der betreffenden Schraube.

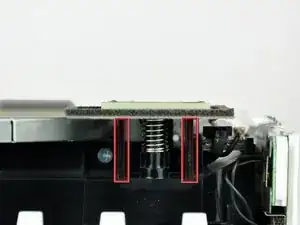
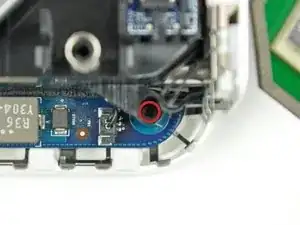
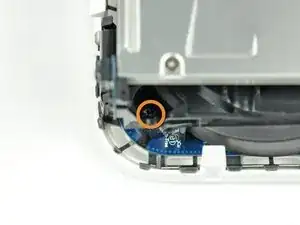
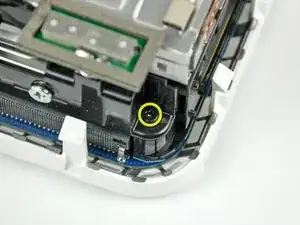
    • Eine der Kreuzschlitzschrauben liegt vertieft in der Nähe der Einschalttaste. Drehe sie heraus.

  12. mQwsrv5mEdJQTbmE
    mQwsrv5mEdJQTbmE
    tp11nlYvAvPFAPsH
    • Eine weitere Kreuzschlitzschraube, die den Rahmen am Gehäuseunterteil befestigt, sitzt vertieft in der Nähe der Statusanzeige. Drehe sie heraus.

    • Das ist die längste der vier Befestigungsschrauben.

  13. 1qgIwm2POlMG5yqD
    1qgIwm2POlMG5yqD
    5vJl6xw6NFLCPtJV
    • Entferne die Kreuzschlitzschraube in der Nähe der Bluetooth-Antenne vom inneren Rahmen.

    Before removing any of these screws, there is another step needed which is not here:

    On the front of the optical drive, right side as you look at the slot-load, is a small blue board attached by a single black screw. This needs to be removed before the optical drive can be taken out.

    Mike Haines -

  14. mVrcohFF2qth5QAR
    mVrcohFF2qth5QAR
    4CIKANIBUuqghOGF
    • Entferne die Kreuzschlitzschraube, mit der der innere Rahmen in der Nähe der Audioanschlüsse am Untergehäuse befestigt ist.

    On reassembly, if you don't have a magnetic screwdriver, a tiny dab of grease at the tip of your screwdriver will help hold the screw on the driver so you can lower it into the recessed slot.

    pfbloom -

  15. CRHKcyOC23ZtADxD
    CRHKcyOC23ZtADxD
    xjktCYpDfSWnZWGd
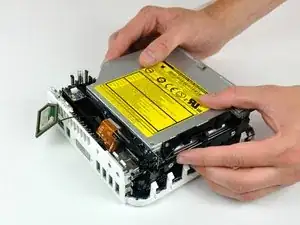
    • Hebe den inneren Rahmen behutsam vom Gehäuseunterteil ab, beachte, dass sich die AirPort-Antenne und andere Kabel verfangen könnten.

    • Eventuell musst du nahe bei der Verbindungsplatine nach oben ziehen, bis sie sich vom Logic Board löst.

    At this point be careful that you don't pull out the Airport antenna ... but if you do, just check that it is back before re-assembling.

    Mike Haines -

    During re-assembly, the internal frame has to go in at an angle ... the back of the optical drive goes in first.

    This means that you can seat the fan cover correctly, but more importantly, there is an interconnect board on the back of the optical drive that must be firmly pushed back into its housing on the logic board.

    Mike Haines -

    Reassembly: Before slipping the main frame back into its place, refer to earlier photos, ensuring proper routing of the WiFi cable.

    Steve -

    If, like me, you pull the wire on the airport antenna free, it snaps back into place easily. The connector is on the extra card screwed to the motherboard that looks like it has a phone battery embedded in it. The connector is at the top of the 'battery'. This accessory card is the wifi card, so it makes sense that the antenna plugs onto this.

    Dan -

  16. QuBMPeiM6GEeGNWZ
    • Die Bluetooth Antenne kann einfach nach oben vom inneren Rahmen nach oben gehoben werden.

    • Drücke die Bluetooth Antenne an beiden Seiten so nahe wie möglich am Mittelpfosten nach oben und entferne sie vom inneren Rahmen.

    • Dazu kann etwas Kraft nötig sein.

    I tried using quite a bit of force and still this board would not come free. In the end I didn't remove it and found I could do the repair without removing it!

    Mike Haines -

    use tweezers at other side to clamp and push the whitestud trough, otherwise you might brake it

    joost -

    I left this piece in place and the optical drive wiggled around it. I applied as much force as I was comfortable with and I did not want to break the Blue Tooth antenna. This was a good work around and did not cause much if any trouble removing the old drive or placing the new drive into the computer.

    sikkingj -

    Comme le dit Mike, l’antenne est un peu dure à enlever. Elle peut être laisée en place, à l’étape 20, lever le lecteur par le coin opposé à la carte d’interconnexion, pour extraire le lecteur par l’avant.

    Ludovic -

  17. AbS1Bbsa5KUqSEom
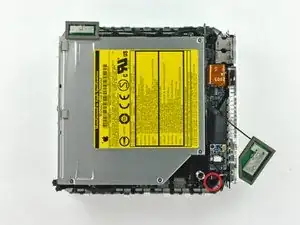
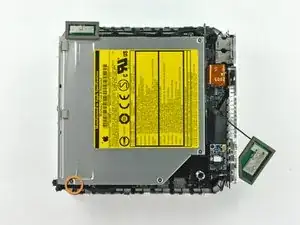
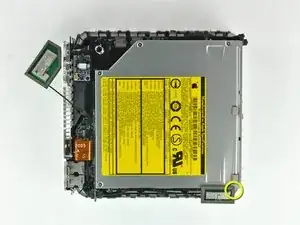
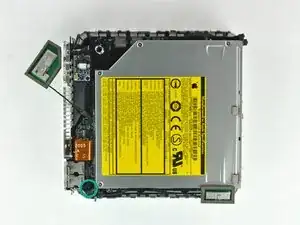
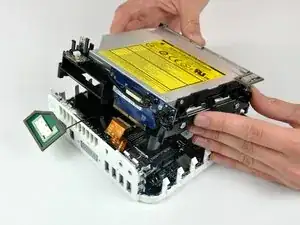
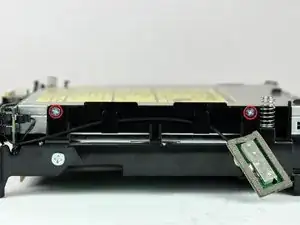
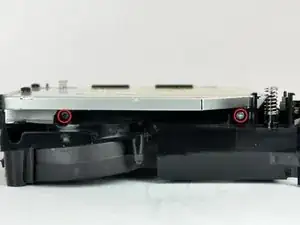
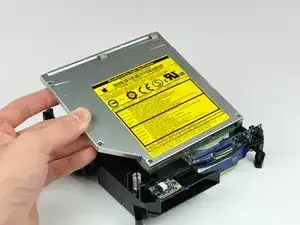
    • Entferne die beiden Kreuzschlitzschrauben, mit denen das optische Laufwerk am inneren Rahmen befestigt ist.

    A Phillips #0 is definitely required for this!

    Javier Campos Delgado -

  18. MnZYmCjWj4igkETX
    • Drehe den Mini um 180° und und entferne die beiden Kreuzschlitzschrauben mit denen das optische Laufwerk an der anderen Seite am inneren Rahmen befestigt ist.

  19. vcJ6EwqO6hiOIj6m
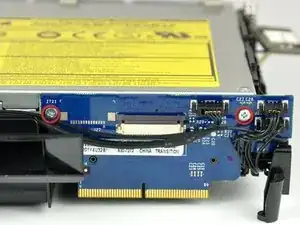
    • Entferne die beiden Kreuzschlitzschrauben, mit denen die Verbindungsplatine am optischen Laufwerk befestigt ist.

  20. 1SXXMS4gyWE5rJah
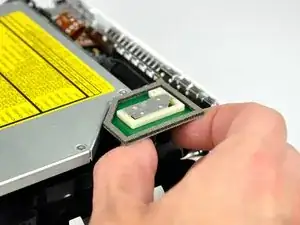
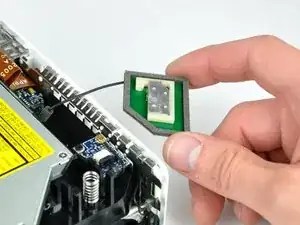
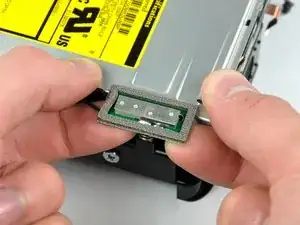
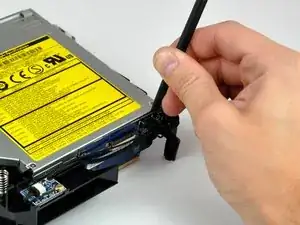
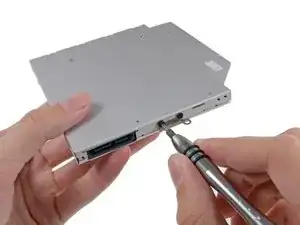
    • Trenne die Verbindungsplatine mit dem flachen Ende des Spudgers vom optischen Laufwerk ab.

  21. FPCNttPMWvcnm4bZ
    • Hebe das optische Laufwerk aus dem inneren Rahmen heraus.

  22. WPcg6hfCMkTtjj2Q
    WPcg6hfCMkTtjj2Q
    ACPTZX2IFKQ1K4WT
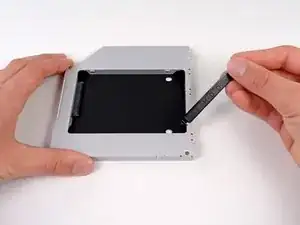
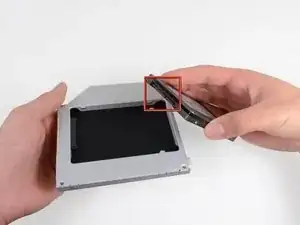
    • Entferne den Abstandhalter aus Plastik aus dem Gehäuse des DVD-Laufwerks, indem du auf einer der beiden Seiten die Plastiklasche eindrückst und den Abstandhalter nach oben herausnimmst.

    is it 9,5mm or 12,7mm for the caddy? My stuff macbook pro mid 2010, need advice what size is compatible. Thank you

    Adi Purba -

    All Macbooks use 9.5mm Optical Drive Caddy, also, If you’re wondering as well, the Optical Drive runs at SATA II speeds just like with the main hard drive area, so if you’re using a SSD, then it’s going to run at a slightly slower speed.

    - PS5iscool - -

  23. NLZqqjQlYQPglXyI
    NLZqqjQlYQPglXyI
    xMhBlQkNdV4PwSMS
    UeALDwtY1rY2dJX4
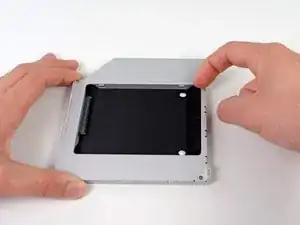
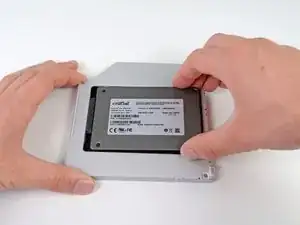
    • Achte darauf, dass die Anschlüsse für die Festplatte nach unten zeigen, bevor du die Festplatte in das Gehäuse setzt.

    • Setze die Festplatte vorsichtig in den dafür vorgesehenen Platz in dem Gehäuse.

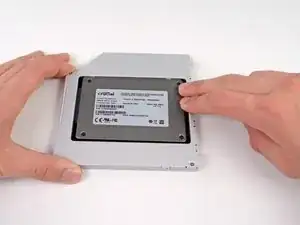
    • Halte das Gehäuse mit einer Hand fest und drücke die Festplatte mit der anderen Hand in die Anschlüsse im Gehäuse.

    Okay it seems like some models of MacBook Pro have issues with a fast (6Gbit/s) SSD in the optical bay. Even though my Mac says it offers 6Gbit on both bays it simply didn't work in the optical bay. So I switched places between the two drives and everything seems to work. My Mac booted from the old HDD in optical bay automatically and then I cloned it afterwards and changed the startup disk to the new one. As said before, don't put a fast SSD in the optical bay!

    Carl -

    This is an extremely late response to an old comment, but… whatev’s. My 2011 MacBook Pro had that issue: the main (HDD bay) SATA operated at 6Gbit, and while the optical bay said it was 6Gbit, the “Negotiated Link Speed” was like 1.5Gbits regardless of what you put in it (I can understand 1.5Gbits for an optical drive, but not for an SSD). Some of the early 2012 models did the same thing, from what I understand, but that was corrected pretty early on; both my 13” and 15” 2012’s run at 6Gb/s on both SATA busses.

    AJH -

    It’s not wise to swop the optidrive for an HD as there is no physical protection. The caddy is only intended for an SSD.

    Ben Ormerod -

  24. 4bUrYFHS5udDCnIj
    4bUrYFHS5udDCnIj
    Ayxd2pXAkaRgHAFN
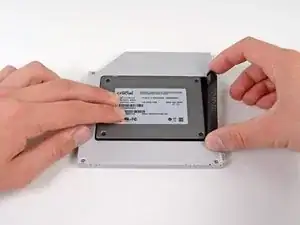
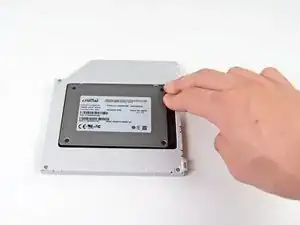
    • Wenn die Festplatte im Gehäuse sitzt, halte sie mit einer Hand fest und setze den Abstandhalter wieder in das Gehäuse ein.

    Normally with the HD enclosure there come a set of screws. use these to screw down the HD in the enclosure since you need to flip it up side down to reinstall it into the MBP

    Bart -

  25. oXd3ohEWeSgsIcWE
    oXd3ohEWeSgsIcWE
    QionNQlc1ANtll4c
    • Verwende zwei #1 Kreuzschlitzschrauben, um die Festplatte im Gehäuse zu sichern.

    Where are these screws coming from? Were they part of the original optical drive?

    Bradley DeHerrera -

    The new enclosure should include these two Phillips screws.

    Sam Omiotek -

    Can someone show the step of removal process of hdd/SSD placed in the caddy? I am unable to revert this process. Do we have to apply back greater force to remove back the hard drive/SSD from the caddy?

    Tarun Kumar Verma -

    Gads, I wish they made a caddy where the optical drive was removable without having to remove the entire caddy. That is a major peeve of mine. Like… just mount it the other way! I don’t want to have to go through this entire process every time I upgrade the secondary drive.

    AJH -

    These screws seems to be located in different places on different enclosures. I had serious trouble getting the SSD that the previous owner of this MacBook installed out of the enclosure until I realized the screws holding the SSD in place were on the side and not on the bottom. In case anyone else has the same issue!

    nessie1001 -

  26. wULpD1PuEZU6bo1R
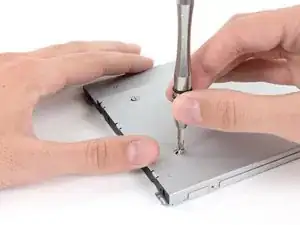
    • Befestige die Öse vom DVD-Laufwerk mit zwei #0 Kreuzschlitzschrauben am neuen Gehäuse.

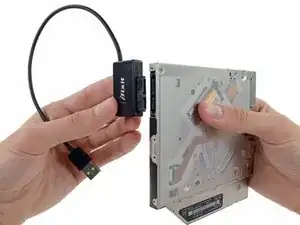
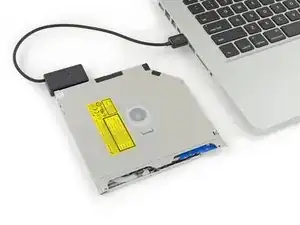
    • Verbinde alle Kabel, die du vom originalen DVD-Laufwerk entfernt hattest, mit dem neuen Gehäuse.

    Replaced the optical with hdd, as well as replaced the hard drive with an ssd. Now I get the circle with a line through it. But, when I hold the option key down, it gives me both hard drives, PLUS, the thumb drive I have in the USB port with a Mountain Lion installer. It even shows the recovery disks, but gives me the circle with the line when I choose one. Any help is appreciated.

    claude -

    Mate,

    My mbp shipped with OS 10.8, and I had upgraded twice to 10.10

    I've a 10.7 USB which upgraded my old MBP.

    My plan today was to boot with my new ssd, my time machine back up and the Lion usb plugged in.

    I would then click on the Lion usb, and tell it to put the OS and time machine back up on the ssd.

    So I help down ALT and when it started it gave me the options of the usual Mac internal or the Lion USB.

    I clicked Lion, but instead of taking me to the install options (Disk utility, restore from time machine etc etc) it gave me that grey circle with a diagonal line through it. The no entry sign - grey on grey - that I think you have.

    Some googling said that it is because I was trying to usb a 10.7 install on a MBP that shipped 10.8

    You can't go back, apparently.

    So if any of the OSs are older than the mac you got, you will get this error. The grey in grey no entry.

    I just cloned my HDD to my ssd (Carbon copy cloner free 30 day trial) using an external stat-usb3 wire and all is good.

    Rory -

    I have a 17" Macbook Pro6,1 unibody with an Intel Core i5, 2.53GHz. I was successful installing a 250GB SSD in the DVD bay, and I'm able to boot from it. I did this by first installing OS X 10.9.4 on the SSD mounted into an external HD case, testing the system to see if it would boot up into the SSD, then installing the SSD and carrier in the DVD drive bay. The system now boots up from the SSD with no problems. If you are having installation problems, I recommend trying this method.

    roger hall -

    I just have finished installing second SSD to my MBP (unibody 15` 2010).

    First one was changed like one year ago. Samsung 500GB SSD. It is in my HDD bay and I'm running system from it.

    Today I put a new Samsung 1TB 850 Evo 1 SSD in to my optic bay.

    I encounter problem with SSD not recognized by Finder.

    But It was recognized by Disk Utility.

    What I did was I erase new SSD by Disk Utility. Then the new partition was created and now It has been seen by Finder.

    So If you see it in Disk Utility just erased it.

    Some extra info in under this link--> https://discussions.apple.com/docs/DOC-4...

    Wish you all luck :)

    rybafly -

    My installation went great thanks to the guide. I did notice a small thing that might make a good tip, and that is to inspect all the visible screws. I saw one that was slightly raised, and when I poked around with the spudger, I found 2 more that had worked themselves out a bit. Its probably something super rare but at the age of these things, it wouldn't hurt to check.

    Tineyi Chapisa -

  27. 3GeKNgsubSw2qWpF
    3GeKNgsubSw2qWpF
    YDaOtdHe4DPnEmIx
    fWvjh13qskVLHsiF
    • Wirf das alte Laufwerk nicht weg! Es kann mit Hilfe unseres SATA-Laufwerk USB Kabel immer noch verwendet werden.

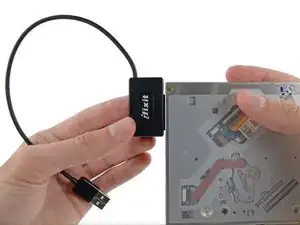
    • Richte den SATA Anschluss des Kabels mit dem Anschluss am Laufwerk aus und stecke ihn ein.

    • Stecke den USB Anschluss in deinen Laptop und das Laufwerk ist bereit zur Verwendung.

    There is a small metal button in the front of the drive and you can use that to eject the drive if you were wondering.

    Joseph Landry -

    Maybe that explain the eject button mechanism maybe….

    - PS5iscool - -

    Die neue SSD wurde durch das Laufwerk ersetzt aber leider wird jetzt die alte HDD nicht mehr erkannt. Hatte schon ein anderer das Problem?

    Alexander Richter -

    J'ai effectué le remplacement du disque optique par un DD de 250 Go en suivant ce super tutoriel !
    J'ai upgradé la RAM à 8 Go et dans un premier temps j'avais installé High Sierra (normalement non supporté sur ce modèle).
    J'ai finalement écrasé MacOs pour installer Linux Mint, le système d'exploitation est ainsi toujours à jour et tourne bien.
    Merci aux contributeurs des différents tutoriels !

    Laskoni -

    Hi everyone, is there any way to install another operating system like Linux or Windows with this update? I currently have Mac OS installed on my main drive. Hi everyone, is there any way to install another operating system like Linux or Windows with this update? I currently have Mac OS installed on my main drive. But I can't get any operating system to work on the second disk.... For example, Linux Mint installs but when I restart it it gives me problems and doesn't start.

    Samuel Zardoni -

Abschluss

Um dein Gerät wieder zusammenzubauen, folge den Schritten in umgekehrter Reihenfolge.

Brittany McCrigler

Mitglied seit: 05/03/12

90749 Reputation

6 Kommentare

Is there any drivers or anything that needs to be done on the Mac itself to install this hard drive? Can you use this hard drive to install applications onto as well?

Nathan -

Here's something important to be aware of. DVD Player will not function without a physical dvd drive installed. This is even if you use DVD image files, which I do. The explanation I got is that without that optical drive DVD Player can't check regions. If you want to watch DVDs on your mac mini, even DVD image files, don't remove the optical drive.

Bob Church -

Or, if you want to play dvd files just use vlc player... if vlc can't play it, it can't be played.

cort -

Just added a 500 gig HD I had laying around to a 2007 Mac Mini I got on eBay.....worked like a charm. Thanks iFixit!

Alexsander Jevtich -

although my optical bay hard drive enclosure did not use or have the bracket shown above with two Phillips #0 screws. And the hard drive had a different attachment system. The screws did not come in from the bottom. They came in from the side....no matter still a great solution.

Alexsander Jevtich -

I tried to open up the bottom of the mac mini but, I ended up with a bent pry tool

Alden Hughes -