Einleitung

Bist du über die Netzleitung gestolpert? Immerhin brauchst du nicht das komplette Logic Board zu tauschen.

  1. ZKHHYbytUpRyM6lK
    ZKHHYbytUpRyM6lK
    Ov6b6WHurmmNqL2m
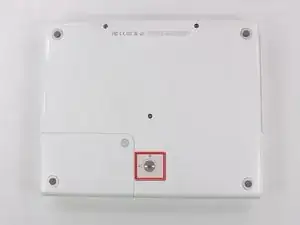
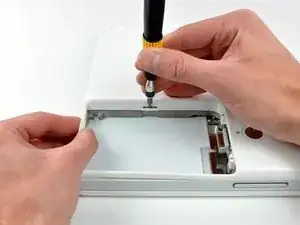
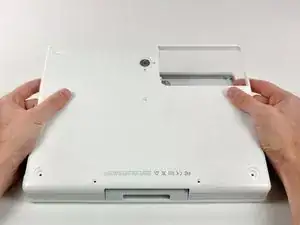
    • Lege dein iBook mit der Oberseite nach unten auf eine ebene Fläche.

    • Drehe die Batterie-Befestigungsschraube mit einer Münze im Uhrzeigersinn um 90 Grad.

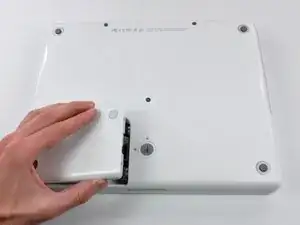
    • Hebe die Batterie aus dem Computer.

  2. xcPQcEJWVJXS6B3x
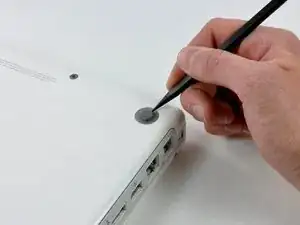
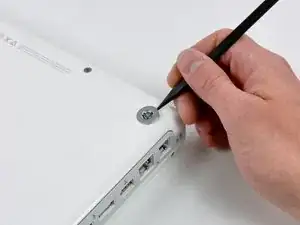
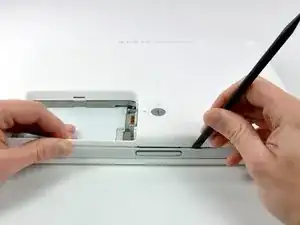
    • Nimm ein geeignetes Werkzeug, z.B. einen Spudger und entferne die drei Gummifüße vom unteren Gehäuseteil.

    "Close the display and flip the computer over." ...Seems like this instruction ought to be at the beginning of step 1 rather than step 2. In step one, the display is already closed and the computer flipped over. In step 2, you just keep it in this position and proceed from taking the battery out to removing the rubber feet.

    margaretmiz -

    Don't use a screwdriver! I broke out one of them...

    Creditcard, FIngernails would be fine.

    hugobass -

    Well, if you've had an iBook G4 this long, odds are the little rubber feet are falling off just from being looked at. Except the battery mounted one. That sucker is the Devils' Tower of little rubber feet.

    john pellino -

  3. VxoWAP5uLbisnNLQ
    • Darunter werden drei Kreuzschlitzschrauben sichtbar. Drehe sie heraus.

  4. Vtn2pSRVdGQnZBNS
    • Entferne mit dem Werkzeug die drei Metallringe, die unter den Gummifüßen befestigt waren.

    I bought & used the tool kit that you sell for this repair. The 3 rings came off when the screws came out--maybe because the screw bit holder is magnetized.

    syl57 -

    Mine also had captive screws. Note when reassembling these rings, they are directional with very small alignment tabs. Rotate the tabs (before fastening screws) until the rings are flush with the bottom cover, not slightly proud of it.

    Andrew Tingley -

  5. pZ2fcuma6eNoR1SH
    • Entferne die drei Torx T8 Schrauben.

    • Die kürzere Schraube ist in der Mitte des Computers.

    I found T9's rather than T8's.

    gdavids57 -

    I found 2mm allen screws in this location

    rneumann -

    it seems a little bit weird to be using a Torx Screwdriver (T8 or T9 as the case may be) to remove hex screws. My machine has Torx screws in these locations.

    Kostas Kritsilas -

    Definitely haha- I checked the picture and those are definitely hex screws.

    Scyth3934 -

  6. NDjTpkl6TsjAHJ3E
    • Entferne die beiden 4,5 mm langen Kreuzschlitzschrauben an den Seiten der Akkukontakte.

  7. PXufY63IupGMNqVZ
    • Atme tief ein, jetzt kommt ein schwierigerer Moment. Wir versprechen aber, das das Gehäuseunterteil entfernt sein wird.

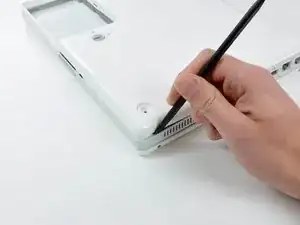
    • Drücke die Ränder des Gehäuseunterteils um das Akkufach nach innen, so dass sie über die Rasten gehen. Hebe dann nach oben, damit diese Ecke des Gehäuseunterteils frei kommt.

    When I did this, it helped to start around the disc drive

    kleitscs -

    I find that a stiff nylon guitar pick will work if you don't have a spudger.

    discodamon -

    I didn't find this step difficult at all. I have very short nails. I imagine a woman with long nails might have a problem grasping the rim and pulling up.

    syl57 -

    Definitely read the rest of the instructions now. I struggled at first... I was using my ipad with the step by step instructions and didnt scroll down past this photo, so I didnt see the sequence of how to loosen the tabs. in fact I didn't know where the tabs might be... Only discovered that part when I reassembled it. The spudger didn't work for me. Too soft, I used mostly a thin very small screwdriver.

    manyanelson -

  8. olEnPRDoh1K2onyU
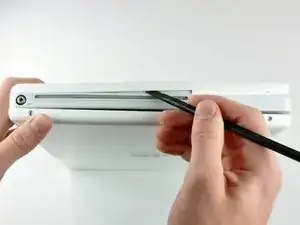
    • An der Wand des Akkufachs gibt es einen Schlitz, mit dem das Gehäuseunterteil festgehalten wird. Nimm einen kleinen Flachschraubendreher und heble diesen Schlitz am unteren Rand heraus. Ziehe gleichzeitig am Gehäuseunterteil, damit sich der Schlitz von den Rasten löst, mit denen er festgehalten wird.

  9. lQTWRyAjSpaL1wCt
    • Fahre mit einem Spudger entlang der Naht zwischen dem oberen und unteren Gehäuseteil an der vorderen Seite des Computers, um die Rasten zu lösen, mit denen das Gehäuseunterteil festgehalten wird. Ziehe das Gehäuseunterteil nach oben und benutze weiterhin den Spudger, bis du es dreimal deutlich klicken hörst.

    Steps 7-9 were effortless for me.

    syl57 -

  10. feKwLpOlE12lDufX
    • Fahre weiter mit dem Spudger um die rechte Ecke herum. Es gibt zwei Rasten an der Seite mit den Anschlüssen, eine nahe an der vorderen Ecke und eine nahe am Audioausgang.

  11. AfyPg1l26auOw3ZP
    • Bevor das Gehäuseunterteil entfernt werden kann, müssen drei Rasten über dem optischen Laufwerk gelöst werden. Schiebe den Spudger über dem optischen Laufwerk in das Gehäuseunterteil hinein und fahre mit ihm zur Rückseite des Computers hin, bis du es dreimal deutlich klicken hörst.

    try using the spudger at the back near the vents. To be specific, on the left side of the hinge when faced upside-down. It's easier this way and it's described on Apple's official repair manual.

    Jinhan Liu -

    then put a library card or something between the outer enclosure and the optical drive enclosure then pull from the other side to free the casing

    Jinhan Liu -

  12. oRkCxOWHgXOZNvU4
    • Nun sind die Vorderseite und beide Seiten des Gehäuseunterteils frei.

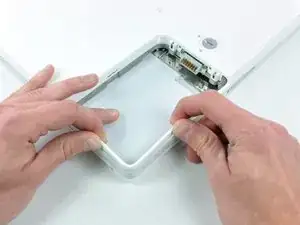
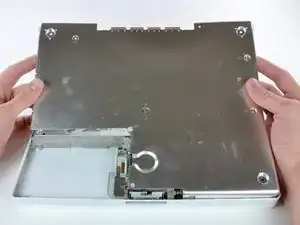
    • Drehe den Computer so, dass die Rückseite zu dir zeigt. Ziehe das Gehäuseunterteil nach oben und gleichzeitig zu dir hin, bis sich die Rasten an der Rückseite lösen.

    • Es hilft, wenn du das Gehäuse dabei auf und ab bewegst.

    Steps 10-12 were just as easy. I bought & used the Spudger, too.

    syl57 -

    this required a little more force than I felt comfortable with at first.

    Dave -

    Removing the back cover at this final step was had for me; I had to use a flathead screwdriver to separate the back edge of the cover away…I was not able to separate the lower case all the way by pulling the lower case up and toward me as shown in the photo.

    Jean S Barto -

  13. dyv22rN2KFGMIYDb
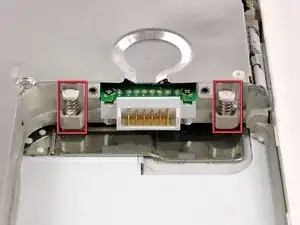
    • Entferne die beiden kleinen gefetteten Federn mit den weißen Kunststoffkappen an jeder Seite der Akkukontakte.

    • Sei weiterhin geduldig, folge den Anweisungen, dann wird das Ergebnis gut.

  14. KhpDSfTRIT12bTEr
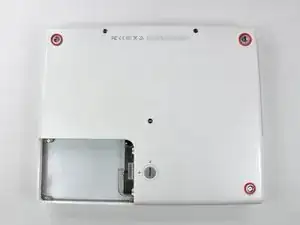
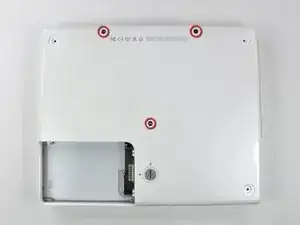
    • Entferne folgende vier Schrauben von der unteren Abschirmplatte:

    • Zwei 3 mm lange Kreuzschlitzschrauben

    • Zwei 7,5 mm lange Kreuzschlitzschrauben

    This is where things got interesting for me. I had 4 missing screws! I don't know if it came from Apple like that (highly doubtful) or if it was returned to me without the screws from the Apple Store repair I had done to replace the Latch (more likely, huh?).

    syl57 -

  15. TPlNEnHrJIHGsl6Q
    • Hebe die untere Abschirmplatte ab.

  16. pqalqi4Fddg2m5on
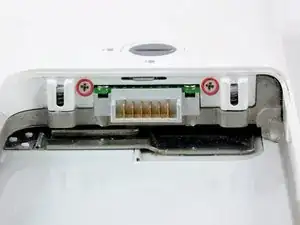
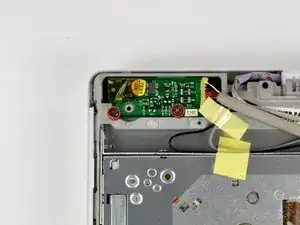
    • Ziehe soviel vom Klebeband ab, wie nötig. Entferne dann die beiden Kreuzschlitzschrauben, mit denen die Stromversorgungsplatine befestigt ist.

    Be careful here as the actual DC silver connector is raised from the chipboard so once you remove the screws use the spudger to gently lift out the DC IN board itself. There's some rubber casing around the silver connector too which got caught on the plastic casing of the laptop which required a bit of gentle poking to get free...

    loughlin -

    Again, I was missing a screw here--the left one! The process of removing this part was not a problem.

    syl57 -

    Is it necessary to remove DC cable?

    rickyzhang -

    @rickyzhang Yes, in order to remove the top case, this is required.

    CL Johnson -

    8 Bit Guy clearly bypassed that step somehow. https://www.youtube.com/watch?v=52-nCu2w...

    Adam Panák -

  17. vIVEYqnKAfYXvBPC
    vIVEYqnKAfYXvBPC
    Es1ALUxKcMTMOF1T
    • Ziehe soviel Klebeband ab, wie nötig. Löse dann das Kabel um das optische Laufwerk ab.

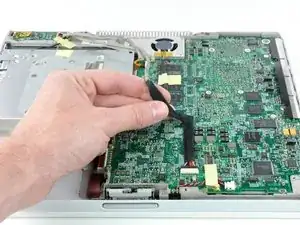
    • Trenne das Stromversorgungskabel vom Logic Board ab und Stelle die Stromversorgungsplatine schräg hoch.

    Also, once I removed it, I thought there was more to do. It happened so quickly and effortlessly! I kept wondering when the difficult and trying part was coming. I was kind of disappointed by the lack of the challenge, but that's OK! The difficult part came from reversing the directions and getting the shield back in place. A cable covering on the back edge under the shield slipped out and prevented the metal tabs from seating correctly. Once I figured that out, it was smooth sailing!

    syl57 -

    Why? It‘s not necessary

    Benjamin Grunmaurer -

Abschluss

Um dein Gerät wieder zusammenzubauen, folge den Schritten in umgekehrter Reihenfolge.

Walter Galan

708447 Reputation

2 Kommentare

A HUGE thank you! I took my old iBook G4 into the Apple store a couple years ago to ask about getting my computer fixed - the pin/needle to the charger broke off inside and I could not remove it - and they told me I could try a toothpick and superglue and try to remove the pin, otherwise they couldn't fix it. But after researching for a few hours and because of this website, I was able to purchase a new DC-in Board AND replace it myself! I'm no handy-woman whatsoever and this was very easy. A little intimidating as soon as you pull of the bottom shield, but actually replacing the DC-in Board was definitely the easiest part. Thank you so much for your step by step manual with photos. I can not thank you enough.

alicia -

I did this procedure twice on 9 June 2019; to remove a working DC-In Card from a “hanger queen” 12”iBook, and install it into an operational G4 iBook with a bad DC-In Card. I lack mechanical expertise as well as strength in my hands, but wanted to try doing this because having someone else fix my iBook would cost 3 or 4 times as much as the iBook is currently worth! Anyway, after researching the take-apart steps here and on YouTube, I first bought a toolset and spudgers from my local Micro Center before attempting the DC-In Card removal and replacement. My “hangar queen” iBook was easier to take apart since it had been worked on previously before being declared “dead.” I really had trouble separating the back cover from the working iBook because it had not been opened for a very long time. I kept at it, and was finally able to separate the back cover, remove the metal interior cover, install the “good” DC-in Card back into my working iBook, and put it back together. My iBook is now charging as it should.

Jean S Barto -