Einleitung

Grundständige Anleitung: Ausbau der unteren Halterung im iMac 27" 2017

  1. IkLPB52BKFCosy5l
    IkLPB52BKFCosy5l
    GWeQuJBpgU2XsRKa
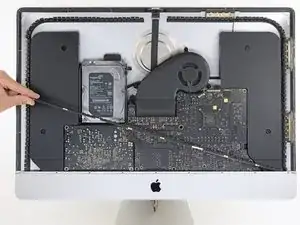
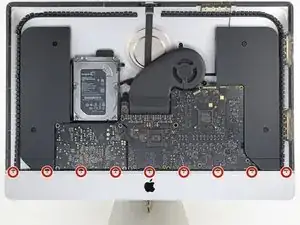
    • Entferne die neun 3,2 mm Kreuzschlitzschrauben, mit denen die untere Halterung befestigt ist.

    • Möglicherweise musst du die Display-Schutzfolie an der Unterkante des Gehäuses abziehen, um an die Schrauben heranzukommen.

    These are new steps from when I did this on my late 2015 retina iMac so I believe step 25 and 26 are optional (you can cope without doing it).

    Amuseme -

    I did not find it necessary to remove these screws and this bar

    James Orwin -

    I lost these 8 during the reassemble. The manual tells I need eight 3.2mm screws.

    Can anyone help to clarify what screws I need. I don't really understand this size. Is this M2x3mm?

    Daniel -

    If you are replacing the SSD, I highly recommend removing this support bracket as doing so will make removing internal components much easier, and helps to minimise damage to any parts.

    Not removing the support bracket does not save you any time.

    It is very easy to reinstall this support bracket.

    If you are worried about losing the screws, put them in a ziploc plastic bag.

    Ray -

  2. wTfuMb3E45pGiUFT
    • Entferne die untere Halterung (auch "Kinnriemen" genannt) aus dem iMac-Gehäuse.

    • So wird die untere Halterung wieder eingebaut:

    • Lege die Halterung diagonal ein.

    • Drehe die Schraube ganz rechts wieder teilweise hinein, so dass sie zwar die Halterung hält, diese sich aber noch drehbar bleibt.

    • Schwenke die linke Seite der Halterung nach unten, bis sie horizontal in ihrer ursprünglichen Position ist.

    • Beginne an der Schraube ganz links und ziehe die Schrauben fest.

    No comments on this ?

    It's quite possibly the most difficult part to put back in the entire process

    The screws are tiny and the there is no easy way to line up the holes on the bracket with the screws

    Having got this far - it wasn't even all that necessary to remove this part in the first place

    Severe pain in the neck

    Eoin -

    After an hour of painstaking mess - I managed to get 7 out of the 9 back in

    By that time I could care less about the remaining 2

    Eoin -

    With the right tools and technique, the bracket can easily be replaced in under a couple of minutes.

    Use a screwdriver with a magnetized tip which frees up one hand and place a screw on the tip first.

    Then line up the screw hole on just one end of the bracket and using a pair of tweezers from the side, hold the bracket in place while you put in the screw.

    Next, do the same on the other end of the bracket. After that, all of the screws in the middle are quick to replace. I didn't really have to touch the bracket again after the end screws were in place.

    Hope that helps someone else since removing this bracket does make later steps a bit easier.

    Max Z -

    I used Max Z tweezers technique but screwed one screw in at the end and then worked my way to the other end.

    Stephen B -

    Max & Stephen are correct. Not difficult at all if you start at the right end (either end, probably, but I liked staying away from the power supply), and use a magnetic driver.

    jiclark -

    How to easily reinstall this support bracket:

    1. Position the bracket the same way it’s pictured in Step 25 - diagonally

    2. Screw in the first screw on the far right - but don’t fully screw it in

    3. Lower the left side of the bracket so it’s in it’s original position (horizontal)

    4. Screw in the screw on the far left

    5. Screw all screws and fully tighten them

    Ray -

Abschluss

Um dein Gerät wieder zusammenzusetzen, folge den Schritten in umgekehrter Reihenfolge.

Adam O'Camb

Mitglied seit: 11/04/15

220588 Reputation

0 Kommentare