Einleitung

Diese Anleitung zeigt, wie das Netzteil im 17 Zoll imac Intel ersetzt wird.

  1. hxZiNdMfTd5UBC5X
    hxZiNdMfTd5UBC5X
    jrHdcI6E5RcnJOQh
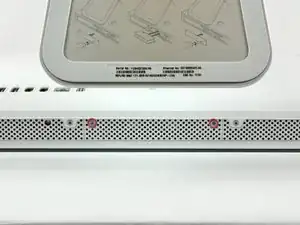
    • Löse die beiden unverlierbaren Kreuzschlitzschrauben, mit deinen die Zugangsklappe am iMac befestigt ist..

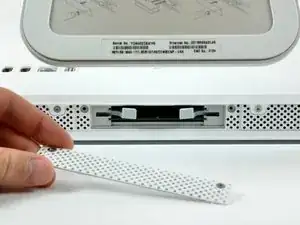
    • Entferne die Zugangsklappe zum iMac.

    • Bevor du mit der Reparatur beginnst, ziehe den Netzstecker des iMac und drücke den Ein-/Aus-Schalter für 20-30 Sekunden, um die internen Kondensatoren zu entladen.

    That is a really, really unnecessarily complex way of fitting a new hard drive. Thanks, but no thanks...

    annax -

    Zitat von annax:

    That is a really, really unnecessarily complex way of fitting a new hard drive. Thanks, but no thanks...

    annax, if you can suggest a simpler way we're all ears!

    Jake Simmonds -

    I found this guide to be very useful. The installation was super easy, especially since I've never opened my iMac before. I was able to skip steps 6, 7, 9, 10 and 14. Wish I had one of those long skinny magnetic torx screwdriver's though. I had to use duct tape to hold the screws on the end of the bit for step 12.

    I used this opportunity to vacuum out the dust with mini attachments. Much needed after 3 years ;0)

    Awesome site!!! Thanks for sharing your knowledge and saving me time and $$$!

    Eric Patten -

    Yes I did it! thanks for this very good manual

    Philippe d Anfray -

  2. l6WpNmqtB6tTifMa
    • Entferne die folgenden vier Schrauben:

    • Drei 6 mm T8 Torx.

    • Eine 8 mm T8 Torx.

    T8's on the MA590LL 17" iMac.

    Endareth -

    8mm screw is 2nd from left - useful when reassembly

    Stefano Speriani -

  3. GCiFY4DTc13hL43o
    GCiFY4DTc13hL43o
    TrmMZuGpeYhtXQbr
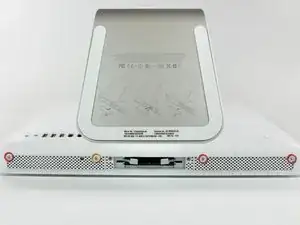
    • Drehe den iMac um und lege ihn mit der Standseite nach unten auf eine ebene Fläche.

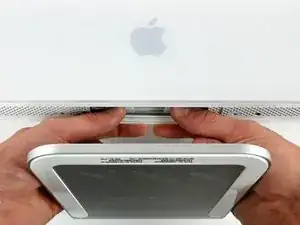
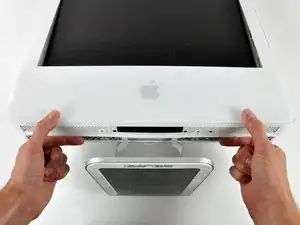
    • Um die vordere Blende vom iMac abzuheben, führe die folgenden Schritte gleichzeitig durch:

    • Verwende deinen Daumen, um die RAM-Arme einzudrücken und den iMac festzuhalten.

    • Benutze deinen Zeigefinger, um die kleine Brücke an der vorderen Blende zu dir hin zu ziehen.

    • Hebe die vordere Blende mit den Zeigefingern an.

    • Sobald die kleine Materialbrücke die RAM-Arme passiert hat, hebe die vordere Blende an ihrer unteren Kante gerade genug an, um die untere Kante des hinteren Gehäuses zu überwinden.

  4. vVcHZ6veadAdUm1V
    vVcHZ6veadAdUm1V
    43upA2MYcCjkVqEI
    xVukDXZ33b1NXD5Z
    • Richte deinen iMac so aus, dass er aufrecht auf dem Fuss steht.

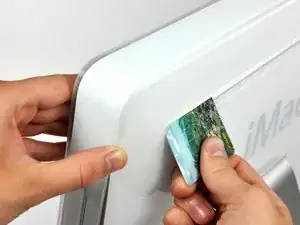
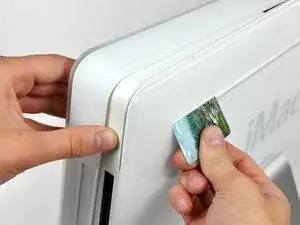
    • Führe eine Kunststoffkarte in die Ecke des Belüftungsschlitzes in der Nähe der Oberseite des hinteren Gehäuses ein.

    • Schiebe die Karte in Richtung Oberseite des iMacs, um die Verriegelung der Frontblende zu lösen.

    • Ziehe die Frontblende vom restlichen Gehäuse weg.

    • Wiederhole diesen Vorgang für die andere Seite der Frontblende.

    • Eventuell ist es nötig mehrere Schichten Klebeband auf der Oberseite der Plastikkarte aufzubringen, um das Lösen der Verriegelungen zu ermöglichen.

    • Sollte sich die Blende nicht lösen lassen, drücke die untere Kante wieder auf das hintere Gehäuse und wiederhole den Vorgang mit der Plastikkarte.

    Apple uses a powerful magnet to release these latches, but the official tool is not available. If you have access to a few failed hard drives, you can take out the magnets from those, and stack them up to have a magnet strong enough to easily open these latches.

    Simply place the magnet on an upper corner of the machine, and when you hear a click, gently pull the corner of the front case forward. Repeat the process for the other upper corner. Use care not to pull on the iSight cables.

    Note: Use care when handling the hard drive magnets, they are powerful, and you don't want them to snap together on your fingers. OUCH!

    Zaphod -

    You can use a credit card. Mine survived, though it did get a little bent.

    David Bendory -

    I used two credit cards for extra thickness and the latches released very easily.

    James French -

    The magnetic latches are about 2-3 cm from the left and right edges right at the top edge of the case. I just ran a rare-earth magnet over the from of the bezel in this area. You can hear it click when it disengages. RadioShack has these kind of magnets for $3, the call them "super magnets".

    James -

    This was a nuisance. Had to really move the card around to get it to finally release.

    Tim Dougherty -

    Be very careful not to damage the metal clips with a credit card. My iMac was very stubborn and I ended up bending the clips in a way they cannot be bent back. The clips do still work and the front bezel does still go back on, however it no longer sits flush with the back of the iMac.

    Gary Lefebvre -

    The double credit card worked for me. Have to be persistent. It's a very light latch, no force needed or anything, or any click when it releases.

    Julian Wood -

  5. 6BjhpBMMJXMguR2M
    • Lege deinen iMac mit der Standfläche nach unten auf einen Tisch.

    • Hebe die Frontblende von der unteren Kante an und drehe die Blende vom Rest des iMac weg, wobei du auf die RAM-Hebel achten mußt, die sich verfangen könnten.

    • Lege die Frontblende über den Rest des iMac.

    I found that it is much easier if you remove the top of the case first, then lay computer back on the stand & remove the bottom as directed.

    G A Long -

  6. JeU6BpqAYHH52fbg
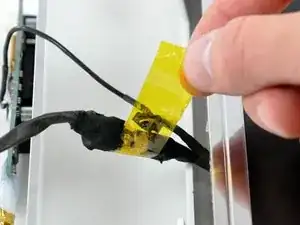
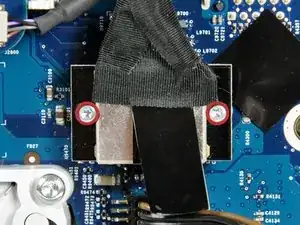
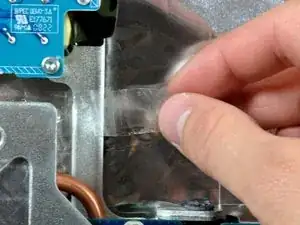
    • Wenn nötig, entferne das gelbe Kapton Klebeband (es ist ok es dann wegzuwerfen), welches um die Mikrofon- und Kamerakabel gewickelt ist.

    I was able to skip Steps 6 & 7 entirely. The microphone and camera cables had enough slack to flip the front cover off and lie it flat above the rest of the computer.

    Carly Hobeef -

    Step 4 is completely unnessecary. Just lift the bezel up and wiggle it until the metal clips let go. Then lift the bezel straight up.

    Cloudsurfer -

  7. 5CYDVbqHBIKBqYPO
    5CYDVbqHBIKBqYPO
    XfVD2huglrE2dXxG
    • Trenne die Kamera- und Mikrofon-Steckverbindungen.

    Make sure the white wire is on the same side of both parts of the connector before reconnecting.

    It is possible to reconnect the microphone cable in the wrong/reversed orientation with the connector. The microphone will still work but will be muted and result in a "tinny" sound on the receiver's end.

    creecher -

    Can anyone ID these connectors (at least the camera connector) so that I may make an extension (to move the camera out and re-house it myself). I probably have the gear to do the mic already.

    Is the camera connector some standard I can order M & F versions online to terminate to an extension cable?

    hutchwilco -

  8. 3doWRKFBHIAsUk2V
    • Löse die untere EMI-Abschirmung von der Gehäuserückseite ab.

    • Du brauchst sie nur an drei Seiten abzulösen, lasse sie noch am Display befestigt.

    • Es geht besser, wenn du die EMI-Abschirmung mit Klebeband am Display befestigst, um sie aus dem Weg zu halten.

  9. GCqCZsDpmhBagfDJ
    GCqCZsDpmhBagfDJ
    bWEEeQCC3WAKiOYv
    • Entferne die beiden 4,8 mm Torx T6 Schrauben, mit denen das Displaydatenkabel am Logic Board befestigt ist.

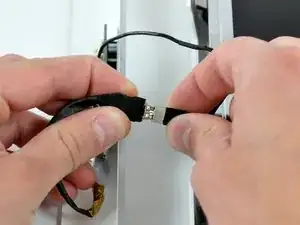
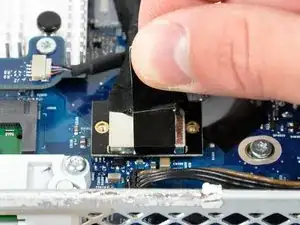
    • Fasse die schwarze Lasche am Stecker des Displaydatenkabels und ziehe ihn gerade nach oben aus dem Anschluss auf dem Logic Board heraus.

  10. fRojFAJYaFUtunLV
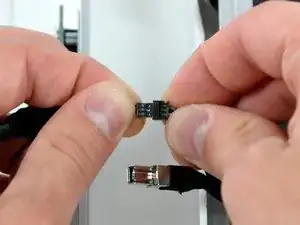
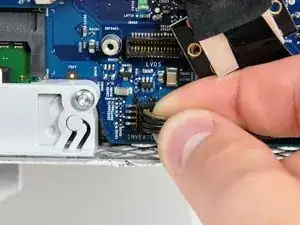
    • Das Inverterkabel an 24" iMacs wird nach links abgezogen.

    • Ziehe den Stecker am Inverterkabel gerade nach oben aus seinem Anschluss auf dem Logic Board heraus.

    The inverter connector had a different location for me. It was situated next to the top left corner of the right speaker, just under the display. I didn't figure this out until I actually lifted the display off the computer.

    Cloudsurfer -

    My 17" iMac also has the inverter cable. It located in the upper right just below the display.

    Clinton -

    I couldnt get this cable off, so I skipped this step. If you have this problem, just proceed; when you get to step 13, lift the display carefully as this cable will still be attached. You'll now easily be able to grip the connector and remove it.

    David Bendory -

  11. CSJ1tHoIsYEFb1iZ
    • Ziehe die EMI-Abschirmung aus Aluminium von den beiden senkrechten Displaykanten ab.

    • Beim Zusammenbau geht es besser, wenn du kleine Stückchen Klebeband auf den linken und rechten Klebeflächen der EMI-Abschirmung anbringst, bevor du das Display in die Gehäuserückseite des iMacs absenkst.

    Only peel back the black EMI tape that overlaps the edge of the display, not the silver tape on the display itself.

    Odesseus -

    The above note sounds as if one should peel the aluminum-foil colored tape back from the frame. Do NOT do this; instead, peel the BLACK-colored aluminum tape back from the display frame to reveal the crevice between the display and the case and the mounting screws you are about to remove.

    Valdaquende -

    I didn't actually need to peel anything at all. The screws would have been visible had I looked more carefully.

    David Bendory -

  12. hsZWYSSqY3uh4EQm
    hsZWYSSqY3uh4EQm
    1IBaEELCXg5KFiRq
    • Lasse die EMI-Abschirmung vom Display herunterhängen.

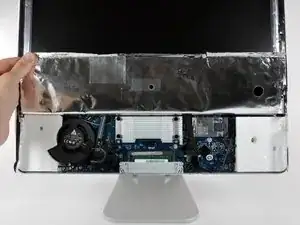
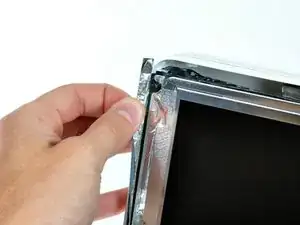
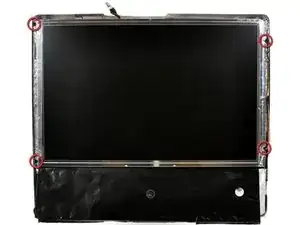
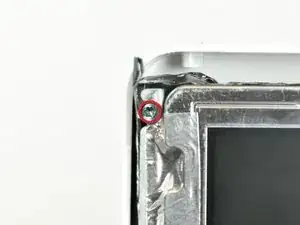
    • Entferne die vier 8 mm Torx T10 Grobgewindeschrauben mit 2 mm breiten Kopf, mit denen das Display an der Gehäuserückseite befestigt ist.

    • Diese Schrauben sitzen vertieft, ein dünner Schraubendreher, so wie dieser hier, ist zum Entfernen unverzichtbar. Bits sind dafür zu kurz.

    • Wir empfehlen sehr, einen magnetischen Schraubendreher zu verwenden, damit die Schrauben nicht in den iMac hineinfallen können.

    To put the T10 screws back, you'll need a magnetic head T10 screwdriver or a long, tweezer-like device found in a good set of computer tools. The screws are WAY down there and it is difficult if not impossible without the right tools.

    Monkee -

    If your thin torx driver is not magnetized, you can hold another, magnetized, driver against it as a temporary solution.

    Si B -

    If you really want to tackle it without proper tools: with a non-magnetised thin torx loosen the screw till its ready to come out, then wrap a little bit of duct tape (sticky side out) around the head of a spare thin screwdriver, gently push the duct taped screwdriver on top of the loosened screw. The magic tape will lift the screws out.

    When re-assembling, it's also a good way to fish out the screws that missed the holes completely when your expert fingers skills are classed as clumsy.

    Mark -

    You must have a magnetized Torx 10, 2 to 3 inches in length to safely get these screws out. Fortunately if you have the T10 you can magnetize it with your iMac.

    Inside the front bezel are two magnets that hold your apple remote to the case, simply tap the T10 to the larger magnet 3 or 4 times and test it's strength in holding a weighty screw. You are good to go. I did this and the scary lose a screw into the iMac was diminished with a firm hold in both removal and install.

    rwpete63 -

    If you don't have a magnetic screwdriver or they are aluminum screws, you can use this old mechanics tip: Use a small piece of paper or celophane tape on the head of the screw, then press the screwdriver into it, this creates a nice snug hold so you can reinstall the screws.

    Greg Olson -

    I was able to slightly bend the plastic case to get my driver to seat. This was the most challenging part of the teardown and reassembly because I did not have the proper tool.

    Tim Dougherty -

  13. A1JGpUqMRA2Onn1W
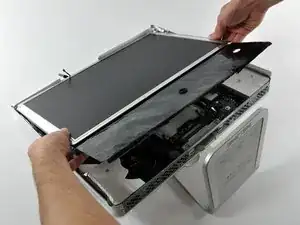
    • Hebe das Display an der Unterkante an und ziehe es zu dir hin, so dass sich die EMI-Abschirmung von der Oberkante löst.

    • Achte darauf, dass sich beim Ausbau keine Kabel verfangen.

    Steps 14 & 15; If you remove the top screw, and just loosen the bottom screw you can rotate the optical drive clip out of the way, tighten it, then screw the top screw back in to hold the logic board down for later trying to remove the connector. You also save three more parts kicking around on the desktop.

    dentoni -

  14. VxOwpyxUrEorvQOL
    • Löse die verschiedenen Stromversorgungskabel hinter der Festplatte.

    Didn’t seem any reason for the fiddly de-routing of the cables so I just left them which caused no problems.

    nijafe -

  15. UnvWIAWmwrph3vQU
    UnvWIAWmwrph3vQU
    DM21QkjNXSAL6AmR
    MrTHDNNUaZVeirsu
    • In manchen Modellen kann ein Wärmesensor auf der Festplatte liegen. Sollte deine Hauptplatine keine Sensorbefestigung haben, wie auf dem roten Kästchen auf der ersten Seite dargestellt, kannst du diesen Schritt überspringen.

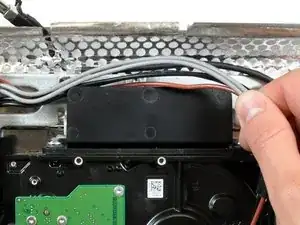
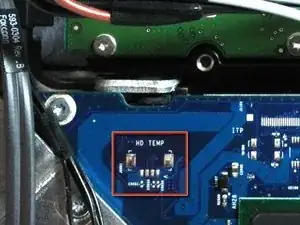
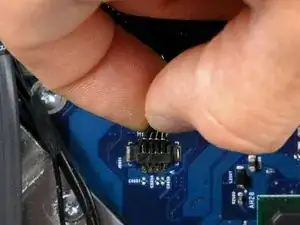
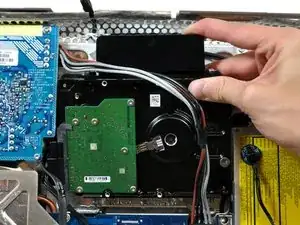
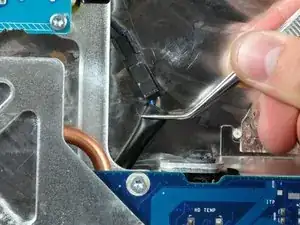
    • Ziehe den Stecker des Wärmesensors der Festplatte aus seinem Anschluss auf der Hauptplatine.

    • Ziehe an diesen Stecker parallel zur Oberfläche der Hauptplatine in Richtung der oberen Ecke des iMac.

    • Benutze einen Spudger, um den Wärmesensor mit dem Klebstoff von der Festplatte abzuhebeln und bringe ihn wieder auf der selben Stelle der Austauschfestplatte an.

    There was a thermal sensor attached to the HD. You can peel it off and glue it on the new HD and attach the connector back again.

    map -

    I think there is no need to mess whit the connector. just peel it off and glue it on. the connector is very week.

    thanks for ever ifixit!

    sebalancea -

    My thermal sensor was magnetised. I just pulled it off my old HD and put it on my new one. It sticks perfectly to the metal casing.

    Cloudsurfer -

    There was a thermal sensor attached to my previous HD but not to the new one. But without this sensor, the iMac was down :-( (logic board ?)

    I was forced to re-install the old HD with the temp sensor on.

    Except this point, related to my iMac, thanks ifixit for this great manual

    Jerome -

    I found it easier to take the sensor off the Hard Drive, not the logic board. The stickiness holding it place on the old drive was sticky enough to hold it in place on the new drive.

    Leif -

    Just in case anyone wants to know why this is an issue. 😊

    The sensor on the hard drive is there to send a signal to the logic board so it knows the hard drive isn’t running too hot.

    Apple moved this sensor into the hard drive on some later models of the iMac. Removing these drives and replacing them with a standard non-Apple certified drive causes the logic board to not get a temperature sensor reading which in turn causes the panicked logic board to ramp up the Fan to the highest possible speed.

    The iMac normally boots but with the fan on max. speed makes a lot of noise. There are external sensors available for this case so you can add whatever hard drive you like.

    Ricardo Santos -

  16. 2dVFIrEmGGnSNU6b
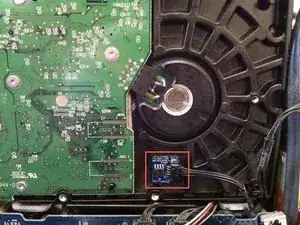
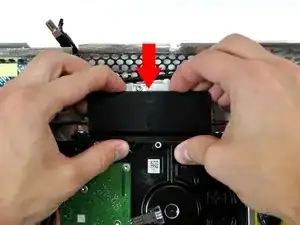
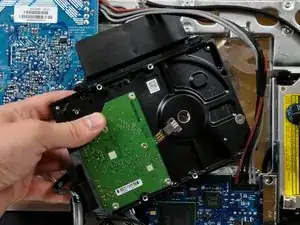
    • Drücke die Festplattenhalterung nach unten, um sie von dem hinteren Gehäuse zu lösen. Drehe dann die Oberseite der Festplatte zu dir hin.

    • Der Druck auf die Oberseite der Festplattenhalterung nach unten, den es benötigt, um die Halterung vom hinteren Gehäuse zu entfernen, muss ausreichend stark sein. Wir empfehlen deshalb, dass du deinen iMac auf einen Tisch legst, damit du ihn nicht versehentlich umwirfst.

    • Solltest du Probleme beim Lösen der Festplattenhalterung haben, kann die Halterung von der Festplatte entfernt werden, indem du die zwei T8 oder T10 Schrauben, mit denen die Halterung an der Festplatte befestigt ist, löst.

    I was applying a considerable amount of force and was not getting anywhere and I was afraid it was going to suddenly release and the resulting jerk would break something else. I noticed that all I was trying to do is get a plastic tap to go past a metal plate. There was plenty of room with no other components around so I stuck a medium screw driver behind the plastic latch and applied a small amount of pressure and it unlatched very nicely. I pried on one side and then the other to release it on both sides. For me this method worked a lot better.

    flyingmonkey1 -

    When I was trying to remove this bracket, it broke right off!! do you think i could super glue it back together, or order a new one? or does it even need one?

    danielle -

    The drive bracket wasn't moving until i placed my fingers exactly as shown in the picture and firmly applied force. Then it moved easily.

    Clinton -

    I also struggled trying to get the bracket loose by pressing down. I finally took FlyingMonkey's suggestion about the screwdriver and it came right off.

    Rachael Whitaker -

    I too was afraid I would break the bracket. I removed the screws that held the bracket to the hard drive. This allowed the hard drive and bracket to come right out.

    Roscoville -

    Never managed to get it off. But Lucky to have a screwdriver with a pull out flexible end which made unscrewing the T8 screws on the bracket the easiest option.

    Then lift drive up at bracket side, leaving bracket in place.

    nijafe -

  17. RH6fCALZWrjeJLHo
    RH6fCALZWrjeJLHo
    Ym5gvcGmFqu6F1WH
    • Hebe die Festplatte aus den unteren Pins und ziehe sie aus dem hinteren Gehäuse heraus. Achte auf die Netzkabel, die sich verfangen könnten.

    • Wenn du deine Festplatte wieder neu installierst, solltest du darauf achten, dass du die beiden Gummiüberzüge nicht aus ihren Haltelöchern im Gehäuse herausdrückst. Um sie wieder herauszuholen, müsstest du die Hauptplatine entfernen.

  18. 1oSbjVHP3qWsSrbP
    1oSbjVHP3qWsSrbP
    TDdN5WegEA2mPmcm
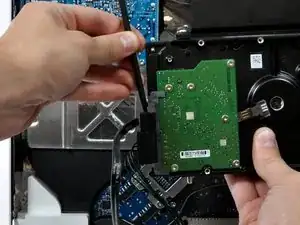
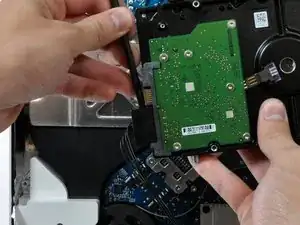
    • Setze einen Spudger zwischen die SATA Stecker und drehe ihn, um den Stecker von der Festplatte zu trennen.

    • Trenne beide SATA Stecker ab.

    I really didn't need a spudger to pull the cables off.

    Cloudsurfer -

  19. xrfRcCFunYHUgeNA
    • Bei den nächsten fünf Schritten musst du mit der Hand Nähe an der freiliegenden Netzteilplatine arbeiten. Berühre sie nicht, die großen Kondensatoren könnten noch geladen sein und einen kräftigen elektrischen Schlag austeilen.

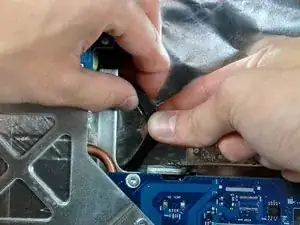
    • Drücke die Entriegelung am Stecker der Stromversorgung mit einem Spudger zu dir und ziehe ihn aus dem Anschluss heraus.

    • Die Entriegelung zeigt zur Gehäuserückseite hin.

  20. YcZbMxfaJQOhEMLP
    • Entferne, wenn nötig, das Stückchen Klebeband, mit dem das Netzkabel unter dem Rahmen gehalten wird.

  21. LUI32OKoCeLfLdQX
    LUI32OKoCeLfLdQX
    XtkUoDWDMTCx3OvR
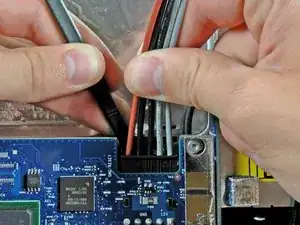
    • Ziehe das Netzkabel mit einer Pinzette to unter dem Rahmen heraus.

    • Drücke die Entriegelung am Stecker des Netzkabels und ziehe ihn gleichzeitig aus seinem Anschluss heraus.

  22. fSifwqoe3R1s4DCj
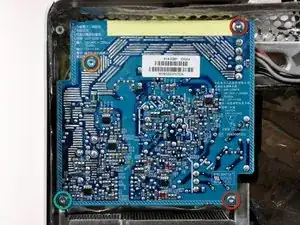
    • Entferne die vier Torx T10 Schrauben, mit denen das Netzteil an der Gehäuserückseite befestigt ist:

    • Zwei 14 mm lange Schrauben mit Feingewinde an der rechten Seite

    • Eine 14 mm lange Schraube mit Grobgewinde in der unteren linken Ecke

    • Eine 20 mm lange Schraube mit Grobgewinde in der oberen linken Ecke

    Power supply seems to differ – is split in two parts.

    Peter Pavek -

    for re assembly I found it was easier to reattach the cables of the power supply before screwing the latter into place, remembering to route the smaller cable under the chassis

    osdoctor1 -

  23. Z4PnZLFLH41sNTc5
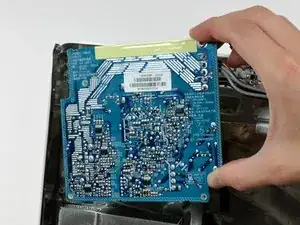
    • Hebe das Netzteil aus der Gehäuserückseite heraus, achte dabei darauf, dass das Zuleitungskabel sich nicht am Rahmen verfängt.

Abschluss

Um dein Gerät wieder zusammenzubauen, folge den Schritten in umgekehrter Reihenfolge.

Walter Galan

708447 Reputation

5 Kommentare

It was quite easy, but a little fiddly. I didn't need to remove the hardrive to replace the power supply.

cjmaxwell -

The PSU in the 17” is smaller than shown and has the DC - DC convertor above it.

Marcus Evans -

DC - DC convertor is above the psu in the 17” model and the psu is half the size than that shown.

Marcus Evans -

I wanna try this because my imac no longer turns on, but i dont know if its my power supply. I press the power button and it turns on barely for a second and then turn off completely. it makes the sound when a mac turns on and the screen turns on for a sec…..what should I do?

Jess -

@jess : Check this out: My iMac will not turn on? – it explains how to read the diagnostic LEDs.

Ernst de Haan -