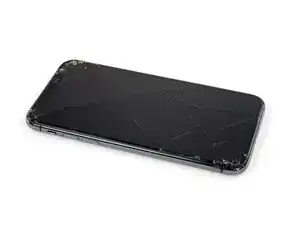
Einleitung

Akkus im iPhone sollten nach 500 Ladezyklen noch mindestens 80% ihrer ursprünglichen Kapazität haben, das genügt bei einem normalen Gebrauch für 18 bis 24 Monate. Danach muss das iPhone wahrscheinlich öfter geladen werden und iOS gibt eine Warnung aus, dass die Leistung eingeschränkt ist (anders gesagt: das iPhone wird langsamer). Diese Anleitung zeigt, wie der Akku getauscht werden kann, um wieder die ursprüngliche Leistungsfähigkeit zu erhalten.

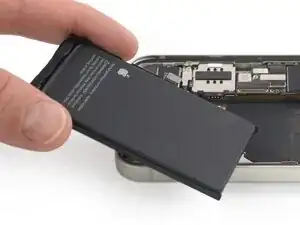
Wenn dein Akku aufgebläht ist, musst du geeignete Vorsichtsmaßnahmen treffen.

Hinweis: Unter iOS 17.6 und früher kann es vorkommen, dass dein iPhone nach der Reparatur eine Warnung über die "Echtheit" des Akkus ausgibt, selbst wenn Originalteile verwendet wurden. Wenn dein iPhone normal funktioniert, brauchst du diese Meldung nicht zu beachten. Unter iOS 18 und neuer musst du den Akku mit Hilfe von Apples Repair Assistant authentifizieren.

Um beste Ergebnisse zu erreichen, solltest du nach der Reparatur den neuen Akku kalibrieren : Lade ihn auf 100% auf und lasse das Ladegerät noch mindestens zwei weitere Stunden angeschlossen. Benutze dann das iPhone, bis es wegen leeren Akkus von selbst ausgeht. Lade es dann ununterbrochen auf 100% auf.

Für einige der Bauteile werden zum Wiedereinbau Ersatzklebestreifen benötigt.
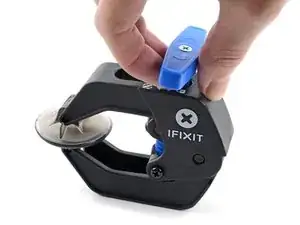
  1. ByiiAO26RDQLNDGS
    ByiiAO26RDQLNDGS
    BdJkXeHW4RxNU42g
    • Bevor du beginnst, entlade deinen Akku auf unter 25%. Ein geladener Lithium-Ionen-Akku kann sich entzünden und/oder explodieren, wenn er bei der Reparatur versehentlich beschädigt wird. Falls dein Akku aufgebläht ist, musst du entsprechende Vorsichtsmaßnahmen treffen.

    • Schalte dein iPhone aus, bevor du mit dem Zerlegen beginnst.

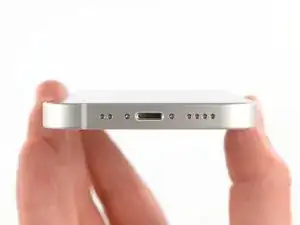
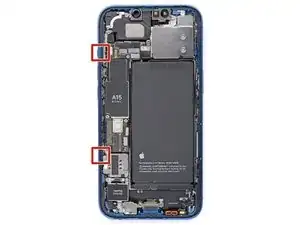
    • Entferne die beiden 6,8 mm langen Pentalobe-Schrauben an der Unterkante des iPhone.

    • Wenn du das Display des iPhone öffnest, werden seine wasserfesten Dichtungen beschädigt. Halte Ersatzdichtungen bereit, bevor du nach diesem Schritt weitermachst, oder vermeide es, dein iPhone Flüssigkeiten auszusetzen, wenn du es ohne neue Dichtungen wieder zusammenbaust.

  2. 6UPwoloGBO4tmVoS
    6UPwoloGBO4tmVoS
    BmSYPJmOy6dbHipF
    3EOdQPAGOmiuhoKU
    • Wenn du ein Plektrum zu tief einschiebst, kann das Gerät beschädigt werden. Dieser Schritt zeigt, wie du eine Marke am Plektrum anbringen kannst, damit das nicht passiert.

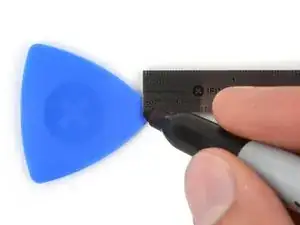
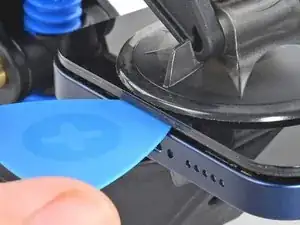
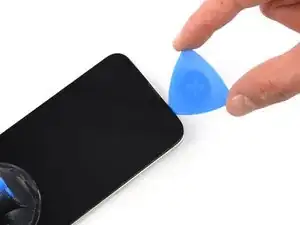
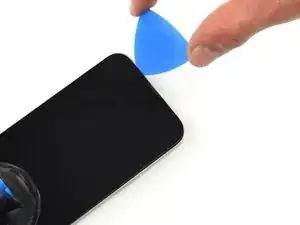
    • Zeichne mit einem Permanentmarker 3 mm von der Spitze des Plektrums entfernt einen Strich.

    • Du kannst die anderen Ecken ebenfalls mit Strichen in verschiedenen Abständen markieren.

    • Du kannst auch eine Münze so mit einem Klebeband auf das Plektrum kleben, dass sie einen Abstand von 3 mm zur Spitze hat.

    • Apple verkauft ein spezielles Trennwerkzeug im Self-Service-Reparatur-Store. Damit kann der Displaykleber sicher aufgetrennt werden.

    Got to step 2 and realized the fix kit doesn't include an opening pick! Looks like a guitar pick, and I have those lying around. Is that expected? Looks like the pick is used in many steps below. There's a little blue crowbar that isn't mentioned in the instructions. Perhaps that replaces the opening pick?

    Sloan Looney -

    Hi! I can't see which guide you were using when writing this comment. Can you reply here with which guide and fix kit you used?

    Clay Eickemeyer -

    I see you posted this in Meta. I hope it's resolved soon! In the meantime, a guitar pick may work well enough for your repair.

    Clay Eickemeyer -

    what fix kit?

    Meow Purr -

    Super late reply to original post but my pick was with the replacement screen and not the tools kit.

    Nichol Augustus -

    My fix kit didn't include an opening pick either

    WILLIAM HARRIS -

    Make sure you check inside the black boxes after emptying them. My pick was stuck inside one of the boxes.

    AndyF -

    My AliExpress refurbished screen came with a pick that has a coin-like circle that pops out, so no modification was necessary

    Gijs Leegwater -

    the picture shows 3 cm but the description says 3 mm's. Which one is it?

    John Pena -

    That is a misunderstanding. It is a ruler with a scale for cm, it shows 0.3 cm, i.e. 3 mm.

    VauWeh -

    Oh, come ON!

    Big Ed -

    It will ALWAYS be millimeters on a phone, but this step is ridiculous, skip it!

    Leif DeWolf -

    @leifdewolf I wouldn't skip it for a first repair.

    Gabriel-Science -

    It's not an Ifixit KIT if it doesn't include everything. You'll need to order the opening pic separately. Or head to Walmart like myself and look for guitar pics. Hopefully, this will work just as well.

    Jaleeljb97@icloud.com -

    No pick in mine as well. It’s really not clear that you have to order this separately when ordering an IPhone SE 202/2022 screen repair kit. Is this the case?

    Jackson Castiglione -

    Frustrated, I ordered a compact package where everything was encapsulated. Useless suction tools could not separate the screen. If it is unable to decouple the screen, then why sucking suction tools you have provided.

    Shourob Datta -

    For my kit the triangle pick was stuck inside the box with the screen not with the other tools maybe it's also there for you

    Henry Scheibehenne -

    Y’all are getting far, FAR too detailed with some of this stuff…. Measuring and marking the pick that you won’t actually use to open the device?!? lol that’s kinda funny. Just heat it up, grab a spudger, and the back just pops right off! The iFixit tech need to stick to the KISS method more often, you know KEEP IT SIMPLE STUPID!!! Like l, for reals, I’ve been doing this stuff for YEARS and using iFixit guides regularly and this is just ridiculous at this point!

    Leif DeWolf -

    Will the phone still work if the sensor assembly on the back of the screen is damaged?

    Mutshidzi Rambau -

    I don't have a pick, but how much better are these picks than an old credit card for opening an iPhone 13 mini?

    mike eng -

    an old credit card will do that job, although you'll have to pull a little bit more if the credit card is thicker than the picks, just again, be careful and don't insert it that far

    Russ Torrez -

    The pick in my iFixIt kit was packed with the battery, not with the rest of the toolkit.

    Tony Houlihan -

    Many of these comments are PURE GOLD. Seriously y’all, if you’re not sure if it should be 3mm or 3cm or whether you could find and use an alternative pick, mending an IPhone really isn’t for you. Find a responsible adult and get back to doing something simpler…

    Alasdair Cameron -

    indeed!!!! I agreee!!!

    Lonnie -

    I bought the kit of five just in case. I used two and marking them at 3mm was definitely helpful.

    Megolina -

    Funktioniert super. Habe vorher sicherheitshalber den Akku abgesteckt.

    Lukas D -

  3. pvyofbGR6QDZLwuT
    pvyofbGR6QDZLwuT
    uHpIXSCwsv5aX6k2
    qDfr6bv6XxVSWXYb
    • Wenn dein iPhone ein zerbrochenes Display hat, klebe dieses mit Klebeband ab, um ein weiteres Splittern und mögliche Verletzungen zu vermeiden.

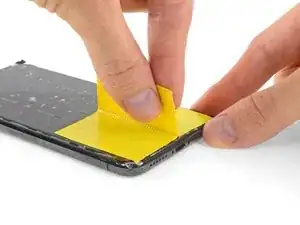
    • Lege so viele überlappende Streifen von durchsichtigem Klebeband übereinander, bis das gesamte Display abgeklebt ist.

    • Trage eine Schutzbrille während der Reparatur, um deine Augen vor möglichen Glassplittern zu schützen.

    • Falls es dir in den nächsten Schritten nicht gelingt, den Saugheber auf dem Display zu befestigen, kannst du alternativ ein festes Stück Klebeband nehmen und in eine Art Griffschlaufe falten und damit das Display anheben.

    • Falls alles nicht hilft, kannst du den Saugheber mit Sekundenkleber auf das Display kleben.

    Yes, tape to cover the cracks. Guess what also loses adhesion when you apply heat to it,&&^&^$^ tape.

    dylan brune -

  4. nomKPGPYQmVXKkY4
    nomKPGPYQmVXKkY4
    u2VWMGNpSNEWhWhn
    wdIbZZ2ZcndTbHWn
    • Wir haben die Anti-Clamp entwickelt, um das Öffnen von Geräten zu erleichtern. Die nächsten drei Schritte zeigen, wie sie verwendet wird. Wenn du sie nicht benutzen willst, überspringe die nächsten drei Schritte und folge einer anderen Methode.

    • Genaue Anweisungen für die Anti-Clamp findest du hier.

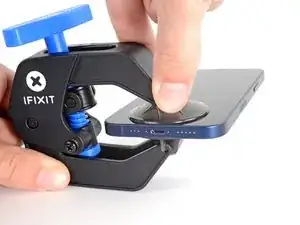
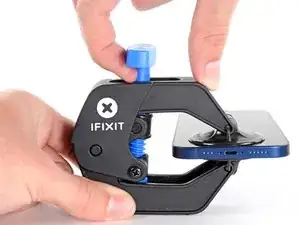
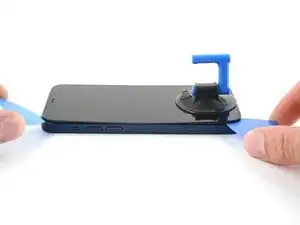
    • Ziehe den blauen Griff nach hinten, um die Arme der Anti-Clamp zu entriegeln.

    • Schiebe die Arme entweder über die rechte oder die linke Kante deines iPhones.

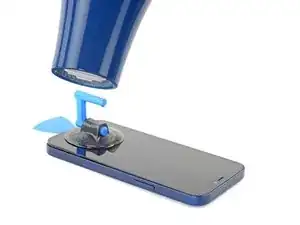
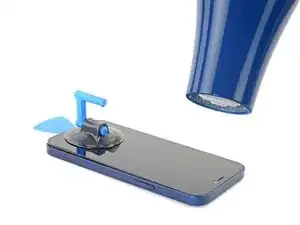
    • Bringe die Saugheber nahe an der Unterkante des iPhones an, einen auf der Vorderseite, den anderen auf der Rückseite.

    • Drücke die Saugheber auf den Oberflächen fest.

    • Wenn die Oberfläche deines iPhones zu rutschig für die Anti-Clamp ist und diese nicht gut hält, kannst du Klebeband benutzen, um eine griffigere Oberfläche zu schaffen.

  5. QAZAG12HZt4ymkfM
    QAZAG12HZt4ymkfM
    hqqQq1tU46iiXLQv
    XG1WOiVw4haPnbZL
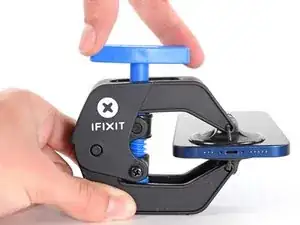
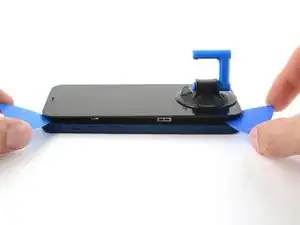
    • Ziehe den blauen Griff nach vorne, um die Arme zu arretieren.

    • Drehe den Griff 360° im Uhrzeigersinn, oder soweit, bis du merkst, dass sich die Saugheber dehnen.

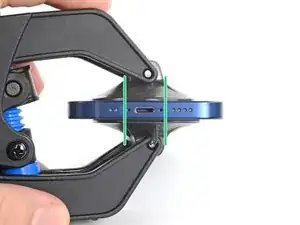
    • Achte darauf, dass sich die Saugheber weiterhin gegenüber stehen. Wenn sie sich nicht mehr gegenüber stehen, dann löse die Saugheber ein wenig ab und schiebe sie in die richtige Position.

  6. QImf2HMVTecJsNYY
    QImf2HMVTecJsNYY
    PdUh3NIj6JOFRBEW
    x1dkLGaMEDFJ2MaR
    • Lege dein iPhone auf einem stabilen Gegenstand ab, z. B. einem Buch mit festem Einband, damit es frei und parallel liegt; so lässt es sich in den folgenden Schritten leichter handhaben.

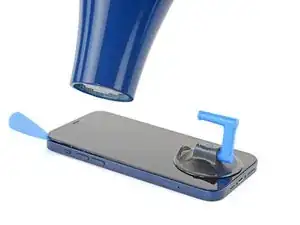
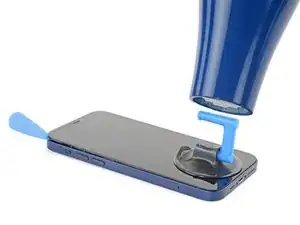
    • Erhitze die untere Kante des iPhone mit einem Fön. Das Display sollte sich beim Berühren etwas zu heiß anfühlen.

    • In dieser Anleitung wird genau erklärt, wie man einen Fön verwendet.

    • Warte eine Minute, damit sich der Klebstoff lösen kann und ein Spalt entsteht.

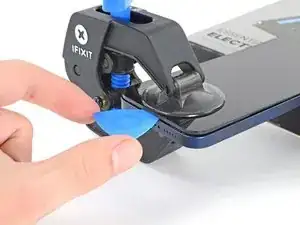
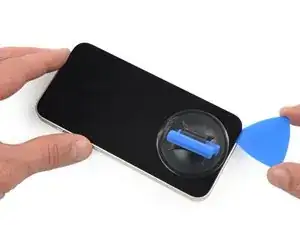
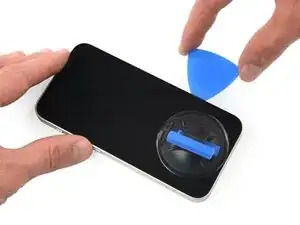
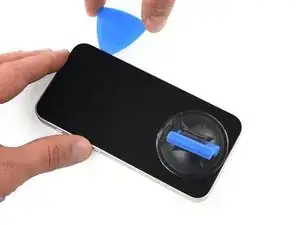
    • Setze ein Plektrum unter die Kunststoffeinfassung des Displays ein, sobald die Anti-Clamp einen ausreichend großen Spalt gebildet hat.

    • Wenn die Anti-Clamp keinen ausreichenden Spalt öffnet, erhitze den Bereich stärker und drehe den Griff um eine Viertelumdrehung.

    • Drehe den Griff nicht mehr als eine Viertelumdrehung auf einmal und warte jeweils eine Minute zwischen den einzelnen Umdrehungen. Lasse die Anti-Clamp und die Zeit die Arbeit für dich erledigen.

    • Überspringe die nächsten drei Schritte.

    Make sure as you are prying the screen that the thickness of the screen looks like it does in the picture. Be very careful to slice the adhesive between the bezel and the device not between the screen and the bezel as I did.

    Reed -

    i shouldve bought this tool... now i ripped the cable to the screen cuz the screen came off easier than i thought. now i gotta buy a new screen lol since i was just trying to replace the back shell...

    Hayabusa 530 -

    Same problem as noted above. The screen separated from the bezel and I couldn't tell until it wouldn't fold open as described. So, make sure the thickness at the separation is NOT just that of the glass screen. It should also include the surrounding metal plate, the "bezel". You can tell by comparing yours to the photo.

    Locke Wilson -

    Noted as above, didn't realize there is a metal assembly that should come off with the screen until I got to a point where it didnt look like the guide or the video.

    Vishal Mansuria -

    ほかの方も記載している通り、ピックをさす際に細心の注意が必要です。有機elのパネル自体の張り合わせが強くないため誤って差し込んでしまうと簡単に壊れてしまいます。有機elパネルは高価なため安価な液晶スクリーンにグレードダウンすることになってしまいました(t_t)

    aosiro -

  7. DXVJqMSTNoNsgZmT
    • Benutze einen Fön oder eine Heißluftpistole, um die Unterkante des iPhones 90 Sekunden lang bzw. bis sich das Display etwas zu heiß anfühlt, zu erhitzen.

    • Lasse den Fön nie zu lange auf eine Stelle gerichtet.

  8. gc1DbP6iqYjfWshi
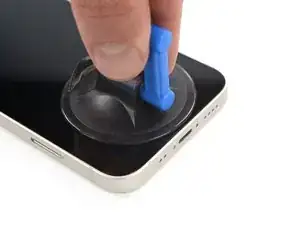
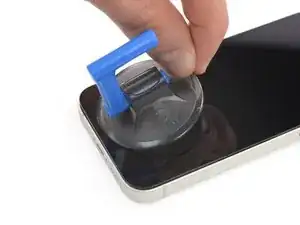
    • Wenn du einen einzelnen Saugheber benutzen willst, dann bringe ihn so nah wie möglich an der Unterkante des Smartphones an.

  9. e1dK1xEJxTfcVLKq
    e1dK1xEJxTfcVLKq
    VPQXZHseIw6MBrKx
    6nnBtHV1qYbWeVbN
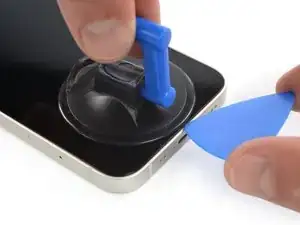
    • Ziehe den Saugheber fest und gleichmäßig nach oben, so dass ein kleiner Spalt zwischen dem Display und dem Rahmen entsteht.

    • Setze ein Plektrum in den Spalt unter der Kunststoffeinfassung des Displays ein.

    • Achte darauf, dass du das Plektrum zwischen die Kunststoffblende und den Metallrahmen schiebst. Wenn du das Plektrum zwischen die Glasscheibe und den Kunststoffrahmen setzt, wirst du das Display beschädigen.

    • Das Display ist stark mit wasserfestem Kleber befestigt. Um den Spalt zu erzeugen, muss ziemlich viel Kraft aufgebracht werden. Wenn dies zu schwer geht, dann erwärme es nochmals und ruckle die Scheibe vorsichtig auf und ab, bis der Kleber schwächer wird und ein ausreichend großer Spalt für das Plektrum entsteht.

    Take care on this step: it's possible to delaminate the glass from the frame holding the screen and vital components together. If you're not aware, you could continue working away (as I did) delaminating the entire glass from the frame only to discover you've messed up. The entire assembly is about 1mm thick and visually looks like two layers (as shown in the last photo here).

    Brent L -

    I broke my screen here. There is a seam in between the glass and the components. Don’t stick your pick in there or it will break. Stick it below the black bezel

    ecwskier -

    As with Brent above, I managed to separate the glass from the frame. Didn't realise until I was at step 18 below. Everything felt fine and looked unbroken until it was too late. So; the glass / screen could be 2x as thick as you think.

    David Wall -

    I’m grateful for the words of caution. I really had to take my time on this step. Actually had to reheat the phone multiple times without any success. Then I tried using an alcohol wipe along the edge of the phone, squeezing the wipe to allow some of the alcohol down along the edges. That was the magic touch that finally let the adhesive loose. Patience is the word.

    wade walters -

    I was doing the heating - pulling process but at a certain point, the screen cracked. Now I can't pull anymore and my screen is destroyed even though it can still work. I don't really know how to repair this...

    matthieu tremblay -

    Even though I read the comments, I crashed the screen. I inserted the plectrum carefully and instantly slipped between the screen and its board. I might have not heated the device enough as I used the iOpener.

    I would highly appreciate a better instruction here and a closer zoom on the removed screen.

    sbb -

    I too delaminated the glass from its surrounding plastic bezel, even after reading all the comments. I highly recommend finding a video of this process. The screen/bezel unit is held together by an adhesive gasket- just like the bezel-to-frame adhesive. So it seemed I was doing the exact right thing. The plastic bezel includes retention structures for the top sensors and lens cavities, so when I got that far I realized something was wrong. If you're like- but wait what are all these structures you're referencing- then find a video. It would be great if ifixit would produce or link such a video, and/or better macro photos.

    Michael Szetela -

    Another broken screen here, just happened about ten minutes ago so I believe my memory is still fresh - when pulling on the suction cup to create a gap on the bottom edge, I believe the only gap that appeared was the one that was behind the glass. I don't believe I "created" the gap by inserting my pick in the wrong place, the gap was there when I pulled on the suction cup. So right now I'm not sure how I could have avoided this. Maybe by heating it up more?

    goblazers -

    Did the same thing as many people here. I did not insert the pick deep enough and accidentally cracked the screen by getting in between the glass and the screen itself.

    Albert Svendsen -

  10. ZEWwUd1VKFpLNHnH
    ZEWwUd1VKFpLNHnH
    vxW4gGTiscfcZjjd
    • Erhitze die rechte Kante des iPhones (die Kante mit der Einschalttaste) 90 Sekunden lang mit einem Fön bzw. so lange, bis das Display etwas zu heiß zum Anfassen ist.

  11. utIUPTVOaPOp1Ifx
    utIUPTVOaPOp1Ifx
    O3sVLQxU3UtCbveS
    JyIfEVAZUhSNvJaA
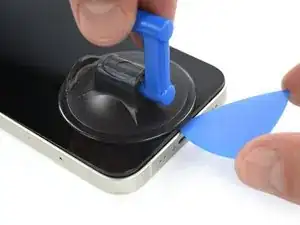
    • Schiebe das Plektrum um die untere rechte Ecke herum und an der rechten Seite des Smartphones nach oben, um den Displaykleber aufzutrennen.

    • Setze das Plektrum nicht mehr als 3 mm ein und schiebe es nicht mit Gewalt durch erkaltete Stellen, du könntest sonst abrutschen und Bauteile im Inneren des iPhones beschädigen.

    • Lasse das Plektrum in der oberen rechten Ecke stecken, bevor du weitermachst.

    This procedure cracked my screen. Do not move too fast with the pick, and make sure to heat it before hand. Not sure what else can be done to prevent a cracked screen here

    Kristo Jorgenson -

    cracked my screen to. The pleck sliped cause I was to afraid to damage something intern so it sliped out and cracked the display.

    Tariguz -

  12. 3YUMT2CHgElg5VOQ
    • Erhitze die Oberkante des iPhones 90 Sekunden lang mit einem Fön bzw. so lange, bis das Display etwas zu heiß zum Anfassen ist.

  13. ZCG5NVqdocby1GPW
    ZCG5NVqdocby1GPW
    OMva3FZdafurBsCc
    FhZtShTebyNBx4BB
    • Schiebe das Plektrum um die obere rechte Ecke herum, um den Kleber zu durchtrennen.

    • Setze dein Plektrum nicht tiefer als 3 mm ein, du könntest sonst die oberen Sensoren beschädigen.

    • Lasse das Plektrum in der oberen linken Ecke stecken, bevor du weitermachst.

  14. xO2l2HZJc1muXP11
    xO2l2HZJc1muXP11
    C5gwyDhXaAymJMeD
    • Erhitze die linke Kante des iPhones 90 Sekunden lang mit einem Fön bzw. so lange, bis das Display etwas zu heiß zum Anfassen ist.

    iPhone 13Mini H.S. a cette étape .

    Macé -

  15. LeorCMl1FMcbETas
    • An der linken Kante deines iPhones befinden sich empfindliche Kabel. Setze dein Plektrum hier nicht ein, da sonst die Kabel beschädigt werden könnten.

    Wo ist die "linke Seite"? (Blick auf das Display?) Was bedeuten die roten Quadrate auf dem Bild vom geöffneten Gerät? Zur Orientierung wäre es passend, die Lage der Lautstärke + bzw. - Tasten anzugeben.

    anyone nobody -

    Yes, they mean the “left side” as if you’re looking at the display (which is already removed in this photo, of course). If you enlarge the photo, you can just barely see the two volume buttons protruding out slightly from the edge (as well as the ringer-off/mute switch just above them).

    I’m not sure what the red squares are indicating either. Maybe they’re showing something relevant to another repair guide where they use the same photo…

    (Probably terrible Google translation):

    (Wahrscheinlich eine schlechte Google-Übersetzung): Ja, sie meinen die „linke Seite“, als ob man auf das Display schaut (das auf diesem Foto natürlich bereits entfernt ist). Wenn man das Foto vergrößert, kann man die beiden Lautstärketasten, die leicht aus dem Rand herausragen, gerade noch erkennen (sowie den Klingelton-Aus-/Stummschalter direkt darüber).

    Ich bin mir auch nicht sicher, was die roten Quadrate bedeuten. Vielleicht zeigen sie etwas Relevantes für eine andere Reparaturanleitung, in der dasselbe Foto verwendet wird …

    Chris -

    Immediately ripped left cable here. Have done iFixIt repairs many times. Very disappointed!!

    Seth Kaplan -

  16. yFckTkxJQV1LwVUA
    yFckTkxJQV1LwVUA
    DrfwXaAUvrJ3qpBH
    • Setze ein zweites Plektrum in die untere linke Ecke des iPhones ein.

    • Drehe beide Plektren gleichzeitig, bis sich die Clips an der linken Kante lösen.

    • Drehe die beiden Plektren langsam.

    • Wenn du Schwierigkeiten hast, den Kleber zu lösen, erhitze die linke Kante erneut.

    In my opinion, twisting the picks is setting yourself up for disaster. Done too hard, even slowly, and the potential energy buildup in the display at the clips could send the display flying fast enough to rip the cables you’re trying to protect. Unfortunately there is no real good way that I know to open the left side. I managed with only slight difficulty to open it by sliding the puck as you would on the other edges, but being very careful to do it slowly, paying particular attention to how deep the pick is inserted and how far up from the bottom to slide before getting too close to the cable. You can slightly lift the screen enough to see where the cable is so as not to damage it. When you’ve slid the pick close enough that you don’t feel safe sliding it any more there should be enough of a leading gap that you should be able to put another pick in in front of the first on the other side of where the cable is. Once you do that the last clip is right there around mid way up from the bottom of the phone.

    Thousand Sunny -

  17. A6WHmMQGKB6oxNDa
    • Ziehe an der kleinen Noppe am Saugheber, damit er sich vom Front Panel löst.

  18. GLQiEdBCG6FcV6lm
    GLQiEdBCG6FcV6lm
    3YqSYNiGN2RQrZrM
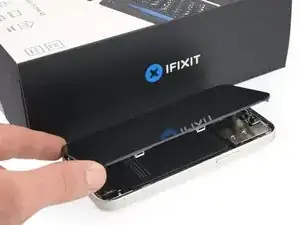
    • Drehe dein iPhone so, dass die rechte Kante zu dir zeigt.

    • Öffne das iPhone, indem du es von der rechten Seite her wie einen Buchdeckel aufschlägst.

    • Versuche noch nicht, das Display ganz zu entfernen, es ist noch mit empfindlichen Flachbandkabeln am Logic Board des iPhones angeschlossen.

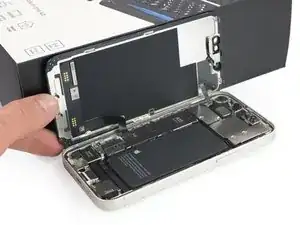
    • Lehne das Display gegen einem stabilen Gegenstand, so dass es während der Reparatur senkrecht stehen bleibt.

    • Lege das Display beim Zusammenbau in der richtigen Position hin und richte die Rasten an der Oberkante aus. Drücke dann erst die Oberkante fest und lasse das restliche Display einrasten. Wenn es nicht gut einrastet, dann überprüfe den Zustand der Rasten um den Rand des Displays, achte darauf, dass sie nicht verbogen sind.

    Frame of the screen ripped apart from the rest, I was using hot air gun with my newly acquired Anti-Clamp tm

    Jobas -

  19. KLe2YjWtRXUQG5kV
    • Entferne die beiden 1,2 mm langen Y000 Schrauben, mit denen die Abdeckung am Stecker des Akku- und Displaykabels befestigt ist.

    • Halte während der ganzen Reparatur alle Schrauben gut geordnet und achte darauf, dass jede Schraube an ihren alten Platz zurück kommt, sonst kann das iPhone schwer beschädigt werden.

    • Beim Zusammenbau ist jetzt eine gute Gelegenheit, um alle Funktionen zu testen, bevor du das iPhone wieder zuklebst. Vergiss nicht, es danach wieder auszuschalten.

    나사가 1개 밖에 보이지 않는데 왜 나사 2개를 풀라고 하는 거죠?

    hello world -

  20. 1x34KdU3TWSITTSQ
    1x34KdU3TWSITTSQ
    ETBGNqNgchaTVWlp
    • Entferne die Abdeckung des Display- und Akkukabelsteckers mit einer Pinzette.

    This cover has an almost hinge like catch. If the cover is still laying flat you should apply lateral motion toward the battery, taking extra care to not damage the battery connection ribbon.

    James -

    thanks, that was excactly my problem!

    lucas -

  21. 1cTopM5GU6iPMVQW
    1cTopM5GU6iPMVQW
    VYeTVBm1VKJCyQXf
    Or3clFmSofBrikGt
    • Heble den Akkustecker und den Displaystecker mit einem Spudger aus seinem Anschluss auf dem Logic Board hoch.

    • Beschädige dabei nicht die schwarze Silikondichtung am Stecker. Diese Dichtungen schützen zusätzlich gegen Staub und Feuchtigkeit.

    • Biege den Stecker ein wenig vom Logic Board weg, damit er sich nicht wieder versehentlich verbinden und während der Reparatur das Gerät mit Strom versorgen kann.

    • Um Press-fit-Verbinder wie diesen hier wieder anzuschließen, musst du ihn sorgfältig ausrichten und erst an einer Seite herunterdrücken, dann an der anderen. Drücke nicht in der Mitte. Wenn der Stecker nicht richtig aufgesetzt wird, können die Kontakte verbogen und dauerhaft beschädigt werden.

  22. KQyxRhIYUbApWJvY
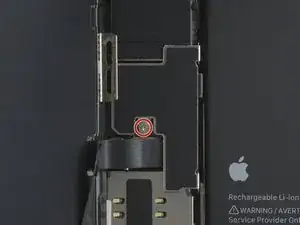
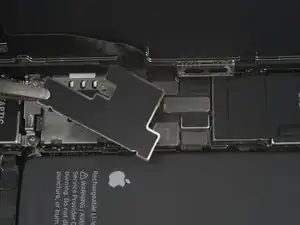
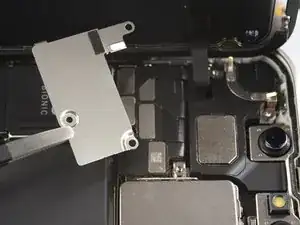
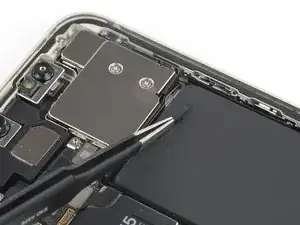
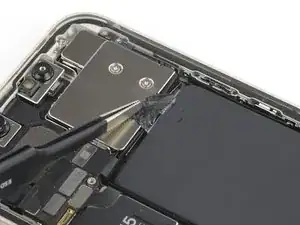
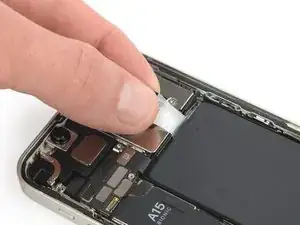
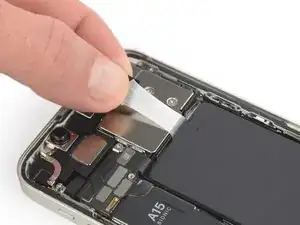
    • Entferne die drei Schrauben, mit denen die Abdeckung der Frontsensoreinheit befestigt ist.

    • eine 1,4 mm lange PH000 Schraube

    • eine 1,8 mm lange Y000 Schraube

    • eine 1,2 mm lange Y000 Schraube

    Please fix your kit! You ship a PH000, but in the video you show a PH00 (and that’s what it is)

    Connor Luckett -

    This needs to be a PH00 as previous comment mentioned. The wrong bit was included in my kit. Thankful I had the right one in a spare kit from previous repairs.

    Creuzy -

  23. mwAAonIRqIkdFXKh
    mwAAonIRqIkdFXKh
    5EygfgGy65MRBPVO
    • Entferne die Halterung der Frontsensoreinheit mit einer Pinzette.

  24. CplKT1Q5CQOMY3Lq
    CplKT1Q5CQOMY3Lq
    vDM1rHsmmTLRHHkX
    • Trenne den Stecker am Kabel zur Frontsensoreinheit mit einem Spudger ab.

    Mist…. Flachkabel von Frontsensoreinheit abgerissen…. Oh Mann. Was nun? Beim öffnen trennte sich der Rahmen vom Display. Dieser war sehr fest mit dem Gehäuse verklebt … Funktioniert das Display auch ohne Frontsensor? Klar, dann ohne Face ID.

    Sonst noch ein Tipp von den Experten?

    Harald Schober -

    Soweit ich weiß funktioniert es auch ohne, aber da könnten noch mehr Funktionen betroffen sein als nur Face ID. Wenn du es sowieso schon offen hast, wäre es vielleicht am besten, doch gleich auch ein neues Kabel reinzumachen: https://de.ifixit.com/Anleitung/iPhone+1....

    Sandra Hiller -

  25. nPES1VHYtBE5fqV1
  26. 1WCCP1cQLOV2jZMJ
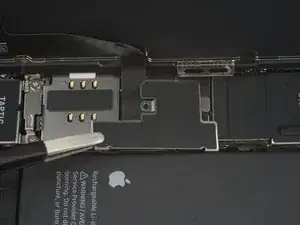
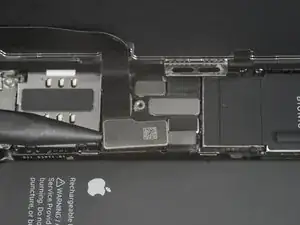
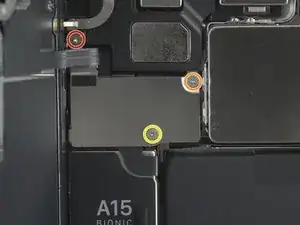
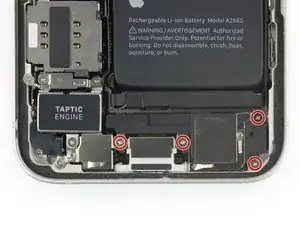
    • Entferne die vier 1,5 mm langen Kreuzschlitzschrauben #000, mit denen der Lautsprecher befestigt ist.

    The Philips bit that was shipped with the kit broke here after only unscrewing one other screw, the top right screw for the speaker assembly was stuck. I barely managed to get the other two out and back in, but since it was stuck, and the bit broken, and since I couldn’t find any of my many other bit kits having just moved and all, I was forced to proceed without the speaker removed. Though all the release tabs on the battery broke because of that, the battery came out easily enough with some isopropyl.

    Thousand Sunny -

    Please fix this to say PH00 bit.

    Creuzy -

    4本とも同じビスではなく右下のビスだけ細いです。あとの3本は同じです。

    GCT OJSN -

  27. PAwrDTPbsGUn5n5T
    PAwrDTPbsGUn5n5T
    bZP4L3DFviCgPMxa
    • Entferne den Lautsprecher mit einer Pinzette.

  28. prHVMtPQG6TlElcu
    prHVMtPQG6TlElcu
    v2lYMjVBBrkmDKQs
    • Der Akku ist mit drei elastischen Klebestreifen am Rückgehäuse befestigt, zwei an der Unterkante des Akkus, einer an der Oberkante.

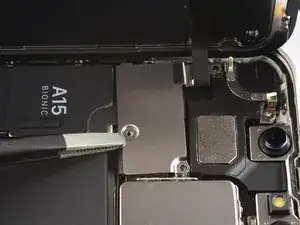
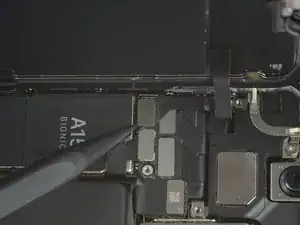
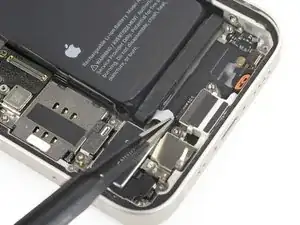
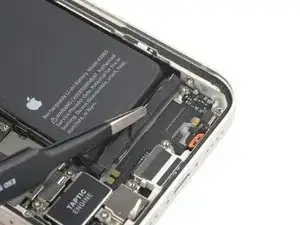
    • Ziehe die Lasche am elastischen Klebestreifen nach unten von der Unterkante des Akkus ab.

    • Achtung: Beschädige den Akku nicht mit irgendwelchen scharfen Werkzeugen. Ein angestochener Akku kann gefährliche Chemikalien verlieren oder in Brand geraten.

  29. NgJySNXmMmU1ayXA
    NgJySNXmMmU1ayXA
    IR4See5LOWxSuaHB
    UmucVlwoE3wOdqkN
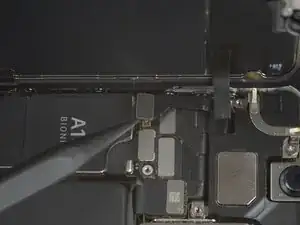
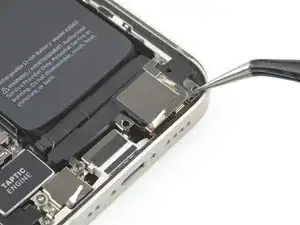
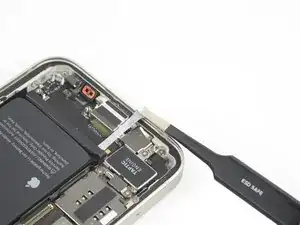
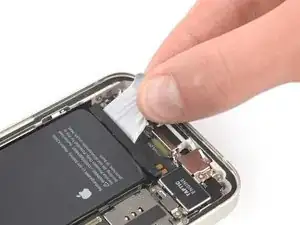
    • Fasse die untere rechte Zuglasche mit einer Pinzette oder den Fingern und ziehe sie langsam vom Akku weg zur Unterkante des iPhone 13 mini hin.

    • Ziehe fest genug, dass der Streifen angespannt bleibt, aber auch nicht zu fest. Lasse dem Streifen Zeit, sich auszudehnen und unter dem Akku loszulassen.

    • Drücke den Akku nicht nach unten. Halte das iPhone an den Seiten fest.

    • Halte den Streifen glatt und knittere ihn nicht. Ziehe gleichmäßig am gesamten Streifen, nicht in der Mitte oder an der Seite.

    • Ziehe in einem flachen Winkel, damit der Streifen nicht an der Kante des Akkus entlang schabt.

    • Wenn der Streifen reißt, dann versuche, ihn mit den Fingern oder einer stumpfen Pinzette zu greifen und weiter herauszuziehen. Versuche nicht, unter dem Akku zu hebeln.

    • Wenn einer der Streifen unter dem Akku reißt und nicht herausgeholt werden kann, dann versuche zuerst, die anderen Streifen herauszuziehen. Fahre dann mit den nachfolgenden Schritten fort.

  30. LRQHUWjIJloceCGL
    LRQHUWjIJloceCGL
    X5uP5IDQHQdRetn6
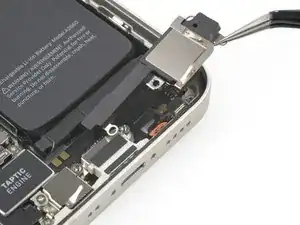
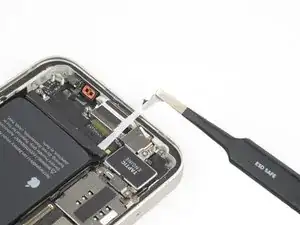
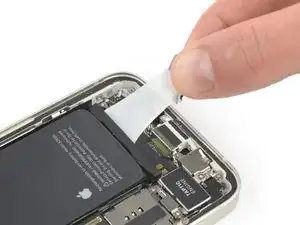
    • Fasse die breite Zuglasche mit einer stumpfen Pinzette und ziehe sie langsam vom Akku weg hin zur Unterkante des iPhones.

  31. LGey2ehSaDAZ4UBU
    LGey2ehSaDAZ4UBU
    3MvPsmJjYCJJXyBA
    2JYFybXBr2CkHNUR
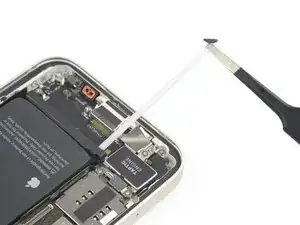
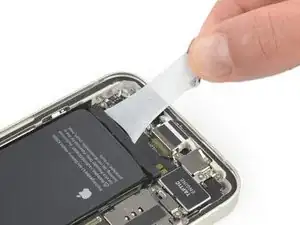
    • Fasse die zweite Zuglasche mit den Fingern und ziehe sie vom Akku weg hin zur Unterkante des iPhones.

    • Verfahre genauso wie im vorigen Schritt beschrieben: drücke den Akku nicht nach unten, halte den Streifen flach, knittere ihn nicht und ziehe in einem flachen Winkel.

    • Wenn der Streifen reißt, dann versuche, ihn mit den Fingern oder einer stumpfen Pinzette zu greifen und weiter herauszuziehen. Versuche nicht, unter dem Akku zu hebeln.

    • Wenn der Streifen unter dem Akku reißt und nicht herausgeholt werden kann, dann fahre mit dem folgenden Schritt fort.

  32. Om4LyuXpTv3pQ3tC
    Om4LyuXpTv3pQ3tC
    M3E1RBVcGXqlOAok
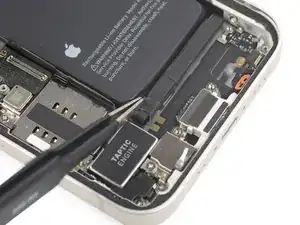
    • Fasse die obere Zuglasche mit der Pinzette und ziehe sie langsam vom Akku weg hin zur Oberkante des iPhones.

    Regardless of Battery charge, if compromised in anyway shape or form, you will have sparks and you will toast your battery.

    Evan Williams -

  33. PCUMDNpTZ2sM5XQ3
    PCUMDNpTZ2sM5XQ3
    ScEFjkQPNFyJuGdT
    • Ziehe auch die letzte Zuglasche mit der gleichen Methode heraus, um den Akkuklebestreifen zu entfernen. Passe auf, dass der Klebestreifen nirgends hängenbleibt.

    • Wenn der Klebestreifen unter dem Akku abgerissen ist, dann gib einige Tropfen hochkonzentrierten Isopropylalkohol (mindestens 90%ig) unter die Kanten des Akkus in der Nähe des/der gerissenen Streifen.

    • Lasse den Alkohol ungefähr eine Minute lang einwirken.

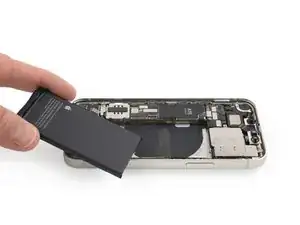
    • Hebe den Akku behutsam mit dem flachen Ende eines Spudgers an.
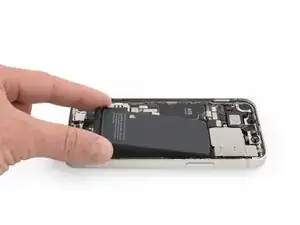
    • Heble den Akku nicht mit Gewalt heraus. Wenn es nötig ist, kannst du noch etwas mehr Alkohol dazu geben, damit der Kleber noch mehr aufgeweicht wird. Verbiege den Akku niemals mit dem Hebelwerkzeug und stich ihn nicht an.

  34. nO1yZDvI6qIanKL6
    nO1yZDvI6qIanKL6
    dkanq24IOneNXKU3
    • Entferne den Akku.

    • Wenn noch Reste vom Alkohol im Smartphone verblieben sind, dann wische sie sorgfältig weg oder lasse sie trocknen, bevor du den neuen Akku einbaust.

    • Verwende diese Anleitung, um neue Klebestreifen am Akku anzubringen.

    • Führe nach dem Zusammenbau einen erzwungenen Neustart durch. Dadurch können manche Probleme vermieden und die Fehlersuche erleichtert werden.

    Or, just pay a professional repair shop to replace your battery - cost $100.

    Michael Owen -

Abschluss

Schalte, wenn möglich, dein Gerät ein und teste die Reparatur, bevor du das Gerät wieder verschließt.

Befestige den neuen Akku mit vorgestanzten Klebestreifen oder doppelseitigem Klebeband. Um ihn korrekt zu positionieren, befestige den Kleber an den Stellen, wo sich der alte Kleber befand, und nicht direkt auf dem Akku. Drücke den Akku gut fest.

Um dein Gerät wieder zusammenzubauen, folge den Schritten in umgekehrter Reihenfolge. Reinige die Klebestellen zuvor erst mit Isopropylalkohol (mindestens 90%ig).

Je nach Ersatzteil kannst du es möglicherweise mit Hilfe von Apples Repair Assistant kalibrieren, verfügbar ab iOS 18. Führe ein Update des Gerätes durch, navigiere zu Einstellungen Allgemein Über Parts & Service History, tippe auf Restart & Finish Repair, und folge den Anweisungen auf dem Display.

Um beste Ergebnisse zu erreichen, solltest du nach der Reparatur den neuen Akku kalibrieren.

Entsorge deinen Elektroabfall fachgerecht.

Hat die Reparatur nicht den gewünschten Erfolg gebracht? Versuche einige grundsätzliche Lösungen oder frage in unserem iPhone 13 mini Answers community nach.

Adriana Zwink

Mitglied seit: 18/12/19

64739 Reputation

33 Kommentare

Schade, dass Apple die Reparatur von Iphones nicht mehr kostengünstig zulässt. Das wird die Gebrauchtmarktpreise und somit den Wert der Handys stark verringern...

Mike B. -

Does this repair disable the ability to view the current charge percentage of the battery in the top right of the screen?

James Bender -

No, but it will take a few charge cycles to get an accurate reading. iPhone will re-learn what 100% is, based on how the battery behaves. It is recommended that your run your phone for a couple of COMPLETE charge cycles:

1. Charge it to 100%.

2. Leave on charger for an additional hour.

3. Don’t charge your phone again until it is below 5% (ideally, until empty).

4. Repeat once.

This gets you back to accurate reading, sooner. More importantly, it’ll extend the life of the battery.

Also do this if you haven’t used your phone in a while (a couple of months or more).

Read more about this by looking up: priming a lithium battery.

Last note: do not leave a lithium powered device on its charger all day or 24/7. (Laptops, phones,etc.). It’s bad for the battery and will greatly reduce its life.

This is why, when you charge your iPhone overnight, on a regular basis: iPhone will charge to 80%, then finish the charge in the morning. Batteries degrade/deteriorate faster at 100%.

Emmanuel Bouys -

Das Glas hat sich leider bei mir von dem Display gelöst... Jetzt ist es kaputt.

Es wurde keine große Kraft aufgewendet, man hätte ruhig hier warnen können, bzw. irgendwie auf etwas hinweisen können um dies zu verhindern..

Stefan -

Hallo liebes ifixit Team,

leider habe ich auch am 25.12.2023 mein iPhone 13 mini in den Himmel geschickt. Als der Spalt nach dem Erwärmen und dem Zug am Saugnapf größer wurde, dachte ich jipppiiiii es klappt, allerdings bin ich mit dem Werkzeug leider zwischen Glas und Elektronik gekommen und habe somit das Display gefetzt.

Ein Hinweis, wie dick ungefähr das Display samt Elektronik ist, wäre hier sehr hilfreich gewesen.

Eure Anleitung ist top, allerdings merkt man erst zu spät, dass sich Realität und Foto eurer Anleitung nicht decken. Dann ist es zu spät und das Display ist defekt.

Viele Grüße

Christian

Christian Ide -

Hat super geklappt. Schließe mich den Vorrednern an: Ein Hinweis bzgl. des auf dem Display aufgeklebten Rahmen (der auch am oberen Lautsprecher und den Kameras fest verbaut ist), würde auf diesen sensiblen Bereich und der Möglichkeit etwas zu zerstören geholfen.

phrankme -

My iPhone 13 mini doesn't look like this inside. The earpiece grille is not a part of the screen and the screen connector is on the top edge, not the side. I think this guide caused me to break my phone. I am very upset.

frustrated -

I have an iPhone 13 mini that will not turn on with a new battery, but turns on just fine with the old battery. I've tried 2 different batteries now and the first one wouldn't charge and always showed 1%. The 2nd battery doesn't turn on at all.

Vista7814 -

Ich kann Christian in dieser Kommentarspalte nur zustimmen.

Liebes Team, es gehört wirklich eine rote Warnmeldung an den Schritt, wenn das Display mit dem Plektron gelöst wird. Es passiert leicht (so wie mir leider auch), dass man versehentlich zwischen Displayglas und Displayelektronikeinheit kommt und so das Display zerstört. Dies könnte man verhindern, wenn nochmals mit roter Schrift auf die "Dicke" der abgelösten Displayeinheit hingewiesen wird.

(ENG)Dear team, there really should be a red warning message on the crotch when the display is detached with the pick. It's easy (as unfortunately happened to me) to accidentally get between the display glass and the display electronics unit and destroy the display. This could be prevented if the ‘thickness’ of the detached display unit was indicated again in red lettering.

Arne -

Hallo, er wäre schön, diese Anleitung als .pdf laden zu können.

Hier auf dem IPad ist die Schrift doch sehr klein. Ausgedruckt könnte der gerade notwendige

Arbeitsschritt in beliebiger Schriftgröße neben dem Reparaturfall liegen.

Andreas -

Kommentar mit Wusch nach .pdf bitte entfernen! Habe den Download gefunden.

Andreas -

So does just replacing the battery work? Or do I have remove a part from the old battery and solder it to the new battery for it to work ?

Liz -

The cable of the battery is longer than the original i’d say 3mm or so. this caused a problem of connection with the mother board, I had to press the battery down and put pressure on the cable for it to enter, thankfully it worked but this isn’t good!

majd makarem -

Das mit dem Bildschirm muss man tatsächlich aktualisieren, auf dem Foto wird leiter genau der Fehler dargestellt der von meiner Vorredner beschrieben wurde. Ansonsten konnte ich meine Batterie gut Tauschen.

Andreas Gross -

Now going to an Apple Store... I am joining the group of other people damaging their screen because it's not mentioned how thick the screen assembly vs. only the glass is. I've repaired things before and that's something that should definitely be mentioned in the instructions. Very disappointed.

Eric R -

Excellent guide, was able to do this repair with no issues having no previous iPhone repair experience.

nevets1912 -

The guide needs to be updated, it needs better photos and emphasis showing the risk of removing the top glass over the screen, which was quite natural to do when you see a gap while pulling the screen. If you don't remove the whole screen frame, you will end up removing the glass of the screen and this will kill your screen, a €50 repair becomes a way more complicated €250 repair (if you get a OLED replacement part... or you can make you phone worse with the LCD one).

R4f4 -

I deleted my previous comment, wherein I expressed my disappointment that the screen glass separated from the thick surround with the clips that hold the screen assembly to the phone. This guide should be updated to reflect how fragile the bond is between the screen glass and the thick plastic surround, and to be careful not to pull the screen away from that component. The adhesive seal is unusually strong (which this guide states), and as such it can be stronger than the bond between the two critical screen components. Mostly, I'm disappointed in Apple for this error. I proceeded with the battery replacement and installed a new adhesive seal. My screen, particularly on the top-left corner and down the left edge, doesn't sit down completely with a good seal due to the separation described. But that's another repair for another day.

fleming42 -

Yup, another customer that had to buy a new screen after performing this repair. It is absolutely not clear enough from the instructions how deep the screen bevel sits. Using suction removed the screen glass from the bevel without raising the bevel above the lip of the rear body. Even reading the many comments does not convey the delicacy of the screen separation. Considering how many people have this issue, it is unfortunate that ifixit has not included better pictures and video for this sequence of steps. Pretty disappointed, I would've been better off taking it to a third party repair shop, as it is the cost is turning out to be 2x the cost of a paid repair. I recommend against doing this repair yourself unless you are specifically experienced in repair on this model.

Michael Szetela -

🚨🚨🚨 Ich kann mich nur den ganzen anderen Kommentaren hier anschließen 🚨🚨🚨
Ich habe hier auch der Anleitung blind vertraut, und eigentlich habe ich Reparaturerfahrung. Außer in einem kleinen Absatz in rot (der viel zu inflationär gebraucht wird) wird aber nicht ausdrücklich genug davor gewarnt, dass man mit dem Plektrum unter den Plastikrahmen kommen muss. Als es hieß "nicht das Glas sondern das Metall" bin ich erstmal vom klassichen Problem ausgegangen, dass man das Panelglas löst. Beim iPhone ist es aber so dass auf dem Panel-Assembly nochmal ein Plastikrahmen mit Metallclips verklebt ist. Durch das erhitzen löst sich als erstes der Kleber zu diesem Plastikrahmen, und mit dem Saugnapf hebt man nur das Panel von diesem Plastikrahmen, und man kommt zwangsläufig mit dem Plektrum hierdrunter, und macht das Display kaputt.
Ich hätte mir gewünscht, dass hier deutlich gewarnt wird. Außerdem wüsste ich ehrlich gesagt gar nicht, wie man erhitzen soll, dass man mit dem Saugnapf nicht diesen Rahmen löst.

AAskari -

Do you have recommendations on how to find a high-quality replacement battery in the case that the iFixIt brand battery is not an option? By that, I mean the cost of the iFixIt battery plus shipping is about US$128, which is US$23 more than the Apple Store charges to do a battery replacement. There are some vendors who sell replacement batteries at the local centro de tecnología for US$20, but I do not know how to evaluate their quality.

Quinn -

I'm another victim of this tutorial. I just noticed at the right moment the screen bevels. However, I did separate most of them anyway. I fixed my error in the end. However, as a result of overheating I broke the OLED screen... There's green line now. This is so bad of the tutorial.

Usserrrr -

Hello, is the a15 chip overheating after powering in normal? should it go away once i run the Apple repair assistant ?

Carmen L -

I just ran into the very same issue as many others in this thread, in which I mistakenly separated the display glass from its electronic component thanks to the poor writing and photos in this guide. The photos aren't even of an iPhone 13 mini, which has the earpiece at the very top of the display glass and rather than in the centre of the "notch". I should've known better, but I'm also extremely disappointed in a guide that I thought I could trust was created specifically for the mentioned device. Sad.

Ryan Carteret -

Your iFixit Opening Picks are way too thick to open this hell of an iPhone. I suggest you set the tutorial as hardcore (this is the 15th iPhone I open, and the first that breaks).

Khetheb -

100% agree. First ifixit guide that failed for me after replacing around 10 iphone batteries in the past.

goblazers -

Broke my screen and touch... sucks, seen a gap when lifting the screen and thought it was it, but the screen seperated from the frame.

Big D Wizz -

Hello, I would like to draw everybody's attention on a contradictory info released on this site. On the battery replacement guide for iphone 13 mini there is a note at the very beginning stating that by using the repair assistant built-in function it will be possibile to install the iFixit battery and reset the iphone to like-new working conditions. However, after having done the repair and not being able to activate the assistant repair finish repair procedure I went back to iFixit iBot and asked exactly the question "will assistant repair work in phone 13 mini with an iFixit replacement battery?" and got a very precise answer "No, the Repair Assistant will not work with an iFixit replacement battery for the iPhone 13 mini." If that had been clearly said at the beginning, I might have chosen to buy an original part instead of the iFixit replacement part. I find this message and guide really deceptive as far as the "final like-new working conditions" is concerned. Kind Regards. Adriano

Adriano Ceccarelli -

Thanks for clarifying. That is indeed deceptive as hell.

Jani Pestana -

Broken screen after attempting this repair. I had removed multiple screens from older iphones, but my similar approach was apparently not careful enough and I ended up separating the screen from the frame. I applied heat to the front of the phone on the bottom edge, pulled up with a suction cup, and the gap that appeared looked like it was ok, when in fact it was the gap between screen and frame.

Now looking at reddit for "iphone 13 mini disassembly screen delamination frame" shows many comments about the extreme care needed when heating up the phone prior to attempting to lift the screen with suction. One even advised against heating from the front screen, as it may cause the adhesive between the screen and frame to loosen (which might have caused my failure) rather than the frame and the body underneath. Another recommended against using any heat at all and just applied alcohol.

I thought ifixit was the only place I needed to check before doing this repair, but should have checked elsewhere first.

goblazers -

For me, the flex cable of the replacement battery is too long. That is a major issue on such a small delicate phone.

Jani Pestana -

Count me another victim of this inadequate repair guide. I guess I'm replacing with an inferior screen, but in hindsight I'd rather have short battery life and OLED.

Ben Guiles -

You've marked the 1.4mm screw as PH000, but thats a JIS screw

Andrew Cassidy -