Einleitung

Diese Anleitung zeigt, wie die Glasscheibe - das Frontpanel - des iPod Touch ausgebaut wird, um ins Innere des Gerätes zu gelangen.

  1. AK61uLs34Ai1bUBi
    • Die Glasscheibe (Frontpanel) am iPod Touch der 3. Generation hat einen Kunststoffrahmen, der an der Außenkante und unter den breiten schwarzen Streifen oben und unten am Gerät festgeklebt ist.

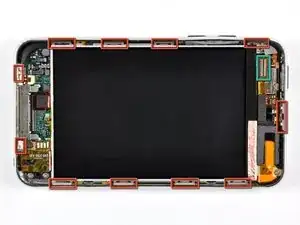
    • Das Bild zeigt links (Frontpanel bereits entfernt) die Stellen, an denen sich die Metallclips (rot markiert) befinden. Diese Clips Rasten in den Kunststoffrahmen ein. In den nächsten Schritten wirst du versuchen, das Frontpanel an den Lücken zwischen den Clips hochzuhebeln.

    • Denke daran, dass das Frontpanel mit einem sehr dünnen und empfindlichen Flachbandkabel in der oberen linken Ecke des iPods angeschlossen ist (Anschlussstelle grün markiert).

    Do be gentle when snapping your replacement front panel back on your iPod. There is potential for the Home button to be “squished” up against the internals and thus unable to be pressed in. If this happens, you must pry the panel up enough to let the Home button clear all the parts behind it and leave room to work.

    Matt Rausch -

  2. qFlgY3FdyMHoNgHs
    qFlgY3FdyMHoNgHs
    QHtswJOFonfxmAsS
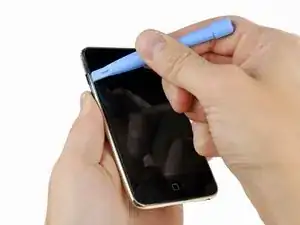
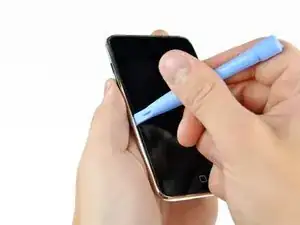
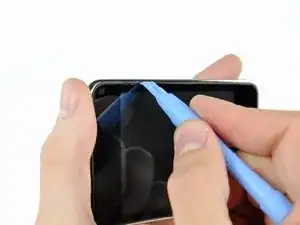
    • Setze ganz vorsichtig ein iPod-Öffnungswerkzeug zwischen die Glasscheibe und seiner Kunststoffeinfassung in der Nähe der Lautstärketaste ein.

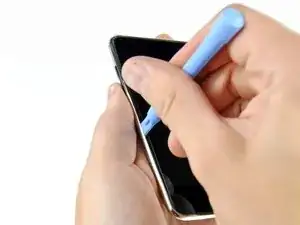
    • Kippe das Werkzeug vom iPod weg, um die Glasscheibe hochzuheben.

    • Es ist entscheidend, dass du ganz langsam und behutsam arbeitest, damit keine Bauteile im Inneren kaputt gehen.

    This is a poor place to start. You risk damaging the volume control. It makes more sense to start at the bottom, at the Home button, where there is plenty of room and nothing to damage.

    Esmond Pitt -

  3. IGWB4pXI1HcQnjjq
    IGWB4pXI1HcQnjjq
    N1rEsG6BVFhYpe1K
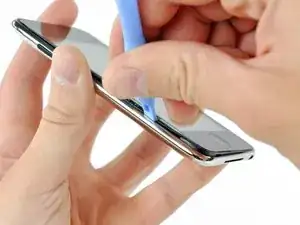
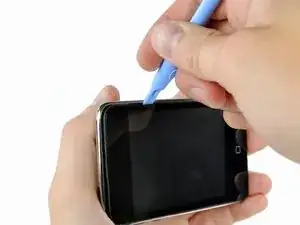
    • Setze das iPod-Öffnungswerkzeug zwischen das Frontpanel und seine Kunststoffeinfassung an verschiedenen Stellen der linken Seitenkante ein und heble nach oben.

    • Setze das Werkzeug nicht einfach ein, um es am Frontpanel zu verschieben. Dadurch könnte das Panel und der Gummistreifen an der Kunststoffeinfassung beschädigt werden. Am besten ist es, das Werkzeug anzusetzen, hochzuhebeln, wieder herauszuziehen und dann an einer anderen Stelle gleichartig zu verfahren.

  4. dtPaaMEouxBdduA2
    dtPaaMEouxBdduA2
    2V5IlTNojTldQZwk
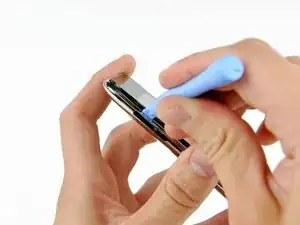
    • Heble die linke Kante weiter hoch, bis die Ober- und die Unterkante anfangen sich nach oben zu heben.

    • Wenn die Ober- und die Unterkante leicht aus dem iPod abgehoben sind, dann kontrolliere mit dem Öffnungswerkzeug, ob die Kunststoffeinfassung sich aus den Clips im Inneren des iPods gelöst haben.

  5. rYgfjiSwJsIWJMdm
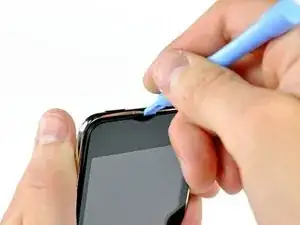
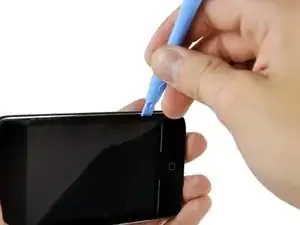
    • Heble weiter ab, wobei du dein Augenmerk besonders auf das Lösen der Kunststoffeinfassung von den Metallclips im Inneren richtest.

    • Heble an der Oberkante entlang, um das Frontpanel vom restlichen Gerät zu lösen.

  6. xldCQmjOG2JsFtmg
    xldCQmjOG2JsFtmg
    OQ6KETBADwy1hVFw
    t1vukwXndiSOwQy6
    • Heble das Frontpanel in gleicher Weise an der rechten Kante ab.

    • Arbeite dich rund um den Rand des Frontpanels herum, bis es überall ein wenig abgehoben ist.

    • Kontrolliere nochmals, ob die Kunststoffeinfassung überall von den Clips frei ist.

  7. XbF3gSGrkor4mCir
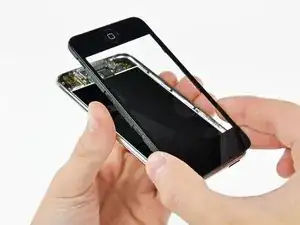
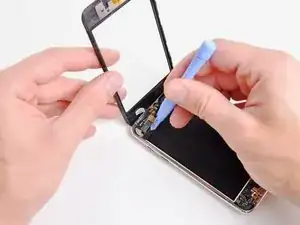
    • Hebe das Frontpanel aus dem Gehäuse heraus. Denke dran, dass es noch mit einem Kabel in der Nähe der linken oberen Ecke angeschlossen ist.

  8. e22uRmeUMNtPONkT
    • Heble den Stecker am Touchscreen-Kabel äußerst vorsichtig mit dem flachen Ende des Spudgers (oder einem Öffnungswerkzeug) oben vom Logic Board hoch.

    • Das Touchscreen-Kabel ist sehr empfindlich. Sei beim Abtrennen wirklich vorsichtig, es kann leicht reißen.

    • Wenn das Frontpanel ausgebaut ist, überprüfe es auf Schäden. Wenn die Kunststoffeinfassung nicht überall bündig mit der Glasscheibe ist, löse sie behutsam ab und drücke sie wieder gut fest.

    • Zerkratzen das Frontpanel nicht auf der Unterseite in den schwarzen Bereichen, die Kratzer wären nach dem Zusammenbau auffällig sichtbar.

    • Reinige die Oberfläche des Displays und die Innenfläche des Frontpanels gut. Eventueller Staub oder Fingerabdrücke bleiben im Inneren des Touch und sind gut zu sehen, wenn er wieder zusammengebaut ist.

    I had a real challenge getting the ribbon cable connected; after 20 minutes of trying while carefully balancing the front panel and trying not to rip the ribbon, I grabbed the old screen, ripped off the connector and practiced getting it on.

    I had another challenge of the connector staying on...I had noticed a little piece of rubber had come off when I took the old screen off. That piece of rubber was EXACTLY the same size as the connector; I'd guess it is meant to hold the connector in place when the panel is put back on...So, I put it on top of the connector and closed it up..

    Perfect!

    Cheers, Rob

    rledwa2 -

    This was where I messed up, the adhesive on the digitizer was weak and when I tried to remove the original the bracket stayed in place, I figured that as I was installing the replacement and as I tried to put it into place and it wouldn't go I apparently jerked and broke the ribbon cable on the replacement there went my money now I have a faceless unusable iPod until I can order another, I did replace the LCD with little trouble though, not a completely failed repair.

    kcbennett -

Abschluss

Um dein Gerät wieder zusammenzubauen, folge den Schritten in umgekehrter Reihenfolge.

Andrew Bookholt

598569 Reputation

6 Kommentare

When prying up - make sure that you lift the black plastic frame. I got trouble because on side I managed to lift the glass of the plastic frame on one side, and lifted the plastic frame out of the clips on the other sides, making it very hard to get the panel out. When I at last succeeded it was because the plastic frame broke in the lower right corner – when I had lifted the panel off the right side of the plastic frame was still attached (it needed to break at the top too before I could lift of the panel completely).

Michael Villebeck -

will i because to put the panel back on easily?

Celeste Morley -

Patience and a can of compressed air are mandatory. The inside of my iPod Touch was pretty dusty after two years in my pocket. Before putting on the new digitizer, everything needs to be clean.

Also, I used my spudger to pry half the broken frame out of the left gutter (see Michael above). Doing that without damaging the screen was the hardest part.

reichman -

I'm getting ready to do this and have the old screen partially off to let things dry out. I am, however, unclear on what to pry on to release the ribbon. From past experience with other iPod products, I'm thinking it is a small clamp that needs to be pried up. Is that the case and, if so, is it located where the picture indicates? I think the clamp is under the small grey plastic cover.

adamorth -

I watched the iFixit video & read the steps. I found out that when removing screen...be very careful not to stick pry tool in to deep to lift out frame, it can crack the LCD, which is what I did.

Chuck -

Be careful not to put the replacement panel back on too tightly! Gently snap it into place when you’re ready to finish the job. If you push too hard on the panel, the Home button ends up hitting the internals and will NOT work.

Matt Rausch -