Einleitung

Nutze diese Anleitung, um den Akku deines iPod Touch auszutauschen. Um denAkku auszutauschen benötigst du Lötwerkzeuge und Kenntnisse über SMD-Löten.

Erstelle vor der Reparatur ein Back-Up deines iPods, indem du es mit iTunes synchronisierst. Es kann nämlich sein, dass nach der Reparatur ein Wiederherstellen des iPods nötig wird.

  1. AK61uLs34Ai1bUBi
    • Die Glasscheibe (Frontpanel) am iPod Touch der 3. Generation hat einen Kunststoffrahmen, der an der Außenkante und unter den breiten schwarzen Streifen oben und unten am Gerät festgeklebt ist.

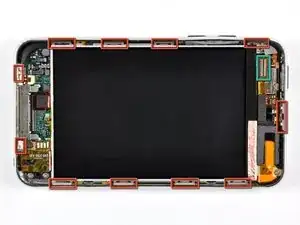
    • Das Bild zeigt links (Frontpanel bereits entfernt) die Stellen, an denen sich die Metallclips (rot markiert) befinden. Diese Clips Rasten in den Kunststoffrahmen ein. In den nächsten Schritten wirst du versuchen, das Frontpanel an den Lücken zwischen den Clips hochzuhebeln.

    • Denke daran, dass das Frontpanel mit einem sehr dünnen und empfindlichen Flachbandkabel in der oberen linken Ecke des iPods angeschlossen ist (Anschlussstelle grün markiert).

    Do be gentle when snapping your replacement front panel back on your iPod. There is potential for the Home button to be “squished” up against the internals and thus unable to be pressed in. If this happens, you must pry the panel up enough to let the Home button clear all the parts behind it and leave room to work.

    Matt Rausch -

  2. qFlgY3FdyMHoNgHs
    qFlgY3FdyMHoNgHs
    QHtswJOFonfxmAsS
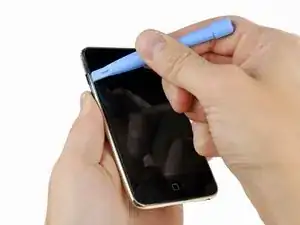
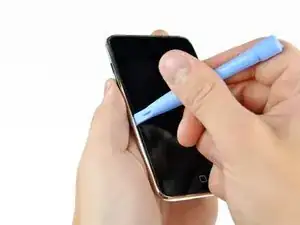
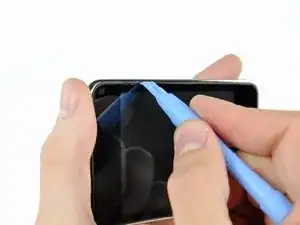
    • Setze ganz vorsichtig ein iPod-Öffnungswerkzeug zwischen die Glasscheibe und seiner Kunststoffeinfassung in der Nähe der Lautstärketaste ein.

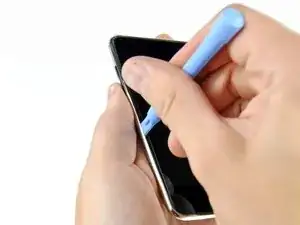
    • Kippe das Werkzeug vom iPod weg, um die Glasscheibe hochzuheben.

    • Es ist entscheidend, dass du ganz langsam und behutsam arbeitest, damit keine Bauteile im Inneren kaputt gehen.

    This is a poor place to start. You risk damaging the volume control. It makes more sense to start at the bottom, at the Home button, where there is plenty of room and nothing to damage.

    Esmond Pitt -

  3. IGWB4pXI1HcQnjjq
    IGWB4pXI1HcQnjjq
    N1rEsG6BVFhYpe1K
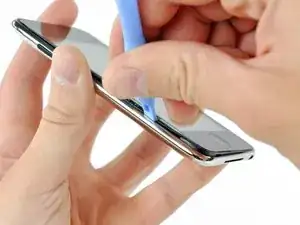
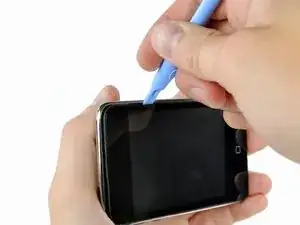
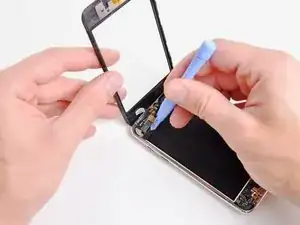
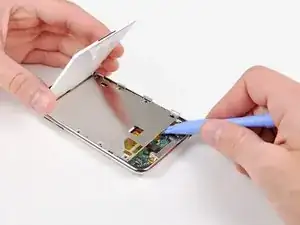
    • Setze das iPod-Öffnungswerkzeug zwischen das Frontpanel und seine Kunststoffeinfassung an verschiedenen Stellen der linken Seitenkante ein und heble nach oben.

    • Setze das Werkzeug nicht einfach ein, um es am Frontpanel zu verschieben. Dadurch könnte das Panel und der Gummistreifen an der Kunststoffeinfassung beschädigt werden. Am besten ist es, das Werkzeug anzusetzen, hochzuhebeln, wieder herauszuziehen und dann an einer anderen Stelle gleichartig zu verfahren.

  4. dtPaaMEouxBdduA2
    dtPaaMEouxBdduA2
    2V5IlTNojTldQZwk
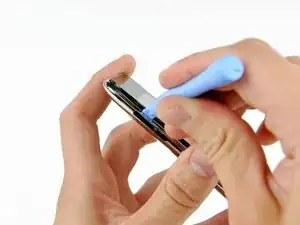
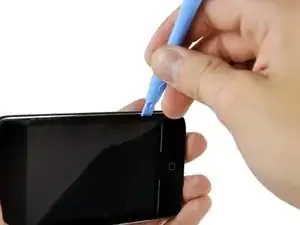
    • Heble die linke Kante weiter hoch, bis die Ober- und die Unterkante anfangen sich nach oben zu heben.

    • Wenn die Ober- und die Unterkante leicht aus dem iPod abgehoben sind, dann kontrolliere mit dem Öffnungswerkzeug, ob die Kunststoffeinfassung sich aus den Clips im Inneren des iPods gelöst haben.

  5. rYgfjiSwJsIWJMdm
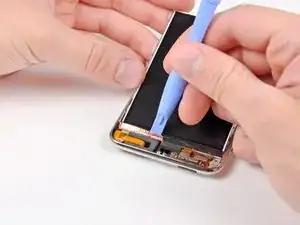
    • Heble weiter ab, wobei du dein Augenmerk besonders auf das Lösen der Kunststoffeinfassung von den Metallclips im Inneren richtest.

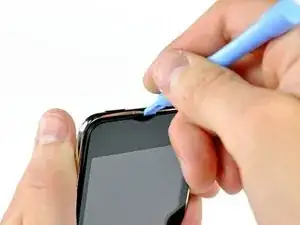
    • Heble an der Oberkante entlang, um das Frontpanel vom restlichen Gerät zu lösen.

  6. xldCQmjOG2JsFtmg
    xldCQmjOG2JsFtmg
    OQ6KETBADwy1hVFw
    t1vukwXndiSOwQy6
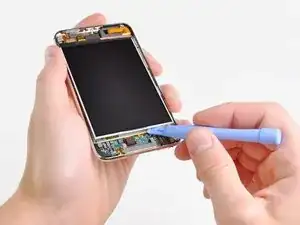
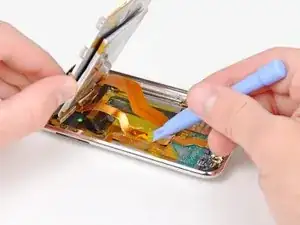
    • Heble das Frontpanel in gleicher Weise an der rechten Kante ab.

    • Arbeite dich rund um den Rand des Frontpanels herum, bis es überall ein wenig abgehoben ist.

    • Kontrolliere nochmals, ob die Kunststoffeinfassung überall von den Clips frei ist.

  7. XbF3gSGrkor4mCir
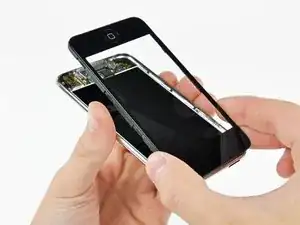
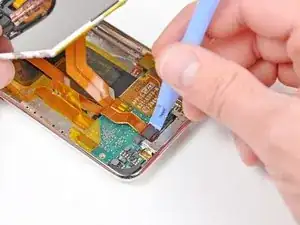
    • Hebe das Frontpanel aus dem Gehäuse heraus. Denke dran, dass es noch mit einem Kabel in der Nähe der linken oberen Ecke angeschlossen ist.

  8. e22uRmeUMNtPONkT
    • Heble den Stecker am Touchscreen-Kabel äußerst vorsichtig mit dem flachen Ende des Spudgers (oder einem Öffnungswerkzeug) oben vom Logic Board hoch.

    • Das Touchscreen-Kabel ist sehr empfindlich. Sei beim Abtrennen wirklich vorsichtig, es kann leicht reißen.

    • Wenn das Frontpanel ausgebaut ist, überprüfe es auf Schäden. Wenn die Kunststoffeinfassung nicht überall bündig mit der Glasscheibe ist, löse sie behutsam ab und drücke sie wieder gut fest.

    • Zerkratzen das Frontpanel nicht auf der Unterseite in den schwarzen Bereichen, die Kratzer wären nach dem Zusammenbau auffällig sichtbar.

    • Reinige die Oberfläche des Displays und die Innenfläche des Frontpanels gut. Eventueller Staub oder Fingerabdrücke bleiben im Inneren des Touch und sind gut zu sehen, wenn er wieder zusammengebaut ist.

    I had a real challenge getting the ribbon cable connected; after 20 minutes of trying while carefully balancing the front panel and trying not to rip the ribbon, I grabbed the old screen, ripped off the connector and practiced getting it on.

    I had another challenge of the connector staying on...I had noticed a little piece of rubber had come off when I took the old screen off. That piece of rubber was EXACTLY the same size as the connector; I'd guess it is meant to hold the connector in place when the panel is put back on...So, I put it on top of the connector and closed it up..

    Perfect!

    Cheers, Rob

    rledwa2 -

    This was where I messed up, the adhesive on the digitizer was weak and when I tried to remove the original the bracket stayed in place, I figured that as I was installing the replacement and as I tried to put it into place and it wouldn't go I apparently jerked and broke the ribbon cable on the replacement there went my money now I have a faceless unusable iPod until I can order another, I did replace the LCD with little trouble though, not a completely failed repair.

    kcbennett -

  9. CZKEh2DFhbpXp4hj
    • Halte das iPod-Öffnungswerkzeug mit der Kante nach oben und setze es schräg unter die Unterseite des Displays zwischen der weißen Hintergrundbeleuchtung und der Metallabschirmung darunter ein.

    • Heble das Display entlang der Unterkante soweit nach oben, dass du es mit den Fingern fassen kannst. Achte darauf, dass das Display nicht verbogen wird.

  10. hU2O4te5w1Rq1sf1
    • Hebe das Display an der Unterkante hoch und klappe es zum oberen Rand des iPods hin.

    • In den folgenden Schritten werden Bauteile unter dem Display entfernt. Halte das Display gut fest, damit das empfindliche Flachbandkabel nicht zu stark angespannt wird.

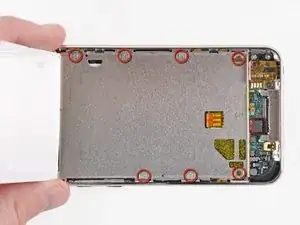
    • Entferne die sieben Kreuzschlitzschrauben mit denen die Metallfassung des Displays an der Gehäuserückseite befestigt ist. Sie können sehr fest sitzen, arbeite sehr sorgfältig, die Schraubenköpfe dürfen nicht beschädigt werden.

    • Die beiden dunkleren Schrauben gehören in die Löcher in der Metallfassung nahe an der Unterkante des iPods.

  11. qlXLnosEdWpCpDDa
    • Lege das Display wieder in die Metallfassung zurück.

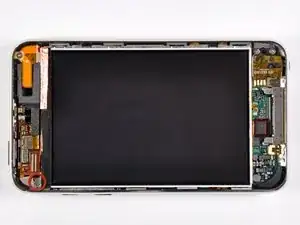
    • Entferne die letzte Kreuzschlitzschraube mit der die Metallfassung an der Gehäuserückseite befestigt ist.

  12. dZGiyfhSqqCriULB
    • Hebe das Display aus der Metallfassung heraus und Kippe es zur Oberkante des iPods hin.

    • Hebe die Metallfassung mit einem iPod-Öffnungswerkzeug heraus und kippe es zur Oberkante des iPods hin.

  13. CAN1JSNhHqoVuppB
    • Löse das Kupferband mit dem Öffnungswerkzeug von der Oberkante des Displays ab.

    • Lasse das Kupferband an der Metallfassung des Displays festkleben.

  14. cTJQCi4XB4K3bnoQ
    • Löse das Klebeband über dem Displaydatenkabel mit der Kante des Öffnungswerkzeugs ab.

  15. cTb24PdotTCtmYVs
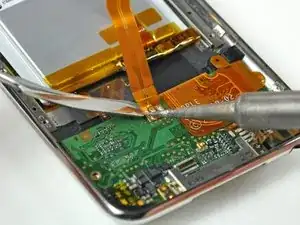
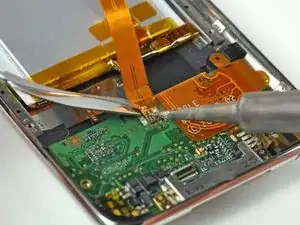
    • Heble den Stecker am Displaydatenkabel mit dem Öffnungswerkzeug aus seinem Anschluss auf dem Logic Board.

  16. oOaUb4tc3EiJGypu
    • Löse das Displaydatenkabel aus der Klebeverbindung zur Gehäuserückseite.

  17. ySZEyIeMkmtN4bR5
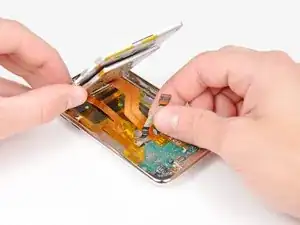
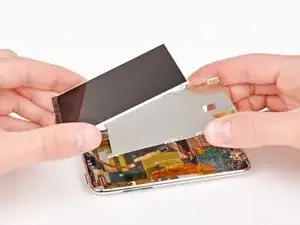
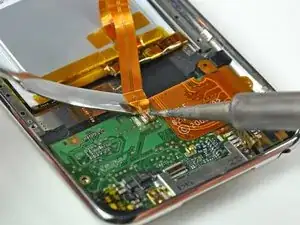
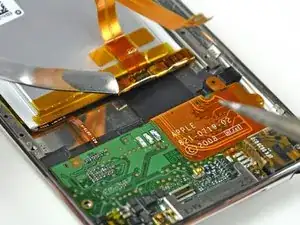
    • Hebe die Metallfassung des Displays leicht an (der Akku ist an seiner Unterseite festgeklebt) und entferne das Display vom iPod. Achte darauf, dass sich keine Kabel verfangen.

    • Das Flachbandkabel zum Display verläuft unter der Metallfassung des Displays.

  18. 1FiHDYdHZAD2SFTU
    • Heble den Akku mit dem flachen Ende des Spudgers aus der Klebeverbindung zum metallenen Displayrahmen.

    • Entferne den metallenen Displayrahmen und lege ihn beiseite.

  19. B4OtpLDX5GUNUTTs
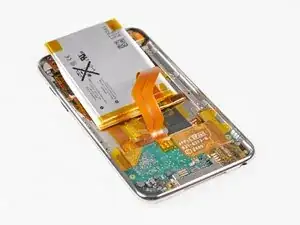
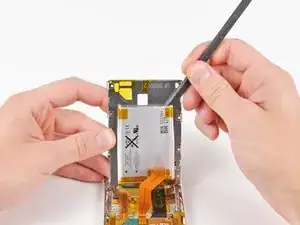
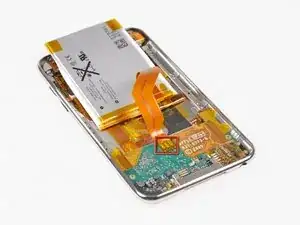
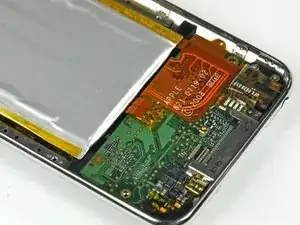
    • Drehe den Akku so, dass dieser auf dem hinteren Panel liegt, wie im Bild gezeigt

    • Nutze eine Pinzette, um die kleinen Klebestreifen (siehe Bild in Rot markiert) zu entfernen, die das Ende des Akkukabels fixieren.

    • Wenn du deinen Akku ausgetauscht hast, musst du das Ende des Akkukabels wieder mit Klebestreifen abdecken, um Kurzschlüsse zu vermeiden.

  20. ru6ZaVoTZi4Ea2Zj
    ru6ZaVoTZi4Ea2Zj
    NfQYBVuWVNOIsZB3
    gaXCD6WXKnK4sMvK
    • Die Befestigung mittels Lötpads des 3rd Generation iPod touch hat kleine Löcher, die durch das Batteriekabel gehen und auf kleinen Pads auf dem Logicboard befestigt sind. In diesem Schritt erhitzen wir jedes dieser Lötpads einzeln mittels Lötkolben und entfernen diese dann mit dem Spudger vom Logicboard.

    • Schließe die Verbindungen zwischen den Lötpads nicht mit dem Spudger kurz. Ein Kurzschluss kann dein Logicboard ruinieren.

    • Pass auf, dass du das Board oder die Kabel nicht überhitzt. Halte nur die Spitze des Lötkolbens so lange gegen das Pad, dass das Lötzinn schmilzt. Zu viel Hitze schadet dem Logic Board und kann die Kabel schmelzen.

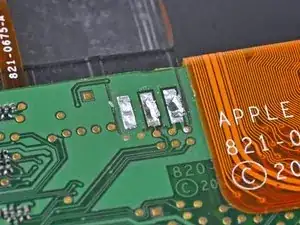
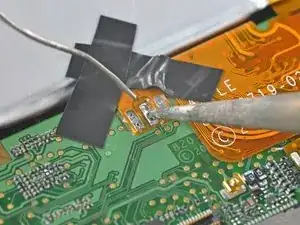
    • Beginne an einer Seite des Batteriekabels. Wir haben auf der linken Seite begonnen. Erhitze das sich am weitesten links befindende Lötpad und Löse dabei sachte das Kabel vom Board. Wiederhole den Prozess mit den übrigen beiden Pads. Arbeite dich von einer zur anderen Seite durch.

    • Versuche nicht, am Batteriekabel zu ziehen während du obige Schritte ausführst. Beim Ziehen reißt du die Pads vom Logicboard ab und zerstörst es damit.

  21. DZIqniULDTjfyuGF
    • Nun sollte der Akku vom Logicboard vollständig gelöst sein.

    • Entferne den alten Akku des iPod Touch und lege ihn zur Seite.

  22. 11DlLmViDFaNLsoZ
    11DlLmViDFaNLsoZ
    KCs1Mf3eXjqQgVcN
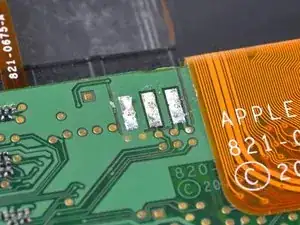
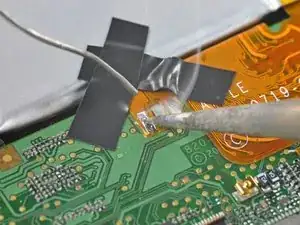
    • Forme das übrige Lötzinn mit der Spitze des Lötkolbens flach . Die Bilder zeigen einen Vorher-Nachher-Vergleich.

    • Vergiss nicht, dass zu viel Hitze das Logicboard ruinieren kann.

    The center battery connector is more fragile, it does not go thru the board and came off. I was able to connect it to the spot just above and it seems to work.

    Other than that I did have trouble with the clips on the right side and damaged the rubber a bit, but it is servicable. The technique and angle for uncliping is still not clear but probably hard to explain - it is a skill.

    However, thanks for the best instructions I could find!

    Cory -

    Step 21

    It seems the connectors are very fragile! I had to glue the left one back and connect it to the round contacts on the logic board with a tyni wire (solding). Be very careful to put enough heat on the solder pads before levering the connector cable off (but do not overheat)

    mattkupfer -

  23. 1oMSGYSCoNhTosYP
    1oMSGYSCoNhTosYP
    NdCFCkcUR1eAsoOT
    • Platziere deinen neuen Akku mit der Kabelseite nach unten in der Rückseite. Fixiere die Kabel mit zwei kleinen Stücken von Klebeband gegen die Lötpads.

    • Wenn der Akku falsch herum installiert wird ( Kabel zeigt nach oben) wird das Logicboard zerstört.

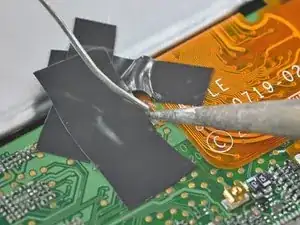
    • Befestige etwas Klebeband über das Ende am Flachbandkabel zum Akku, erstens, um die Pads zu überdecken und zweitens, um die Kontakte am Logicboard zu halten.

    • Erhitze den Kontakt ganz rechts, bis das Lötzinn darunter schmilzt und füge eine kleine Menge an Lötzinn hinzu, damit es durch die Löcher im Kabel bis auf das Logicboard fließt.

    • Verwende nicht zu viel Lötzinn, es genügt eine winzige Menge.

    • Sobald das Lötzinn durch das Loch geflossen ist und das Logicboard verbindet, ist der Lötvorgang vorbei.

  24. 5TaHqVD6wpTYjDPG
    5TaHqVD6wpTYjDPG
    2XcnULt6LWWODJqK
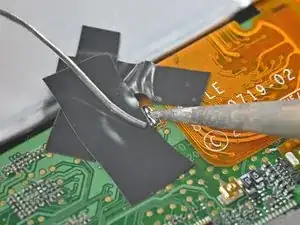
    • Entferne das Tape, welches die übrigen beiden Pads bedeckt. Wenn dir die Position des Kabels so gefällt, mach mit dem nächsten Schritt weiter. Ansonsten löte es wieder ab und versuche es erneut.

    • Löte nach dem Schema die übrigen beiden Pads an das Logic Board an, denk wieder daran, Kabel und Platine nicht zu stark zu erhitzen.

  25. IlbNFqE6QFUnWVI3
    • Vergiss nicht, am Ende wieder Tape über die fertigen Lötpads zu kleben um Kurzschlüsse zu vermeiden.

Abschluss

Um dein Gerät wieder zusammenzubauen, folge der Anleitung in umgekehrter Reihenfolge. Vergiss nicht, dass Display sowie die Display-Innenseite vor der endgültigen Zusammensetzung zu reinigen. Dafür eignet sich Brillenreinigungsspray und ein fusselfreies Tuch. Prüfe nach der Reinigung, ob du mit dem Resultat zufrieden bist.

Andrew Bookholt

598569 Reputation

20 Kommentare

wher can you buy the battery

gerardo -

They can be found here in our store.

Andrew Bookholt -

I've done the battery change and went through the whole process without too much hassle. Once it was done, I turned my iPod on and it worked. However, when I came to charge it, it just wouldn't work (the battery won't charge at all). So my iPod just depleted itself till the new battery went empty, and now it just won't boot anymore. I think I've done the job pretty well (or at least the iPod worked for a little while after the battery change) so I don't know what's the real reason for this not to work. Now my iPod is stuck on this screen http://km.support.apple.com/library/APPL.... Sucks to be me.

djules -

at least u didnt fix it, boot it so it worked, then assemble it and have it broken.

Daniel Powers -

Appreciate it's probably way too late for yourself, but wanted to comment here in case anyone else is in this situation and stumbled across this thread.

Don't give up here if the battery won't charge, it may still be fixable! It was for me!

I Replaced the battery, everything appeared to work fine, so I reassembled only to find that the battery would not charge. The icon came up saying that it was charging, but slowly the charge ran out until I was stuck at that same screen.

Was about to sell it on for spares when I thought I'd have one last go... It turned out that the problem was not with the replacement battery itself, but the protection circuitry attached to the battery. I was able to remove the circuit (plus ribbon cable) from the original (dud) battery, and solder it onto the new one (as always being carful not to short it out in the process. Once reattached, it worked perectly!

Can only suspect it's an issue with the non-OEM circuit being faulty, or detected and blocked by apple somehow...

graysters -

- Rubber ring damaged? Check!

- Dirt inside the screen? Check!

- Blue plastic tools busted? Check!

- Battery replaced? Check!

- Unit working? Check!

I recommend having blue nitrile gloves on your hands to minimize grease transfer.

I'd also recommend enhancing the instructions on how to release the side catches with more technique photos. That was the hardest part for me.

Job complete. Check!

johnvoth -

-tools broken? Check!

-able to proceed? Nope!

Brandon -

People u need a metal tool to easily remove the front glass a plastic spudger won't do it very well as it needs to be flat and pushed in between the clips and the metal retainers and gently lifted. Also if you must use tape to hold the battery ribbon cable down use heat resistant tape made for the job because if you melt the tape it will mix with the solder and contaminate it. Use IPA and a lint free cloth to wipe down the screen right before replacing the front. The correct way to prep the contacts before soldering is to use solder wick to remove any old solder that remains. Also be carefull of static. If you have trouble getting digitiser cable to fit back on the board and you are getting annoyed walk away for a few mins and clear your head I bet it'll go on first time when you got back to it.

One last thing warm the plate with a hair dryer to get the old battery off it will soften the glue make things much much easier and you don't risk bending the battery and causing yourself disaster.

annualuk72 -

I installed the battery, and double checked one of the battery connectors before closing it up. Once I got it all together, I plugged it in and it showed the REALLY low red battery with the lightning logo. So I waited, and read a couple comments, and people were turning on their iPods right away, but mine wouldn't give me anything but the REALLY low battery. I started to get worried, and looked up a couple other answers. After about 5 minutes, the silver Apple logo popped up and I was relieved.

Just remember to have a little patience.

Trevor Bugera -

I had a problem with mine after the battery was replaced. I would turn it on and just get the sliver of red for the battery, and it would not boot. It would work fine until I pressed the LCD assembly down into the housing, and then the battery went dead. What I observed was that the LCD ribbon cable that runs under the battery to its socket was quite stuck to the back of the case when I tried to remove it. This left a bit of the insulation from the cable stuck to the back of the housing. After replacing the battery it would work fine till I pressed the LCD down, and then it would short out. So I lifted the LCD assembly again, lifted up the LCD ribbon cable and put a inch and a half piece of black tape down underneath between the cable and the housing. After reassembly it worked fine.

karlehlert -

Also, just a tip that worked for me..instead of trying to remove the old battery with the solder tip trying hard not to short or bridge the terminals, I just snipped the old battery ribbon cable back about an inch or so from the solder joints with scissors. Then with a grip on the leftover piece of ribbon I just quickly applied the tip to all three solder joints and lifted it off easy. (I am sure this is not what is standard practice, but with the battery snipped off and out of the way, I didn't see the a problem with bridging the terminals all at once, since there was no battery voltage to worry about.) Anyway, it worked!

karlehlert -

After I finished, had to reset the iPod to get anything to show up other than a blank white screen: press and hold power and home button at same time. After they are released, the Apple logo will show up for a minute or two. Then it should come back to life, but settings may be lost. Fortunately, I had a manual backup of the pod I had done before starting the battery replacement.

lauryshark -

The first thing to do before any work on the hardware is to synchronize the iPod with iTunes. It may come up in a state which needs resetting and restoring from the latest backup. I agree with the comment saying more photos and better instructions are needed at steps 2-6. This is the hardest part and it is also a step where you can do serious physical damage. I also agree that a metal tool is needed for this step, although to be used very carefully. The plastic one provided is not strong enough and flexes too much in the first stage. Solder wick is definitely the answer to the desoldering step, and if you're a competent solderer with a good iron you don't need the masking tape at steps 23-4. The other hard part is reattaching the cable removed in step 8. If your big round button doesn't work on reassembly, this is why. You need tweezers, or sensitive fingers, for this step, and patience. The hints about cleaning should be given at the end, not at the beginning.

Esmond Pitt -

El procedimiento es correcto pero la herramienta de plastico de color azul se dobla y no tiene fuerza para separar el protector del LCD.

Lo he tenido que hacer con una herramienta de metal y sin querer he pellizcado el LCD y se ha agrietado por lo que lo tendre que cambiar la pantalla.

ponjordi -

First time soldering and I did this and the LCD/ Screen Replacement Without any hassle I was done In an hour. The guides are a real Confidence booster.

Michael Ocasio -

Great guide. It almost worked for me! I think I may have shorted the new battery during installation. Apparently, the battery has a fuse in that little circuit board to which the ribbon cable is attached (can anyone confirm that a short-circuit fuse is indeed present?). Anyways, I'm thinking of wiring in a temporary external battery just to test the iPod. Can anyone tell me which battery terminal on the iPod logic board is positive and which is negative? Thanks

Steve -

Having done this a few times I now disagree with step1. The thing to do is to pry *at* the clips, to release them. Not between them. Thay way you don't risk breaking other things such as the volume control, dock connector, earphone socket, etc. Just pry at each clip in turn, bend inwards to release the clip, and catch the cover edge so it doesn't slip back into position.

Esmond Pitt -

Step 10 - I managed to strip the upper left most screw in the picture. All others came out ok. Am I completely dead in the water now that I can't seem to remove that screw? Any suggestions would be very appreciated!!

mbrotz -

HELP REQUIRED

what is the true meaning of the battery symbol with a electricity bolt below it?

When you plug it in this is all that appears on the screen and then disappears again. No life at all when unplugged so I took this as a battery failure. I have replaced the battery and it still has the same problem. Any info or help would be great.

Thanks, David

davidquigg86 -

Successfully completed the battery replacement. The removal of the screen was the hardest part. I damaged the gasket like so many here have. I’d like a better description of how to open the unit up without damaging the gasket “if possible”.

Get a de-soldering braid. Remover to add a little flux to the brass before. It will help to suck up the excess solder.

Also, the soldering technique makes a big difference. The smaller the solder gauge and soldering iron tip the better. Use a flux pen/marker to prepare the soldering points on the board. Also add a tiny bit of solder to the top of the ribbon cable points (again apply flux) and it should make the job easier.

Good luck.

Benjamin -