Introduction
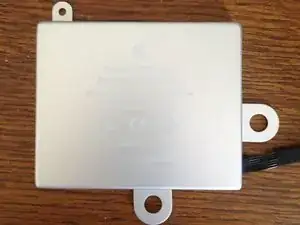
Underneath the pretty aluminium box, Apple's RAID Card batteries are just bog-standard lithium polymer cells with some control gear.
When they fail after a year or two in service you can bet the £££ you'll fork out to replace it that the cell isn't dead, but instead has got itself into a stuck state where the RAID card is confused about what to do with it.
In this guide I will outline how to open up the battery and recondition or even replace the cell, at significantly lower cost than buying a new battery.
Please don't attempt this repair unless you already have a good idea of what you're doing. Any mistakes have the potential to be extremely dangerous.
Tools
Parts
-
-
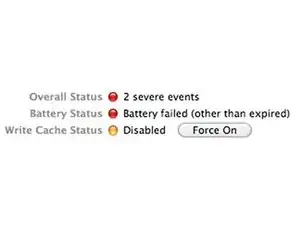
The RAID card battery has various error codes that indicate it's condition, which appear in RAID Utility when there's a problem.
-
The error codes follow the format "Battery failed (code 0x#0 = XX)", where 'XX' can be a number, usually 17, 18 or 19. Good luck finding out what any of those mean... You may also see "Battery failed (other than expired)".
-
In most cases this guide will prove successful regardless of the error code.
-
-
-
If you're working on an Intel XServe you'll need to locate the right disassembly guide that shows you how to remove the battery. This usually means removing the air ducting, fan assy., RAID card and power distribution board. You'll also need a screwdriver to prise the battery from the chassis, just be careful not to bend it.
-
For Mac Pro RAID cards you can follow this guide.
-
-
-
Now the battery's out, it's time to open it up. From this point on you should be extremely careful, as damaging the battery could cause a fire. If the battery starts getting hot, or you slip and damage it, throw it outside immediately.
-
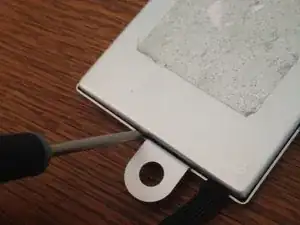
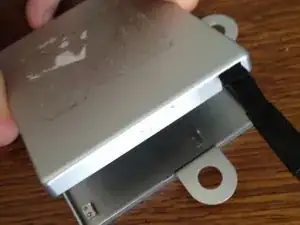
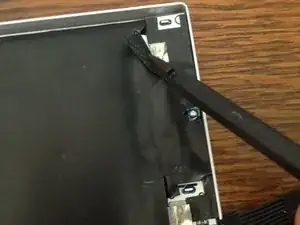
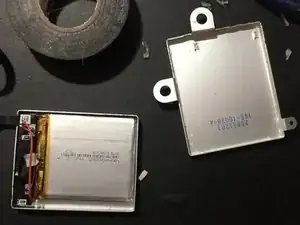
The battery case comprises a base and a lid, held together by some hot glue around the inside. Some gentle persuasion with a screwdriver around the edge is all it takes to separate the two pieces.
-
-
-
In order to check and recondition the battery's cell we'll need to get at it directly, bypassing the control systems. This means we will have NO short-circuit or overload protection, so take extra care.
-
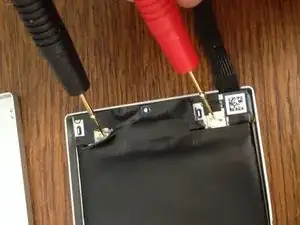
Peel back the black insulation to expose the cell's terminals (Never let these points become electrically connected) and check with a voltmeter.
-
If you see a voltage greater than about 4V, the RAID Card is charging the battery but it can't tell when it's finished. Proceed to step 5.
-
If you see a voltage significantly less than 3.6V, then the RAID Card is not charging the battery. Proceed to step 6.
-
-
-
Grab an old torch (or flashlight for those over the pond) and pull the light bulb out. This will serve as our load. (Note: This needs to be an incandescent bulb)
-
Connect the bulb across the two terminals of the cell without letting the terminals touch. (A set of crocodile clip leads makes this a breeze). The bulb should light.
-
Connect your voltmeter too and watch the voltage fall. Disconnect the bulb when it reaches around 3.5V and proceed to charging (Step 6).
-
-
-
If your cell is charged to less than 3.6V, or you've just discharged it, the next step is to recharge it up to around 3.7V where the RAID card should be able to pick up and carry on.
-
Use a Constant Current power supply, set to a maximum voltage of 3.7V and a maximum current of around 500mA. Connect the output directly to the cell's terminals and switch on. Monitor the cell's temperature while charging and reduce the current if it starts getting warm to the touch.
-
Once 3.7V is reached, allow the current to drop below 100mA and switch off the power supply. The battery is now charged and ready to go back on the RAID card.
-
-
-
Ensure the cell's terminals are covered by the black insulation and replace the cover. We'll glue it back on when we're sure the cell is working.
-
Now reinstall the battery onto the RAID card and fire up the machine. If all has gone well, the RAID card will start charging the battery and after a few hours switch to "Fully Charged".
-
If after refreshing / recharging the battery the RAID utility still reports an error, first double check the voltage of the cell and consider trying steps 5/6 again. If this doesn't work the cell is beyond repair and will need to be replaced.
-
-
-
If you have been unable to recondition the cell to a state where the RAID card will accept it, the cell will need to be replaced. (It is also possible the RAID card is faulty, but it's much more likely to be the battery)
-
Purchase a "606168" Rechargeable Lithium cell from your supplier of choice. If you can get one with offset terminals like the original cell then it'll make replacement a lot easier, but most have symmetrical terminals.
-
Unless you have a battery tab welder, you'll need to solder the new battery in place. Don't dwell for too long or the cell will heat up. The new cell should come already charged, so follow Step 7 to reinstall the battery.
-
If you see a green battery symbol in RAID utility then the repair has been a success! You can now glue or tape the battery back together and enjoy hopefully another year or two of service from it.
9 comments
Oh man, this is the article I've been looking for. Apple no longer makes the "proper" battery for Xserve1,1, and mine has been KP'ing lately because of the RAID controller being unable to begin the reconditioning process (see: https://www.reddit.com/r/macsysadmin/com...). Maybe now I will finally have a stable Xserve1,1 running a Pikified Mac OS 10.11.6!
Much appreciated.
Bought two batteries from China on eBay for $20.
Soldered one into the Apple box. Twelve hours of battery conditioning later my Xserve raid is working great. Now I have a spare too.
Great guide. Thanks!
Don Juan -
Works like a charm!
Ordered a bulk of 10 cells directly from china for 6 $ each.
The replacement is very simple if this guide is followed and care is taken to ensure that no short circuit is produced.
You once again saved my day!
Great guide. Thanks alot!
since my battery was dead and not charging, I’d guess that “0x#0 = 17” is dead battery.
Tim Mitra -
That would mean, 17, 18, and 19 would all be the same code. That doesn’t make sense.
It’s possible 17 is a dead battery, or 18 or 19 are. But I doubt all three are the exact same error.
The conclusion may be the same but the three different numbers may be the cause.
jpmhughes -
In all likelihood the different error codes mean something like:
•Cell not reaching it’s fully charged state within the prescribed time (symptom of old cells)
•Cell is overly-discharged (If it was drained to preserve the backup caches and not recharged immediately)
•Cell is too hot/cold
•Cell did not meet the prescribed capacity requirements upon conditioning (symptom of old cells)
Dan -