Introduction
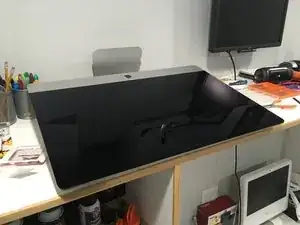
I was nervous buying the the late 2015 iMac 27" because there was such little information about it. I could only find a few videos specific to the tear down and very little info about adding or upgrading to an SSD. There was tons of info about the 2014 and early 2015 model, but noting on the late 2015. So here we go.
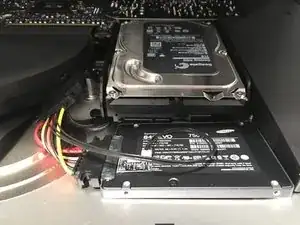
I'm disconnecting the SATA & power cable from the HDD, adding a 2.5" SSD (leaving the HDD in place).
-
-
Opening the Retina iMac's can be tricky and you need the right tools. And you're going to need a few things to open the case and to install the SSD correctly.
-
Here's the current iFixit tear down that shows you what you're getting into. iMac Intel 27" Retina 5K Display Teardown
-
And from our friends at OWC, they have a great video on taking the HDD complete out and replacing it with an SSD, but this guide will show how to simply leave the HDD and install the SSD. https://vimeo.com/139364064
-
Make sure to grab the essential tools like: Pro Tech Toolkit and Jimmy for opening up the iMac, although I used a medical scalpel, I found that the "guitar pick" was too weak and too thick. The "Jimmy" would be a great substitute for a scalpel.
-
You will also need the OWC In-Line digital thermal sensor, so that the iMac temperature control stays under control. Otherwise you fans will spin at full speed. This OWC kit also includes the needed tape to close you iMac back up. https://eshop.macsales.com/item/Other%20...
-
-
-
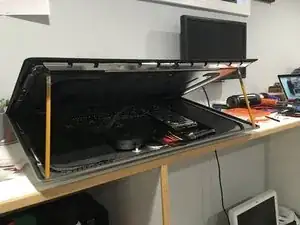
The current iFixit and OWC guides have you disconnect the display cables, with this guide you don't need to. I kept my iMac horizontal and after opening the display I simply used two standard pencils to prop up the display on both sides.
-
-
-
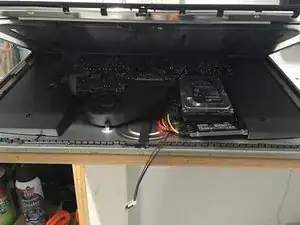
So here you can see that I've detached the SATA cable from the HDD, attached the OWC thermal sensor cable and have already connected the SSD.
-
The OWC cable is a bit stiff but all I had to do was twist it a bit so the SSD laid flat inside the iMac. This entire pocket where I show the SSD is normally empty and the perfect spot for a tiny SSD.
-
-
-
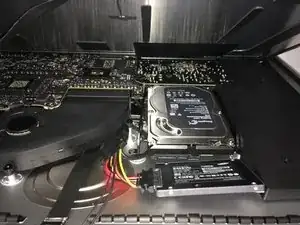
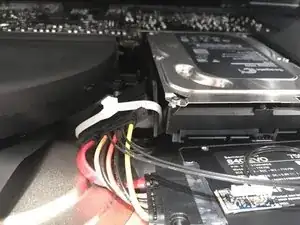
Next I attached the temperature sensor to the SSD, while keeping the cables as organized and compact as possible.
-
Here I also secured the SSD down to the iMac with some 3M adhesive squares. Since the iMac is curved right here I needed something that would hold it in place but was also thicker than most adhesives. https://smile.amazon.com/dp/B00O1WFF8U
-
I used four squares total, but I doubled them up. Stacking one on top of another twice; once on the back left and once on the front right.
-
-
-
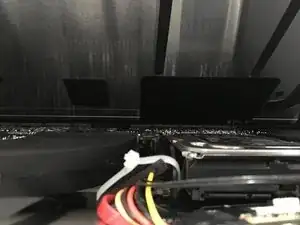
For the final step I simply zip tied the thermal sensor cable to the HDD bracket to keep everything in place.
-
I also wanted to pull the OWC cable down away from the display as much as possible. As you can see from the second picture there is still plenty of room as the OWC cable and zip tie are well below the HDD and fan exhaust.
-
-
-
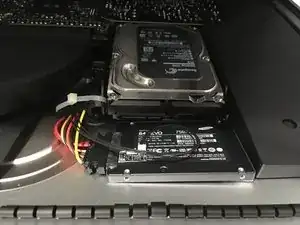
That's it! I can't use the 2TB HDD, but I was able to install an SSD with minimal effort and risk without removing the display, disconnecting the display cables, or removing the speaker, or HDD.
-
As a bonus, the HDD versions of the iMac come as "Fusion Drives" so the have a PCIe SSD attached as well. Mine had a 128GB SSD installed so I do have access to that as an extra drive now. I plan to install Windows on the PCIe drive via Boot Camp.
-
To reassemble your device, follow these instructions in reverse order.

122 comments
Hello, in the last part of closing the iMac, what is the adhesive that you use? I bought some on ebay but its not strong enough. thanks.
PCosta -
My link was in the post: https://eshop.macsales.com/item/Other%20...
It includes the thermal sensor and the tape.
If you are installing an SSD to replace the HDD on iMac 2013 and later, you don't even need the thermal sensor cable from OWC because the heat info will be read through S.M.A.R.T. I think that OWC thermal cable for iMac 2013 and later is a scam. The reason why you need the thermal sensor is that Seagate HDD has a proprietary thermal port back in 2010. The thermal info cannot be read by SMART back then. The new iMac from 2013 (probably 2012 included) will no longer need the thermal sensor cable.
Evan -
Well, unless someone has a definitive answer on if it's needed or not I'd still recommend it. Plus it comes with the tape needed to secure the iMac.
Doesn't the newly installed SSD block the fans natural airflow path being placed there?
@chrisray No. The new 5K iMacs have the external fan hole coming out the center of the back of the case. The older iMac's had a thin vent that ran horizontally along the top third of the back case, and that might have been blocked. But on the 5K iMac the plastic fan in the middle pushes air straight out that vent on the back. The SSD does not impede on that at all.
Can you use SSD Fan Control app to keep the fan at the normal speed?
A VIEW -
Why would you want to? Just use the thermal sensor and the fans will stay in check, no need for a piece of software. https://eshop.macsales.com/item/Other%20...
Justin Winchester -
So this guide basically shows you how to install a regular non Apple SSD in a imac that already has a “fusion drive”?
So now you have the hdd that was not moved and the Apple pcie ssd and now the new non Apple ssd right?
gleeglee217 -
Correct. The big take away is that I didn't have to move or remove anything. I was able to add my own SSD, and use Apple's built-in SSD. However I did lose the 2TB Fusion drive, and I'm not the least bit sad about that.
Justin Winchester -
Thanks for the guide, One question though. Did you find or have experience any issues being the fusion drive still in there? Not sure how the two SSD's would behave and work, but i want to make sure there are no conflicts between them. Also, I am assuming you must have seen lot of improvements in terms of performance, read/write, speed etc after the SSD replacement, right? Mind sharing the before and after if you have recorded something?
Mohit S -
The fusion drive is completely disconnected, so it does nothing but take up space.
Modern computer can handle multiple drives, doesn't matter their type. The SSD are two different drives so the iMac just mounts as such. The iMac (or any computer) can really handle as many drives as you could connect to it, internally, or externally. So no there would be no conflicts between SSDs, HDDs or any mix thereof.
Yes, SSDs are insanely faster and better in every way. I did not run any benchmarks because I never even booted this iMac with the Fusion drive. I installed the SSD before I even booted it up for the first time. But you can look up any benchmarks for my SSD vs a standard WD 7200RPM drives
Justin Winchester -
In Justin’s case, the boot time would probably not change all that much since the operating system is effectively on the ssd part of the “fusion drive.” The big performance improvements will start to show up when you put more than 128 GBs of data on your system.
Rick Harman -
Can someone explain why the existing hard drive doesn’t need the OWC thermal sensor? Why can’t you just disconnect the cables from the HDD and reconnect them to the replacement SSD?
Copywriter Ben -
This config just leaves the HDD in place unused, Instead of removing it. All you are doing here is saving a few bucks for the 2.5” to 3.5” adapter frame and fully removing the HDD.
The original Apple HDD has a build in thermal sensor which Apple leverages. When you replace the drive with either a HDD or SSD you need to replace the now missing sensor Apple uses to manage the systems cooling. Thats why you need to add the OWC in-Line sensor.
Dan -
As Dan stated, any drive other than Apples requires the thermal sensor. And yes it only saves you a bit of money ($15 dollars) but it saves you A LOT of time, makes the SSD addition WAY easier, and you are FAR less likely to damage your iMac since you don’t have to remove any components.
Justin Winchester -
Bonjour, question de novice mais peut-on ajouter plutôt un SSD M2 sur l’iMac 27" (fin 2015) ? Avec la même procédure ?
Vincent -
No you cannot.
Justin Winchester -