Introduction

Use this guide to replace the screen and digitizer in your Huawei Mate 10 Pro.

Opening the Mate 10 Pro will damage the waterproof sealing on the device. If you do not replace the adhesive seals, your phone will function normally, but will loose its water-protection.

Before disassembling your phone, discharge the battery below 25%. The battery can catch fire and/or explode if accidentally punctured, but the chances of that happening are much lower if discharged.

  1. rg3xpGgvKOjMBPWO
    • Switch off your phone.

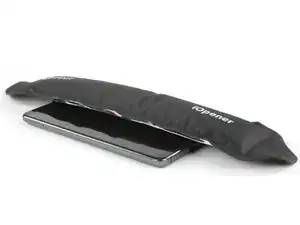
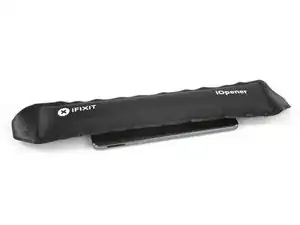
    • Prepare an iOpener and apply it to the back of the phone for about two minutes to loosen the adhesive beneath the back cover.

    Erm… Simply impossible to open the phone this way…

    I used the iOpener for 2 mins as instructed, I’ve used even an hair drier for 30 secs on max power (could barely touch the phone after) and still with the suction tool I was not able to open the phone.

    It simply doesn’t budge!!!

    Miguel Oliveira -

  2. vJVBYc2fWjWoTSNG
    vJVBYc2fWjWoTSNG
    wgXxR6VJO4alrBKR
    illPhNTBeVFxigjt
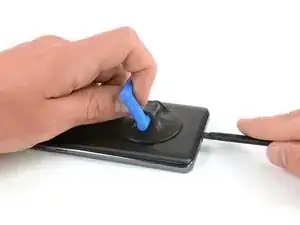
    • Lift up the back cover with a suction cup until you can insert the flat end of a halberd spudger.

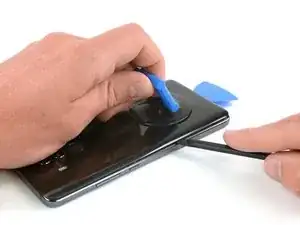
    • Use the halberd spudger to cut the adhesive beneath the back cover on all sides of the phone.

    • Use opening picks to avoid the adhesive from sticking to the back cover again while cutting the adhesive on all sides.

    Faire attention à ne pas enfoncer trop le cutter/spatule hallebarde. Surtout à l’approche des boutons ON/OFF et volume, la nappe ne passe pas loin et se branche à coté de l’empreinte digitale.

    Bilan, j’ai coupé cette nappe et n’ai plus de bouton volume et on/off.

    Plus qu’à chercher la piece de rechange pendant que le telephone est ouvert ;)

    NeoX -

  3. C5QkPmrDkMAECFTO
    C5QkPmrDkMAECFTO
    lV1jdUdq1oorWMA2
    • Don't remove the back cover all the way, yet. The fingerprint sensor cable is still connected to motherboard.

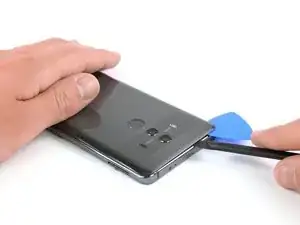
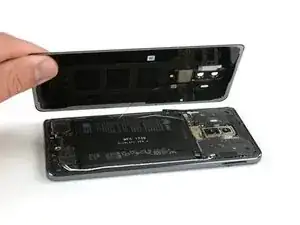
    • Flip the back cover over to the side.

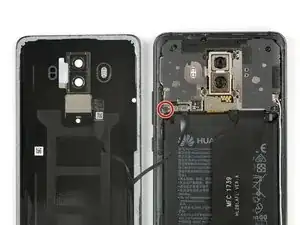
    • Remove the Phillips #00 screw which holds down the metal shield, sitting on top of the connection of the fingerprint sensor cable.

  4. VcxMNTBJfNQCqTLN
    VcxMNTBJfNQCqTLN
    Mx42vEmk5nW5QvKv
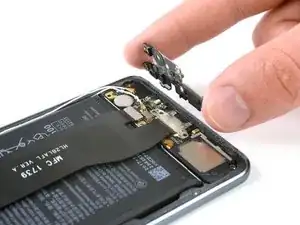
    • Use a pair tweezers to remove the metal shield covering the connector of the fingerprint sensor.

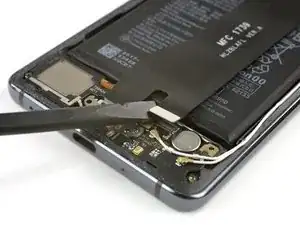
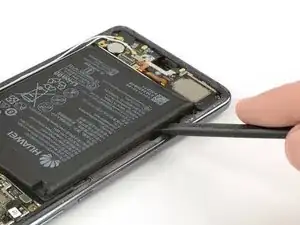
    • Disconnect the fingerprint sensor cable with a spudger.

    • When reassembling your phone apply new adhesive where it is necessary.

  5. tAqccddL4PorxOAC
    tAqccddL4PorxOAC
    SF3upv2yvfqMQaPC
    CNBw4EBW6koEH2Ex
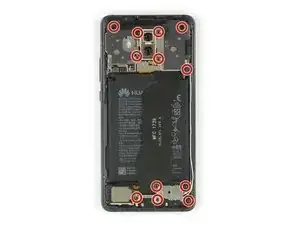
    • Remove the twelve Phillips #00 screws.

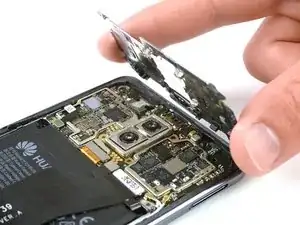
    • Carefully remove the shields on top of the motherboard and the charging board.

    • In case the shields do not pop out easily on their own after you removed the Phillips screws, you can use the pointed end of a spudger to pry them out.

  6. AJKvpcjmmVncyGQ2
    AJKvpcjmmVncyGQ2
    GwxgGLrKtEWpWCmO
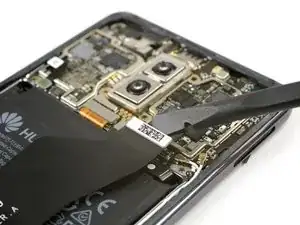
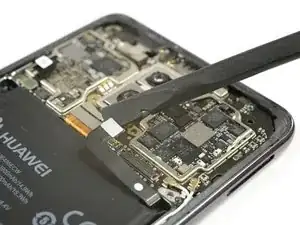
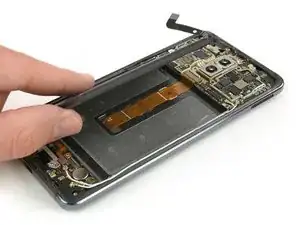
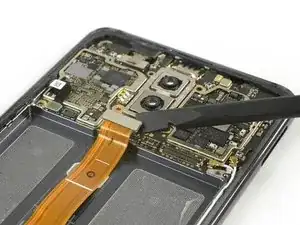
    • Use a spudger to disconnect the charging port flex cable from the motherboard and from the daughterboard.

  7. O6QARa6cJ26AKtOX
    O6QARa6cJ26AKtOX
    pv3hObwLtKYKUyhH
    • Use a pair of tweezers to carefully remove the charging port including its flex cable.

    • The charging port sits tightly in its recess. In case you have trouble removing it, use the flat end of a halberd spudger to pry it out.

    Do I need to apply a new sealer / adhesive tape in order to assemble the phone back together? If yes, where can this be purchased for Huawei Mate 10 Pro?

    Megan -

    If the adhesive on the back cover is damaged too much and/or doesn’t stick any more it is recommended to remove the old adhesive from the back cover and clean off any residue with isopropyl alcohol (>90%). Then use thin double sided adhesive tape and apply new strips of adhesive.

    Tobias Isakeit -

    hi, after this install it will still will water proof ?

    David Tay -

    Hi David,

    opening the Mate 10 Pro will damage the waterproof sealing on the device. If you do not replace the adhesive seals, your phone will function normally, but will loose its water-protection.

    Dominik Schnabelrauch -

    Hi there, I completed the battery replacement nicely with all your steps, the phone could turn on and function normally, the only issue after the battery replacement is the phone has no sound and vibration. I have ensure all connectors are back to place securely. Does anyone have any clue of the cause of no sound and no vibration?

    Shawn W -

    You do not have to remove the charging port for battery replacement, it does not interfere anywhere. I couldn't get the charging socket out at all. Where is the trick?

    Christian -

  8. vVySn6qF1Frbna4b
    vVySn6qF1Frbna4b
    jc1mHKttOiBZ1TWY
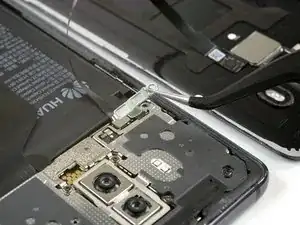
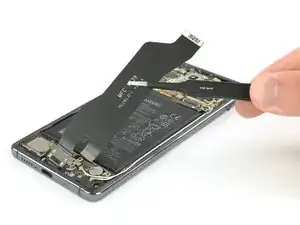
    • Use a spudger to disconnect the battery flex cable.

    • Apply an iOpener on the screen for at least one minute to loosen the adhesive beneath the battery.

    Hier auf KEINEN Fall ein Werkzeug aus Metall (wie den iSesame) verwenden!

    Die Funken die dabei sprühen sollten sehr klar machen, daß das keine Gute Idee für den Akku ist. XD

    Evi1M4chine -

  9. ZJCareMLxjChjOlD
    ZJCareMLxjChjOlD
    NHMoGRWdv1HM2tj1
    eQQideJfRbkMmJOV
    • The display flex cable runs underneath the battery. So be careful not do damage it when loosening the adhesive. Also take care not to bend or puncture the battery at any time.

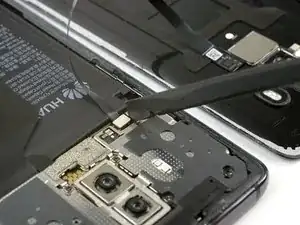
    • Use a spudger to carefully pry up the battery and slide along the side to separate the adhesive.
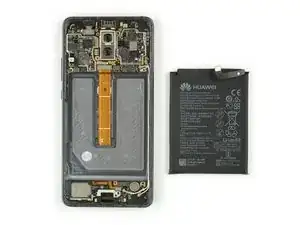
    • Remove the battery.

    • When reassembling your phone replace the old adhesive with double-sided tape or pre-cut adhesive.

  10. N6HHUs5utdVjBF12
    N6HHUs5utdVjBF12
    ILves1PRaZeNYbS2
    • Use a spudger to disconnect the display flex cable.

    • Prepare an iOpener and apply it to the display for at least two minutes to loosen the adhesive underneath. Especially take care of the upper and lower part.

    • If your display is broken or cracked protect your eyes from glass shreds apply some clear tape onto the screen to also get a better grip to open the phone.

    • The display of the Huawei Mate 10 Pro is extremely sticky and you might need to repeat this process during the display removal.

  11. fWUajxQpp5mC2WWQ
    fWUajxQpp5mC2WWQ
    LeumtDCMos4JATXw
    • If your display isn't already broken, it is likely to break during this process. You might want to protect your hands and eyes from glass shards.

    • Push a spudger against the back of the display through the cutout in the midframe, where the charging port was located, to create a gap between the display and the frame.

    • The adhesive is really sticky so this can be a lengthy and difficult procedure. Take care not to damage any other components while doing so.

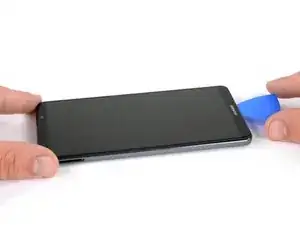
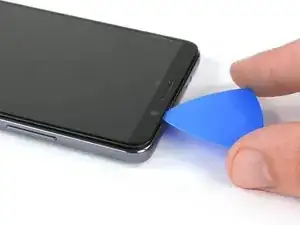
    • Insert the tip of an opening pick into the gap you just created.

    Der Kleber löst sich erst bei 90°C!!

    (Quelle: Herstellerangaben zu ähnlichen Klebern, z.B. den bekannten T-8000 und T-7000.)

    Daher ist es so problematisch mit gewöhnlichen Warmkompressen bzw dem iOpener! Da diese nur bis 100° warm werden können, und schnell auf unter 90°C abkühlen! Deswegen ist es so schwer! Und deswegen geht der Bildschirm so leicht kaputt!

    Wenn ihr also die Möglichkeit habt, versucht, das Ding auf ausreichend weit über 90° zu erhitzen, aber das so kurz und so niedrig wie möglich zu halten, da der Rest des Geräts bei den Temperaturen sonst auch leicht Schaden nehmen kann!

    Also z.B auf 99°C erhitzen (mit einem Bratenthermometer zwischen Wärmequelle und Bildschirm leicht festzustellen), die Wärmequelle überall außer an einer Stelle weiter auf dem Bildschirm belassen(!), und dann eilig aber vorsichtig, den Kleber an der freien Stelle (Ladebuchse) lösen, und sich so voranarbeiten.

    Evi1 M4chine -

  12. AoCtFIpRiCVdaGJ3
    AoCtFIpRiCVdaGJ3
    GPnqAuI1ETBBMWE1
    • Use the opening pick to cut the adhesive around all sides of the Huawei Mate 10 pro.

    • Be careful at the top around the front camera. Only insert the very tip of the opening pick to avoid damaging the camera.

    • In case you're having trouble to cut the adhesive, you can re-use the iOpener to loosen the adhesive again.

  13. s6bfNqPaV2POASpL
    s6bfNqPaV2POASpL
    wSDnUOtl1IPFgSUs
    VX2uRpuKkHmh5JEO
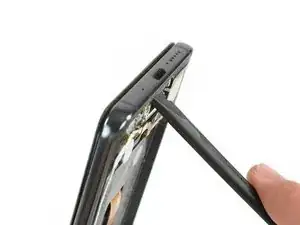
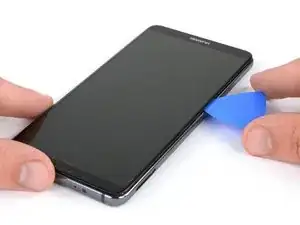
    • After cutting the adhesive on all sides of the phone, flip the opening pick to lift up the display.

    • It's possible that the display cable still sticks a little to the mid frame. In this case loosen it carefully and thread it through the gap in the frame.
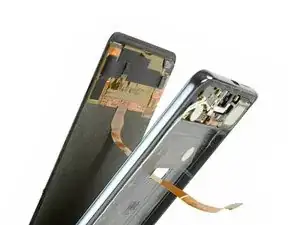
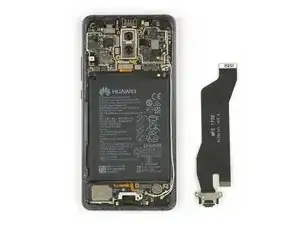
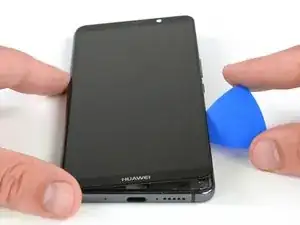
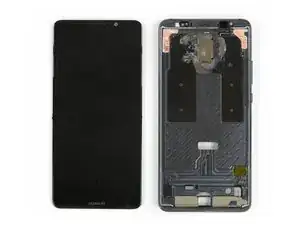
    • Remove the display.

    • Remove any remaining adhesive from the phone, and clean the glued areas with >90% isopropyl alcohol and a lint-free cloth.

Conclusion

If possible, turn on your phone and test your repair before installing new adhesive and resealing the phone.

If the frame is bent, or if any glue or glass remnants are left behind, the new display will not mount correctly and may be damaged. If necessary, replace the frame.

The best way to secure the new screen is with a sheet of custom-cut double-sided tape. Apply the tape to the back of the screen, then carefully feed the display cable through the frame. Align the screen and press it into place.

To reassemble your device, follow these instructions in reverse order.

Dominik Schnabelrauch

Member since: 23/11/16

167327 Reputation

2 comments

Nicely written guide, I am curious about trying this myself in the near future. I have sadly got a tiny scratch in my screen in the last couple days where I haven’t had a screen protector on! Very frustrating.

I’ve replaced almost everything for an iPhone 6+ and done a complete teardown. How difficult is this repair compared to something like that?

Ed Davidson-Bowman -

Perfect tutorial, my only problem was doing it without an opener was difficult. I don’t know if this kind of comment is allowed, and it it isn’t, please just edit this part instead of taking down the whole comment. An icepack in the microwave worked VERY well for me in the end.

That said, breaking the screen to take it off was VERY hurtful in my soul.

Thanks for the instructions!!!

Alex Vermillion -