Introduction

Use this guide to replace the front facing camera in your Huawei P10 smartphone. When reassembling your phone apply new adhesive where it is necessary.

  1. YqiUymRKMTYinZcE
    YqiUymRKMTYinZcE
    1x5qv4HPtVGSmvpD
    byJlAME6WaXCgGa2
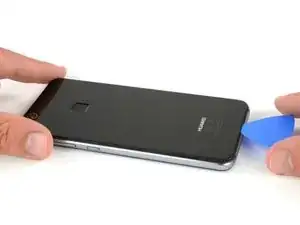
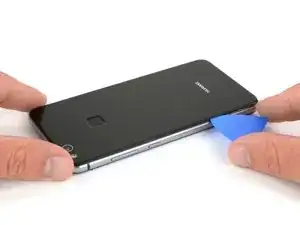
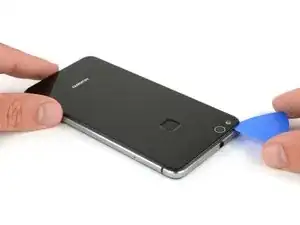
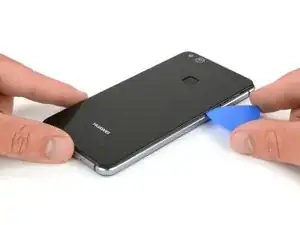
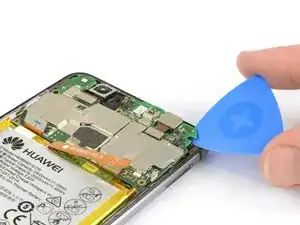
    • Insert the tip of an opening pick between the back cover and the mid frame and slide it around the phone, to cut the adhesive.

    • Using a suction handle to lift the back cover may help to get an initial gap for the opening pick to put in.

    • If the adhesive is hard to cut, use an iOpener to loosen it.

    Mit dem Saugnapf die Rückseite anheben hilft ungemein…

    Matthias Eberle -

    Had to use blue wedge tool to wedge open bottom plate from the rim part in order to then use the tip of the blue opening pick under the back plate to then cut the glue. It’s like placing a pie server or knife under the plate once there’s a gap between the rim and the back plate.

    Jane -

    Be careful, there’s a cable to fingerprint sensor, very close to the edge (see pictures below)… It’s very easy to cut it through with the pick, as I just learned :)

    dambig -

  2. F5lCy2LZ2xfWDDqg
    F5lCy2LZ2xfWDDqg
    Na6gp15IRbPSW3Ll
    2xyqfXZApukGpaZe
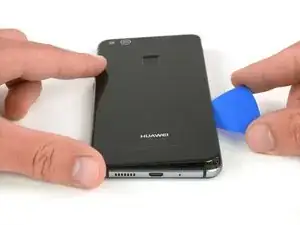
    • After you cut the adhesive on every edge, twist your opening pick, to separate the rear cover from the phone.

    • Flip the rear cover over to the right side of the phone.

  3. oPLqQqGCxyiCQ6oZ
    oPLqQqGCxyiCQ6oZ
    gZgRjiB2CuBip3Xu
    • Use a pair of tweezers to remove the sticker.

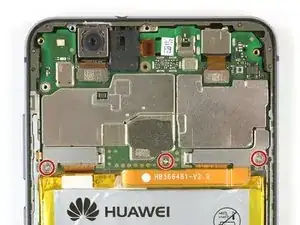
    • Remove the two Phillips #00 screws.

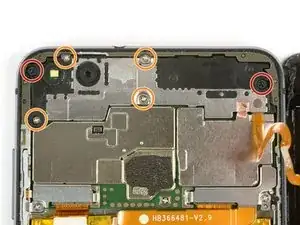
    • Remove the four 2.5 mm Phillips #00 screws.

    Schritt 3 und 4 kann man sich komplett sparen. Wozu auch. Kann gleich mit Schritt 5 weitergemacht werden, zuvor einfach das Flachbandkabel vom Fingerabdrucksensor an der Rückabdeckung abklemmen und fertig.

    Bobby mcgee -

    There are four silver screws and two black to be removed.

    Jane -

    Translate what Bobby mcgee said:

    Step 3 and 4 can be completely ignored. What for? You can continue with step 5, just disconnect the ribbon cable from the fingerprint sensor on the back cover and you're done.

    Antonio Sun -

    However, the reason step 3 and 4 should not be skipped is Step 6 — Use an iOpener to loosen the adhesive beneath the battery. I.e., the adhesive cannot be easily removed without heat, however, that heat might damage the electric chips. Thus they’d better be removed first.

    Antonio Sun -

  4. jMQb6f2oPStGtZUm
    jMQb6f2oPStGtZUm
    QdMRkHKjOFsRwEGW
    • Use tweezers to remove the mainboard shield.

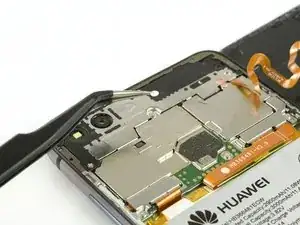
    • Use the flat end of a spudger to disconnect the finger print sensor flex cable.

    • When reassembling apply new adhesive where it is necessary.

    Welchen Klebstoff soll man verwenden?

    josef navratil -

    Hallo Josef,

    sollte bei deinem Ersatzteil kein Klebstoff oder Klebeband dabei gewesen sein, kannst du dünne Streifen Doppelseitiges Klebeband verwenden. Es gibt für das Huawei P10 Lite auch schon zugeschnittene Klebestreifen zu erwerben, hierbei gilt aber je nach Händler Rezessionen zu lesen, ob die Klebestreifen auch wirklich halten.

    Dominik Schnabelrauch -

    Note that there is a copper-colored sticker to lift up near the flat cable connected from the phone the finger pad. Lift the main board plate (shield) up SLOWLY from the camera side to the other end as the plate is wedged in place.

    Jane -

    what adhesive is recommended? thanks

    darren -

    Hi darren,
    pre-cut adhesive would be the best solution if you can source it. Otherwise a two-sided adhesive tape or carefully used E6000 adhesive glue will be your friend.

    Tobias Isakeit -

  5. pYM1NvRB4CGOZrV1
    pYM1NvRB4CGOZrV1
    gnFqS3uDt3jc5gBk
    K5uFSjMakqKGHXSL
    • Remove the three Phillips #000 screws.

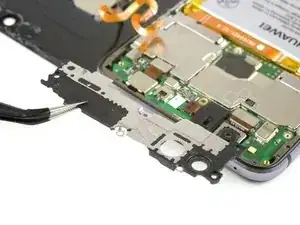
    • Use tweezers to remove the two metal shields which cover the flex cables on the mainboard.

  6. cSvoCEQMrsM5ZgQr
    cSvoCEQMrsM5ZgQr
    ZpdvSmWtRYOpW3Bi
    BNsH4NRw2kfZlnxB
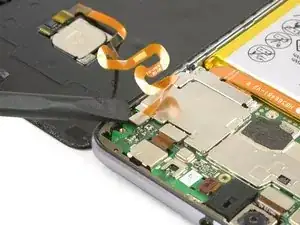
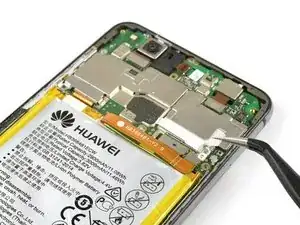
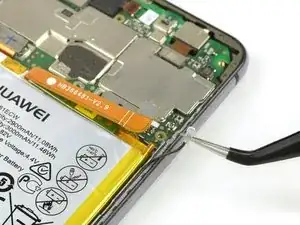
    • Use the flat end of a spudger to disconnect the volume and power button, the display and the main flex cable.

  7. IZyLDwNOJxxIERev
    IZyLDwNOJxxIERev
    vqSGyfCQeAhB5J4j
    • Disconnect the battery flex cable with a spudger.

    • Unplug the antenna cable with tweezers.

  8. w5XIVlq6IdNwTiQl
    w5XIVlq6IdNwTiQl
    MFre2nnBiAYMj3hw
    agoTVnLmReATrWTg
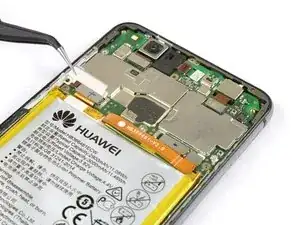
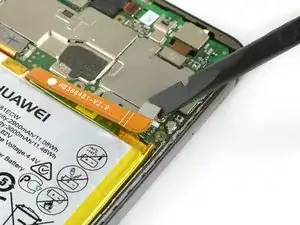
    • Disconnect the headphone jack flex cable with the flat end of a spudger.

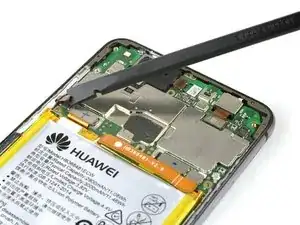
    • Use an opening pick to pry out the motherboard until you can get a good grip.

    • Both camera are still attached to the motherboard. Don't damage them while you remove it.

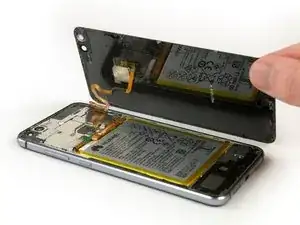
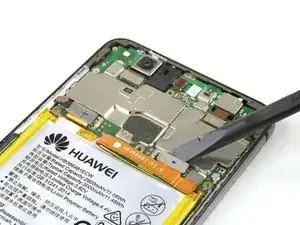
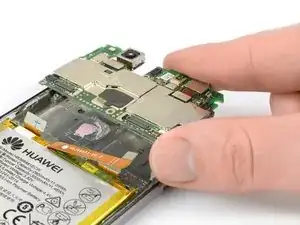
    • Remove the motherboard.

    • If you want to replace your motherboard you need to disconnect both cameras and transfer them to your spare part.

    • On the back of the motherboard there are thermal pads (pink rubber-like gobs) for heat dissipation. If these thermal pads broke or are too dried out you might need to apply new thermal pads on the new display assembly or the motherboard.

    Clear and to the point. Many thanks…

    Richard Marere -

    Where to buy new motherboard original huawei.

    Neil -

  9. ua3TdiqDMCkFvdyt
    ua3TdiqDMCkFvdyt
    PEAHvfM6Et2sQD2y
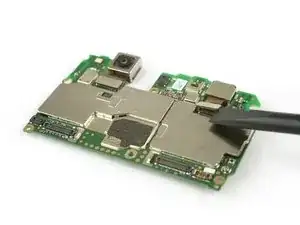
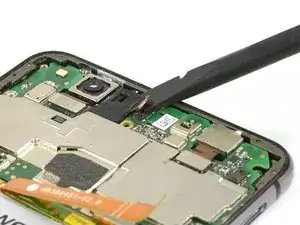
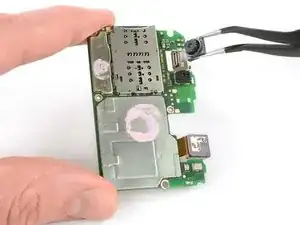
    • Disconnect the flex cable of the front facing camera with a spudger.

    • Flip the motherboard and grab the front facing camera with tweezers. Thread the flex cable through the gap in the motherboard.

    • Remove the front facing camera.

Conclusion

To reassemble your device, follow these instructions in reverse order. When reassembling your phone apply new adhesive where it is necessary.

Dominik Schnabelrauch

Member since: 23/11/16

167327 Reputation

0 comments